If you or someone you know has previously used the services of companies installing double-glazed windows, then you know that installation can be normal and in accordance with GOST. The second option is more expensive, but if all the requirements are met, the quality will be much higher than in the first (you can read more about the standards in GOST 30971-02).
Do-it-yourself installation of plastic windows
Do-it-yourself installation of plastic windows consists of several stages.
- Measurements. Accurate measurement is half the success
- Removing the old window.
Removing the old window - Preparatory work.
- Installation.
Note! For self-installation, manufacturers do not provide a guarantee if the measurements were not carried out by their employees. If installed incorrectly, the windows will soon begin to freeze, and if even the slightest mistake was made in the calculations, the structure simply will not fit into the opening.
However, if you study all the intricacies of the process, then no difficulties will arise during installation. Moreover, this way you can save a decent amount of money.
Video - Installation of PVC windows according to GOST
Removing old window frames
So, you already have ready-made PVC windows at home that you can install. First of all, it is necessary to dismantle the old window frames and prepare the workspace for the subsequent installation of new double-glazed windows.
Dismantling is very easy and requires only a few tools. These are a crowbar, a screwdriver, a hammer and a chisel. Dismantling is carried out as follows:
The first stage - we dismantle the old windows
- The windows are removed first . To do this, you need to use a hammer and a chisel (or screwdriver). First, the movable windows with frames are removed. To do this, use a screwdriver to carefully pry off the lower hinge on which the window is attached, after which the upper hinge . Afterwards, several intense but careful blows are applied from below the frame - this way it should come out of the hinges. If the movable window was not fixed tightly enough, then a small force is enough to remove it from its hinges.
- After dismantling the movable windows, it is necessary to remove the window sill. To do this, take a chisel and a hammer, with the help of which the plaster is beaten into the grooves of the window sill. We put the tools aside and take the crowbar. With its help, the window sill is lifted from below (in the area between the window sill itself and the concrete slab) and loosened - for easy dismantling it is necessary that the window sill “walk” freely. If there is any filler or fixings under the sill (older structures typically have wood blocks for support), they are removed. After this, the window sill is carefully lifted from the side of the frame with a crowbar and pulled forward with several sharp movements. As a rule, old window sills are loosely fixed, so removing them will not be a problem.
- The entire window frame is dismantled . Plaster is beaten with a hammer along the perimeter of the window - its thin layer hides the spacers on which the frame rests. Initially, the wooden spacers from the side are removed. After this, a part of the window frame is pulled out using a crowbar.
As a rule, many builders neglect all the rules of dismantling - a wooden window sill is simply cut into pieces with a grinder, and a concrete one is broken using a hammer drill. The frames are also cut into pieces, after which they are removed from the opening in separate pieces.
General installation requirements according to GOST
GOST 30971-2002 “Mounting seams of junctions of window blocks to wall openings. General technical conditions" was put into effect by order of the State Construction Committee of the Russian Federation on March 1, 2003.
Due to the need to adjust design documentation for design and construction organizations, the transition period for the development of GOST is set until 07/01/2003. The republics of Azerbaijan, Kazakhstan, Kyrgyzstan, Moldova and Uzbekistan have joined the Russian standards.
What's new?
New standards bring significant formalization of window installation and require numerous documents. Among them, it should be noted the need for each installation room to have a window approved by local authorities, the need to develop window installation units for each facility under construction and coordination of units with the customer, it is recommended to analyze thermal fields, and also provides for the execution of acceptance certificates for window openings before installation, acts of hidden work and acceptance certificates of completed window installations.
Of particular interest in the standards are the Annexes:
- Appendix A (recommended) contains drawings with examples of window installation;
- Appendix B (recommended) sets out requirements for fastening windows in openings;
- Appendix B (mandatory) represents the actual requirements for the installation of windows as a whole and is essentially the main working document;
- Appendix D (recommended) describes the requirements for the method for calculating thermal fields (isotherm analysis).
In general, Russian installation standards bring us closer to the standards adopted in Europe, and, in particular, in Germany.
GOST requires a large number of formalities from window companies and has more requirements for testing joint designs and materials used for them.
Formalization is justified by the fight against Russian negligence.
Testing of materials and seams is generally justified by the fact that until now in Russia there were no detailed standards for installation at all, there is no accumulated scientific experience in determining the properties of installation materials and the quality of seams. Of course, there is no need for the consumer to know all the provisions of this GOST; this is the responsibility of professionals.
Without delving into the subtleties, we can talk about three basic principles for installing windows, to which you need to pay the closest attention.
Preparing the window opening and windows
After dismantling the old window frames, there will be a lot of construction waste. On the surface of the opening there may be remnants of old insulation, plaster and small debris (chips, sawdust, etc.). All this must be removed from the surface of the opening. Ideally, before installing new PVC windows, the window opening should be presented either with neat brickwork (if the house is brick) or with a flat and smooth concrete slab (if the house is panel). All irregularities, cracks and chips are covered with plaster and leveled.
Is the window opening ready? Then you need to check the condition of the PVC windows. It is necessary to inspect the block for deformation, and then check that all parts are complete. Be sure to check the availability of the following components:
Complete set of plastic windows
- Windowsill;
- Plugs;
- Mounting profile;
- Anchor plates required for fastening the window;
- Installation instructions (some manufacturers provide it in one set with the double-glazed window);
- Accessories (handles, handle caps);
- Low tide.
After everything has been checked, it is necessary to prepare tools for installation work.
Don't forget to remove the protective film from the outside of the PVC window!
According to GOST 30674 “Window blocks made of PVC profiles”: Removal of the protective film from the front surfaces of the profiles should be done after installing the products and finishing the installation opening, taking into account that the duration of exposure to sunlight on the protective film should not exceed ten days.
If renovation work is still underway in the room where the windows were installed, the protective film may remain on the product until completion. However, on the outside, the film should not be exposed to sunlight for more than 10 days.
The adhesive base of the protective film loses its properties when exposed to heat and UV and can spoil the aesthetic appearance of the plastic profile.
The following are comments from a specialist who participated in the development of GOST for window installation - A. Spiridonov.
GOST 30971-2002. Assembly seams of junctions of window blocks to wall openings. PDF, 1.26 MB
Tools for installing PVC windows
To install PVC windows with your own hands, you will need the following tools:
- Building level;
- Screwdriver;
- Polyurethane foam and a gun for it;
- Hammer;
- Primer;
- Hexagons (it is advisable to have 5-6 pieces in a set);
- Pencil or marker;
- Roulette;
- Paint brush.
As a rule, installers are limited to a smaller set of tools. But, since you need to do the correct installation of a plastic window yourself, and these windows must be installed securely, it is recommended to use the list above.
Deviations from vertical and horizontal
According to GOST 30971-2002 “Mounting seams of joints connecting window blocks to wall openings. General technical conditions", pp. 5.6.4 Deviations from the vertical and horizontal of the mounted window units should not exceed 1.5 mm per 1 m of length, but not more than 3 mm per product height.
In the updated version of GOST 30971 from 2012, the maximum deviations of the window and door unit from the vertical and horizontal levels are the same (clause 5.2.4) - no more than 1.5 mm per 1 m of length, and no more than 3 mm per height of the entire product .
Taking measurements of windows
You can carry out two measurement methods - with a quarter and without a quarter. Let's take a closer look at each of these methods.
Taking measurements without a quarter
The PVC window is installed in the cleaned and pre-prepared window opening. To order a window, you need to make the following calculations:
- Window height: five centimeters are subtracted from the vertical of the window opening;
- Window width: three centimeters are subtracted horizontally from the window opening.
The resulting gaps will subsequently be filled with foam. As a result, the following parameters are obtained: an indentation of 1.5 centimeters is made on the sides of the opening and 2.5 centimeters on the top and bottom sides.
After this, the window sill and drain are measured. Each value obtained must be increased by at least 6-7 centimeters.
Taking measurements with a quarter
Measurements are carried out as follows: the window opening is measured horizontally at the narrowest point. The resulting value must be increased by three centimeters - this way the required window width is determined. In the vertical direction, the length is measured from the base of the window opening to the upper quarter - this way the height of the window is determined.
Based on the results of measurements, you should get the following indicators:
- Window width and height;
- Width and height of the window sill;
- Width and height of drain.
Stage 1. Measurements
In most apartments there are openings without a quarter.
Note! A quarter is an internal frame 6 cm wide (or ¼ brick, hence the name) that prevents the window from falling out and strengthens the structure as a whole.
If there is no quarter, then the frame will be installed on anchors, and the foam will be covered with special covers. Determining the presence of a quarter is quite simple: if the internal and external widths of the frame are different, then there is still a quarter.
How to measure windows correctly
- First, the width of the opening is determined (the distance between the slopes). It is recommended to remove the plaster for a more accurate result.
- Next, the height is measured (the distance between the slope above and the window sill).
Note! The measurements must be repeated several times and the lowest result taken.
To determine the width of the window, two installation gaps are subtracted from the width of the opening. To determine the height, the same two gaps plus the height of the profile for the stand are subtracted from the height of the opening.
Accurate measurements of the opening guarantee the ideal combination of aesthetic perception and ease of use of a plastic window
The symmetry and straightness of the opening are checked, for which a mounting level and plumb line are used. All defects and irregularities must be indicated in the drawing.
To determine the width of the drainage, add 5 cm to the existing drainage for bending. Also, the width of the insulation and cladding is taken into account (subject to subsequent finishing of the facade).
Window measurements
The dimensions of the window sill are determined as follows: the width of the opening is added to the size of the overhang, and the width of the frame is subtracted from the resulting figure. Regarding the offset, it should cover the heating radiator by a third.
Note! Slopes are measured after installation is completed.
Installation of PVC windows according to GOST
In most cases, GOST for the installation of plastic windows is purely advisory. However, we recommend adhering to the basic requirements - this is necessary, first of all, for the home owner himself.
There are two installation technologies. Do-it-yourself installation of double-glazed windows can be done with or without unpacking the windows. In the first case, it is necessary to completely disassemble the window - remove the glazing beads, pull out the double-glazed window, then fix the frame with anchor bolts in the opening, and then install the double-glazed windows and glazing beads. In the second case, the window is not disassembled, but is fixed using special fasteners, anchor plates, without the use of through fastening with dowels. The first method is considered more difficult and requires certain work skills. That is why we will consider only the second case, as the most preferable for the majority of ordinary people.
Installing windows
Before you start installing windows according to GOST, you need to create your own plan. This can be either a self-developed drawing or instructions that come with the manufacturer. Following the plan will help you complete the work without errors and with maximum accuracy.
The work is performed as follows:
Installation of plastic windows in accordance with GOST requires adherence to certain rules when creating an installation seam
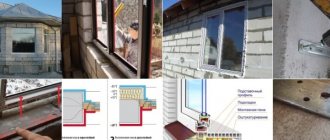
- The surface of a pre-prepared window opening is treated with a primer in order to ensure better adhesion to hydro- and vapor barrier tapes. You need to apply the primer with a regular paint brush.
- We remove the packaging from the windows and glue the PSUL sealing tape . This will provide additional protection for the polyurethane foam from the harmful effects of UV rays and precipitation.
- The window frame is installed in the opening. We will consider this point in more detail later.
- Fill the seam with polyurethane foam.
- The next step is to cover the frame with internal vapor barrier. To do this, a vapor-proof tape is glued along the inside of the frame.
We use the following rules when installing a plastic window:
- We put marks on those places of the frame where the fastening will subsequently take place.
- Fastening elements are attached to the frames from the sides, while a step of 50 cm is maintained. It must be taken into account that the maximum indentation from the edges should be no more than 15 cm.
- Fastening elements - anchor plates - are attached to the window opening with self-tapping screws.
- The window is placed on plastic mounting wedges according to the construction level. Any deviations must be avoided.
- For additional fixation on the sides, mounting wedges or ordinary wooden blocks are used - they are inserted into the spaces between the fasteners.
- On the outside of the window, after installing the frame, a diffuse tape under the ebb is fixed.
- The openings that remain between the window frame and the walls must be filled with foam.
Tip: When fastening the window frame using fasteners, there is no need to tightly tighten all the screws. Only after the structure is finally secured can the fastening elements be brought to the stop.
Window sill installation
The window sill comes in one set with metal-plastic windows. The master himself determines what width it should have. Measurements are taken, after which the window sill is carefully trimmed to the required length. Next, the window sill is installed as follows:
Window sill installation
- The window sill is installed on wooden blocks and adjusted in height. The adjustment must be carried out with a building level so that the window sill is strictly horizontal in relation to the window opening.
- After the position is finally established, the window sill is removed and plugs are put on its side parts. An adhesive mixture is laid on the wooden blocks that serve as the base for the window sill (it is recommended to use CM-11 or a similar material).
- The window sill is reinstalled on the bars and pressed a little. During this procedure, it is necessary to use a building level, since the window sill may move slightly to the side during installation.
- After the adhesive solution is fixed, the space between the window sill and the window opening is blown with foam.
Low tide installation
Installation of ebb and flow on windows
You can install either a home-made ebb or the one that comes complete with a metal-plastic bag. If you purchase a drain, you need to take into account that it is attached with self-tapping screws to the bottom profile, and the part of the window protruding above it must protect the junction of the profile with the drain. The drain itself is installed extremely simply: a profile is attached to the window opening, after which the drain is secured to it using self-tapping screws. For additional protection of the attachment point, blowing with polyurethane foam is carried out.
Stage 3. Preparation
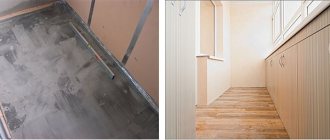
This stage of installation begins only after delivery of the ordered windows. First, the workplace is cleared, all furniture is covered with plastic wrap (there will be a lot of dust).
It is better to remove all the furniture from the room, as there will be a lot of dust.
The film will protect the walls and remaining furniture from dirt
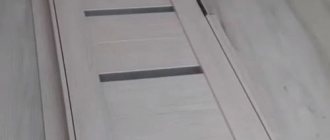
Step 1. If required, the glass unit is removed from the window. To do this, the glazing bead is slightly pryed with a staple and pulled out. First of all, the vertical beads are removed, then the horizontal ones. They must be numbered, otherwise gaps will form after installation.
Step 2. Next, the frame is tilted slightly and the glass is removed.
Window preparation
How to remove glass
How to remove glass
Step 3. The bolts are unscrewed after the plugs are removed from the canopies. The handle is turned to the “ventilation mode” (in the center), the window is opened slightly and removed. All that remains is the frame with imposts.
Note! Imposts are special jumpers designed to separate the sashes.
Then you need to make a marking for the anchors and make holes along it - two on the bottom/top and three on each side. To do this, you will need ø1 cm anchors and a drill of the required diameter.
If the material from which the walls are made is not dense (for example, cellular concrete), then fastening is carried out using anchor suspensions. The latter should be fixed to the wall and frame with hardened self-tapping screws (eight pieces for each).
Note! To avoid the formation of a thermal bridge in the window sill profile, it should be filled with foam the day before installation. This way the element will not freeze.
Sealing PVC windows
Sealing the assembly seam with foam when installing plastic windows
Technological features of foaming are written on the cylinder with mounting foam. Each master can verify this independently by reading the detailed instructions indicated on the cylinder. The foam polymerization process is catalyzed at high humidity. That is why, before starting the sealing process, it is necessary to wet the areas with plain water. In the absence of moisture, polymerization will not be of sufficient quality.
After the foam has hardened, it must be carefully cut using a regular stationery knife. Do this carefully so as not to damage the metal-plastic windows.
Advice: Do not try to fill the entire cavity of the assembly seam the first time. First, you need to apply a little foam using a mounting gun, wait until it swells, and then reapply the required amount.
Plastic window design
There are three main elements:
- frame;
- glass unit;
- accessories.
Frame
- load-bearing part of the structure. Inside there is a durable profile - the base, which can be plastic or metal (in the latter case, the window is called reinforced). The space around the profile is divided into sections (chambers). There can be two of them (two-chamber profile), 3, 4, maximum 7. The more, the different and warmer the PVC product.
Double-glazed window
– consists of 2, 3 or more glasses. The space between 2 glasses is called a chamber (there can be a minimum of 2). The air in the chambers does not allow noise and cold to pass through. The chambers can be filled with inert gas - it copes better with heat conservation and noise.
The glass unit is held inside the profile using a bead
– flexible plastic strip.
Accessories
- this is a set of locking mechanisms, handles and other elements necessary for locking and unlocking the doors.
The moving part of the window unit is called the sash
.
It can be swivel or tilt-and-turn. At the junctions of the sashes, seals
- rubber, rubber or silicone tapes necessary for hermetically sealed closure.
The blind (non-opening) part can be divided into sections by imposts
– vertical racks made of plastic.
The window structure stands on a stand profile
– a PVC stand separating the lower frame and the wall part. Prevents the formation of “cold bridges”. Reduces the risk of condensation.
Additional items
Slopes
– decorative strips on the sides and top, covering the wall around the plastic box. They are made of plaster or removable materials - drywall, plastic panels.
Windowsill
– protrusion at the bottom of the window.
Low tide
– “window sill” from the street side. Protects the assembly seam from moisture and rain.
Common installation mistakes
Both beginners and experts can make mistakes when installing plastic windows. Generally, the most common are the following:
- Taking incorrect measurements or lack thereof;
- Selecting unsuitable profiles for installation;
- Installation on an uneven surface, or on a surface that has not been previously cleaned;
- Installation of PVC windows without level;
- Incorrectly secured window. Some people either use too many fasteners or none at all. There is only one result - the window may become deformed during operation;
- Installing the window at insufficient depth . If the window is placed too close to the inner edge of the window opening, the temperature around the window may significantly drop, and, as a result, condensation may form;
- Incorrect sealing . The installation seams are either insufficiently filled with foam or unevenly. This leads to the fact that after several years of operation the window begins to fog up and loses some of its advantages.
In order to avoid common mistakes, it is necessary to carry out installation exclusively according to the instructions and in compliance with technological features.
What to consider when installing window profiles
If you decide to install PVC windows according to GOST yourself without involving specialized specialists, then take into account these useful tips and recommendations:
- It is possible to install profiles using the in-place method only with the doors closed, that is, all fittings should be adjusted before installation;
- do not forget to install the stand profile, since if it is missing and the window is incorrectly positioned, there may be a risk of a cold bridge;
- When installing a collapsible window structure, pay careful attention to the assembly of glazing beads and fastening. So, when they are removed, the glass unit will be squeezed out easily, and during installation they should be installed as tightly as possible on both sides of the structure;
- follow sanitary standards when purchasing PVC windows. Remember that with extreme tightness, the risk of increasing humidity in the room increases. Also, during installation, all requirements for heating, ventilation and climatic conditions must be observed. This is often done through the use of one or another fitting. Otherwise, mold or mildew may grow on the balcony.
Installation of plastic windows photo
This section presents photographs on the topic of today's article. All photos are clickable.
When is the best time to install?
The peak of requests to Yaroslavl companies for the installation of PVC windows occurs during the warm season. Winter installation imposes additional difficulties. It is more difficult to leave the opening unprotected for a long time. It is necessary to carefully select foam and other materials that reveal their characteristics under certain conditions.
There are also advantages to replacing windows in winter. You can immediately detect shortcomings (freezing, condensation). During the cold season, there are fewer applications for installation and you won’t have to wait long for your turn. Even in winter, there are promotions and discounts for installation, especially when ordering several designs.
Other articles
Details
How to determine the correct position of plastic windows
Before starting installation work, it is important to correctly determine the location of the frame relative to the wall thickness. A plastic window must extend approximately 30% inside from the street side. This is correct and is not 100% mandatory, but if you move the window in any direction relative to the specified distance, you should take into account the fact that the length of the sills and window sills must necessarily correspond to the project. It is necessary to take into account the dimensions of the heating radiator and its position, and the window sill should in no way overlap it by more than 50% of its width. If you completely shut off the heating radiator, this will negatively affect the room temperature in winter, as well as the condition of the window. If installed incorrectly, plastic windows begin to fog up. The length of the window sill should be slightly longer than the window opening (15 cm). Due to this, it is possible to process the edges of the window sill when finishing the slopes. The window sill will come with side plugs that need to be secured after installing the window.
Methods for fixing plastic windows
The selection of a specific fastening method will depend on parameters such as the dimensions of the window opening and wall material. This must also be taken into account when selecting fastening elements for a plastic structure. Fixing plastic windows can be done using several methods:
- Using anchor bolts or dowels. They are fixed in pre-made holes in the wall.
- Plates with teeth that will be located outside the window profile. They are installed on a spacer and secured with self-tapping screws.
The first method described is considered the most reliable. It is for this reason that plastic structures, which are of enormous size, will be secured using dowels. A fastener that goes through the window block is more secure and can withstand impacts. If you decide to install a plastic window in a brick house and it is small in size, they can be secured using anchor-type plates. Such fastening elements can be hidden with slopes and finishing materials. But before carrying out the work, it is necessary to prepare a small recess for them. This will make it possible to avoid problems with the plane leveling process.
It should be noted that when installing plastic windows, specialists combine the indicated methods. In this case, anchor bolts are used to secure the profile base and its vertical parts. The upper part will be secured with plates.
Main rules for installation
To install windows correctly, you must follow certain rules:
Installation of double-glazed windows with a plastic frame must be done using polyurethane foam. This material makes it possible to give the structure an additional degree of rigidity. It will also act as a retainer and thermal insulator.- To protect the space between the wall and the window, it is necessary to fix a waterproofing material on the outside and a vapor barrier on the inside.
- Windows can be installed at any time of the year, and most professionals recommend carrying out all the work in winter, as this makes it possible to immediately notice whether any mistakes have been made.
- Before purchasing polyurethane foam, you must carefully study the characteristics of the chemical composition. These materials differ in certain parameters. One of them may be the solidification temperature. The instructions on the can indicate the most pleasant conditions for using the foam. If you ignore them, the material may begin to deteriorate during the operation of the building.
- When foaming gaps between walls and plastic windows, it is necessary to fill in small portions. This makes it possible to consume much less foam.
- If the window opening begins to crumble, it is necessary to clean the surface of old material and strengthen it.
If you follow the described rules, you can install windows yourself without making the mistakes that people who do not have experience in such work make. The technology for installing windows with a plastic frame in a brick house is very simple, but you need to carefully carry out all the steps so that there is no error.
How will the process of preparing the opening take place?
Before performing installation work, it is necessary to thoroughly clean the opening from dust and dirt. It is necessary to remove all paint residues and building materials. Before installation, it is also necessary to compare the dimensions of the opening and the plastic frame. If the gap is larger than 4 cm, you need to use more than just foam. This is due to the fact that its use cannot create a high-quality and even seam. Moreover, a lot of foam will be lost. Before installation, it is necessary to remove the sashes from the frame. To do this, just pull the pin out of the hinges, and if you need to remove the glass unit from the frame, you also need to remove the glazing beads that hold the glass.
Such actions must be performed with extreme caution so as not to scratch the glass.
After the sash and double-glazed windows have been removed, they must be placed on a soft mat and leaned against the wall surface so that it is in a stable position. Double-glazed windows should not be laid flat, as this can lead to scratches on the glass surface. After this, you will remove the protective film and apply markings to the places where the fasteners will be located. The distance between them should be approximately 0.4 meters, and it is important to note that the distances from the corners should be greater than 0.15 meters.
Installation process
A video of installing plastic windows in a brick house will help you in the further process. After completing the steps described above, you need to insert spacers into the window opening of the brick wall to create the required gap. The frame must be leveled using a building level. It is also necessary to control the side gaps. In house openings made of bricks, it is necessary to mark the installation locations of the anchor. After this, holes are created in the surface of the walls. If the fastening is carried out using anchor plates, it is necessary to bend them so that they fit well on the wall.
The next stage will involve installing the frame. It is imperative to check the horizontality and structural verticality before it is fully and finally secured. After this, the bolts are finally tightened until the cap protrudes above the surface by no more than 0.1 cm. After all the work described above, the double-glazed windows and sashes will be installed, and the functionality of the structure as a whole will be checked. If you installed the products yourself for the first time, you need to carefully inspect the opening and make sure that there were no mistakes during the work.
Installation of slopes
Before installation work on external slopes, it is necessary to measure the length and width of the opening. The plastic slopes will be cut using a circular saw. It is necessary to fasten the slopes only on a leveled and clean surface. At the first stage, the horizontal upper part is secured. It needs to be recessed as much as possible inside, and the space must be filled completely with polyurethane foam. It should be remembered that it cannot be released in large quantities, because when hardening the material can change the shape of plastic products. After this, vertical slopes will be installed, and during such work it is necessary to check the verticality of the elements. The installation of the lower slope occurs in a similar way, and it is necessary to ensure that all elements are joined correctly and that there are no gaps between them. The corners between the plastic slopes are covered with a special detail.
Installation of internal slopes must be performed only after careful preparation of the surface. If the opening begins to crumble, then it is better to clean everything up to the main wall and only after that carry out future work. After this, we level the opening and fill it with insulation. If necessary, the window opening will be strengthened. After this, wooden slats are installed around the perimeter of the window, on which the slopes will be fixed. Mounted plastic windows can become part of the interior of almost any apartment.
How to cut a hole in a brick wall
You can install a PVC system in a finished window opening. But, if you need to make an additional window, then you will have to cut a hole for it. This must be done carefully to avoid collapsing or cracking the brick wall. Initially, it is necessary to apply markings to the surface according to the calculations performed.
Cut out the window opening using a hammer drill. You need to knock out a hole in the shape of the letter “T”. Be sure to insert a metal crossbar to hold the top brickwork. After this, the wall is disassembled, starting from the bottom up. Protruding bricks are cut down with a grinder. The created opening is reinforced with corners and channels.
Assembly seam construction
PSUL around the perimeter and foam insulation are only 2 parts of the three-layer filling of the installation seam described by GOST. After foaming the frame, it is necessary to remove the installation mounting wedges from under the stand profile and fill the resulting voids with foam. For better adhesion, the inner surface of the window opening can be moistened with a spray before foaming. Before installing the drip sill, a waterproofing, vapor-permeable tape should be applied to the outside.
The drain is screwed to the stand profile with self-tapping screws. The edges of the ebb should be folded onto the outer slopes to avoid moisture getting under it. A vapor barrier is glued to the inside of the window around the perimeter (except for the lower horizontal part of the frame), which provides an additional sealing layer to the installation seam and insulates it from moisture. This tape is available in various widths and can be applied both under wet finishing of slopes (plaster) and dry finishing (slopes made of polystyrene foam or plastic). They also produce universal tapes for slopes. A vapor barrier is also installed under the window sill board: full-butyl tape with a foil layer.
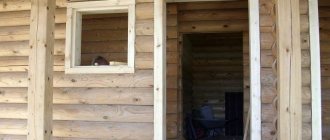
Measurements for regular windows (without a quarter)
In a newly built room, a plastic window will be installed in a window opening that has not yet been glazed. We measure everything according to the technology, the vertical length of the opening and subtract five centimeters. This is the height of the future window. We measure the horizontal length of the opening and subtract 3 centimeters to get the width of the future window. One and a half centimeters will go to the sides and top of the window, and three and a half centimeters will remain on the window sill at the bottom of the window.
Decide in advance what parameters and dimensions your window sill and external ebb will have. Add at least 5 cm to the ready-made parameters to “cut” the window sill into the wall on the left and right sides. Provided that you have never installed plastic windows, it is more practical to add 20-30 cm; the excess will be removed during the work. Finished window sills and ebbs have a standard length of up to 6 meters, and a variety of widths (from 10 to 60 cm). But, as a customer, you are obliged to indicate the minimum parameters that allow you to choose the most suitable option.