If you need to repair the floor on the balcony, and you don’t know or can’t decide how to level and finish the surface of the balcony or loggia, then don’t rush to call a specialist because even a beginner can do this amount of work, and there is an opportunity to save.
Follow the step-by-step instructions in this article, and you will see that this type of work is very simple and does not require excessive skills.
What is the best way to finish the floor on the balcony?
When choosing suitable materials for covering the floor on a balcony, at the first stage they look at the following factors:
- open balcony or with glazing;
- condition of the concrete slab;
- type of previous coating;
- will preliminary leveling, insulation and waterproofing of the balcony slab be required;
- area of the balcony (loggia);
- for what purposes it is planned to be used;
- budget and cost of repair work.
And also evaluate your own strengths - whether you can do the work yourself.
An important point: the floor on the loggia can be made of any kind without fear of excessive load on the base, since the base plate is part of the building. With balconies, especially in old Khrushchev buildings, the situation is worse. After all, there the ceiling is often in poor condition, or is quite worn out, which can cause a collapse during repair work on the floor.
You need to choose a flooring material based on the individual characteristics of both the material itself and the balcony or loggia.
Concrete screed
The most economical option that can be easily done on your own. But this floor is the coldest, you can’t do without insulation, and it’s the heaviest. Therefore, before increasing the load on the balcony slab, you need to perform the appropriate calculations (see here) to ensure that there is no excess weight. If indicators are obtained that are close to critical, it is necessary to consult with specialists to determine whether the balcony can withstand the additional load and obtain permission to carry out the work.
Note that the minimum thickness of the screed is 3 cm, the maximum is 5 cm (when installing an additional heating system inside the floor cake). With strong unevenness and distortions of the slab, the thickness of the CPR layer increases. In some cases, up to 810 cm. In such situations, it is better to choose another floor covering that eliminates the load on the slab.
Linoleum
Rubber-based linoleum is suitable for balconies. It is not afraid of moisture, does not deform and is resistant to mechanical damage. This is a good budget option, especially for insulated balconies and loggias. It’s easy to work with, and it’s not difficult to lay it on your own. Available in a wide variety of colors and patterns.
Classic laminate. It has a presentable appearance, but does not tolerate high humidity and damage during operation, even despite the top protective layer. Laminate flooring does not respond well to temperature fluctuations and weather disasters. The disadvantages include the complexity of installation - beginners should give preference to simpler options.
Vinyl laminate. It tolerates humidity and positive temperature changes well, but is afraid of frost. A good option for warm balconies.
Tile
A very popular finishing material for floors. Ceramic or granite tiles are durable, easy to maintain, and resistant to external factors. The range of tile products is provided in a variety of shades, patterns and textures. You can use mosaic masonry, frescoes, and decorative inserts. Ideal for installing heated floors. The step-by-step installation process is discussed in detail here.
Tiles are beautiful and practical.
The main disadvantage is that the coating is cold and slippery. Exit in rubber mats on the open balcony, heated floors and satin porcelain tiles or relief tiles on the glazed one.
Decking
To cover the floor on an open loggia (balcony), a special type of wooden floor is used - decking. It is more wear-resistant and resistant to temperature changes. The installation principle is quite simple: each plank has special slots on the sides, which makes the use of the material accessible to beginners.
Wooden floor
The coating is made of environmentally friendly material, conducts heat well and has an attractive appearance. Wooden floors look cozy and are quite durable. Significant disadvantages of wood: it swells from moisture and dries out at high temperatures. With constant humidity and heat, wooden planks become larger and become deformed: cracks and sagging appear. To increase the protective properties, special impregnations and varnishes are used.
The floor is made of pine boards.
Self-leveling floor
Allows you to make a perfectly smooth coating and has good performance characteristics. With the high skill of the performer, the floor turns into something like a work of art - any idea and color scheme can be realized. To save money, you can fill it yourself. Details here.
Carpet
It is used more for loggias, and can be a continuation of the flooring from the adjoining room (just not from the kitchen). It has a soft texture, absorbs noise well and retains heat. It is used only on glazed balconies, as it suffers from moisture and attracts dust, and requires periodic professional cleaning.
Attention: details about flooring materials for a balcony, their characteristics and performance of work are described in the article How to lay the floor on a balcony?
Laminate
Laminate is a modern material with many positive characteristics. But it is only suitable for interior decoration in well-insulated and moisture-protected rooms. Laminate looks very aesthetically pleasing, it is easy to install and replace individual boards (in case of damage). It is only important to lay the panels on a perfectly flat surface. This is often achieved by using a cement screed.
Selection of material depending on the type of balcony
It happens that the selected material does not correspond to the type of balcony. If you lay it on the floor, it will not last for a long time and you will have to start all the work all over again, which costs effort, time and money. In order for everything to turn out beautifully and correctly the first time, you should initially understand the characteristics of the flooring and find out whether the material matches the type of balcony.
Open balcony. Suffers from weather conditions and natural disasters. When choosing a material, the emphasis should be on options that are resistant to these indicators, of which there are not so many: tiles, porcelain stoneware, frost-resistant linoleum, deck boards, decking. Concrete and wooden floors are coated with special paints and varnishes for outdoor use. For obvious reasons, the underfloor heating system is no longer needed.
Balcony with glazing. Here you can use any of the flooring materials you like. The room is protected from the scorching sun, cold and rain by window frames. Self-leveling floors and tiles require additional installation of heated floors, and carpet and laminate require high-quality hydro- and vapor barrier. An excellent option would be linoleum and garden parquet.
Unheated balcony. The biggest problem is dampness and cold. If installation of floor heating systems is not planned, then you should choose from moisture-resistant materials: tiles, linoleum, self-leveling flooring, deck boards, decking.
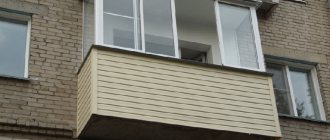
Open balconies
An open, unglazed balcony is constantly “at the mercy of the elements”: sudden temperature changes, precipitation, direct sunlight - all this significantly tests the strength of the structure. So the floor covering must be resistant to climatic and temperature influences, safe from a fire point of view, and easy to care for.
These criteria include porcelain tiles, rubber and ceramic tiles, as well as PVC panels. Another suitable material that has recently appeared on the market is frost-resistant linoleum - pay attention to it.
Tools and materials
Each type of floor finishing on a balcony requires its own set of tools, in addition to the finishing material itself. These topics are covered in detail in the relevant materials on the website (see links). Let's roughly divide them into 4 categories. Tools:
- for surface preparation (removal of old coating, floor preparation);
- performing additional work (formwork, heat, noise and waterproofing);
- laying the selected material;
- finishing works (painting, staining, etc.).
Requirements for a balcony screed
There are some requirements for a balcony screed:
- light weight. The balcony slab has limited load-bearing capacity, so additional weight can destroy it;
- durability. Due to a poor-quality base, the floor covering quickly deteriorates. Carrying out frequent repairs in a limited balcony space is very problematic;
- leveling the surface of the balcony slab;
- strengthening the slab;
- additional thermal and sound insulation;
- affordable cost of the mixture for pouring the slab. The mixture should be inexpensive, but of high quality.
Preparatory work
It is necessary to prepare the balcony for repair work:
- empty the room of furniture and stored items;
- remove old coating: dismantle tiles, linoleum, wooden boards, clean off paint;
- remove all natural and construction debris from the concrete base, clean visible dirt;
- seal cracks and crevices;
- treat the entire area with an antifungal agent;
- prime the floor.
After completing all of the above steps, you can begin waterproofing and insulation.
Waterproofing
If the balcony is open, then waterproofing and insulation are not carried out. On glazed floors and walls, it is mandatory to protect them from moisture, regardless of whether heating will be installed or not.
In order to prevent dampening of the material, enhance thermal insulation and protect some types of insulation from unwanted moisture, the following types of waterproofing materials can be used:
- special deep penetration compounds (for example, Penetron or Hydrotex) - seal microcracks in concrete and block the penetration of moisture;
- coating - the surface on which the screed will be laid and the walls adjacent to it are treated with bitumen putty, or compositions based on polymers and liquid rubber;
- waterproofing roll materials (polyethylene, roofing felt), you can make your work easier by choosing a self-adhesive film;
- plaster mortars: an inexpensive method of waterproofing.
Insulation
The next step after waterproofing is insulation. A cozy additional room cannot be obtained without insulating the floor, walls and ceiling of the balcony. To do this you can use:
- "Penofol" - foil roll insulation. It has minimal vapor permeability, good thermal insulation properties, and low thickness. Easy to install. Due to its small thickness, it can be used with other materials, such as Penoplex. It is laid with the reflective side up, overlapping, the joints are covered with foil tape.
- polystyrene foam - the cheapest sheet insulation with a thickness of 2 to 10 cm. Place it between the joists, on a waterproofing layer. The seams are blown in with polyurethane foam.
- mineral wool - is not afraid of low temperatures, absorbs sounds and is easy to install. Available in slabs and rolls. The advantages include high thermal conductivity and elasticity at a relatively low cost. Of the existing varieties, basalt wool has proven itself best - it is resistant to moisture and more durable.
- expanded clay - light porous balls of various sizes are non-toxic and retain heat well. It is better to use for loggias, since for a good result you need a high layer of expanded clay, which will increase the load on the suspended structure of the balcony.
- “Penoplex” is a popular thermal insulation material that has good characteristics: lightweight, easy to lay on a concrete screed, and additionally protects from moisture. The price corresponds to the quality.
The issues of insulating a balcony are discussed in more detail in the material “How to insulate the floor on a balcony with your own hands?”
Pros and cons of coatings
Naturally, there is no absolutely right choice. When choosing a material, you should pay attention to the amount of light entering the balcony. Consider options, future use of space, and level of your own skills. However, knowing the positive and negative features of the material, you can get a result close to perfection.
| Material | pros | Minuses |
| Laminate, parquet | Moisture-resistant laminate will not deteriorate if exposed to water. Exposure to sunlight, temperature changes and humidity will not affect the material. | Violation of the assembly technology will lead to creaking when walking, or swelling of the coating. The material has increased toxicity in case of fire. May break if heavy objects fall on it. |
| Facing tiles | Has high resistance to aggressive external environments. You can create a unique design. The surface is easy to clean. | Even rough surfaces slip. If the floor is uneven, fungal mold may appear from the accumulation of moisture in the seams. A surface that does not produce any heat. The glossy surface is easily damaged after a heavy object falls. |
| Linoleum | Cheap material. Easily replaced if necessary. | Burns out in the sun. Easily damaged by sharp objects. |
| Terrace board | Easy to assemble. Reliability and durability of the coating. | It will greatly increase the load on the slab, which can lead to its destruction. |
| Dye | Low cost. Easy to apply. You can quickly change the color if you wish. Makes cleaning easier. | The paint fades in the sun. The coating will begin to deteriorate after a year of use. Lack of insulation. Unsightly appearance. |
The apartment becomes a home for many years. The more comfortable the home, the more pleasant it is to return there after work. On your own, with a minimal investment of money, you can easily get an additional room, a flower garden, or just a place to relax.
Warm floors on the balcony
If you plan to use the room as a living space (make a lounge area, workplace, mini gym), then the most suitable option would be to install a heated floor. This is an expensive option with a complex installation system. You can see how to do this correctly with your own hands in the material “Do-it-yourself warm floors on a balcony or loggia.”
Today there are three varieties:
Water system - heating occurs by circulating liquid through pipes in the screed from the central heating system. The most financially inexpensive option. But there are two problems here:
- when the heating is turned off, the floor on the balcony will become cold;
- It is extremely difficult to obtain permission to connect a water-heated floor to a central heating system.
Electric floors heat the room using a heating cable. But this option is not effective either: high energy consumption significantly affects the family budget. Infrared film flooring is the most modern type of floor heating. The operating principle is based on conducting current into heating strips that emit infrared rays. This type is most favorable for the human body, does not overload the balcony base and is easy to install. Compatible with all flooring materials.
Balcony operating conditions
The choice of coating is also determined by what the balcony is planned to be used for. So, if you want to arrange a work office, a guest room or a recreation area there, then the material must be resistant to wear and stress, safe for health, and easy to clean from dirt.
If you plan to use the room as a greenhouse, then you should think about protection from moisture, because when watering some “leaks” are inevitable. In addition, soil will constantly fall on the floor - which means the material should not get too dirty. And slide too, because it’s easy to slip on a slippery surface that’s also flooded with water.
If the main purpose of the room is to store things, then you can get by with the simplest option that is resistant to intense loads - linoleum or tiles. Using something too expensive, ornate and decorative is simply not practical.
How to raise the floor level
The floor on the balcony is not always level with the floor of the room adjacent to it. To remove this drawback, you can use the following methods:
1. Cement screed - it is based on cement-sand mortar, which has considerable weight, which may be unacceptable for balconies. The maximum possible height is up to 8 cm; in other cases, you need to look for alternative and lighter options. Such work can only be carried out in the warm season.
2. Expanded clay screed is poured onto the waterproofing layer and covered with sheets of chipboard, plywood or plasterboard. The advantages include the simplicity and speed of work, the relative lightness of expanded clay, you can raise the floor to a height of up to 20 centimeters.
3. Wooden frame. Can be mounted:
- in the form of a lathing made of bars;
- lag on heels;
- timber on racks, etc.
4. Metal frame - a method similar to the previous one, only from metal elements connected by welding. The most durable of all possible structures, but you need to have special equipment and skills to carry out such work. To avoid corrosion, the frame is treated with an anti-corrosion primer for metal products or painted with paint with the same effect.
Detailed instructions for each method of raising the base of the floor in the expert article How to raise the floor level on a balcony.
Other questions on this topic
We looked at Castorama, but when I started looking for reviews on the Internet, I came across the fact that no one sells it in Russia anymore. Sold only in Belarus and Ukraine. There are no reviews. There is no such collection on the official website either. Maybe someone.
Good afternoon Please help me resolve a number of issues regarding laying tiles on the floor in the kitchen: 1. how to make the correct layout plan (kitchen diagram in the photo)2. how to apply glue correctly - only on the floor, only on the tiles, or both on the floor and on.
Good afternoon, dears! Tell me how))) I like glossy tiles, but I have the impression that they are not very practical in terms of maintenance, or am I wrong?? Thanks everyone in advance))
Hello. The question is very important for us, because at the last stage of the renovation, namely laying the laminate on the floor from the developer of expanded clay + gypsum plasterboard, the craftsmen told us that they could install the laminate (and the locking plug), but without guarantees that after a while.
We are doing repairs. Now the question has come about choosing a floor covering. decided to lay linoleum. What kind of furniture there will be has not yet been decided, because... We do everything as funds become available. The doors are wooden brown. Initially we wanted a light coating.
Project within the framework of express consultations. There were no redevelopments, no drastic ones.
Remember the old song by the group “Time Machine” about a blue bird? She is the one who spins in.
Apartment 55 sq.m. in an old house on Kozhukhovskaya in a Scandinavian style. A good solution.
I continue to post photos of my completed project. This time the bathrooms. Like this.
Exhibitions
- Besit's lair. Bedroom-living room 1
- New Year at work6
- With coming!1
- Cervantus soviticus48
- Next to the living room, namely a guest toilet22
- Happy New Year!24
- Buffetus soviticus30
- “I want it too” or “I need help”16
- Procedure for work in a new building8
- Holiday in the kitchen in 20173
The site administration is not responsible for the statements and actions of site users on all pages of the site, as well as for the accuracy of the information they provide.
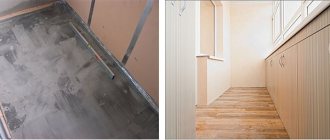
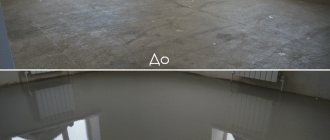
Leveling the floor
During the construction of houses, less attention is paid to balconies and loggias than to living rooms. If in new buildings it is still possible to find a flat floor, then in old houses the situation most often looks deplorable. If the balcony is also open, then, as a rule, there is a bare concrete slab at the base at a slope of 35° (a slope for rainwater drainage). To give a balcony or loggia a presentable look, it is necessary to level the floor. You can’t do without this if:
- The entire apartment has undergone major renovations;
- it was decided to install heated floors;
- finishing coating laminate or tile;
- The balcony is being converted into an additional room in the apartment.
Leveling work can be done using cement screed, joists, expanded clay, or self-leveling mixture.
Cement strainer. Wet screed with a solution of sand and cement is durable, but very labor-intensive, has a lot of weight and takes a long time to set. The technological process can take a month. The advantages include the low cost of this method and the simplicity of the process itself. The downside is the stage of placing beacons. For information on how to do this, read the article How to place beacons for floor screed?
With the help of lags. Lightweight wooden flooring is a simple and cheap option for flooring. When installing the frame, the main thing is to take accurate measurements of the length of the bars and level the finished structure.
Dry screed. Dry screed involves the use of loose expanded clay material, but it cannot be used on open balconies. This method is incompatible with underfloor heating systems. The advantage will be the low weight of the material used, but for large volumes the cost will be quite large.
Self-leveling floor. Self-leveling flooring allows you to create a perfectly even coating with a small layer thickness. Ready-made self-leveling mixtures are plastic, do not crack or sag over time. The mixture itself is expensive, and therefore is used very rarely. The advantage is that within a day after such leveling you can begin the next stage of repair work. Each method is described in detail in the material on the site: How and how to level the floor on a balcony with your own hands.
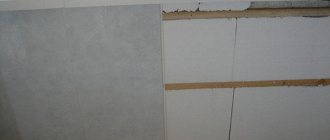
Tile
Tiles are the simplest, most convenient and popular flooring for balconies and loggias. It has several main advantages:
- Long service life. Even in “harsh” conditions, tiles can last a very, very long time.
- Moisture resistant. This is especially important for open, non-glazed structures.
- Easy to care for. To clean the tile, just wipe it with a damp cloth; it does not collect dust and dirt.
- Wide selection of colors and patterns. Tiles can be selected to suit any interior style and design.
Instructions for finishing the floor on the balcony
Having set out to transform a balcony or loggia, you should pay special attention to the condition of the floor - you need to start repair work from the concrete base and only then move on to the next operations. Before starting finishing, you should adhere to the following algorithm:
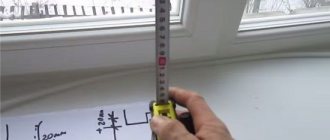
- take accurate measurements of the room;
- check the foundation for strength;
- based on the characteristics of the room, select the appropriate material;
- carry out preparatory work;
- decide on methods and materials for leveling the floor;
- calculate the required amount of the required material for all types of work;
- have a reserve of free time sufficient to bring the matter to the finishing coating, provided that the work is completed independently;
- carry out work in stages;
- do not skimp on materials, especially on primers;
- refer to video materials and reference texts when performing previously unfamiliar work.
In fact, there is nothing difficult about making a loggia floor with your own hands. All work can be done independently if you follow the recommendations, be patient and do not disrupt the technological process. For each floor covering, the website contains installation or installation materials. Let us briefly recall the essence of the technology and tell you where to look for detailed instructions.
Self-leveling floor
It is believed that you cannot pour a self-leveling floor without experience - it is difficult. This is partly true - the mixture lasts for about half an hour and in a large space, like a room in an apartment, you need to have time to complete all the technological steps. But a balcony is a small enclosed space where, even if you hurry slowly, you can manage to complete all the operations provided for in the instructions:
- prepare the mixture;
- pour it in a small stream over as much space as possible;
- Use a spatula to level the mortar near the walls;
- roll the floor with a special needle roller.
Air bubbles are removed from the solution.
The technology is discussed in detail in the work “Self-leveling floor on the balcony.”
Wooden floor
Installation of a wooden floor on a balcony includes the following operations:
- a damper tape is attached along the perimeter of the walls;
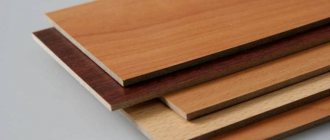
- plywood or OSB sheets are laid on the logs;
- the gaps between the sheets become foamy;
Attaching plywood to joists.
- the tenon is removed from the first board cut to size;
- the board is attached with self-tapping screws to the plywood with a distance of 11.5 mm from the wall;
The board is fastened with self-tapping screws.
- The second board is cut to size, then adjusted to the first one and screwed to the flooring with self-tapping screws.
The second board is laid.
Installation of the floor directly on the joists is carried out using the same technology as on the flooring. Detailed instructions are here.
Laminate flooring
Complete instructions for laying laminate flooring are given in the work “How to lay laminate flooring correctly?”. Here is a brief summary of its main provisions:
- A polyethylene film is laid on the screed, overlapping, overlapping the walls. The joints are sealed with tape;
- a substrate is laid on top of the film;
First the film, then the substrate.
- along the wall from where the work will be carried out, wedges are installed to form a technological gap;
Wedges for fixing the technological gap.
- The tenon is cut off from the panels of the first row. The slats are laid with the cut side facing the wall;
- a wedge is placed in front of the board of the first row;
- the last board of the row is cut so that there is a gap;
- for the second row, the first board is cut by half or one third;
Layout of laminate flooring.
- The laminate of the last row is cut taking into account the gap between the floor covering and the wall.
Laying tiles
The work on laying tiles is carried out in the following sequence:
- the screed or flooring is primed;
- the location of the first tile from which the installation will begin is noted;
- glue is mixed;
- glue is applied to the base of the floor, an area of approximately 1 m2;
- Use a notched spatula to level the adhesive layer;
- An adhesive solution is also applied to the tile on the back side;
- again the glue is leveled with a notched trowel;
- the tile is laid in a previously determined place and pressed into the adhesive with a little force;
- Using a bubble level and a rubber hammer, the tiles are given a horizontal position;
- on the sides of the tiles, elements of the tile leveling system (SVP) or crosses in the corners are installed;
This is how the SVP element is installed.
Leveling tiles with the Rubi Tile system.
- the second tile is glued in the same way;
- If necessary, the tiles are cut using a manual tile cutter.
Cutting tiles using a manual tile cutter.
We refer meticulous site visitors to the work “Laying tiles on the balcony.”
Parquet boards throughout the apartment - is it worth it?
I want a parquet board at one level throughout the entire apartment (except for the basement) without seams or thresholds, I don’t like the joints of different floor coverings. I'm considering Magnum, Polarwood and Upofloor boards. Parquet boards in the hallway and kitchen, I understand, are not practical. But I want unity of gender throughout the apartment. There is an option - wood-look tiles in “difficult” areas and parquet boards in the rooms. The tile is Marazzi Frigate, which is dark brown and matches the oak board closely.
1. According to professionals, installing a board (of the listed brands) in the hallway and kitchen is really not at all reasonable?? (Magnum is written as suitable)
2. Is it worth combining wood and its imitation, which will probably be visually inferior? Has anyone done or come across decent looking examples?
Best answer
I didn’t dare to use a board in the kitchen, but why not in the other rooms? It's beautiful!
Will it be bad even if their junction is at the entrances to the rooms under the doors? Those. I didn’t mean just the entrance area with tiles. And the entire hallway and kitchen are tiled, and only join the rooms.
So make the hallway a board, and the kitchen with tiles! What size is your hallway?
Brass ones are also not happy (
As for the entire hallway, of course the entrance area is of concern. Sand and reagents deteriorate the varnish. But some manufacturers write that their board is suitable for the kitchen and entrance.
2. I found the joint between the tile and the laminate (board) on the Internet as the best way - colorless silicone sealant. To do this, either the coatings must be of the same thickness or the screed must be adjusted to suit existing ones of different thicknesses. (i.e., if you bought tiles and wood in advance), I plan this way, but in practice we’ll see what happens.
3. "Wretched." It means things will be bad for me)). I have already purchased wood-look porcelain tiles and laminate flooring. On day X, we literally chose both within an hour. Half a month later, the tiles cost exactly twice as much, so we had to choose very quickly. They look very similar in color and texture (the grooves can be felt in both places when swiping with the palm of your hand) and a design. But I decided that it would be like this long before the purchase. I also wanted exactly the same floor in color throughout the entire apartment, and not patches. And the practicality of tiles in wet areas of the hallway, kitchen and loggia outweighed them, even though many manufacturers claim super coatings. Another plus in favor of choosing tiles was the fact that I am planning TP in these areas, and tiles are the best conductor in this regard.
They also don’t write clearly about silicone; it loses its appearance quickly due to cleaning, etc.
Good luck to you. Be sure to share later))!
About imitation, I will say my opinion that laminate, parquet boards and tiles are all one imitation. The designs are applied everywhere by designers. For me, specifically wood is just wood, real furniture made of wood, lining in the bathhouse, timber, boards on the floor)). In a parquet board, of course, there is a certain amount of this very wood, but in a laminate there is as much of it as in a tile, which is why I have everything imitation))
I didn’t say “... FOR 1000 rubles. - I said “more than 1000 for chemistry. ".
“Wood,” in the context of this discussion, meant parquet boards. After all, it was the board that was discussed here. The parquet board consists of 3 layers of wood.
Reliable Europeans are the brands that I have listed and others - really excellent and reliable without quotes, these are the Swedes, Czechs, Finns. Of these, a three-plane oak board starts from 1,530 rubles per sq. m. This is today in St. Petersburg. It’s a pity, of course, recently I had my eye on it for 1,316 rubles ((Those that are imported have risen in price more - from 1,370 to 1,900 rubles (another sample that I looked at). So it turns out that even now you can find “parquet boards from reliable Europeans..” above 1000 rubles, but up to 2000.
A three-strip oak cottage from Polarwood costs 1,530 rubles. Three-strip ash oil - 1,730 rubles. This is what I was interested in, there were other colors. I held samples in my hands just yesterday at these prices. + offered discounts based on footage. Polarwood is an excellent and reliable European manufacturer. The Scandinavians use our forests and have factories here. Therefore, if it is not important that this ash or oak be grown in Serbia, it is not at all necessary to import from Serbia. Yes, even if you look at imports, yes, they have become more expensive, but you can still get up to 2,000 rubles. Three-strip Upoflor Finnish samples for 1400 steel 1900 rubles, unfortunately I don’t remember the colors, I can’t tell you.
But again, I meant that if you have a flooring budget of more than 1000 rubles (1500-2000), I personally would not consider laminate. The choice - to take a decent parquet board or chemical pressing at the same price - would be obvious to me. If the budget is smaller, it's a different story.
Could you tell me then, if we consider a light board and a light (shell color) tile, what color is this threshold for them?
But laminate has nothing to do with wood at all, it’s shavings, sawdust or whatever, I’m no expert, glued together with resins and pressed into a slab covered with film. Although he can certainly be beautiful, he is, unfortunately, unjustifiably expensive because of this.
Post your results as soon as you finish them! )) in the end, who cares what it’s made of if it looks beautiful and uniform!
So I have to agree - the board was a pure whim (I imagined how with a small child tinkering with cars, + heels, + sand... the floor would quickly lose its appearance. So it seems I was mistaken)
But I wouldn’t parquet the hallway and kitchen. Over the course of 20 years, in my parents’ hallway, dirt had accumulated here and there in the joints between the planks. The rest is in order. But in the kitchen itself they didn’t lay it, after all, we cook a lot, we can accidentally pour a pot of rich borscht on the floor, and no one is safe from leaks.
If possible, look towards parquet rather than hardwood flooring. The performance properties of the board are much worse, and it costs not much less than real parquet. Any parquet floorer will tell you this.
But can you tell me if the surface preparation work (leveling, substrates, cork, plywood, etc.) cost you a lot for laying the board? They told me that the work and materials for preparing the surface will cost about 2-3 thousand per square, this is in addition to the cost of the board itself. This is true?
But where the quartz vinyl was, I laid plywood there. To level out the difference in the thickness of the material, I selected 10 mm plywood, the craftsmen glued the panels and fastened them with self-tapping screws onto the screed. The plywood itself did not increase the cost much; laying quartz vinyl was expensive. I bought plywood in Castorama, where it was 3 times cheaper than in OBI or Maskidom. The cork backing wasn't expensive either. In general, you need a high-quality screed as a base and a moisture-proof film, everything else is up to your discretion.
Laying solid boards is several times more expensive. but you are going to lay parquet boards, everything is not so scary there.
In general, I understand)) thank you for such detailed answers.
In my experience, I don’t recommend it for the hallway. We put the board on the ENTIRE apartment except the bathroom. Incl. to the kitchen and hallway. And if it holds up well in the kitchen, you just have to try not to spill anything too much, but at the entrance it wiped off. As they later explained to me, it was because of the particles of sand that were brought with shoes. Despite the fact that in all other rooms the board is perfectly preserved, its quality is excellent (and we took a very inexpensive Barlinek). There are no strong dents, small scratches can be removed with oil once or twice. They gave an interesting idea about tiles in the form of a rug, it’s a pity that I didn’t think about this option earlier. We laid out a regular woven rug later, although it was already too late)
Now I'm also thinking about changing my gender. Now the old boards lie and are covered with rugs. And outwardly, I’m not very tired of these dust collectors... I was interested in Barlinek - they have an option with an ultra-durable coating, such a board, as the salesman said in the store, can even be used in public spaces where people walk. I’m thinking it’s wrong to take it, so I’ll stick with this option. And even if I choose from another collection for the rooms, there will be no obvious difference between the coatings.
Final work
When all the rough, dirty work has been completed, the waterproofing and insulation have been laid, the cherished moment comes: installation of the finishing coating. Upon completion of laying the floor, there is a feeling that several details are missing for the integrity of the picture:
- baseboards;
- rugs;
- paints on a wooden (concrete) floor.
This additional amount of work may not be performed, but without it the coating will not be complete.
If the floor is wooden, then lovers of everything natural, to emphasize the structure of the wood, presentability and additional protection, use alkyd varnish for exterior woodwork. It would be good if it has antiseptic properties and resistance to ultraviolet rays and moisture. The varnish can be either glossy or matte, with the latter looking more impressive.
Painted floor
It is enough to perform a simple procedure for painting a wooden or concrete surface using alkyd, oil-based or polyurethane paints. This procedure is as simple as possible, the main thing is the right paint. It is recommended to remove the old layer first, because... On old paint, new paint will not last long: peeling and bumpiness may occur. This will ruin the entire appearance of the finish and you will have to resort to drastic measures.
In search of interesting color solutions, you can paint both wooden and concrete floors with special paints: polyurethane, oil or acrylic paints for exterior use. You can use carpet as an additional insulating coating on top of tile floors and wood coverings.
A special anti-slip mat, or even several if the balcony area allows, acts as a decorative element and prevents falls on slippery tiles. They can be made in different sizes with different patterns, abstractions, 3D effect, transparent and even glowing in the dark. For cold floors, heated mats powered by batteries would be an interesting functional solution. Textile floor products will add coziness and homely warmth to a loggia or balcony.