The installation of a wooden floor on the balcony includes wood of the selected species. Most often they use oak or pine. Oak coating is more reliable and durable, but it is a dark species. Pine is much lighter in color and looks more attractive in most styles. But it is important to choose the right material, since poor processing of pine reduces its physical and mechanical properties.
There are many types of wooden floors:
- Parquet;
- Plywood;
- Deck board;
- Lining;
- Many other options.
The final decision is made after the purpose of the balcony has been determined, its style and potential interior have been clearly formulated.
You can build
The design and appearance of a new building largely depend on the appearance and decoration of the house, as well as on the material from which it is made. An important condition is the harmonious selection of the type of balcony in such a style that it does not stand out in design from the general image of the building.
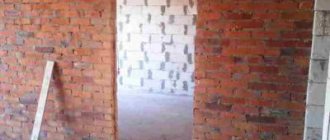
Concrete balconies
The most common option is with a concrete floor. There are several features:
- The load-bearing elements of one of the sides are fixed in the wall of the house. Using electric welding, they are connected to pre-installed and carefully secured anchors. The reliability of the entire structure will depend on how massive the wall is. If the walls of the house, which will help distribute the weight and pressure of the new building, are not strong enough, it is necessary to attach additional supports.
- Dimensions in reach and depth should not exceed one meter.
- In brick buildings, concrete slabs are inserted into the load-bearing wall of the house along its entire length. They are welded to the lintel reinforcement, which is placed above the floor below.
- Console elements are laid into the masonry in houses with stone walls.
- The top level of the main support slab should ultimately be set 100-120mm below the final floor level.
- The floor of the structure being created must have a slope of 2% from the main building.
- The concrete slab should be waterproofed. To do this, a water-repellent coating is installed on the surface of the installed slab, on which a sand-cement screed is then poured.
- Parapets must be at least one meter. For this purpose, metal gratings are used, which consist of handrails and racks. The racks are attached by electric welding to the embedded elements of the slab, and the edges of the handrails are inserted into the load-bearing wall of the building.
- The balcony door threshold must be positioned 100 mm above the floor level.
Bay windows
They are multi-section windows that typically extend outward from the exterior wall of the home. Although they can be used and are commonly found in all styles of home, they are most often found in Victorian or other traditionally decorated homes. Bay windows are popular for many reasons, but mainly because their large size and unique shape have the ability to fill a room with natural light and create a slight expansion of space.
Bay windows are usually three-sided, consisting of three or more windows. One window is parallel to the wall of the house, while the other two face outwards towards the interior wall, forming a trapezoidal shape. Typically, bay windows will add length and width of two to three meters, but this depends on the size of the structure installed.
Bay windows are very popular due to their aesthetic appeal. For this reason, adding a bay window to your home tends to be a very good investment if you ever sell your home in the future. Buyers often pay extra for improved natural light, and panoramic windows only increase this amount. In addition to providing better lighting, bay windows will help improve air flow in your home. They also add extra storage and furniture space, making them a popular choice for small bedrooms, living rooms or reading areas.
Basic methods of building a balcony
For buildings built from logs or timber, the technology for constructing a balcony is similar. The only difference is the method of support. Supports can be made:
- beam-cantilever method;
- beam-supported.
Diagram of types of balconies according to the method of construction in a private house.
In the first option, cantilever beams (logs) or simply extensions are located on the lower rims of the logs and are elements of the continuation of internal or external load-bearing walls. Among other things, such beams additionally decorate the facade of the house.
The cantilever method involves another option, in which the supports for the balcony are elongated beams of the interfloor floor, protruding to the required length beyond the facade. But many experts believe that this method does not comply with building codes and requirements, since moisture may enter the support beams, which will eventually lead to rotting of the wooden elements.
With the beam-support method of construction, the balcony is located above the veranda or terrace and serves as a roof for them. This option is much more often used in the construction of country wooden cottages.
The internal balcony is built mainly according to the French type, when it is arranged as a full-height window frame. That is, this is a small fenced area located immediately outside the door.
Let's take a closer look at each method.
Console method
When using beam-cantilever technology, it is necessary, when preparing the project, to determine the location and height of the loggia in order to release beams in this place during construction. For greater reliability, the other end of the beam should be attached to the main wall of the house. The fastening must be rigid.
Construction of a balcony in a private house on consoles.
The beams are usually released at 1.5-2 m. The beams themselves can be made of rounded logs or profiled timber
It is important that the outlet beams form a monolithic structure with the wall. If the width of the balcony is greater, then additional support pillars are erected
At the same time, a special screw mechanism is placed in the pillars to reduce the height of the supporting element by the size of the building's settlement.
To further strengthen the console, wooden or metal slopes are installed. The latter, made using forging, can serve as an additional element of facade decor. To strengthen the fastening of beams resting on the walls, battens are used.
The consoles, which are the basis of the design of a classic rectangular loggia, are connected by one beam, then a rough flooring is made and a finishing floor is laid on top of it. The outer floor beams are securely attached to the horizontal frame posts of the wall, and the rest are attached to the battens.
The canopy over the loggia is made separately, or is a continuation of the roof of the cottage.
If the balcony is purely decorative and has a width of no more than 1 m, then in this case you can use wooden trusses as a support. They are attached to the wall with special brackets. But there is a significant drawback. Over time, the fastening loses its appearance under the influence of precipitation and dirty rust stains appear in the fastening areas.
Construction of a balcony on racks
Owners of country cottages most often prefer to build balconies on racks that rest on the base of the veranda or terrace. In this case, the base of the balcony serves as a roof for them.
This method is used when the balcony is large, or it is not possible to use a ceiling under the base of the loggia. Of course, this option will require more significant costs, but the size of the balcony and, accordingly, the terrace under it can be any. You can place a parking lot under the balcony.
Attaching a balcony to a private house using the beam-support method.
Support posts with this method can be wooden, metal or brick. They are usually located along the outer edge or on both sides of the loggia. The inner part of the racks rests on a beam, which is rigidly attached to the wall.
Support posts are installed in accordance with the following technologies:
- The logs are taken slightly smaller than required. Initially, bars are placed under them, and after the house shrinks, they are removed, thus leveling the loggia. But, nevertheless, there should be an outward slope of about 2% so that the water does not stagnate, but flows freely.
- The racks are installed on jacks and then tightened as necessary.
- The beams or logs are set strictly according to size, and when the building shrinks, they are simply sawed down.
Material
Durable and durable materials are used to make balconies. Most often it is concrete and wood.
Concrete balcony
This architectural structure has its own characteristics:
- load-bearing structures are recessed into the wall. The reliability of the structure depends on the thickness of the wall; if it is not very strong, then additional supports are used;
- the balcony overhang is at least 1 meter in length;
- if the house is brick, then the base slab is inserted into the wall along its entire length;
- the upper level of the slab is set 5-8 cm below the expected level of the floor covering;
- the concrete base must be thoroughly waterproofed;
- The height of balcony railings should not be less than 1 m.
Wooden balcony
Usually inferior to concrete in size and reliability, but superior in decorative terms. Externally, the balcony resembles a cozy wooden house or hut. Wood is a material that has many advantages. First of all, it is the atmosphere of comfort that natural wood creates, its smell and appearance. Wood goes well with different finishing materials.
Features of a wooden balcony:
- for the manufacture of load-bearing structures, beams with a cross section of 10*20 cm are used;
- the minimum depth of beams in a stone facade should not be less than 25 cm;
- the beams are fastened to the walls with bolts or metal angles;
- vertical posts (boards 4*10 cm) and longitudinal ones (5*10 cm) are attached to the console;
- flooring and handrails are installed;
- All elements made of wood and metal are treated with oil paint, gratings and handrails are coated with frost-resistant and water-resistant varnish.
The gaps between the lattice bars for any structure should not be wider than 10-12 cm.
What to cover
Natural material must be treated with special compounds. If you do not cover it with protective agents, it becomes dirty and cracks. Chemical compositions for wood processing are divided into 3 groups:
- Lucky.
- Paints.
- Impregnations.
Using these means, you can not only reliably protect the lining, but also give it the desired color, while maintaining the original structure. Let's consider the compositions separately.
Lucky
Coating the lining with transparent varnish
Creates a layer to protect against moisture and gives the desired shade. There are several types of compositions:
- Oily. Reliably protect the lining from moisture and abrasion. It is distinguished by its low price and variety of colors.
- Alkyd. These varnishes are distinguished by excellent shine and have good protective properties.
- Acrylic. An indispensable coating for interior spaces. Fits perfectly on the lining and has no odors. There is one drawback: it is not abrasion resistant.
- Polyurethane. They are durable, wear-resistant and provide reliable protection. Often used externally, but also used internally to give the coating high strength.
Impregnations
Tinting with alcohol stains
Protective impregnations are distinguished by their ability to penetrate deeply into the wood structure without forming a film on the surface. Solutions are used as a protective layer or base for finishing. The most popular include the following:
- Stains. Designed to give the surface the desired shade. They are produced on a water, alcohol and oil basis. They do not perform protective functions.
- Lazuri . Based on acrylic. They are capable of completely closing the pores in wood, therefore they are used for finishing. The composition protects the lining well from darkening and exposure to ultraviolet radiation.
- Antiseptics. Protect wood from mold and mildew, extending its service life many times over. Used only as a preparatory layer. After the antiseptic, you must apply a special protective composition.
- Fire retardant compounds. The solution is used as an additional impregnation to protect against possible fires. The market offers universal compositions with fire-bioprotective properties. Such solutions make the wood resistant to fire and mold.
Paints
This product has a high density, which allows you to create the desired color on the surface. Paints are divided into several types:
- Oily. Were popular before. Now they are used less frequently. Although oil paints have good protective properties, they still deteriorate quickly. Every year or two the coating has to be renewed.
- Alkyd. Works great on wood. The paints are applied evenly, forming a thin but reliable film. They protect the material well from dampness and are wear-resistant. They are popular.
- Acrylic. Completely harmless compositions capable of creating a beautiful and reliable film. Can be used in any premises. The paints are water based. The consumer can give white paint any color using pigments.
Waterproofing walls
The process of waterproofing the surface of the walls of a completed balcony can be done using the following methods:
- Painting. The most common, but expensive option. Protective agents are applied to the surface: varnishes with rubber additives, which must be renewed regularly.
- Pasting. Such materials can stick due to exposure to high temperatures or self-adhesive. The more common material is roofing felt. But the process of working with this material is labor-intensive.
- Powder. It includes a regular cement mixture to which liquid rubber, some types of plaster or tile adhesive are added. The disadvantage of this method is its low strength and resistance to mechanical damage.
- Water repellents. They are ready-made mixtures that have excellent water-repellent properties and provide protection from high humidity. The disadvantage is the rapid destruction from direct sunlight.
This method should only be used for hydraulic internal insulation.
Cork panels
If there is a lack of financial resources to purchase natural wood material, cork panels will serve as a good replacement. The bark of the cork tree is used to make them.
Pros:
- fire safety;
- moisture resistance provided that wax is applied;
- variety of shades;
- low price;
- ease of processing.
Installation work is preceded by surface preparation. Drywall is used for this. It is attached to the sheathing with self-tapping screws. Cork panels are placed on a special glue that sets very quickly.
Can be glued either to drywall or to putty walls
You need to have time to install the workpiece in its place in a short period of time. If you miss time, you won’t be able to move it.
It is important for the finisher to choose the appropriate glue from two varieties:
- Universal acrylic.
- Adhesive composition for processing both parts of the connection.
The second option is considered more preferable. PVA glue, which people try to use in all cases, will not work here. The plate will absorb the liquid and swell. This will lead to deformation of the material.
Contact glue is different:
- Strength of connection;
- Increased moisture resistance;
- Immunity to temperature changes;
- Resistant to acids and alkalis.
The quality of the joints is affected by the pressing time of the surfaces. 20 seconds is enough, but if you hold it longer, the bond will be stronger. The adhesive is applied to clean surfaces at a temperature not lower than +15°C and humidity below 75%.
Before purchasing glue, you must carefully study the information on the packaging. Some products are harmless, others contain elements that emit harmful fumes. Several brands of glue are used for gluing cork:
- WaKol. Manufactured on a latex-acrylic base. Not suitable for unheated balconies, as it loses its properties when temperatures drop.
- Decol Vern. During the pasting process, a specific smell is felt, which then disappears without a trace. Glues very securely.
- Bunitex. Good glue based on rubber and polychloroprene.
- "Traffic Moment." Made from polychloroprene and toluene. The product has excellent adhesion, is not afraid of moisture, and is resistant to alkalis and acids. Attaches cork to wood and metal substrates.
The glue hardens completely within 4-6 hours. But this process can take two days at low temperatures and high humidity.
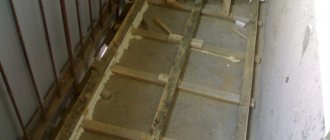
Making a subfloor
After building the foundation, it is recommended to start arranging the subfloor. We first cover the support with roofing felt in two layers.
The floor can be wooden or concrete. For example, in a frame veranda made of wooden beams, a wooden floor would be more appropriate. Concrete pouring will best fit into a brick extension.
Subfloor
We make a wooden subfloor like this:
- We fix the beam of the lower trim on the foundation. We use suitable fasteners, for example, anchors. To connect the beams directly, we first make samples at the places of their joints and additionally fasten them with galvanized nails;
- We attach wooden logs to the bottom trim. We keep the step at 50 cm - this way the floor will definitely not fall through. We use the connection option described above;
- fill the space between the joists with expanded clay;
- We make the flooring from unedged boards or plywood about 50 mm thick. We attach the flooring elements to the joists with galvanized nails or self-tapping screws.
We make a concrete screed like this:
- fill the base with a 10-centimeter layer of sand;
- pour a layer of expanded clay on top;
- lay the reinforcing mesh. For the floor of the veranda, a mesh of rods with a diameter of 6-8 mm with cells of 25x25 cm is sufficient;
- pour concrete.
The recommended thickness of the screed on the veranda is from 30-50 mm. For greater convenience and accuracy of pouring, we can pre-set beacon slats every 2-4 m.
Types of structures
Regardless of appearance and size, all balconies have mandatory structural elements. Among them:
- base plate, which bears the main load;
- fencing (parapet);
- additional elements (visor, wind screen).
The main structural element is a slab, which is made of reinforced concrete or wood. The first option is applicable only for buildings built from durable materials (stone, brick, reinforced concrete blocks). The wooden slab is lightweight, so it can be installed on the facade of any building.
Depending on the method of attaching the slab to the wall, balconies can be:
- with a cantilever beam clamped in the wall (the reinforced concrete slab is recessed into the wall during the construction stage, and the overhang of the structure cannot exceed 1 m);
- with a cantilever slab and support on beams (beams are recessed into the wall, on which a reinforced concrete or wooden slab is placed on top, while the width of the balcony can reach 1.2 m);
- with a slab supported on triangular brackets (this option is used when the balcony is attached to an existing building);
- with a slab on supports (an attached balcony rests on columns, walls, and beams standing near the facade).
The French balcony also belongs to the category of balconies, although, in fact, it is only a beautiful enclosure of a window opening.
Balcony designs in a private house: a balcony over a porch or other extension
The design of any balcony includes mandatory elements.
This:
- Balcony slab;
- Fencing or parapet;
- Protective elements in the form of a visor and wind screens (not mandatory, but desirable elements).
Balcony slab is the main structural element, usually made of reinforced concrete or wood.
Due to the lightness of its structure, a wooden balcony can be mounted on a building made of almost any building material.
For private houses, the following main structural types of balconies are used, which differ in the method of attaching the balcony slab to the wall of the building:
- Balcony with a cantilever slab jammed into the wall. When making such a balcony, a reinforced concrete slab is embedded into the wall to a certain width, while the overhang of the slab (and, accordingly, the width of the balcony) cannot exceed 100 cm.
- Balcony with cantilever slab supported by beams. In this case, it is not the slab that is clamped into the wall of the building, but reinforced concrete beams, on top of which a balcony slab is laid, which can be made of either reinforced concrete or wood. Thanks to the beam support, the width of such a balcony can be up to 120 cm.
- Balcony with a slab supported by triangular brackets. This design can also be used in the case when the house has already been built and the owners decided to acquire a balcony during the operation of the building. In this case, a frame is driven into the wall of the building, on which a balcony slab is laid, which can be either wooden or reinforced concrete. Metal or wooden triangular brackets are used as supporting elements for the slab. This design allows the installation of balconies up to 150 cm wide.
- Balcony with a slab standing on supports. In this case, the balcony slab rests on columns, walls, etc. In this case, the width and shape of the balcony are limited only by the designer’s imagination and the cost of construction materials. An attached balcony can also be made on supports, when the supporting elements are not connected in any way to the structure of the house and are attached separately. Such a balcony can also be attached to an already finished house.
One of the options for a balcony on supports could be a balcony above the porch. With certain design features of the building, optimization of construction can be carried out. In the case where protruding structures are provided on the facade of the house (porch, terrace, garage, bay window, etc.) that require a roof, then this roof can be a balcony slab, and the construction of the balcony will be significantly reduced in cost.
Canopy or roof over the balcony: which is better?
The roof over the balcony is not a mandatory element of the balcony structure, but its presence makes the use of the balcony space much more comfortable, thanks to protection from precipitation; in addition, the presence of a canopy protects the slab itself and the protective fences from destruction under the influence of precipitation and time.
The roof should cover the width of the balcony slab with a small margin and have a slope to prevent the retention of snow and rain.
Recommendations for use
The list of requirements and recommendations for the construction and subsequent operation of a balcony is quite extensive:
- The minimum permissible width at which a person can both stand and sit is 800 millimeters. If the balcony is narrower than this parameter, then it will be difficult to stand on it. Suffice it to recall the old “Stalin” buildings, in which such premises were used only for planting flowers in pots. But this width will not be enough to accommodate even the smallest table. Here it should start from 1200 millimeters. To accommodate more than 1 person, the width should start from 150 millimeters;
- If we are talking about a miniature balcony, then its width should be about 30-35 centimeters. That is, so that a human foot can certainly fit there.
- The minimum permissible height of the fence is 1050 mm, and if it is made smaller, this may serve as a reason for the commission not to accept the house for operation. We must understand that beauty is beauty, but safety is still above all else. In the Soviet Union, where all such technical standards were developed, they knew a lot about safety;
- If the balcony is completely open on all sides, then it can be made a little more comfortable by placing a protective wind screen at least on its sides. It is clear that open ones are beautiful. But from a utilitarian or practical point of view, it is not very convenient: it will leak.
One of the options for cutting load-bearing beams
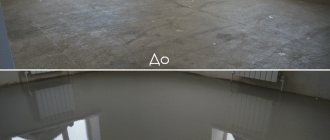
Screed, its manufacture and features
When talking about what to make a balcony floor from, you should take into account that making a screed yourself is not so difficult, and besides, it is a budget option. However, this simple method also has a downside:
- The screed significantly increases the height of the floor on the balcony (about 10-15 cm), which of course puts additional load on its base - that is, the slab. If the house is very old, the balcony may simply collapse.
- Concrete floors are considered the coldest. Of course, it can be insulated (for example, with polystyrene foam), but this will not help much; thermal insulation still leaves the floor cool.
If the above circumstances do not scare you, then you should study step-by-step instructions on how to make a floor on a balcony with your own hands.
Home comfort on the loggia directly depends on how well it is insulated
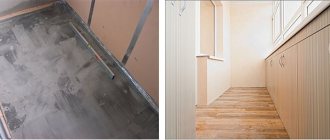
Do-it-yourself screed manufacturing technology
First, the floor is prepared for installation work. The first step is to carefully close all noticed cracks. They usually occur in those places where the wall is adjacent to the slab - the base.
Conventional polyurethane foam or acrylic sealant will help you with this preparatory stage. After all the cracks are sealed, you can begin arranging the floor.
Sealing cracks is an important step in the process of constructing and installing a floor on a balcony.
Waterproofing
Laying a waterproofing film is necessary so that when pouring the solution, excess moisture from your screed does not leak to the neighbors below.
To waterproof the floor on the balcony, you don’t have to make any special efforts. Just carefully lay a thick sheet of polyethylene in the form of a neat “trough”.
Important! The film should be laid overlapping, laying about twenty centimeters on the walls. After the work is completed, the edges of the polyethylene are carefully cut off. Waterproofing the balcony with plastic film
Waterproofing a balcony with polyethylene film
Reinforcement process
Basically, a steel mesh made of three-millimeter wire is used for this. The cells of the reinforcing mesh can be 50×50 or 100×100 millimeters.
The sequence of work is quite simple:
- All visible dirt and other debris are removed from the surface;
- The first row of mesh is carefully laid on the insulation and pressed tightly;
- The second row is placed overlapping 1-2 cells.
Reinforcement mesh increases the strength of the screed and significantly increases its service life
Lighthouses
In construction, beacons are special guides (landmarks), by moving along which you can level the applied coating to a perfectly flat and flawless surface. When making a balcony floor in the form of a screed, you can’t do without such little things.
Beacons are installed in one plane, which is determined in accordance with the height of the threshold in indoor block doors. Also, all beacons must be carefully aligned horizontally.
The top edge of the lighthouse should be at the same height as the subfloor surface
Important! To ensure that the beacons do not move during the screed leveling process, they must be firmly fixed. To secure them firmly, it is best to use building plaster or cement mortar. Installation of screed beacons using thick cement mortar
Installation of screed beacons using thick cement mortar
Filling the screed
After all this preliminary work has been done, you can prepare a solution of sand and cement (four parts cement and one part sand). The finished mixture is carefully poured between pre-installed beacons and carefully leveled using the rule.
To make the floor level, the rule must be applied slowly with little pressure, while simultaneously resting it on two beacons
After completing the concrete work, the screed is covered with a sheet of polyethylene to slow down the drying process. If you neglect this, it may crack during hardening.
It is also necessary to ensure that the thickness of the screed laid on foam plastic or other insulation is at least fifty millimeters. Otherwise, the base of the floor on the balcony will crack under the influence of gravity - for example, from the weight of furniture.
If all work on arranging the concrete screed is carried out according to the instructions, the floor surface should be perfectly flat
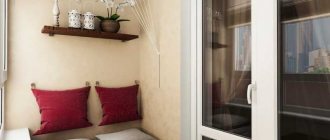
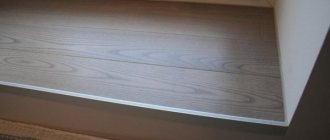
Conclusion
Decorating a balcony and covering cold concrete with warm and cozy wood is not as difficult as it seems at first glance, because the material is easy to process and install. The video in this article will help you understand even better some of the important nuances of the topic we discussed. If you want to clarify certain points, then write all your questions in the comments under this review.
Did you like the article? Subscribe to our Yandex.Zen channel
September 14, 2016
Balcony and loggia, Finishing materials
If you want to express gratitude, add a clarification or objection, or ask the author something, add a comment or say thank you!
Wooden balcony in a frame house
Let's take a closer look at the technology of constructing a wooden balcony in a frame house with our own hands. The construction of the balcony itself consists of a main frame, a floor, a canopy and a protective fence. The support for a wooden balcony is provided by outrigger beams and support posts.
Let's consider options for constructing balconies in a frame house:
When building a balcony, floor beams are used for the base of the frame, which extend beyond the plane of the wall. Wooden beams with a cross section of 150 by 150 mm will be sufficient for a platform about two meters wide. The remote beams must be rigidly fixed in the wall, and they will form a single monolithic structure with it, which will not involve any repair work in the future, and will not need to control the shrinkage of the house. The ends of the beams are connected by a special crossbar, which will serve to construct the finished floor. The load-bearing capacity of the balcony can be increased by installing wooden struts in the form of a triangle, resting with one leg on the embedded parts in the wall.
When it is not possible to use all the elements and details of the floor as a base or remote platform, an independent structure of a wooden balcony on load-bearing posts is used. This structure will require additional financial expenses, but there are no restrictions on dimensions, and space will be created for a frame house with a terrace, utility room or car parking. In addition to wood, metal, sand-lime brick or reinforced concrete are used for supporting columns. The racks are placed on both sides of the balcony or under its outer edge, the inner part resting on a wooden beam fixed along the wall.
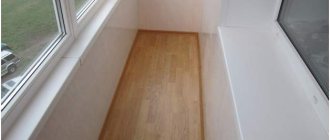
Balcony flooring
The columns of a wooden balcony are connected by a transverse beam laid on top of them, and placed slightly below the wall beam. The resulting slope of approximately 2° will ensure that all the water drains from the wall. Between the beams of the wooden frame, logs are installed in increments of 70 cm, which are fixed with special galvanized corners on the beam. The finishing coating is made from planed wooden boards (50 mm thick), screwing all parts and elements on the sides with hidden fasteners with a gap of 7 mm. The best material for the floor on a wooden balcony would be a decking board with a special corrugated surface, made from hardwood or wood-polymer composite.
Balcony fencing
The height of the railings on the balcony should not be less than 120 cm. The railings are assembled from carved or turned wooden blanks. Fence posts are attached to the load-bearing parts of the wooden frame using a tongue-and-groove connection, brackets and double-sided studs. On longer wooden balconies it is customary to install intermediate balusters.
Canopy device
The roof on a wooden balcony comes in two main types:
- The roof is shared with the house; to do this, simply lengthen the ridge line or extend the rafter legs.
- A canopy independent of the main roof, supported on a load-bearing wall through special supports or on pillars along the entire outer perimeter of a wooden balcony.
But the simplest and most effective solution is to use a lightweight structure covered with plastic, fabric or polycarbonate.
Wood protection
All wooden balcony elements and parts are usually coated with special paint mixtures and impregnations that are resistant to fading and fluctuations in external temperatures. High-quality and reliable wood processing is carried out by a whole complex of the following operations: priming, impregnation and painting.
Installing and assembling a frame balcony with your own hands requires a lot of physical effort and financial costs, depending on the final dimensions of the building, the complexity of the entire structure and the specifics of the building materials. But for the sake of comfort and coziness, it’s worth trying hard to make a more convenient place for your relaxation and work in the fresh air.
How to choose
The material for finishing balconies must withstand the aggressive effects of ultraviolet radiation. Thermal conductivity is allowed within 0.3 W/mK. Its increased rate is used either as a source of cooling or heating. Dark colors quickly warm up in the sun's rays, but such shades do not harmonize well indoors. For walls, light colors that reflect light are used more. Dark colors are suitable for the floor.
An important selection criterion is resistance to moisture and temperature changes. Under their influence, some types of wood materials become deformed over time, losing their original color and attractiveness.
Painting wood moldings a dark color adds style!
Selection of material types
The consumer has no problems finding the right material. It's harder to make the right choice. In order not to regret the consequences, it is advisable to seek help from knowledgeable specialists. The variety of materials puts the consumer who is inexperienced in construction in a difficult position. Let's consider the most popular materials.
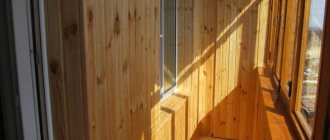
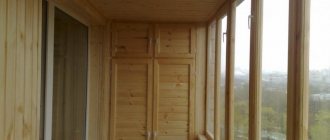
Lining and eurolining
They are preferred by many consumers and craftsmen. Over the years, these materials have proven their high quality characteristics. They can be easily processed with any tool. The lining is suitable for covering ceilings, walls, cabinets, and shelves. At the same time, the material is affordable.
Trimming with eurolining horizontally
When choosing lining or eurolining, you should not be excessively stingy. If you don’t have enough money for the highest grade material, you should at least opt for class A. There are fewer cracks and knots.
Eurolining differs from ordinary lining. It is better dried, has grooves to drain condensate and is not subject to rotting. The material is manufactured in accordance with GOST and will last over 20 years if the operating rules are observed.
Before starting work, it is necessary to take measurements of the room. Window and door openings are calculated from the total area.
Prepare the following materials in advance:
- Lining.
- Bars and slats.
- Polystyrene foam or mineral wool.
- Material for vapor barrier.
- Antiseptics for wood.
- Fastening elements.
- Wood varnish.
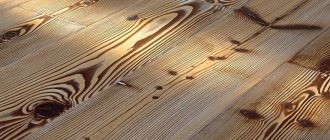
To finish the balcony, lining made from various types of wood is used. The most commonly used are linden, pine, ash, larch, and aspen. Oak lining is considered the most expensive. Not everyone can buy it.
Any natural wood looks good in the interior of a balcony. But most often preference is given to pine and linden . These breeds are easy to process and affordable.
To give the balcony interior a special appeal, imitation timber, called a block house, is often used.
Before purchasing, boards should be checked for cracks, mold, and rot. Densely spaced growth rings indicate good quality. It is also necessary to check the degree of humidity and the functionality of the locks.
Pros:
- good sound insulation;
- pleasant appearance;
- environmentally friendly
Minuses:
- high price;
- possibility of damage to the tenons and groove during installation;
- poor protection from rotting and insect penetration;
- ease of combustion.
The planks are attached to the sheathing using nails, screws or clamps. The latter are more suitable for installation. Before installing the block house, it is recommended to insulate the surface with mineral wool or polystyrene foam.
MDF panels
Covering balconies with MDF panels has gained wide popularity due to significant savings in money. At the same time, the material is characterized by high strength and sufficient durability. The panels are manufactured using a special technology of the same dimensions with surface treatment. They are available in 3 types: waterproof, fireproof and bioresistant.
Pros of MDF:
- moisture resistance;
- strength;
- resistance to temperature changes, fungi and insect damage;
- density, which makes it easy to process and give the desired shape;
- large selection of colors;
- low cost.
Minuses:
- content of harmful ingredients;
- dust formation during sawing;
- greater weight than wood panels.
Installing panels is not much different from installing lining. MDF is attached to guide rails.
This method allows you to level the surface of the wall and, if necessary, use thermal insulation. The only difference is the use of special brackets for fastening, which are hidden under the canvas.
Wood boards
Balcony finishing with OSB boards.
This material is used only in high-quality premises that are well insulated. Wood panels swell greatly in damp conditions. But this finishing method is one of the cheapest, and provided the necessary conditions are created, it is very effective.
Please note: How to finish a loggia in an apartment with MDF panels?
Installation of such plates does not cause any difficulties. Pre-prepared sheets are screwed onto the finished sheathing. The main thing is that they fit perfectly into the installation locations. To achieve this, you need to take the correct measurements and saw off the workpieces with a sharp tool so that sawdust or shavings do not crumble. Sometimes wooden slabs are used for flooring, reinforced with joists.
There are several types of wood-based panels:
- Plywood. It consists of several pressed layers of wood veneer. The principle of plywood manufacturing is based on perpendicular gluing of adjacent plates. The number of layers ranges from 3 to 23. They can have different thicknesses. They are made from deciduous, coniferous and in a combined version. Plywood is classified into grades depending on its composition and manufacturing technology, which affect the degree of protection from moisture, mold, fire and abrasion. The material is also divided into 5 grades, which are designated by the corresponding letters of the alphabet.
- Chipboards. Sawdust and binding compounds are used for their production. Chipboard is produced in slabs of various thicknesses. The slabs have a number of advantages: strength, ease of processing, water resistance, low cost. Cons: contains harmful formaldehyde, fragility. Used as a substrate for floors and wall panels.
- Cement particle boards. Consist of wood chips, cement and binding additives. Available in large format. After pressing, a smooth slab is formed. The material is waterproof, environmentally friendly, resistant to moisture and insect penetration. It is easy to process, will last more than 50 years and is inexpensive. Has a wide range of applications, including interior decoration.
- Oriented strand boards. Consists of 90% wood. The material has high strength due to its long chip length. The slabs consist of 3-4 layers, which are held together with resins and pressed at high temperature. When purchasing slabs for interior work, you should pay attention to the content of harmful impurities. The slabs are used for covering ceilings, walls and floors. Before use, treatment with special means is required.
- Wood fiber boards. Consist of wood fibers and synthetic resins. Available in several versions: super-hard, hard, semi-hard and soft. Depending on the manufacturing technology, the slabs are used for various purposes in finishing balconies: thermal insulation, decoration, sound insulation.