Many owners of small apartments are faced with the issue of expanding the space of their homes. Quite often, a balcony is the backup option that can solve the problem of missing square meters. A reasonably equipped and decorated balcony will not only be a wonderful place to relax, but can also solve the storage problem. This requires a little imagination and craftsmanship. An acceptable option would be a bench with storage space, which is easy to construct yourself.
How to make a box for sitting on the balcony with your own hands? To carry out such creative and useful work, it is necessary to develop an action plan, select and prepare material, and collect the tools necessary for the work.
Advantages of balcony boxes
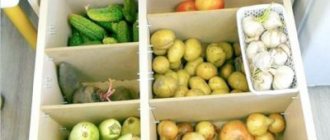
A vegetable box on the balcony will be a good alternative to the cellar and will help protect potatoes, carrots, and beets from drying out and unnecessary germination during the warm period. During frosty times, it will protect vegetables from the cold.
Such a storage box on the balcony will allow you to create an optimal level of humidity and an acceptable temperature level, protect the crop from sunlight, and make a beautiful and convenient thing with your own hands.
Instead of vegetables and fruits, such a creation can be used to store used cans, old blankets, pots and everything else that should certainly be useful in the next decade.
In addition, such a box can be used as a cozy bench, and the large space of the balcony will only benefit from placing a sofa on it, inside of which there will be spacious storage.
How to make it yourself
Before making storage for vegetables with your own hands, it is important to consider all the nuances:
- Decide on the type of vegetables.
- Count their number.
- Take into account the temperature on the balcony at any time of the year.
- Find out the humidity level (monitor the norm).
After this, the shape and size, as well as the design of the container, are determined.
In optimal weather and good climatic conditions, and the balcony is also insulated, the structure is not sheathed with thermal insulation material.
For a regular box without heating you will need:
- wood sheets;
- beams with a cross section of 20*40 mm, also 40*40 mm;
- cotton blanket (or other thermal insulation);
- screws, corners;
- a processing agent that will protect the tree from damage, moisture, and sun.
Carrying out the work step by step:
- The foundation is made independently, taking into account external parameters. They must correspond to the area of the box itself. Then a frame is built from the beams and sheathed.
- Next, the frame for the walls of the building is assembled from bars. They should first be cut, measuring the required length, and connected into one frame. After this, attach it to the base using self-tapping screws. Fasten the frames with corners.
- Cover the walls with plywood. Don't touch the front one.
- The storage is made according to the following parameters: 120-140 mm less than the external base. It is finished with insulation or a foil version.
- The sides on the sides of the external structure are attached to the wall surface and secured with brackets.
- The internal structure is placed inside the external one. If heating is present, legs are attached separately.
- Magnets or hinges are used to secure the outer panel of the drawer from the inside. An incandescent lamp or other heating object is hung. It must be controlled by an external thermostat.
- It is important to insulate the lid from the inside. Then it is installed on the hinges.
The upper part of the lid needs to be covered with insulating material.
A plywood box is suitable for insulated balconies
This kind of container can serve as a sofa for relaxing. The main thing is to lay the mattress on the cover. If there is heating inside, it will also heat the sofa.
There is an option for a vegetable storage box with ventilation. The container is assembled according to the scheme described above, instead of beams there are sheets of plywood. The only difference: you need to drill holes.
Ventilation from the inside is required. Do not drill from all sides. Those adjacent to the walls of the balcony are best left alone. Make holes no more than 3 cm in diameter. Otherwise the vegetables will freeze. Drill in the middle or at the top of the walls so that the soil from the potatoes does not spill out.
Types of boxes for balconies
There are several types of such structures.
The most popular option has become a vertical loading one with a hinged top lid, which can also serve as a seat for a bench or sofa.
Such boxes are beautifully located in the corners or ends of the loggia. Tall options are raised to the height of the window sill, thereby increasing the usable area of these structural elements. Of course, it is unlikely that you will be able to sit on them, but it will be very possible to place flower pots, toys and other design elements.
The second most popular drawer is a small cabinet with doors. They are located at the ends of the balcony and are convenient for storing small items that are located on the shelves. Such a cabinet can be a built-in structure or a free-standing shelving unit.
The least popular are cabinets with drawers. They are more expensive and capricious in nature.
Any model can be purchased in a store, but it is much more effective (and cheaper) to make a box for the balcony with your own hands.
The simplest option would be to make a bench with a built-in drawer. This will be an ideal solution for a small balcony and will allow you to beautifully decorate a larger area.
Cabinets
The result of choosing a ready-made cabinet for a small balcony is always unpredictable. The issue is resolved with the help of custom-made furniture, available in a wide range.
Wardrobes, although they visually reduce space, are ideal places to store household items.
In the case of a balcony with an atypical configuration, built-in wardrobes can correct the situation. For example, on a long balcony, built-in wardrobes are placed against short walls.
Preparation
First you need to determine the installation location of the future creation. Of course, you can attach small wheels at the bottom, which will make it possible to roll the box along the floor, but such a solution will not be the best idea. The wheels may not be able to withstand the load, and no one will want to roll a heavy chest.
Don’t forget about the design of the room; new furniture should fit completely into it.
The balcony itself should be relatively warm and closed. Snow, water, and temperature changes will negatively affect the appearance of the product and the quality of the items stored in it.
When the location has been determined and agreed upon with the rest of the household, you can begin measuring the structure and calculating materials.
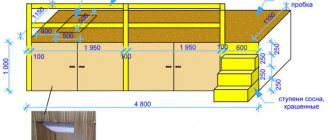
At this stage, making a drawing will be a rational action. This will help you better understand what and in what quantity you will have to buy.
When this point is passed, the material itself, consumables and tools for work are purchased.
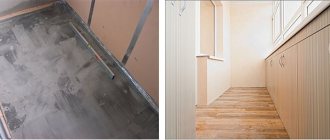
Clear the space on the balcony from old structures, if there are any, and from things.
Locker made of furniture board
When we arrived at the site, we saw the frame for the locker had already been completed. The customer installed it himself - the job stopped halfway. He asked us to do everything again. Then there would be holes left from the old nails. So People's Windows came up with another plan to convert the old locker into a new one.
We thought of a neat chest for storing camping equipment. Everything should fit here - my pot, grill for meat, skewers, folding table. That's what the customer wanted.
Also, make me a smooth lid. I want to sit, smoke and chat on the phone with friends. Yes, you need a place to put your laptop.
All the owner's wishes were fulfilled.
We made the top cover from solid wood 18 mm thick. This locker lid is smooth. It is convenient to move the fifth point. This chest is very similar to a shop in terms of functionality.
As a result, this furniture can accommodate one person of any weight and build.
We made and installed a folding table close to the seat.
The laptop will be located here. The table was set at a height for a specific person.
All the customer’s wishes were taken into account. He was pleased and undoubtedly spends more time on his favorite balcony.
Materials and tools
In order to make a box for a balcony, they usually select edged boards 25-30 millimeters thick for the walls of the box, wooden beams 40*40 millimeters, which are designed to ensure structural strength, and piano hinges that will secure the seat cover.
For finishing you will need foam rubber, leatherette or artificial leather. You can use thick fabric or fur (if the bench will not be subject to severe damage).
To save money, you can use strategic reserves from your garage or cottage.
Among the tools, you need to stock up on a tape measure and ruler, a pencil or marker, a hacksaw or jigsaw, a drill, a screwdriver or a set of screwdrivers, and a building level. Depending on the material and design of the future creation, the set may vary.
The consumables you will need are self-tapping screws.
Conditions for proper storage of various products
To prevent vitamin reserves from deteriorating over the long winter, you need to try to provide them with optimal conditions. There is no universal solution here, they will all be different:
- Potato. It does not deteriorate at temperatures from +1 to +5 C. High humidity is unacceptable, it provokes the development of rot. Tubers are placed in boxes, trays or even nets in a layer no higher than 100 cm. An important point: darkening is necessary, otherwise the potatoes will begin to sprout.
- Root vegetables (carrots, beets, etc.). The optimal temperature for them will be from 0 to +2 C. Their skin dries out very quickly, so it is best to put the food in storage and sprinkle it with wet sand or sawdust.
- Red or white cabbage. It is well preserved from +2 to -1 C if you place it on shelves with the stalks up. Broccoli or cauliflower is not stored this way. They only need to be frozen, after cutting them into inflorescences.
- Garlic or onion. Dry completely and hang or lay in bulk. In the first version, the heads are woven into a kind of braids or folded into a net. The best temperature is from -2 to 0 C.
Instagram drevlev
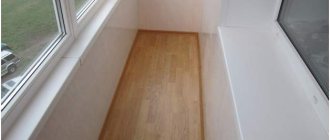
A box made of natural wood is well suited for storing vegetables.
Start of the process
The classic version involves the presence of a front and back wall, two side walls, a bottom and a top cover.
The process itself of how to make a box on the balcony is quite simple, and anyone, even a beginner, can carry it out. The main thing: take your time and do everything carefully.
To begin with, cut four bars that will become the base of the box. The sides, front and back parts are attached to them, the bottom and lid are installed.
Roller shutters
Such blinds smooth out temperature changes even in the case of an unheated balcony.
They have the following advantages: they can rise to any height, their installation does not take much time and is inexpensive, they go well with loft and hi-tech styles.
Drawer finishing
The lid, and all other parts of the box, can be left in their natural form. Just strengthen the wood with varnish or stain. This idea is well suited for almost any balcony decoration and will beautifully complement this space of the apartment.
But usually the box is decorated a little. These can be patterns or ornaments, themed stickers or drawings, burning or wood carving.
The upper part is upholstered with fabric or a pillow made of fabric with foam rubber. Often a small mattress is placed on top of the box.
Or you can simply sew small pillows, decorate them with colorful patterns and place them on top in any order.
Some owners paint the box with paint. It can match the color of the decoration of the balcony itself, making the mini storage room completely invisible, or add a bright accent spot to the loggia.
Drawers finished in decoupage style look good.
Having a vertical backrest will make the storage box even more comfortable to sit on.
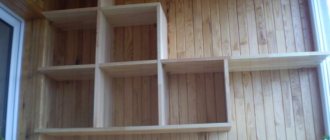
Shelving
The least complex system consisting of open shelves. Craftsmen make such shelves from chipboard or MDF panels.
Unlike cabinets, due to the lack of side partitions, a room with shelving does not feel cramped.
It is better to store things on racks in packaging, which will save them from dust and give the balcony greater aesthetics.
Open shelves are often covered with curtains to protect things from contamination and to decorate the room.
Flower boxes
A flower box on the balcony will be an excellent reason to create a small cozy flower garden or micro-garden on the balcony. They can be floor- or wall-mounted, and can also be installed outside the balcony.
Flower boxes for the balcony must be durable and resistant to moisture.
The most commonly used material is wood or plastic.
But plastic structures have a number of significant disadvantages. They can become deformed under the influence of sunlight and create a greenhouse effect for plant roots, which negatively affects flowers.
Wooden boxes are more environmentally friendly; they allow moisture and air to pass through perfectly, providing plants with the necessary conditions for growth and flowering.
In addition, making them with your own hands is not at all difficult. Especially after creating a large box.
Drainage holes are made at the bottom of the flower boxes. To prevent excess water from falling onto the balcony, the boxes are placed on special pallets.
After the new place of residence for the flowers is ready, a layer of fine crushed stone or broken brick is poured there, a cushion of peat is made on top, which perfectly absorbs excess water and releases it in dry weather, then earth or an earthen mixture is poured directly, whatever more likely.
Petunias, marigolds, nemesia, begonia, ampelous and climbing plants are most often planted as flowering inhabitants of the balcony.
Photos of the box on the balcony will show the beauty of such a perfect, simple decoration.
Storage methods
So how can you preserve vegetables in winter in an apartment at home? You should choose the right storage method and follow the recommendations.
In clay
To store in clay you will need the following: box, clay, water, cling film.
- You must first prepare the solution by mixing water with clay until smooth and leave for 3 days to infuse until it reaches the consistency of sour cream.
- Lay a film on the bottom of the box and place the fruits without touching each other.
- Next, fill it with clay and let it dry, in this order the box is filled to the top.
In sand
Sand retains moisture well and maintains temperature conditions. What you need for this is a box, sand and water. The sand needs to be moistened with one liter of water per bucket. Let's get to work.
- Pour a 3-4 cm layer of sand onto the bottom of the box, then put the carrots without touching each other, and again a layer of sand.
- Continue alternating until the box is full.
You can add 1% slaked lime or ash to the sand; such an additive has an antiseptic effect, preventing the spread of fungi and bacteria.
In the moss
On a note. Moss is able to retain carbon dioxide in the box in the required amount for carrots.
- The harvest should first be placed in a cold place for a day.
- Next, take the box and sphagnum moss, and lay it out in layers to the top of the container.
Detailed instructions on how to store carrots in moss can be found here.
In the sawdust
For such storage, only fresh sawdust is used, and last year’s sawdust may contain microbes and bacteria that will spoil the root crop. It is laid in layers, as in the previous versions.
You will find more information about storing carrots in sawdust here.
In onion skins
The husk releases essential oils that have a detrimental effect on bacteria, preventing rotting of the fruit. The laying sequence is similar to storage in sawdust.
In a saucepan
You can use large enamel pans; this option will also allow you to preserve carrots for a long time.
- The root crop needs to be washed, dried and the tops trimmed.
- Place in a vertical position, cover with a napkin and a lid on top.
Photos of boxes on the balcony
Please repost