For the cellar and living quarters, different equipment and heating modes are used. Some features need to be taken into account:
- Temperature distribution. In underground storage facilities it can vary significantly depending on the height, even within a small space.
- Room volume. The cellar is usually small; this must be taken into account when locating the heater and sensors.
- Humidity. A high rate may affect the operation of some thermostat models.
- Power. To heat a small area, you should not use a heater that is too powerful - this is uneconomical.
These parameters influence the choice of the heater itself, and then the thermostat for it. Despite the technical differences, the operating principle of the devices remains the same.
How to properly make a cellar on the balcony
The key to successfully preserving vegetables for a long time is the presence of high relative humidity and a stable temperature closer to zero. Only in this case the vegetables will not dry out and rot. People who have their own private houses are luckier, because in the cellar the required regime is observed on its own. It is also possible to store vegetables in the apartment if there is a balcony cellar.
A thermal container or cellar has close to ideal conditions for vegetables in the apartment.
People who live on the first floor can actually make their own cellar right under the balcony. A cellar on the balcony is a good chance for people who do not have their own basements.
Conditions for storing food on the balcony
It may seem to you that creating a cellar on the balcony is very difficult. To do this you need to spend a lot of effort and money, but in reality everything is quite the opposite.
Do-it-yourself heating cabinet
There are two types of balcony cellars:
- Already ready (that is, purchased);
- Homemade.
Purchased balcony cellars are also divided into subtypes:
Photo:
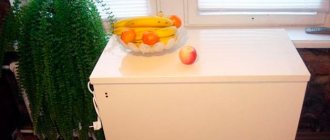
A thermal cabinet is a steel cellar structure that has a thermostat and a ventilation system. Holds up to 300 liters.
A flexible thermal container is a bag made of water-repellent fabric. The bag is insulated with synthetic padding and has wire electric heaters.
Mini storage for vegetables
Ready-made cellars are available in two types: hard and soft. They come in different sizes and models, and are designed for use on an unheated balcony or loggia. Since different models have technical differences, it is better to find out details of operating conditions from the product instructions.
Hard cellar
A cellar with a rigid body is a plastic, metal, painted or chrome-plated container, from the appearance of which you cannot guess that vegetables are stored inside. Cellars with a capacity of 100, 200 or more liters are produced, and you can choose a product for a small or large balcony, for a family of 1, 2 or more people.
The cellars are equipped with built-in thermostats that maintain a constant temperature in the heating cabinet, and most models provide forced ventilation. The ventilation system eliminates the formation of condensation inside the container, which means that vegetables do not spoil due to excessive humidity and stagnant air. Products can be stored in hard cellars both in winter and summer.
The cellars operate from a 220 V electrical network, power consumption is economical and safe. During a temporary power outage, most devices maintain the temperature inside the storage unit for some time.
Flexible cellar
Flexible cellars are similar in appearance to a spacious bag. Their main advantage is mobility: at the end of the season, the storage can be easily rolled up and put on a shelf. The cellar is made from waterproof fabric and soft insulation, mainly padding polyester. Thin heating electrodes are built into the fabric, which, when heated, increase the temperature inside the vegetable storage device.
The flexible cellar is powered from the mains and, according to manufacturers, can be used on an unheated balcony at temperatures down to -40C. Some models have a screen outside that informs about the temperature inside the storage. When it drops below the programmed limit, the heating turns on automatically, and when the upper temperature limit is reached, the heating system turns off.
The disadvantage of flexible containers is that, unlike their rigid counterparts, they are not intended for storing vegetables in the summer.
How to make it yourself
To consider the question of how to make a cellar for a balcony with your own hands, you need to start with the simplest option. After you figure it out, you need to add elements of a more complex design.
You can always find a place on the balcony to put a balcony cellar. The balcony partition, fence and facade of the building are used as a supporting side during the construction of the cellar.
To build any basement on the balcony you need to prepare:
- hammer;
- wooden blocks (20 by 40 or 40 by 40 mm);
- saw;
- screwdriver or screwdriver;
- pencil;
- drill;
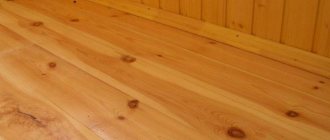
- furniture board;
- chipboard board (thickness 16-20 mm);
- self-tapping screws;
- nails;
- furniture edge;
- roulette;
- furniture hinges;
- thermal insulation materials (foam rubber, polystyrene foam, mineral wool, sawdust).
Don't forget to prepare the tools you need to handle the necessary materials to install the cellar. For insulation, polystyrene foam or rigid polystyrene foam, which can withstand mechanical loads, will help.
Thermal container for food storage
A thermal container is a special box in which all the conditions inherent in a real cellar are created.
Such a box can be mobile, that is, it can be moved to a convenient place on the balcony, or maybe stationary, built between the walls.
Both options are made according to the same principle, and the diagram of such a box looks like this:
1 - This is the body of the box. It can be made of plywood, chipboard or boards.
2 - The second layer is insulation - it is used as polystyrene foam or foil-coated polyethylene foam, laid in several layers.
3 - Additional insulation will be provided by the air gap between the insulation and the inner box.
4 - Drawer for vegetables with ventilation holes.
5 - A safe, well-insulated heater is installed between the inner drawer and the bottom of the cabinet.
This thermal container is intended mainly for potatoes or other root vegetables. The optimal temperature for storing them is from 3 to 7 degrees Celsius, which is impossible to achieve in Russian winters on an unheated balcony without additional heating of the storage, which is why a heater with moderate power is installed.
In the summer heat, the insulation, on the contrary, will maintain a cool temperature inside the box. If necessary, you can even lower it by placing ice inside in an airtight container or package.
There is nothing complicated in installing such a cellar, and if you have the tools and materials for its manufacture at home, then it can be assembled in one day.
Tools and materials
To make such a balcony thermal container-cellar, depending on the chosen design and size, you will need the following materials:
- Thick plywood or chipboard for the outer shell. If the cellar is stationary, then this material will be needed for the front wall and top cover of the product.
- For the inner box, you can use thin boards or plywood.
- Wooden blocks for the construction of the frame on which the sheathing material will be attached.
- Insulation - polystyrene foam, polyethylene foam or other dense materials.
- Electric heater. It is quite possible to use infrared film as it, since its power will be quite sufficient to achieve the desired temperature. For a small container volume, even a regular 40 or 60 W light bulb may be suitable, but in this case it is advisable to install an incandescent regulator.
- Thermometer for monitoring the temperature in the cellar.
- To assemble all the materials into a common structure, you need to purchase self-tapping screws, hinges for securing the lid, nails, anchors for a stationary building, and you may need metal corners.
- Polyurethane foam for fastening foam sheets together. It can also serve as insulation if you fill the space between two layers of plywood with it, thus making a homemade sandwich panel.
- Among the tools you need to have on hand is a jigsaw or hacksaw, pliers, screwdriver, screwdriver, hammer, drill and drills of different sizes for wood and, if necessary, for concrete.
Having prepared everything necessary, we begin work on making a thermal box for storing vegetables.
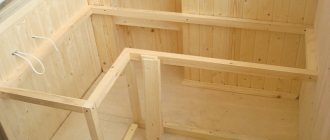
Cellar assembly
Thermal cabinet
If the product is “mobile”, then the frame of the box is assembled from a block.
- The bars can be fastened together using metal corners.
- The bottom should be raised above the floor of the balcony, so two bars are attached to it, closer to the middle, which will not only create an air cushion, but also give rigidity to the structure.
- Next, insulation is installed. It is cut out in a size that corresponds to the perimeter of the planes between the bars. The insulation must have a thickness equal to the size of the block. To ensure that there are no cold bridges between the insulation and the bars, the resulting cracks are filled with polyurethane foam.
- Thin plywood is fixed to the bottom to cover the insulation. One of the heating devices is installed on top of it. Due to its small thickness and safe operation, infrared film is well suited for the box. They also create a “warm pillow” with the help of light bulbs, but in this case the volume of the box is reduced, since another lattice bottom must be installed on top of them.
- Then it will not be superfluous to line all internal planes with foil polyethylene foam. If a light bulb is used for heating, the bottom-grid is not covered with polyethylene.
- The gap between the lid and the frame of the box, on the side where the hinges will be installed, should also be covered with elastic polyethylene foam. After installing the cover, the strip of insulation material is secured with staples to both the box and the cover.
- It is recommended to make the inner box with ventilation holes on the side walls, in which the potatoes will be stored, removable. This will make it convenient to clean and dry it at a time when there are no vegetables in the cellar. This mini storage element is best made from boards.
In the case where the cellar is planned to be stationary, first markings are made on the walls of the places where the bars will be attached, that is, in this case the frame of the box will be completely fixed to the walls. Further work is carried out in exactly the same way as when constructing a mobile container.
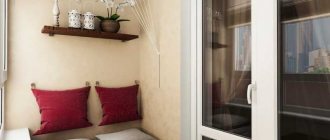
By the way, the top lid of the cellar can also be used as a seat for a balcony sofa, if the design is reliable enough for this. To do this, you need to put a mattress sewn to its size on top.
Features of a cellar for a balcony on the first floor
The owners of the apartments located on the ground floor do not even realize how lucky they are in terms of installing a cellar. Making storage on the balcony for vegetables with your own hands is very easy.
It’s possible to create a cellar on the balconies of the first floors if you use our recommendations.
You need to start building a cellar with an ordinary foundation made of strips (this is only possible if there is no distance between the balcony and the foundation of the house). For the foundation you need to dig a ditch. The height is 30-40 centimeters and the same width.
When pouring the foundation, consider the thickness of the house wall.
The bottom of the ditch under the foundation must be compacted tightly, and then lined with roofing felt, which will provide you with waterproofing. We arrange the reinforcing banding on top of the roofing felt, then pour in the concrete and leave it to harden.
When the concrete has completely hardened, you need to cut a hatch in the floor. The area is 70 by 70 centimeters. The well-known grinder, which is equipped with diamond and metal discs, will help you do this.
You need to attach a metal corner to the hatch and insulate the lid in advance. If there are any gaps left, polyurethane foam will help you.
We cover the bottom of the cellar with roofing felt in several overlapping layers, weld the joints with a gas-based burner. A pillow made of ASG is installed on the roofing felt; the thickness should be at least 5 centimeters.
The walls for the cellar on the balcony should be brick, the thickness should not exceed the thickness of the brick. It is important not to forget about ventilation. Ventilation is installed in the upper corner of the wall.
You need to know that when insulating, you need the appropriate temperature not only of the cellar, but also of the balcony floor.
What does the sensor show?
But how will this device behave in a cellar thermostat circuit? We need to figure this out. Let's say absolute zero in the room is 273 degrees below zero Celsius. It's 0K, so you'll have to do a little conversion. It is in conditions where the temperature is 0 K that the sensor will not produce a signal.
As soon as there is a 10K increase in temperature, the voltage will increase by 0.01 volt. And this will happen with every increase in temperature. But you need to take into account that such temperatures do not exist, and 0 degrees Celsius is 273 K. Normal conditions, according to all textbooks, are 25 degrees Celsius, or 298 K. By performing a few simple steps, you can determine that at a temperature of 25 degrees Celsius, the signal pin of the sensor will have a voltage of 2.9815 volts.
The temperature range in which the device operates lies in the range -40..+100 degrees Celsius. Moreover, its main characteristic is linear in this range - this facilitates the calculation of voltages and temperatures. And do not forget that absolute zero is 273.15 K. In accurate calculations, even hundredths of values should not be neglected.
The principle of operation of the cellar thermostat
For general information, you need to understand that the thermostat in everyday life is used in different devices: from a refrigerator to an iron and a soldering iron. The process of operation of the thermostat itself is very simple, the setup of the work is primitive, and as a conclusion there is a simple electrical circuit.
The most complex and time-consuming process in creating “simple” thermostats is bringing them to the required temperature.
To determine the characteristics of the temperature points on the scale, you must first immerse the sensor with ice that melts (this is approximately zero degrees Celsius), and then sharply into boiling water (this is 100 degrees).
Sensor calibration
For beginner radio amateurs, the most difficult thing will be setting up the device, namely calibrating the sensor and microcircuit. To do this, several steps are performed - the reading device is first immersed in water whose temperature is 0 degrees, then in boiling water. To calibrate the regulator, you need to measure intermediate values and put the appropriate marks.
It is possible that before connecting the thermostat you will need to carry out the setup procedure several times. But in order not to bother with making and setting up the device yourself, you can buy a ready-made device and install it in the cellar without any problems. Most of the sensors are designed to work with microcontrollers; their output is a digital signal, which is transmitted via a bidirectional single-wire 1-WIRE interface. This allows you to design quite complex devices, for example, multipoint thermometers - these are devices that allow you to measure temperature in several rooms at once.
Schemes for smooth temperature control in the cellar
To preserve vegetables in the basement, you must constantly maintain the correct temperature. If the temperature is elevated, the vegetables will sprout and rot; if the temperature is low, they will freeze and spoil.
You also need to regulate the power of the heater so that you can pre-set the desired temperature. The proposed design is also designed to maintain temperature in the basement.
| City | Price |
| Novosibirsk | 7530 rub. |
| Moscow | 6300 rub. |
| St. Petersburg | 6800 rub. |
Mini storage for vegetables
Ready-made cellars are available in two types: hard and soft. They come in different sizes and models, and are designed for use on an unheated balcony or loggia. Since different models have technical differences, it is better to find out details of operating conditions from the product instructions.
Hard cellar
A cellar with a rigid body is a plastic, metal, painted or chrome-plated container, from the appearance of which you cannot guess that vegetables are stored inside. Cellars with a capacity of 100, 200 or more liters are produced, and you can choose a product for a small or large balcony, for a family of 1, 2 or more people.
Thermal cabinet
The cellars are equipped with built-in thermostats that maintain a constant temperature in the heating cabinet, and most models provide forced ventilation. The ventilation system eliminates the formation of condensation inside the container, which means that vegetables do not spoil due to excessive humidity and stagnant air. Products can be stored in hard cellars both in winter and summer.
The cellars operate from a 220 V electrical network, power consumption is economical and safe. During a temporary power outage, most devices maintain the temperature inside the storage unit for some time.
Flexible cellar
Flexible cellars are similar in appearance to a spacious bag. Their main advantage is mobility: at the end of the season, the storage can be easily rolled up and put on a shelf. The cellar is made from waterproof fabric and soft insulation, mainly padding polyester. Thin heating electrodes are built into the fabric, which, when heated, increase the temperature inside the vegetable storage device.
The flexible cellar is powered from the mains and, according to manufacturers, can be used on an unheated balcony at temperatures down to -40C. Some models have a screen outside that informs about the temperature inside the storage. When it drops below the programmed limit, the heating turns on automatically, and when the upper temperature limit is reached, the heating system turns off.
The disadvantage of flexible containers is that, unlike their rigid counterparts, they are not intended for storing vegetables in the summer.
Reviews
Alexander, 35 years old.
I installed this miracle thing like a cellar in my apartment on the balcony. The wife is delighted. It takes up very little space, but has a lot of benefits.
Kirill, 43 years old.
I decided to design a cellar for the balcony myself (I always lacked space to store vegetables). At first I thought it was difficult, like I couldn’t handle it. But everything worked out. Now I don’t understand why my hands didn’t reach him earlier.
Oksana, 29 years old.
I saw a cellar on my friend’s balcony. She praised him very much. I thought I needed to buy one for myself. But the prices are higher than I expected.
If you find an error, please select a piece of text and press Ctrl+Enter.
Warm floor
This is the most common type of cellar heating when using stove heating. The idea is that the cold air generated in the house is redirected into pipes on the floor. To use such heating, you need very well-made waterproofing (if the water level is high enough and flooding is possible) and thermal insulation (mineral wool, expanded polystyrene).
say :
raks: In severe frosts the cellar freezes; there used to be an 800 W oil radiator. I stood at minimum, ate very little and worked all winter. Oil leaked at the junction of the heating element and the radiator, now I’m thinking about what to replace it with. At my former job, one of the automatic telephone exchanges was in a thermal booth, and ceramics were installed there. convector, I always set it to minimum and it fried this little room up to +23.
Shurhenchik : It’s better to insulate, then less energy will be spent on heating. And the air conditioner has the highest efficiency, but you just need to put it the other way around, with the outer unit facing inward. Only then you will get a heat pump.
Features of using a thermostat in the cellar
For the cellar and living quarters, different equipment and heating modes are used. Some features need to be taken into account:
- Temperature distribution. In underground storage facilities it can vary significantly depending on the height, even within a small space.
- Room volume. The cellar is usually small; this must be taken into account when locating the heater and sensors.
- Humidity. A high rate may affect the operation of some thermostat models.
- Power. To heat a small area, you should not use a heater that is too powerful - this is uneconomical.
These parameters influence the choice of the heater itself, and then the thermostat for it. Despite the technical differences, the operating principle of the devices remains the same.
Choosing a household balcony heating cabinet
A hanging container (a thermal box or a thermal cabinet that has a thermostat), invented by compatriots, is used in unheated rooms for seasonal storage of canned vegetables, root vegetables, and individual large fruits and vegetables.
To maintain the desired temperature, an electric heater is used, which is located around the entire structure; there is also a thermally insulated housing with an air gap.
You may also find the material on choosing universal cabinets for your balcony useful. Find out how to choose your ideal option here: https://homeli.ru/komnaty/balkon/tumby-na-balkon.
To monitor and regulate the temperature, there is a sensor with a thermostat inside the thermal container.
Today, many manufacturers offer thermal containers with different technical characteristics, which can be selected depending on preference.
Balcony heating cabinets for preserving agricultural products are mainly produced in Russia. Thermal cabinets allow you to maintain the required climate inside at extremely low temperatures.
In addition to wardrobes, clothes dryers can also be placed on the balcony. You will learn about what types there are and how to choose them from our material: https://homeli.ru/komnaty/balkon/sushilka-dlya-belya-na-balkon.
The most common models of heating cabinets:
- The winter heating cabinet model TBPZ-140 has dimensions of 60x50x80 cm. Stores food with outdoor temperatures from -35 ˚С to +5 ˚С. The temperature adjustment inside the oven varies from 2 ˚С to 10 ˚С. It is used seasonally, in the cold season, as it only works for heating. Winter models of the heating cabinet can have a capacity of 105 l, 145 l, 185 l, 245 l, 300 l, 365 l.
- The year-round heating cabinet model TBPK-240 has dimensions of 1000x500x850 mm. The temperature control inside the oven varies from 2 ˚С to 10 ˚С, regardless of the time of year, as it has a heating mode and a cooling mode (refrigerator). Operates at -30 ˚С to +35 ˚С. Year-round heating cabinets can have a capacity of 145 l, 185 l, 305 l, 245 l.
- The year-round vertical heating cabinet, manufactured by Predictor in Novosibirsk, has dimensions of 120x85x50 cm. The inside of the heating cabinet is lined with galvanized steel. The heating cabinet is equipped with a temperature regulator, with mode stabilization up to +2 ˚С at ambient air temperatures ranging from -40 ˚С to +40 ˚С. There are models with a partition and a cooling mode with a capacity of 365 l, 145 l.
- The dismountable heating cabinet with forced ventilation, manufactured by Metles, Moscow, has dimensions of 79x75x41 cm. Forced ventilation ensures uniform distribution of air and temperature inside the heating cabinet. The machine stabilizes the indicators at the level of +2 ˚С to +9 ˚С (when it’s down to -39 ˚С outside). Thermal cabinets from this manufacturer have models with a removable movable partition. Thermal cabinets can have a useful volume of 147 l, 150 l, 174 l.
- The balcony heating cabinet model Pogrebok-200 with forced ventilation manufactured by Metles, Moscow, has dimensions of 82.5x78x40 cm. The machine stabilizes the readings at the level of +2 ˚С to +9 ˚С (when it’s down to -39 ˚С outside). Cellar-200 from this manufacturer has models with a removable movable partition, which can be used to divide the space of the heating cabinet into sections.
The principle of operation of the thermostat
The essence of the device is to control the heating element. The temperature control value is set. If the air in the room is colder than required, the sensor detects this and the device turns on the heating. When the specified level is reached, it turns off.
On a note. Most modern thermostats are electronic. A mechanical thermostat is also suitable for a cellar, but in recent years electronic models have become available that offer more functionality.
Thermostats with an air temperature sensor for the cellar require not only the correct selection of the device, but also its placement.
Types of cellar heating
There are two ways to warm up the cellar in winter:
- According to water heating technology - radiators, gas or electric boilers. In this option, the air is heated by the boiler. The advantage of such a system: the availability of hot water at any time of the day or night.
- Using stove heating technology - potbelly stoves, stoves. The advantage of the system is its economical placement (potbelly stoves require little space). Additionally, you will need to create a hood (chimney) with the required draft force.
How to best arrange equipment
When installing the sensor, you should proceed from the volume of the room and the selected location for storing supplies:
- Next to the grocery shelves. The main task is to control the temperature in this area.
- When vegetables and canned foods are evenly distributed, a few centimeters from the floor.
- At some distance from the heater. Both too close installation and a long distance can be harmful. In the first case, too small an area will be controlled; in the second, regulation errors are possible.
If heating elements are used in spacious vegetable stores, you need to distribute them evenly. For rooms with an area of up to 5-6 square meters, one located in the center is enough.
Infrared heating element for home heating cabinets, balcony vegetable stores (cellars).
You have made an insulated box or box - place the “Cellar” in it and connect it to 220V.
An electric heating element with “reduced” heat generation, especially for long-term operation in home “cellars”.
A temperature sensor on a 40cm cable is placed inside the box at a distance from the heating plate (for correct operation of the thermal stabilization system). The digital thermal switch and sensor are programmed to maintain a thermal regime of approximately +4°C.
- according to the degree of protection against water access - IPХ0;
- in terms of operating temperature - low temperature;
Recommendations for placement:
1. The plate is fixed and placed so that the heat from it is easily removed and distributed evenly throughout the volume of the thermobox. Placement vertical or horizontal (suspended from above; laying flat on the bottom and covered with food is not recommended). The heater is installed at a distance of 2-5 cm from the walls of the box (you can place a couple of wooden blocks vertically).
There should not be a situation where the plate is “insulated” on all sides (this applies to heaters from any manufacturer):
- on one side it is completely (the entire surface) “covered” (pressed) with insulation;
- on the other hand, objects are pressed close to it,
Otherwise, heat will not be transferred to the internal volume of the box, and the temperature of the heater itself will begin to accelerate (the foam insulation may melt and damage the thermostat board).
2. The temperature sensor is placed at the maximum distance from the plate, on objects that are heated.
3. To reduce heat loss from the thermal box (especially in cold weather), the inner surface of the box, in addition to insulation, is covered with foil (or foamed polystyrene with one-sided foil). Then the heat will be reflected into the inside of the box - the rate of heat transfer through the enclosing structure (box walls) is reduced. If it is not possible to cover the entire volume of the box with foil, then at least in the heater zone - to reflect heat from the walls of the box into the internal volume.
Selecting a thermostat
You should select a regulator model after measuring the cellar area and humidity level. The devices differ according to the following characteristics:
- range of read temperatures;
- information display – display or set of indicators;
- protection from external influences - moisture and dust particles;
- maximum range of the sensor.
If high technology is not needed, but only functionality is important, you don’t have to buy a device, but make it yourself.
Preservation storage conditions
First, a little theory. The fact is that storing different types of preserves requires special preparation and storage conditions. Taking into account the fact that all recipe recommendations are followed during cooking, and the dishes (glass or metal jars) are sterilized and tightly closed, the following temperature requirements are imposed on canned food:
- fish – from 0°С to +15°С;
- meat – from 0°С to +20°С;
- mushroom – from 0°С to +15°С;
- vegetables (fermented and salted) – from 0°C to +25°C;
- fruits and berries – from 0°С to +25°С.
Temperature indicators for pickles and starters stored in barrels, others - from -1°C to +4°C. Therefore, on an insulated balcony it is recommended to keep only products in glass and metal containers specifically designed for preservation. The humidity in the room should not exceed 75%, and regular ventilation is also a mandatory requirement (which is easy to do on the balcony).
Homemade twists are the best snack for the New Year's table
In addition to temperature restrictions, storage periods must also be observed. For example, it is better to sell home-cooked meat and fish within the next year, while pickled gherkins or salted saffron milk caps will easily survive 3 years.
Seaming machine - an easy to use tool
Although new-fangled packaging for long-term storage of various products appears on the market every now and then, the best tableware remains glass jars and bottles made from a special type of glass that is resistant to high temperatures. The standard volume of cans is from 0.35 l to 1.2 l, but 2- and 3-liter containers are often used for pickling cucumbers or sealing semi-finished vegetable products. Products are sealed with tin lids using a seaming machine.
Homemade thermostat
When making a temperature regulator for a cellar with your own hands, you can use a bimetallic sensor. However, mechanical heater interruption is less reliable than electronic switching. You can assemble a thermostat using a regular microcircuit.
Depending on the imagination of the creator and the scope of tasks of the future thermostat, a different set of components will be required. However, several main ones can be identified.
Materials for creating a thermostat
When designing a working device, the following elements are usually used:
- Zener diode - a diode that passes current one-way;
- thermal resistor - resistance changes depending on temperature fluctuations;
- variable resistor – regulates the temperature.
Setting the device to the response temperature manually is a difficult step. You can make it easier by purchasing a ready-made sensor. With such a cellar air temperature sensor, a digital signal will be sent to a microcontroller.
Room temperature control
To maintain the optimal temperature using a homemade or factory-made device, you can choose several methods:
- Turning the heater on or off. The method is simple and effective, but it is not always suitable. Errors in adjustment can cause temperature fluctuations that are dangerous for stored supplies.
- Operating mode control. Either the degree of heating of the element or the speed of the cooler (when using a fan heater) changes.
Usually the first method is used - devices with a similar operating principle are cheaper and more reliable.
Thermostat circuit
An electrical diagram will help you fully understand the operating principle of the device or assemble it yourself. Examples can be found in the technical manuals of simple thermostats, for example, LM335. Despite the fact that the device was developed quite a long time ago, the circuits remain working. It is enough to take them as a basis and supplement them with the necessary components.
The electrical circuit diagram is a basic circuit; most likely, if you design it yourself, other elements will be added to it, for example, devices for indicating operation. If you understand the operation of the components and have sufficient knowledge of radio mechanics, you can upgrade the system, for example, install a thermal relay to turn on the heater.
Thermostat PCB
The device can be assembled on a printed circuit board. Material – one-sided fiberglass. The board is placed in any suitable case, the thermistor is taken out. Relay actuation is calibrated using resistances R2 and R1, selecting the angle by rotating the knob.
Comparator operation
On the thermostat diagram you can see the key element LM311 - a comparator that has direct and inverse inputs, as well as two outputs. It works as follows:
- The voltage at the direct input is higher - the output level is set high, the transistor or relay turns on the heating element.
- The voltage is higher on the inverse - the low level is set, the heating is turned off.
The temperature sensor is connected to the inverse input, so the voltage across it will increase as the temperature rises.
How to connect the device to the heater
The thermostat must be connected to the heating device according to the diagram specified in the technical documentation. Usually there should be no difficulties, since all possible options are taken into account.
If the device is homemade, you need to make sure once again that the design is reliable and made correctly. Elements must be carefully protected from moisture, which cannot be avoided in the basement. Particular attention should be paid to the quality of soldering and the absence of short circuits.
The correct choice or assembly of a thermostat will allow you to forget about the problem of hypothermia or too high a temperature in the cellar. It is enough to set control values and monitor the state of the device, the device will do the rest.
Electric heating
This is the most budget option, used much more often than heated floors or boilers with stoves. To ensure the operation of electrical appliances, electrical wiring insulated from moisture is required in the cellar.
In the video below you can see a simple example of how to heat a cellar in winter.
As for the devices themselves, they can be very different. For example:
Convector heaters - suitable for large cellar areas, mounted on the wall or placed on the floor. Their heating speed is high, they are silent, easy to install and do their job well even in severe winters.
The disadvantage is high power consumption.
Infrared heaters - heat only the space in front of you. Warming up the entire cellar requires a lot of time and a correspondingly large amount of electricity. They are silent, durable, safe to use, and reliable.
Oil heaters compete with convector heaters in terms of frequency of use when heating a cellar without the use of electricity. But, using them is not so easy. Initially, the oil in the radiator is heated, and only then will it be able to transfer heat to the room. In terms of time, it's a long time. Meanwhile, such heaters are cheaper than convector heaters, heavy, silent, and easy to install.
Thermostats with heater (thermostats) for balcony cellar, drawer
You can store vegetables in winter with success and at low cost on a balcony or loggia in a box - a balcony cellar.
Typically, such a cellar is an insulated box with a volume of 300-500 liters, in the lower part of which there is a heater. The heater is controlled by a thermostat (controller).
We manufacture ready-to-use thermostats for balcony cellars in several modifications. They differ in the types of thermostats and heaters.
The devices do not require special installation. You simply place the heating elements at the bottom of the container under the grille between two metal plates, or install a fan heater and place the sensor in the most “critical area”. The thermostat can be left on the balcony (it works in cold weather) or brought indoors.
Instructions for making a “cellar” and using the thermostat are attached.
In addition, you can order a thermostat individually, for example, for a large box on the balcony with a higher power heater.
Infrared heating element for home heating cabinets, balcony vegetable stores (cellars).
You have made an insulated box or box - place the “Cellar” in it and connect it to 220V.
An electric heating element with “reduced” heat generation, especially for long-term operation in home “cellars”.
A temperature sensor on a 40cm cable is placed inside the box at a distance from the heating plate (for correct operation of the thermal stabilization system). The digital thermal switch and sensor are programmed to maintain a thermal regime of approximately +4°C.
- according to the degree of protection against water access - IPХ0;
- in terms of operating temperature - low temperature;
Thermostat for cellar on balcony, vegetable storage box
We manufacture and supply box thermostats in two versions:
- Temperature regulator TRO-02.S (with a contactless output device) with 2 heating elements of 250 W each, connected in series. The total power is 125 W, heating elements heat up at a quarter of their power, work for a long time, and are fireproof.
- Temperature regulator TRO-02.R (with relay) with 250 W fan heater.
You set the temperature using the adjustment knob on a scale in a range, and control the thermostat by the LED that lights up periodically.
The length of all cables (sensor, heater, between heating elements) is 2 m.
Basic technical characteristics of the thermostat
- Power supply 220 V
- Temperature control range from 0 to +10°
- Heater type (selected when ordering): – two heating elements with a total power of 125 W (separated by a cable by 2 m); – fan heater with a power of 250 W (heating element and fan) and an air flow of 160 cubic meters per hour
- Overall dimensions: heating element - 220 x 85 x 13 mm; fan heater - 220 x 120 x 130 mm.
Temperature regulator TRO-02.S with two 250 W heating elements spaced 2 m apart - 1960 rubles. Cost including mailing: – prepayment (to Sberbank Visa card or account) – 2290 rubles; – cash on delivery with payment upon receipt of the parcel, taking into account all postal fees – 2576 rubles
Temperature regulator TRO-02.R with fan heater 250 W – 2350 (2780) rub.
Temperature controller LM335
Among all thermostats, the cheapest and simplest is the LM335. It has several modifications - with the designations 235, 135. In the marking, the very first digit indicates the scope of application:
- The number “1” means that the device is intended to work in devices for military-industrial complex.
- The number “2” means the element is used in industry.
- “3” – for installation in household appliances.
The appearance of the thermostat is a TO-92 housing. The internal circuit contains 16 semiconductor transistors. Sometimes sensors can be found in the SO-8 housing, but the differences are only observed in appearance - the internal circuit remains unchanged.
The operating principle is somewhat similar to a zener diode. The stabilization voltage directly depends on the temperature. When the temperature increases by 10 Kelvin, the stabilization voltage increases by 10 mV. In this case, the operating current of the device is 0.45-5.0 mA. If the maximum current value is exceeded, the sensor will overheat and it will measure the temperature of its body.
Digital thermostat for balcony cellar, drawer
A digital thermostat for a balcony cellar or drawer will allow you to control
and maintain the set temperature in your thermal container.
Two versions:
- Thermostat with 2 U-shaped 250 W heating elements connected in series. The total power is 125 W, heating elements heat up at a quarter of their power, work for a long time, and are fireproof.
- Thermostat with 250 W fan heater. The fan heater is a heating element and a fan in the form of a wire module, see photo.
We use controllers from Elitech CTE-102 or ECS-961neo as a thermostat. For this application, the technical capabilities of the devices are approximately the same.
The length of all cables (sensor, heater, between heating elements) is 2 m.
By special order or independently, the lengths can be increased.
When the power is turned off, all settings are saved.
Basic technical characteristics of the thermostat
- Power supply 220V
- Temperature measurement and control range from -20 to +50°C
- Hysteresis (difference between the temperature of turning off and turning on the heater) - from 1 to 15°C
- Heater type (selected when ordering): – two heating elements with a total power of 125 W (separated by a cable by 2 m); – fan heater with a power of 250 W (heating element and fan) and an air flow of 160 cubic meters per hour
- Overall dimensions: heating element - 220 x 85 x 13 mm; fan heater - 220 x 120 x 130 mm.
Thermostat with 2 heating elements 250 W – 2160 rub. Cost including postage – 2447 rubles
Thermostat with fan heater 250 W – 2530 (2957) rub.
Payment and delivery
You can buy a thermostat for a balcony cellar in our office or place an order with delivery throughout Russia, see How to buy.
We send goods by mail or transport companies after payment. We guarantee delivery.
It is possible to send the parcel by mail cash on delivery with payment upon receipt. This method is more expensive, and we send them goods with a total value of up to 2,000 rubles.
If you have any questions, please write or call. , request a call back (if busy, please call back).
Russia, Novosibirsk, st. Russkaya, 39, of. 517.
Thermostat (Ratar-02.p/p with heater) for a balcony cellar
The thermostat consists of an industrial regulator Ratar-02.p/p.N2 and a heater.
In addition to the heaters discussed above, we can connect others to the regulator at your choice with arbitrary cable lengths. For large boxes and vegetable storage on the balcony, you can use several 250 W heating elements and a fan or several 250 or 500 W fan heaters (with 2 heating elements).
Ratar-02.p/p.N2 with sensor – 2998 rub.
Heating element 250 W – 270 rubles; fan heater with heating element – 950 rubles; fan heater with 2 heating elements – 1240 rubles; fan Sunon” DP-200A – 540 rub.
Order examples: thermostat TRO-02.S with 2 heating elements; thermostat ECS-961neo with fan heater.
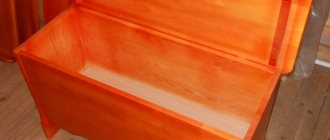
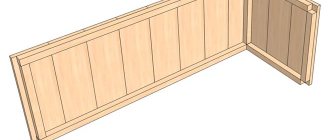
Step-by-step guide to making the inside of a vault
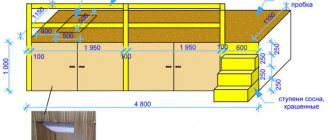
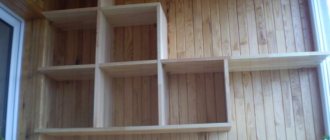
- Mark the measurements of the width and length of the future container on the furniture board and cut it.
- Assemble a box of the desired size and shape from the cut out parts - this is the outer box of the vegetable storage.
- Cut and assemble the second box from moisture-resistant material - the inner body of the cellar.
- Attach a sheet of fiberboard or plywood, as well as boards treated with machine oil, to the bottom of the container using self-tapping screws.
- Cover the inside of the outer box with insulation.
- Cut a lid for the container that extends one and a half centimeters beyond the outer edges of the thermal box.
- Attach the lid using furniture hinges.
- Drill holes in the walls and bottom of the container for air circulation.
Please note: We set up a sauna right on the balcony
Exterior decoration
Thermal container design diagram
The final stage of creating a cellar for the balcony is covering the lid of the container, which will later serve as a seat. To do this, make a cut out of the desired material. Its size should be slightly larger than the area of the lid (taking into account the folds and tension). Cover the lid of the thermal box with a ball of foam rubber of the appropriate size, and attach the “lining” material on top. Fasten fabric, leather or leatherette using a stapler or small nails.
Heating and temperature control system
It’s one thing to simply build a container for storing vegetables, and quite another to provide heating on the balcony for apartment cellars. This part is especially important in the winter season. After all, when there is severe frost outside, the box, even with thermal insulation, needs additional heat, otherwise the entire crop will freeze.
There are different ways to heat thermal containers. Alternatively, they often use:
- light bulbs;
- thermostats from old refrigerators or irons;
- heating element;
- hairdryer
Cellar dimensions
Using light bulbs to maintain the required temperature, you can resort to 40 watts. To heat a container with a capacity of no more than 1 cubic meter, two lamps will be needed. Attached to the lid or walls, they will provide vegetables with a comfortable temperature even in 25-degree cold. Important note: Potatoes usually turn green when exposed to direct light. To prevent vegetables from coloring, it is advisable to cover the light bulbs in the heating cabinet with a metal plate.
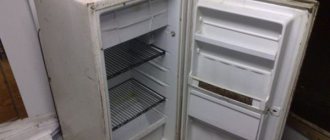
A thermostat from an old refrigerator or iron can also be used to heat homemade cellars, and a computer cooler will provide excellent ventilation in the thermobox.
Electrical specialists can afford to equip the cellar on the balcony with a heating element or a thermal fan.
The only note: these devices operate under life-threatening voltage, therefore, when installing them, you must be especially careful.
If none of the above options suits you, you can resort to the services of a regular hair dryer. A hose is attached to the device, through which warm air enters the thermal container. In severe frosts, it is enough to supply a warm stream for 5-10 minutes every two hours.
And finally. In order to always know whether your crop needs additional heating or not, you should equip the lid of your homemade cellar with a thermometer. But the high humidity necessary for successful storage of vegetables can be easily created using a plastic bottle filled with wet rags.