ROTO fittings enter the consumer market in several modifications, and the production of the same modifications can be carried out by different enterprises in different countries. However, the principles for adjusting ROTO fittings are the same for all models. Use our recommendations and then you can extend the life of your fittings.
Next, we will outline the principles of adjusting ROTO fittings depending on the most common problems that arise during the operation of windows.
You can find out more about the adjustment object in the article “ROTO - a new turn in the production of fittings!” The recommendations published on our website will help you choose fittings specifically for your plastic windows. The review material at: https://oknanagoda.com/okna/furnitura/vidy-furnitury-dlya-okon.html will help you choose gaskets, seals, handles and other accessories for plastic windows
When adjusting modern models, you only need a 4mm hex wrench. Some older models may require a screwdriver and pliers.
Care and maintenance instructions for ROTO NT fittings The operation and condition of fittings must be checked according to the following criteria:
- ease of movement;
- fastening of fittings;
- wear of fittings;
- damage to hardware parts.
- Ease of movement of fittings.
The ease of movement of the fittings can be checked on the window handle. The locking and unlocking force applied to the window handle, according to DIN 18055, must not exceed 10 Nm. The check can be done using a torque wrench. Ease of movement can be improved by lubrication or adjustment of the fittings. The ROTO turn-and-tilt fittings can be adjusted in 2–3 axes. Incorrect adjustment can lead to complete failure of the window.
Problems and solutions
Roto fittings: eliminating sash sagging by adjusting the bottom hinge
1. When closing, the sash touches the frame at the bottom
. This means that the sash is sagging. It must be raised relative to the frame. To do this, remove the protective cap at the top of the lower hinge and insert a hexagon into the opened recess. By rotating it clockwise, you can raise the frame by 2 mm, in the opposite direction - lower it by 2 mm. As a rule, this is enough to eliminate the problem.
2.
The sash touches the frame with its middle part.
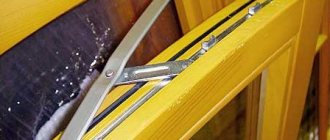
ROTO fittings: horizontal displacement adjustment using the top screw
The malfunction is eliminated by moving the sash horizontally relative to the frame. For this purpose, horizontal adjusting screws are used: on the upper hinge bracket at the top and on the lower hinge at the bottom.
By rotating them clockwise, you pull the sash towards the hinge, eliminating snagging, rotating in the opposite direction - on the contrary, you bring the sash closer to the frame with its front part. In this way, you can move the sash by 2 mm, maximum - by 3 mm (in the area of the top hinge).
Allowable adjustment distances
ROTO fittings: horizontal offset adjustment using a screw on the bottom hinge
Frame distortion is eliminated in the same way. In this case, you can also use the vertical adjusting screws. They, as already mentioned, are covered with protective caps, so they must first be removed.
Tolerances for adjusting the window sash
3. There is a draft from the window.
It is necessary to achieve a tighter press of the sash to the frame. For this purpose, eccentric locking pins are used. They are visible when the window is open from the end of the sash. When turning clockwise, you will ensure that the sash is pressed more tightly to the frame (winter mode); when rotating in the opposite direction, you will depressurize the window (summer mode).
Remember - with a stronger pressure, the seal laid around the perimeter of the sash wears out faster. To change it less often, adjust the pressure so that you are comfortable and there is no excessive load on the seal.
Eccentric trunnion of ROTO fittings, regulating the pressure of the sash to the frame
It should be noted that in some models of ROTO fittings there may be not one adjusting eccentric, but several around the perimeter of the sash. We must try to press them evenly.
You will be helped by the marks marked on the ends of the eccentrics. If the risk looks “outside”, then the clamp is weakened, if inside the room, then, on the contrary, the clamp is strengthened.
The pressure can be adjusted in this way within +_ 0.8 mm.
You can also adjust the sash pressure in the area of the upper scissors by rotating the vertical screw on the upper bracket. In this case, a displacement in the range of +_ 1 mm can be achieved.
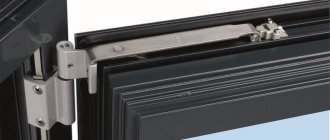
Adjusting the sash pressure in the area of the upper scissors of the ROTO
4 . The handle is jammed in an intermediate position when the window is open.
The result of improper operation of the safety device due to incorrect opening of the window (illegal operation of the lock). This happens when the handle is switched too quickly from one position (window open) to another (window rolled down, or vice versa). In this case, the lock is activated and jams the handle.
To get rid of this trouble, you need to find a “tongue” or clip that is deflected towards the frame below the handle, and align it parallel to the seal.
After this, gently rotate the handle to one of the standard positions.
Clip for blocker against incorrect opening of window in ROTO fittings
If this does not work, it means that the “tongue” does not come into contact with the counter part of the blocker. This part must be unscrewed and thin plastic placed under it so that the contact between the two parts is restored.
5.
The handle has become loose
or needs to be replaced with another one, say, with a “children’s” lock.
To do this, you need to turn the decorative strip covering the base of the handle 90 degrees, unscrew the screws holding it and put a new one in place of the old handle.
Or, if the handle was just dangling and did not require replacement on its own, tighten the screws.
Are you interested in other brands of German window fittings? The article “Winkhaus – the patriarch of fittings brands” talks about one of the most popular brands of tilt-and-turn fittings in Russia. Meet also the prestigious Siegenia-Aubi. Those who use Hautau fittings cannot be called anything other than connoisseurs of beauty - read about it at the link https://oknanagoda.com/okna/furnitura/hautau-furnitura-dlya-okon.html
Comb for ROTO fittings – window lock in the slightly open position
A comb is also attached in the area of the handle - a multi-position lock of the sash in the slightly open position.
6.
Lubricating fittings
To ensure smooth operation of the mechanism and its durability, fittings must be periodically lubricated. Automotive lubricant WD-40 or silicone lubricant are suitable for this. The points for applying lubricant are indicated in the diagram: these are hinges and rubbing parts.
It is recommended to lubricate the fittings at least once a year, or once every six months in harsh operating conditions.
Checking the tightness of a Roto window (how to check where the air is blowing from a Roto window?)
If in summer the problem of blowing through Roto windows bothers us little, then in winter we don’t want to freeze at home. So, three ways to detect a blowing Roto window. We check the windows for blowing, look for where the wind is blowing from the Roto window.
The first way to check the tightness of a Roto window : using a sheet of paper, half an A4 is quite enough. We open the window sash slightly and expose half of the sheet to the street, close the sash, and lower the handle all the way down. Important! The sheet of paper should not fall on the locks that are installed on the window frame, otherwise it will simply be bitten and the experiment will be carried out incorrectly. We pull out the sheet. Three options: the sheet flies out with a whistle, the sheet comes out with difficulty, it feels like the sheet is about to tear. Important! Thus, the entire perimeter of the window sash is checked. If in most places of such a check the sheet comes out freely (flies out with a whistle), the seal needs to be replaced. If the sheet comes out with difficulty in most places of inspection, the problem of window tightness can be solved by adjusting and lubricating the window. If the sheet is about to tear in most places of inspection, you do not need to do anything with the Roto window. You won't be able to blow from this Roto window!
The second way to check the tightness of a Roto window : using a soap solution. Do you remember how you were looking for a hole in a bicycle tube?))) We make a soap solution. Apply Roto around the perimeter of the window. Where the bubbles appear is where it blows.
The third way to check the tightness of a Roto window : using a candle flame. Carefully move a burning candle around the perimeter of the window. Where the flame fluctuates, that's where it blows from the Roto window.
Call a service technician!
How to apply lubricant to ROTO fittings
If it is necessary to replace certain parts of the fittings (except for the handle), to more fully adjust the pressure or the position of the sash relative to the frame, it is necessary to invite a service specialist.
You can dismantle the window sash yourself. To do this, you need to unlock the top hinge pin, remove it, tilt the sash towards you and remove it from the bottom hinge pin. But, at least until the expiration of the warranty period, this should not be done - this work should also be entrusted to a service specialist.
All operations for self-service of windows - lubrication of fittings, transfer of the pressure eccentric from the summer to the winter position, etc., are performed exclusively on the frame with the sash assembly.
So how can you properly prepare Roto windows for winter yourself?
First, think about what bothered you last winter? How are things going with Roto windows now? Do they open well? Were there any puddles on the windowsill during heavy rain? How does the window handle turn? With or without effort? As expected, does the handle go all the way down? Or not? As they say: cleanliness is the key to health! In our case, regular removal of accumulated dirt and lubrication, plus timely adjustment (adjustment) of windows, significantly increases the service life of Roto window mechanisms. The question arises: how to properly wash a Roto window so that it does not get damaged? You can safely wash the Roto window with ordinary soapy water and a soft sponge. We soap the glass (double glazing), the Roto window profile, the slopes, the window sill, and then wipe it dry with a soft cloth. Check the drainage channels (they are at the bottom of the window frame), maybe they need to be cleaned? It is also important to know how to adjust Roto windows, but more on that below.
Maintenance of ROTO fittings
Annual lubrication (do not use lubricants containing acidic or resinous substances) of all rubbing parts of the fittings on the frame and sash ensures ease of movement and protects the fittings from premature wear. Burglar-resistant steel locking pins also require constant lubrication to reduce wear. See the figure for lubrication points for fittings.
Lubrication points for ROTO fittings
How to order preparation of Roto windows for winter in St. Petersburg (St. Petersburg) inexpensively and efficiently
Order preparation of Roto windows for winter in St. Petersburg (St. Petersburg) inexpensively +7(812)904-30-42
By calling, you can order the preparation of Roto windows for winter inexpensively and efficiently in St. Petersburg (St. Petersburg) and the Leningrad Region. A Roto window repair specialist will arrive at the specified address at a time convenient for you. Will quickly and efficiently complete all necessary work. The experience of our technicians allows us to guarantee that, with proper operation, the corrected problems will not reappear for a long time.
We employ only highly qualified professionals who will quickly identify and eliminate the cause of the malfunction. You can once again enjoy the flawless operation of your Roto windows.
Draw your attention to! We DO NOT have “general profile” specialists (from ceiling to floor) or migrant workers!!! Only professional window repair specialists Roto (roto)!!!
Did you find it cheaper to prepare Roto windows for winter in St. Petersburg (St. Petersburg)?
Send an offer from another company of similar quality and we will make it even cheaper. We are confident that our prices are reasonable!
Where do we get such confidence?
We do not have overdressed offices in every district of our beloved city, at every metro station, at every underground passage. There is no overstaffed staff. We do not advertise from every iron. BUT! We have over 16 years of experience, professional craftsmen and excellent cost optimization!
Timely preparation of Roto windows for winter in St. Petersburg (St. Petersburg) will require a significantly smaller amount of money than their repair and will extend their service life.
Our advantages
— We prepare for winter, repair and service Roto windows of any complexity.
— Affordable prices. System of discounts, promotions.
— Urgent departure. Urgent repair of Roto windows at a time convenient for you.
- Only experienced craftsmen.
— High-quality materials and fittings.
— Guarantee for all types of work.
There will always be someone who will do it cheaper...
“Expensive and sweet, cheap and rotten”, “Free cheese comes in a mousetrap” - this works here too. Okay - it doesn't come cheap. The one who works cheaply is the one who steals spare parts from production, the one who pretends to be a master, the one who does not value his work. We work HONESTLY and WELL.
The choice is yours, remember that “The miser pays twice”!
Honest reviews from our clients
Adjusting ROTO NT fittings
To adjust ROTO fittings, a hexagon wrench (4 mm) is required; it can be purchased at any tool store. Adjustment of a PVC window or balcony door is done by tightening the eccentrics in the adjustment holes of the hinges, locking trunnions and on the strike plates of the fittings.
Adjusting the locking pins
Sealing the seams of a Roto window with thermal insulation materials
In case of improper installation, sealing the seams with thermal insulation materials may be the only solution. Sealing installation seams and joints with special heat-insulating materials is one of the most effective ways to insulate Roto windows.
How can I seal the street seams of a Roto window?
- polyurethane foam, which must be plastered or covered with strips
- mineral wool, which must be covered with strips
- polystyrene foam, which must be covered with strips
— liquid rubber (STIZ)
How can I seal the internal joints of a Roto window?
- silicone sealant
- acrylic sealant
— cosmofen (liquid plastic)
The described problems with Roto windows can appear due to poor-quality installation of a metal-plastic structure or during a long service life - longer than 10 years. During installation, installers had to familiarize themselves with the design properties of Roto windows and teach owners how to use Roto windows.
The end of summer, the beginning of autumn is the time to prepare Roto windows for winter. If you take care of insulating Roto windows in advance, you will definitely not freeze at home in winter!
Reviews
Modern fittings from the Roto brand are not the most affordable, but they work well and last for a long time.
Users note uninterrupted use in both apartments and country houses .
In some cases, it is necessary to periodically adjust the fittings to achieve a better fit or function of the sashes. This ensures smooth opening.
Real reviews can be read here and here.
Seasonal Maintenance
The main feature of opening windows is that they do not have vents. For better ventilation of the room, the system provides rotary doors. During the operation of plastic double-glazed windows, you may notice that a draft appears in winter. Don't panic - this is not a manufacturing defect, but simply the seasonal mode is set incorrectly. Switching plastic windows to winter and summer modes is a mandatory maintenance procedure.
The tilt and turn mechanism of the glass unit must be adjusted depending on the season of the year
During long-term use, drafts may also appear. This occurs due to the loosening of the hinge screws of the rotary-locking mechanisms. By independently adjusting the windows for the winter, you can easily save 3-7 thousand rubles on calling specialists.
Leak test
How to prepare plastic windows for winter? With the onset of cold weather, it is necessary to carry out a preventive inspection of the state of normal locking of the sashes in winter mode. Leak tightness can be checked in several ways:
- Tactile. By running your hand along the frame, you can determine the presence of serious drafts.
- Fire with a match or lighter. Deviation of the flame from the vertical indicates the presence of blowing.
- A sheet of paper. They leave him in the closed door and try to pull him out. If the leaf comes out easily, the sash does not close tightly.
If the paper sheet is easy to pull out through the sash, then the window is not airtight.
Having identified problem areas, we begin to adjust the system to optimal requirements.
Advantages
of Roto brand fittings can be highlighted
- Burglary protection. The window cannot be opened from the outside. This is provided by fittings with different security options. This is possible thanks to anti-burglary systems.
- Slam protection. Thanks to the use of the NT system, the window will not slam shut in a strong gust of wind. Safety against slamming is ensured at all times.
- Safety for children. It is allowed to block the rotation and transition of the sash from the folding to the open position. To unlock, use only a special key supplied with the accessories. It should always be kept out of the reach of children.
- Micro ventilation function. This feature allows you to avoid constantly opening windows. At the same time, fresh air will constantly flow into the apartment or house.
- Long lasting use. The manufacturer offers a new coating for the surface of RotoSil fittings. The result is high-quality protection against corrosion.
Note . In addition to the main advantages, an elegant design is provided. The shape is distinguished by refined lines. In addition, the handles are located in the same plane as the window sashes.
In this case, it is necessary to take into account some difficulty of care due to the presence of hard-to-reach places. But a smooth surface somewhat simplifies the problem. In addition, you can use almost any detergent without abrasive particles.
Switching winter/summer modes
When installing double-glazed windows, installers set the initial neutral parameters for locking the sashes. All positions will be adjusted for optimal functionality. However, then it is necessary to adjust the settings - ideally twice a year.
Why is this necessary?
Seasonal adjustment is often forgotten, leaving the sash pressure in a neutral position. As with any violation of operating rules, consequences arise over time:
- drafts from under the sash even with correct installation adjustments;
- if the summer mode is set, then in winter this will not provide sufficient pressure on the locking mechanism, which will cause heat loss from the room;
- if you leave the winter position, then due to the constant strong pressure of the sash on the seal, the latter will quickly become unusable;
- in the absence of seasonal adjustment, the normal microclimate of the room is disrupted, including an increase in humidity levels (there is a risk of condensation and mold).
Incorrect operating mode can lead to the formation of condensation on the glass.
To do this, you need to correctly set the winter and summer modes of plastic windows in the sash settings.
Adjustment mechanisms
Before you begin changing the mode, you need to determine the locations where the adjustment devices are located. In most cases, the system provides for the presence of special mechanisms - trunnions, which, depending on their position, determine the degree of pressing of the sash required for the season.
They are located at the ends of a metal-plastic window or door. The number of such mechanisms may vary depending on the size and manufacturer of the glass unit (from two or more).
Possible locations of eccentrics - different manufacturers have them in different places
The trunnions may differ in appearance, but they perform the same adjusting function.
Options for the appearance of eccentrics
At the edge of the eccentric there is a mark, which serves as an indicator of the desired mode. By default, it is set up - this is a neutral position, which needs to be changed in accordance with the season.
Risk indicating the selected mode
How to switch
The process itself is quite simple, you only need one tool - a simple hexagon (usually 4 mm), or less often an asterisk.
You need to set plastic windows to cold season mode before the onset of frost, when the temperature is still plus 5–10°.
Open the glass unit and inspect the ends. Usually there is one eccentric on the side, the second on top.
Mark indicating adjustment mode
Most likely, the regimes will be in a neutral position, and the risks will point upward. Having selected the desired tool, change the position of the marker.
To set a plastic window for the winter, turn the notch on the regulator towards the outside of the room. With the onset of the warm season, the position of the marker should be moved by the mark inside the room. Accordingly, if there are several such regulators, then the modes are transferred by turning all available eccentrics to one position.
You need to constantly switch modes according to the season - this is what will ensure normal functionality, balance of ventilation and sufficient energy saving in your home.