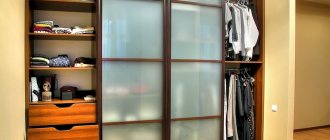
Hi all! Agree that not everyone lives in huge private houses or spacious city apartments. A large number of people live in Khrushchev-era buildings, compact Stalinist buildings, etc. Therefore, the question arises of smart space saving. One option is hanging doors.
I think everyone knows the swing door mechanism. This is a canvas mounted on hinges in a doorway. Opens to oneself or from oneself. To open, you need some space in front of the door.
If the room is small and you want to make it more practical and functional, the hinged system will leave the space under the wall where the door opens useless. You can't put anything there.
There is a solution. These are hanging doors. These are canvases that are made from different materials. The point is that the fastening is carried out on the hinge system at the top of the opening, and not on the side.
The main advantage is the ability to save free space in front of and behind the door leaf.
What is it and how does it work?
The hanging system for sliding wardrobes is a set of sliding doors equipped with top-supporting or bottom-supporting rollers. It consists of an aluminum profile with a special coating. The system includes closers that allow you to close the doors carefully. The need for its appearance was dictated by the living conditions of many apartment owners and their families who do not have significant living space: it allows rational use of living space.
The hanging system for sliding wardrobes is a set of sliding doors equipped with top-supporting or bottom-supporting rollers.
The choice of the “right” one is determined by ideas about comfort.
Doors installed with this system move from the outside of the structure.
Top 5 secrets that will help with installation
If you want to simplify the installation process as much as possible, you can use the following secrets:
- In panel houses, there are often several wooden blocks in the openings. They are used to secure the box using self-tapping screws or any other fasteners. If you have such bars, you will not need to drill holes to attach the box.
- A hammer drill can also be used as a drill to create holes in a box or canvas. Even the most budget hammer drills have a drilling function. For adventure mode, you need to put the toggle switch in the appropriate position. In total, rotary hammers have 3 modes: drilling, drilling with chiselling and just chiselling. Concrete and brick walls are drilled in impact mode with chiselling.
- Using a laser level will greatly simplify marking. The laser beam instantly creates a 90-degree line along which it is extremely comfortable to align the canvas.
- To prevent chipping of the coating when sawing, it is recommended to use a hand saw. A jigsaw with a special file would also be a good solution. In this case, sawing with a jigsaw should begin immediately at high speeds so that it does not “tear” the material.
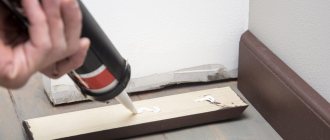
- For faster and higher-quality foam application, it is advisable to use a special gun. For high-quality fastening of the door frame, it is necessary to use foam.
By following simple rules, you can install the door without any difficulties. Self-installation allows you to save a lot, especially if the doors are changed throughout the apartment.
Types of hinged doors
This:
- Hinged door. The canvas is suspended on the upper fittings and fixed on the lower one;
- Support door. The wings are supported by the lower rollers, and the upper fittings are used to fix and support the door. They are easier to install and cost less, but the sashes may have play relative to the line of movement.
- Combined. The shutters are fixed on both profiles (there is no play). The design is the most reliable and expensive.
The design has proven its versatility, which is why it is used in the manufacture of sliding wardrobe doors, which can be installed in any room of the apartment.
| System type | Peculiarities |
| Roller | The roller is located inside the rail guide, which ensures that the cabinet door opens neatly. It has two types of roller mounting – upper and lower. |
| Framework | Made from aluminum or steel. Aluminum profile is considered more resistant to abrasion, so it costs more. |
| Frameless | Budget version of the sliding system: the most inexpensive, but also short-lived. Deforms due to temperature changes or high humidity. |
| For radius cabinet models | Used for furniture with a non-standard configuration |
Installing hinges and hanging fabric
Before hanging the canvas, install the fittings . It is more convenient to do this when the frame has already been removed. For a light sash, 2 pairs are enough, for a heavy sash - 3.
- The attachment point is marked on the canvas and the loop stand - at a distance of at least 15 cm from the top and bottom.
- Using a chisel or milling cutter, select the space for the mounting plate.
- Screw the canopies to the canvas with self-tapping screws.
- Install the frame and fasten it with anchors. Insert the canvas into the box and fix the second part of the door hinges in the hinge stand. The screws are not tightened rigidly.
- Check the verticality of the sash and freedom of movement. If necessary, adjust the position of the door frame and door until they achieve free opening.
- Remove the canvas. Tighten the anchors tightly and fill the cracks with polyurethane foam. After complete drying, hang the sash and secure the door hinges.
If a handle with a lock is installed on the door, this operation is performed after installing the sash.
What is special about the hanging system for sliding wardrobe doors?
Anyone who plans to order a wardrobe is faced with the problem of choosing a system for sliding doors: bottom-supported or suspended (top-supported). The latter consists of:
- top guide with rails;
- roller carriages;
- locking mechanism.
The hanging system for sliding wardrobes appeared on the Russian market not so long ago, but has already managed to win the enormous sympathy of customers. The peculiarity of the top-support system is that the sliding doors are suspended on the upper guide, which holds the entire structure. The doors do not move inside the cabinet, but in front of it. The guides are attached either to the ceiling or to the roof of the cabinet. Installation of the suspension system is quite simple and does not require additional milling of the doors. However, during installation, it is important to take into account the quality of the plane on which the guide profile is attached, since it may not withstand heavy loads.
Typically, hanging systems for sliding wardrobe doors are used for interior partitions and built-in wardrobes, because due to the absence of a bottom guide, unnecessary and inconvenient obstacles are not created on the floor. In addition, dust constantly accumulates inside the rail with the bottom guide, which makes it difficult for the doors to move. There are no such problems with the top guide.
Preparatory activities
If you plan to install the structure in such a way that the doors are hidden in a wall niche, then you should install a sliding mechanism at the stage of rough repair work.
When installing by any other method, the fasteners are installed already at the finishing stage.
Before you begin the installation itself, make sure that the geometry of the doorway is ideal.
Its side faces must maintain maximum verticality and strict parallelism to each other. If such geometry is not maintained, do everything possible to bring the shape of the opening closer to the ideal.
Materials for the manufacture of suspension systems
To ensure that the suspension system remains reliable for many years, stably withstanding serious weight and inertial loads, its elements are made of high-strength modern materials:
- profiled guides - made of high-strength aluminum alloys;
- rollers are made of abrasion-resistant and elastic fluoroplastic;
- rolling bearings are made of special steel, hard and resistant to shock loads;
- fasteners are made of stamped alloy steel.
This approach is practiced by well-known European manufacturers Krona Koblenz, Cinetto, Hettich and some others. Systems produced under these brands allow the use of heavy door leaves made of solid wood, MDF panels or thick tempered glass. Most often they are installed in wardrobes, but in recent years sliding doors between rooms, where highly reliable hanging systems are also used, have become increasingly popular.
Materials and tools required for installation
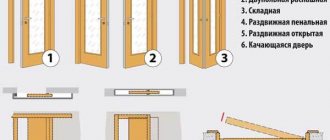
There are several types of hinged doors:
- The accordion consists of several elements fastened together and folding when opened into a compact structure.
- A coupe involves the movement of one leaf the size of a standard door.
- The partition is a leaf structure that is much larger in size than a standard door. It is set as a design technique for dividing the space of a large studio room into zones.
You can install each one yourself, but you should know that greater accuracy will be required in determining the dimensions. Otherwise, the alteration will entail repairs to the ceilings and walls.
Tools for installing a hinged door: drill, level, pencil, ruler, hammer, chisel.
Tools (they are suitable for any design) that will be needed:
- container for mixture, tools for plastering;
- drill and pobedit drills;
- screwdriver;
- level;
- pencil and square;
- hammer;
- chisel.
Materials for installing a sliding door:
- Leveling dry mixtures for walls. They must be perfectly level, because the door leaf must move freely along them.
- Door guide. This can be a wooden beam, suitably processed, or a vertical element from a door frame, since hinged doors are not intended to be made.
- Upper and, if the design provides, lower roller elements. Their length should be 2 times the width of the doorway (+ 5 cm margin). This is done so that the structure does not fly off the rollers when opened wide. The quality of the hangers must be high, since the door is heavy.
- Door leaf with platbands. In addition, you need to purchase plastic grooves that will cover all the flaws in the wooden work. And if there are no lower rollers, then plastic legs (with inserts), which are wedges, will come in handy.
- Door furniture. It is worth considering that the handles for such doors are not at all similar to ordinary ones. They are built into the canvas.
- Self-tapping screws and dowels.
Advantages and disadvantages of a hanging system for sliding wardrobes
This design has gained great popularity due to a number of reasons:
- the room is provided with a neat aesthetic appearance, since all things are securely “hidden” in the closet;
- space saving is ensured;
- the loss of running carriages is prevented due to the strong fixation of the array in the doorway and the shape of the profile;
- an atmosphere of comfort is created when using sliding wardrobes due to the silent movement of doors;
- allows each door to withstand loads of up to one hundred kilograms.
The design has proven its versatility, which is why it is used in the manufacture of sliding wardrobe doors.
The bottom-support sliding system is installed in a mortise or overlay manner, which allows the door section to be installed to the floor.
The reason for this was initially the ease of use in small apartments.
Attention! Among the disadvantages, experts note the rather high price of cabinets with top rails. They require mandatory design of the upper part of the door, since its structure is open. Installation of the product will be much more difficult, compared to bottom-mounted ones.
This design has gained great popularity.
The system includes closers that allow you to close the doors carefully.
The roller is located inside the rail guide, which ensures that the cabinet door opens neatly.
And if they are decorated with mirrors and inlays, this adds aesthetics and gives the room originality.
Assembly and installation of the box
Installation of interior doors, swing or rotary, begins with assembling the frame. In most cases, the kit includes all the necessary elements. You just need to follow the step-by-step instructions.
If you purchased a boat with ready-made fasteners, assembly is very quick. You need to knock out the plugs along with the pins from the mounting holes, connect the posts and the crossbar and hammer the connecting pins from the kit into the holes.
If the box is a set of blanks, the technology is more complicated.
- Measure the sash. The length of the frame elements is calculated so that there is a gap of 3 mm between the door and the door, and 6 mm between the hinge post and the door. If a seal is installed, the thickness of the gasket is added. It is taken into account that vertical racks are placed 8–10 mm from the floor.
- The workpieces are cut to size and angles are cut at 45 or 90 degrees. It's better to use a miter box. Drill holes in the racks and crossbar and fasten the elements with long self-tapping screws - 2 for each fastener.
- Place the sash in the frame , measure it, make sure that the canvas can be easily removed.
- Mount the box in the opening in an open or closed way. The first one is much easier.
- The frame is inserted into the opening and aligned horizontally and vertically using a plumb line and level. Hold the box in the desired position by driving wooden wedges into the gap between the frame and the wall. Manipulations are performed until the box takes a strictly vertical position.
- Through holes are drilled . Remove the frame.
- Holes are drilled in the wall at the marked places using a concrete drill. Put the box back in place and screw it loosely with anchors. Check verticality.
The anchors can only be firmly secured after the sash has been suspended.
The best models of the hanging system
There are products from many manufacturers on the market. The best models are:
- Aristo is a high-strength profile with a wide range of colors. Estimated service life up to 30 years;
- Versal – perfect dimensional accuracy of profiles, easy installation. Estimated period of use is up to 18 years;
- Komandor - with increased tensile strength and a more advanced design of the lower roller.
HfTTich, Hafle and Marbella profiles are also popular.
Thus, an atmosphere of comfort is created when using sliding wardrobes due to the silent movement of the doors.
Important! It is not recommended for specialists to buy cheap models. The design is not particularly reliable and can quickly fail. There will be more problems instead of convenience and efficiency of use.
Sliding wardrobes are compact, multi-functional, large capacity, and easy to use. They replace numerous cabinets with doors. The hanging system is an ideal solution for attaching door leaves. Convenient and aesthetically attractive conditions are created for access to the contents of the cabinet and for its smooth closing.
Features of sliding products
Assembly diagram of the hanging system door.
Saving space is not the only advantage. Other advantages include:
- Ease of use. The shutters can be moved without much effort.
- In case of drafts, the doors do not slam shut.
- You can divide the room into zones.
- The design does not have thresholds, which allows people using a wheelchair to move around the home without much difficulty.
In addition to advantages, hanging products are not without some disadvantages:
- If the canvases move along the walls, this eliminates the possibility of installing large-sized furniture near its surface.
- They do not have a sufficient level of sound insulation.
- If there is a need to lock the doors with a key, you will have to purchase specialized locks.
Features of the suspension system for heavy doors
The classic hanging system for a door is a rail attached to the top lid of a cabinet or the top trim of a doorway, along which rollers move with the door leaf suspended on them. Thus, the entire weight load falls on the rail and the upper supporting element of the structure. At the bottom of the cabinet or doorway there is a bottom rail, which serves as a guide and limiting element, preventing the panel from swinging on the suspension. Rollers slide along the bottom rail, attached to the lower end of the door leaf and not bearing any weight load.
Designers of sliding systems focus on safety and comfort. This is why it is recommended to use suspended rather than support options. By using a support system, the consumer is not free from the danger of the door tipping and falling under certain circumstances. In addition, the lower guide often becomes clogged, which disrupts the smooth operation and creates obstacles for opening and closing.
For suspended systems, the danger lies primarily in the inertial force possessed by a massive door sliding on rollers. However, today we have learned to deal with this problem with the help of:
- patented shock-absorbing devices that are built into the carriage with rollers to absorb vibrations and soften the movement of the web;
- soft closing systems that protect hands from being hit by the door;
- locking devices that absorb the shock load when the end of the door leaf comes into contact with the locking mechanism;
- closers that ensure slow and reliable closing of the door.
All these devices not only ensure the safety of the user, protecting him from being hit by the door leaf flying on rollers along the guide, but also extend the life of the door. If they are not installed, the vibrations of the impact load that occurs when the door slams will loosen the connecting fittings and break the door leaf. This will not happen when using damping systems.
Installation features
There are two ways to install suspended systems:
- on the ceiling or on the top lid of a cabinet - usually used for sliding wardrobes, sliding interior partitions, wardrobe doors;
- on the wall above the doorway - used for installing interior doors or doors to a dressing room.
If the upper (load-bearing) guide is mounted not on a solid wall, but on a cabinet lid or on a light partition, then care must be taken to ensure the proper strength and rigidity of the material in order to avoid its deflections or other deformations under the weight of heavy doors. The top rail and rollers are usually masked with a decorative trim to maintain the overall aesthetics of the structure.
What mistakes should you avoid?
When installing the door, you must avoid the following mistakes:
- The canvas is too close to the box. In summer and winter, the door expands and contracts. This leads to the fact that the canvas rests against the box.
- Foaming seams when the fabric has not yet been installed. Foam can expand significantly. Without a restraining element, there is a possibility of deformation of the box.
- Use of force when trying to insert the handle. If the hole is too small in diameter, it needs to be widened. To do this, use a drill with a special feather drill.
- Lack of holes before screwing in self-tapping screws. Doors from the budget and mid-budget price segment may crack when screwing in self-tapping screws, so it is recommended to first create a hole of a smaller diameter. This will significantly reduce the likelihood of a crack.
Before installing an interior door yourself, you will need to draw up a work plan. Enough time should be allocated for dismantling, preparing the opening and installing a new canvas. If you approach the procedure responsibly, the installation can be completed in 1 day, even if such work has never been carried out before.
Types of hinged doors on rollers
The general principle of all sliding doors is that they do not open outward or inward, but to the side, moving horizontally along or even inside the wall. Despite this, there are differences in the types of hinged doors and they must be taken into account.
Sliding door
The most common and well-known type of hinged door. But here everything is not so simple because they can be:
- Hanging. They are attached only at the top and, if the height is sufficient, they can tap when moving along the wall.
- Suspended with two guides. They are attached both at the top and bottom, but the design implies the presence of a threshold or a guide recessed into the floor.
- Hanging cassette. Installed in most cases in private homes. The door leaf goes into a special groove in the wall, which is quite difficult to make in ordinary apartments.
Cascading sliding doors
The design principle differs from sliding doors with two guides only in that two, or even more, guides are installed both above and below. There can be several door panels and the entire structure is mounted in such a way that their sequential arrangement can form another interior partition, and in the open position all the panels are assembled together.
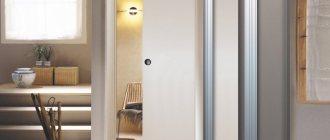
Cassette version
When installing a sliding structure, it is necessary to free the wall where the movement of the leaf will occur, and sometimes this requirement causes some inconvenience, but when installing cassette-type doors, this can be avoided.
Their peculiarity is that they go deep into the wall. There are two ways to do this. During construction, you can make the opening at home much wider, but in this case, the installation of cassette-type doors must be planned in advance.
If the owners have identified a desire to install a cassette door in an already finished house, then it is necessary to create an opening in the already finished walls. This design option has one undoubted advantage - the canvas is located in the opening, due to which it has good sound insulation and will not let in unnecessary odors, for example, from the kitchen.
Harmonic
Hanging interior doors open according to the accordion principle. It consists of several narrow canvases, which fit tightly to each other when opened. When closed, they form a single plane, but not always perfectly flat.
Among the advantages, it is worth highlighting their low cost among all hanging doors. They are easy to use and do-it-yourself installation. But when it comes to sound insulation, the accordion is far from ideal. Therefore, most often this door option is installed in pantries or dressing rooms.
Suspended double-leaf structures
The most traditional option. The installation of interior doors occurs on the upper hangers, and the installation completely depends on the size of the panels. Ease of movement is ensured by installed rollers that move along the upper guide. To remove unnecessary noise from the operation of the suspension system, the hinges are lined with rubber or plastic material.
In order to hide the top guide, a decorative overlay made of wood or plastic is used to match the design, but if you wish, you can leave everything as is. To avoid excessive concentration on decorative finishing, experts recommend making such a decorative panel around the entire perimeter of the room.
Sources
- https://berkem.ru/drugoe/podvesnaya-sistema-dlya-shkafov-kupe-kak-pravilno-vybrat/
- https://severdv.ru/mebel/shkafy-i-shkafy-kupe/navesnye-dveri-na-shkaf-kupe/
- https://rial.pro/komplektuyushhie-dlya-shkafa-kupe/podvesnaya-sistema-dlya-shkafov-kupe/
- https://www.divandi.ru/statyi/vybiraem-razdvizhnuyu-sistemu-dlya-tyazhelyx-podvesnyx-dverej-kupe
- https://passaz-okna.ru/dveri/navesnaya-dver-svoimi-rukami-osobennosti-montazha.html
- https://o-dveryah.ru/razdvizhnye/podvesnye-s-verkhney-relsoy/
[collapse]
Post Views: 6,353
What to do if you have a non-standard opening
Each country has different standards for door leaf sizes. In our country, the standard door leaf is 60-90 centimeters wide and 2 meters high. Many factories that produce doors produce sliding interior doors of exactly this size, so the choice of standard models is very large.
Wide designs are made to order only. The most common decorative element used to decorate the door leaf is glass or mirror inserts. They can give the room in which they are used a feeling of greater spaciousness and improve lighting. Mirrors help increase the size of a room several times.
Before ordering hanging systems, it is advisable to make sure that there is enough space required for the sliding doors to function properly. If desired, you can order a sliding door higher than two meters. But it is worth remembering that the price for such non-standard sizes will be much higher than for regular canvases. Opening and closing the interior sliding door can be done manually or using an installed automatic system. A manual mechanism involves opening the door in the desired direction using a handle. An automatic door system allows you to activate the entire structure using a motion sensor located in it. This happens as follows: when a person approaches the door, it reacts to him and opens. In addition, there are options with opening at the touch of a button.
It is quite possible to automate a door that has already been installed. To do this, you need to buy all the necessary equipment and install it correctly on your door structure. This system has a fairly high cost, so it is not particularly popular in our country.
Advantages and disadvantages
Hinged interior doors have a number of advantages. And this:
- impossibility of slamming under the influence of drafts;
- easy opening and closing even for small children;
- visual lightness;
- lack of demand for additional space;
- the likelihood of installing automated control, which will significantly facilitate the operation of the enclosing structure;
- Acceptability of ordering canvases according to individual sizes and designs.
But sliding doors also have disadvantages. In particular:
- insufficient sound insulation;
- high price;
- impossibility of placing rosettes or decorative elements in the opening area of the overhead sash.
Hanging canvases have multiple finishing options. They visually expand the space without weighing it down. The only thing that does not decorate the doors concerns decorative elements that prevent the movement of the panels relative to each other.
Stages and features of work
Installation diagram of a hinged door.
The walls and doorway must be leveled with diluted building mixtures so that the door structure is aligned strictly parallel to the concrete base. Unevenness along the door path is not allowed: it will touch them, and the service life of the hinged structure will be short.
The marking of the guides is done as follows. The height of the canvas is measured. A gap of 5 mm is made between the door and the floor (the width of the roller structure is added). Marks opposite each other are made with a pencil and a line is drawn. Then this same line is checked with a level to the floor surface so that the doors do not open spontaneously later.
You need to immediately drill holes for the rollers on the guide to avoid cracking the wood. Next, the guide is attached to the wall, strictly under the drawn line.
Now work begins directly on the door.
Using a chisel at the ends, if both roller structures are assumed, grooves are selected.
Approximately half a wheel. If the rollers are only at the top, then holes for the “legs” are drilled in the bottom end, and the groove is selected directly in the floor. The plastic elements are screwed on with self-tapping screws, and the legs can be inserted into the holes by first filling them with epoxy glue (the strength will be excellent).
Sliding door mechanism mounting diagram.
The hardware is immediately installed in the door. Doing this yourself is somewhat difficult, especially if the handles come with vertical locks. Therefore, it is best to purchase a ready-made door leaf.
The roller structures are screwed to the track and the door can be hung for fitting. If everything is good, then the level shows an impeccable result, and the door itself does not raise any complaints. It is removed, the trim is nailed on and hung in place for use.
Hinged sliding sliding doors can have several leaves. Their installation is longer, but not difficult. The downside of all sliding doors is no sound insulation or heat.
Installation recommendations
Installation diagram
To make hanging doors with your own hands, we first acquire everything you need:
- Canvas . There can be two of them, and of any size. It all depends on your preferences. The remaining materials are taken depending on the number and size of the canvases.
- Guide. The length of such a rail should be twice as long as the width of the web. If you plan to slide it in both directions, or install two doors, then the length should be four times the width of the door. Essentially, the top guide is a metal profile. It will need a beam of equivalent length in a section of 50x50 mm.
- Roller mechanism . When purchasing it, be sure to consult with the seller in the store. The fittings must be able to withstand the weight of the door and match the width of the panels.
- Platbands . If desired, also purchase platbands for covering the jambs according to the size of the opening (see How to install platbands on doors).
- A false panel for masking the guide and equal to its length.
- Pens. It is best to purchase built-in handles for sliding wardrobes.
- Closer for smooth closing . Optional accessory. You can install it not immediately, but over time (see Door closer - type of devices, selection, installation).
If you purchase a ready-made set of fittings, you can additionally buy timber, handles and a door closer. Having purchased such components and canvas, you can safely begin the installation itself. The instructions below will tell you how to make your own crafts.
Do-it-yourself door leaf from boards
Do-it-yourself canvas from boards
DIY olive door
If you like a similar door leaf made from boards, then you can make it yourself. First, make a drawing - a sketch, which will reflect all the dimensions. Based on them, immediately calculate how many boards should make up the canvas.
Then prepare everything you need:
- basic boards for canvas;
- two side boards, for decorating them and several for framing - it all depends on your ideas;
- wood glue;
- wooden choppers for gluing;
- pens;
- paint and varnish.
You can’t do without clamps, a tape measure, a jigsaw and a drill.
So:
- Stage 1. We adjust the size of the boards, literally down to the millimeter, so that the tightness is neat and beautiful.
Trimming boards
- Stage 2. We drill holes for the chops at a distance of 20 cm, with a shift on the next board by about a third.
Marking for gluing
- Stage 3. Prepare glue and chopsticks. We need to do everything quickly. Therefore, we keep everything we need at hand.
Glue and chopsticks for gluing
- Stage 4. Glue all the boards and secure them with clamps so that the wood sticks well.
Gluing boards
- Stage 4. The gluing takes about 8 – 10 hours to dry. It all depends on the wood and the action of the glue itself.
- Stage 5. After, we mount the frame in the same way and leave it to dry.
Frame gluing
- Stage 6. Designate places for handles.
Places for pens.
- Stage 7. Prepare mounting holes for the rollers, if they are external, or leave them as is for a hidden mechanism. If desired, we paint the door.
Finished canvas
Dyeing and varnishing of canvas
Let the decorative layer of paint dry and prepare the jamb for installation of the roller door.
Installation of a wall hung door system
First of all, prepare the joint. If necessary, we install platbands. You can just take everything out beautifully and decorate it for the walls. In our case, the door is hung on a ready-made frame.
Therefore, let's move straight to installation:
- Stage 1 . We decide which way the door will open. We calculate at what height the fastening will be = the size of the canvas + the hanging mechanism. At this level, we fix a beam or board under the base and paint it as desired.
Base installation
- Stage 2. We adjust the guide profile along the length of the board.
Guide profile
- Stage 3 . We fix the profile to the base. The better the fastening, the more durable the structure will be. In our case, special metal hangers were used.
Fastening the guide profile
- Stage 4. Install the rollers on the canvas and mount the handles.
Installation of rollers
- Stage 5 . We put the canvas on the “rails”, and the door is ready.
Finished hinged door.
If you are confused by the powerful roller mechanism, you can cover it with a false panel. Although, in European interiors, this is a real highlight. The video in this article will tell you clearly how to install roller interior doors.
Decor for the front door
Do you doubt that you can make beautiful hanging doors yourself? Practice on a small specimen. And the resulting mini-canvas can be used as decor for the front door - as a screen for the peephole.
Cascade of doors - sliding wall
For small apartments, one-room or small apartments, a good solution may be to use cascade doors. Unlike the options described above, they are multi-leaf sliding structures that move along separate hanging and floor guides.
The convenience of such interior doors is the possibility of constantly changing the internal space of the premises. They can become a temporary wall or a partition with one sliding panel. If you need to expand the space, you can instantly move the doors with your own hands to create a large room. This is true, for example, when guests arrive.
In this type of doors, you can use not only traditional materials, but also fabric on the frame, frosted or painted tempered glass, and others. In this case, cascade doors will not only perform utilitarian functions, but will also become an original decorative element of the apartment.