Retractable doors built into the wall are becoming increasingly popular to save usable space or as a stylistic solution in modern interiors. A canvas of a suitable size is hidden in a specially designed niche, which is also called a cassette. An interior cabinet door can be installed in a ready-made cassette or you can make a niche yourself. Read on to find out how to do this.
Installing a door in a plasterboard partition - nuances
- When choosing a door, you must take into account the thickness of the partition. It consists of the width of the profile and 2 gypsum boards sewn onto it. The box beam must strictly correspond to the resulting number.
- It is also advisable to place timber inside the profile surrounding the opening for additional strengthening and to facilitate further work. The exception is the installation of sliding doors.
- The doorway must be embedded in the partition during its installation. Otherwise, you will have to dismantle part of the partition and profile, and this is unnecessary trouble and expense. The size of the opening should be 6 mm greater than the door frame in height and 6-10 mm in width.
Sliding door in plasterboard partition
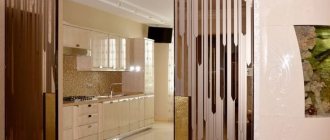
One of the very popular door options is sliding doors, as they save the already small space of rooms. A common problem that arises when installing them is the need to somehow mask the mechanism of movement and fixation of the sashes. All these planks, boxes, overlays made of chipboard, MDF, laminate, wood do not always successfully complement the ambiance of the room. A partition, including one made of plasterboard, allows you to conveniently avoid these troubles. It turns out that the sashes slide along guides into a specially created gap inside the wall. The top profile, the stopper mechanism and all other parts are perfectly hidden there.
What should you pay attention to when installing a sliding door in a plasterboard partition?
- The partition frame must be assembled taking into account the future door, because it is necessary to provide a place for the sashes, in which there should be no profile jumpers or other obstacles to the driving mechanism.
- All work must be carried out strictly according to the level.
- It is imperative to ensure that no other openings or objects are planned in the partition along the door wings: sockets, switches, cable ducts, etc.
- Bottom guide: if any floor covering is provided, then you need to make sure that their height matches the size of the profile. In linoleum it is necessary to make a groove for the guide. If this is not provided for, the door will open noisily, difficultly, or get stuck.
Subject to these conditions, a sliding door in a partition will be one of the most aesthetic and ergonomic options.
Installation of a door in a plasterboard partition
What will you need to install the door?
- Door frame assembled or 3 beams of the required width.
- Actually, the door.
- Platbands.
- Door fittings (locks, handles, etc.).
- Polyurethane foam.
Tools:
- a simple pencil and a ruler, preferably a meter-long metal one;
- roulette;
- calipers and protractor (as a last resort, a square);
- building level;
- a set of screwdrivers or a screwdriver with bits;
- flat chisel;
- hammer and saw;
- knives.
The simplest option is to attach the door to a plasterboard partition with a prepared opening.
The work itself is carried out in the following sequence:
- Box installation. If it is prefabricated, then the box beams are connected to each other. At the same time, their joints need to be cut at an angle of 45 degrees (this is where you will need a protractor or square), if you miss the cutting angle, you will end up with a crooked door frame.
- Now you need to install the hinges. The hinges are either screwed on or cut in. The second option is more difficult, because You need to use a chisel and knife to remove from the surface of the door and frame a layer with a thickness and area equal to the base of the hinge. What makes the job easier is that the hinges can be purchased complete with screws. When hanging hinges on the door leaf, you need to ensure that it is clearly aligned with the door frame. Typically, hinges are hung at a distance of 17-20 cm from the edges of the door frame.
- The box is installed in the opening. This is done level to maintain verticality. The box is attached to the profile with screws or self-tapping screws. For a better decorative effect, their heads should be covered with plugs, or stickers, but they have a bad tendency to peel off. All cracks are filled with polyurethane foam. After it is completely dry (12-24 hours), all protrusions and irregularities can be cut off with a knife.
- It's a matter of fittings. Holes are drilled in the door leaf and frame for the lock and strike plate, the lock, handles, decorative trims, etc. are installed.
- The last stage is the installation of platbands. They can be nailed, mounted on screws or self-tapping screws, or attached with glue.
Arches and openings do not provide sound insulation to the room and do not create an isolated space at all.
Installing a door into a plasterboard partition is an excellent redevelopment option that provides privacy.
Steps to install a sliding door into a wall
There is so little space in a small apartment that even the opening of the interior door creates inconvenience. Sliding systems help to partially solve the problem, but the canvas extending behind the partition interferes with the installation of furniture. The best option is considered to be a cassette design, which provides for the sliding door to roll back into the wall using a pencil case.
Application of hidden doors
Sliding doors designed for hidden installation are more often used in small rooms. But, such designs are quite practical for residential buildings or apartments where young families with small active children live.
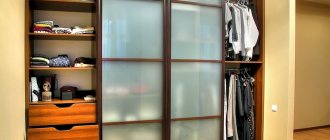
Thanks to its design features, the hidden canvas harmoniously combines with modern interior design styles. Hidden doors are an excellent solution for narrow hallways. Such designs are used to hide built-in wardrobes or separate a dressing room. In this case, the canvas can be used not only as a cabinet door, but also as a large mirror.
How does a cassette sliding system work?
According to the principle of operation, cassette interior doors are no different from designs that require the door to be rolled back behind the wall. The mechanism consists of rollers and guide rails. The main difference is the ability to hide the door leaf inside the wall. This design is called a cassette or pencil case. It is made in the form of a flat box, replacing part of the wall. In addition to the sash, guide rails and a roller system are hidden inside the cassette.
The benefit of a pencil case for sliding doors is the creation of free space inside the wall; the door that rolls back into the cassette does not interfere with installing furniture close to the interior partition. The pencil case protects the door leaf from dirt, scratching by pets and other damage.
For normal operation of a sliding door, a wall thickness corresponding to the parameters of the cassette is required. The structure should form a niche that does not protrude beyond the plane of the pier. In the sliding system, the thickness of the sash and the side posts of the pencil case, as well as the gaps between the elements for the free movement of the canvas, are taken into account. The width of the cassette is always made twice as large as the doorway. The half, intended for rolling back the canvas, is hidden behind a false plasterboard wall.
Which is better: heated floors or radiators?
Warm floorBatteries
Advantages of a pencil case
The sliding door cabinet performs several important functions:
- Improves the aesthetic space by hiding the open door leaf.
- Protects the door leaf from mechanical stress. This is especially true if you plan to install glass doors, and armored glass is not affordable.
- An open door slides along the wall, so nothing can be placed on it. The pencil case will take up a small space, but you can move furniture close to it, hang shelves, paintings, pots directly on it.
Varieties and features
All sliding systems are identical in design. They may differ in dimensions, material, design of rollers and guide rails . The dimensions adhere to standards that imply a door height of 1.9–2 m and a width of 0.6 to 1 m. For large openings, built-in double compartment doors are installed in the wall. If you need to deviate from the standards, the cassette is made to order in the required sizes.
The factory design is supplied in its entirety. The pencil case is already folded and ready for installation. When manufactured independently, the cassette is assembled from a thick board, timber, or galvanized profile. The door leaf can be adapted to any suitable size.
Of the additional devices, the system is most often equipped with a door closer . The mechanism creates a smooth closing of the sash. For complete convenience, the sliding interior door, hidden in the wall, is equipped with automation. The leaf opens when a person approaches and closes after he passes through the doorway. The automation is triggered by sensor signals. The canvas is moved by an electric motor.
Automation is rarely installed in residential premises due to cost and impracticality. Autonomous systems are in demand in stores and other buildings where a large flow of people passes through the day.
Kinds
Sliding doors built into the wall are a structure assembled from a frame, a leaf, a cassette, a set of guides, rollers, and handles. Door blocks differ in the design of the pencil case and the number of leaves. Single-leaf structures are usually installed in standard-sized openings. The cassette is mounted to the ceiling or wall, and no box is required.
Two sashes are placed in wide openings, and each of them must have its own cassette. The canvases are fastened together with a guide.
Main advantages and disadvantages
When deciding to install a sliding door in a pencil case, you need to weigh all the pros and cons of the design. an advantage :
- Space saving. The absence of a swing sash eliminates the formation of a dead zone. You can place furniture close to the wall and it will not interfere with the opening of the canvas.
- Reduces the likelihood of injury. A person walking in the dark sometimes hits the end of an open swing door. The sensations are unpleasant and sometimes dangerous. No matter how hard you try, you won’t be able to hit the end of the sliding panel.
- Increased service life. Due to the rollers, the weight of the door leaf is evenly distributed across the frame lintels. The box becomes more resistant to loosening and does not warp. The linen hidden inside the pencil case is protected from pets and will not be smeared by children.
- The sliding design visually expands the space , creates a zoning effect, and emphasizes the modern style of the interior.
The disadvantage is the high cost . A high-quality roller mechanism is expensive. Additionally, the costs of purchasing or manufacturing a pencil case are taken into account. It is difficult to install a cassette for a sliding door yourself. If you lack experience, you will have to hire specialists.
Another disadvantage is the reduction in sound insulation . There is a gap at the bottom and top of the end of the door leaf. It will not be possible to ensure silence in the room. Additionally, odors will penetrate from the kitchen through the gaps. The problem will have to be solved by installing a powerful hood.
What might be required for the job?
Sliding door mechanism diagram.
Pencil cases for sliding doors, completely ready for installation, can be purchased in the store. However, they are very massive and have a fairly high cost. Making a pencil case for a door with your own hands will cost almost twice as much. It is possible to install a cabinet door yourself, but this requires some experience and knowledge. Installation should begin at the stage of finishing floor leveling. The pencil case should be erected when the level of the finished floor is known, down to the thickness of the floor covering and underlay.
To work you will need:
Do-it-yourself cassette door installation
Before you start making a pencil case for a sliding door, determine the width of the opening. The design of the entire system will depend on this parameter. There are two types of cassette coupes:
- Single leaf. Door blocks are designed for standard narrow passages to the bedroom, kitchen, and bathroom.
- Bivalve. Door blocks are designed for wide passages. Often such openings are installed in the living room or when combining rooms. The design consists of two separate cassettes installed on opposite sides of the aisle. The result is combined single-leaf systems, where each leaf rolls back in the opposite direction.
When making a pencil case for sliding doors with your own hands, take into account the type of wall. The usual non-load-bearing interior partition is completely dismantled. In its place, a structure with a niche is being erected. A sliding door with a plasterboard partition forms a false wall, which is a cassette. The construction of a new wall allows you to save useful space by maintaining the original thickness.
A load-bearing wall cannot be dismantled. The frame of the pencil case will have to be attached to the surface, and covered with plasterboard on top. The result will be a double thickening of the wall and a reduction in space, but there is no other way out.
The cassette compartment door is installed after the finished floor has been installed. By this time, the final leveling should be completed, and the thickness of the floor covering should be taken into account.
Installation procedure
- In order for the design of an interior compartment door to be made without errors when you make it yourself, you will need to draw a drawing and then transfer it to the wall. Using markings, they determine which areas need to be dismantled.
- When drawing up a drawing, you need to calculate the dimensions of the sliding door cabinet. Measurement starts from the sash. Its width is multiplied by 2, which determines the length of the guide rail. The height of the racks of the pencil case is calculated taking into account the thickness of the jumper, the guide, as well as gaps of about 5 mm at the top and bottom of the end of the canvas. The pencil case is made 2 cm wider than the sash. The depth of the cassette is usually limited to 8 cm.
- After performing the calculations, the dimensions of all elements are indicated in the drawing. To make a false wall, a profile is prepared. If the pencil case is mounted on a load-bearing wall, then you will need one row of racks. When assembling a false wall, instead of the removed pier, two rows of supports are installed to form a niche. The length of the racks is equal to the distance from the floor to the ceiling, since profiles are attached in these places.
- An upper jumper is installed inside the niche, and a guide is fixed to it. A similar element is mounted to the floor. It is advisable to place a rubber band under the rail to dampen the sound of moving rollers.
- The assembly of the sliding system depends on its type. Rollers can be on both sides of the sash or only on the upper end of the leaf, and a guide knife is attached to the bottom. After installing the roller mechanism and fittings, the sash is hung on the rail. There should be a gap of 5 mm between the ends of the blade and the guide element.
They try to roll the hung door on rollers. The movement should be smooth, easy, without rumble or jumps. It is important not to forget about the limiters that serve as a stop for the sliding sash.
After successful testing of the sliding structure, the niche frame is sheathed with sheets of plasterboard. Further actions are aimed at decorative finishing of the false wall and framing the ends of the cassette, forming the door frame.
What are the advantages of factory-made pencil cases?
Main advantages:
-the pencil case door is thinner;
-there is a powerful lintel with ready-made holes for fastening the guide rail;
- the door-cases have special roller mechanisms; these mechanisms have adjustments for the carriage stoppers;
- a simpler process of hanging the canvas.
how many panels can be used in cabinet doors
A modern manufacturer has released a door model that has four leaves 700 mm wide.
The canvases move off in pairs in opposite directions.
This corresponds to two-section pencil cases.
On request, a pencil case can be made for four canvases, the width of which reaches 900 mm.
Partitions from compartment doors
When working with plasterboard partitions, you can solve a number of problems at once. For example, sound insulation, the material itself perfectly holds sound waves, and when you use an additional soundproofing gasket inside the wall, you will completely protect yourself from excess noise. Then choose a door from our standard Smart series: they are almost always in stock, and you won’t have to wait long. Remove the old door and prepare the doorway. Install your sliding door using our step-by-step instructions.
When working with drywall, it is necessary to maintain the room temperature at least 14 degrees. This allows work to be carried out in winter. Drywall sheets. They come in different sizes and thicknesses and are designed for different spaces. For example, there is plasterboard for bathrooms; it tolerates moisture very well.
Yes, you can. Our sliding doors are made of lightweight modern materials, so there are no problems installing them on a plasterboard wall. Making a partition with your own hands from plasterboard sheets and a metal frame is quite possible, but sometimes difficulties arise when installing doors.
If you approach the repair from the right side, you can eliminate such moments.
- Stock up on the required amount of drywall;
- Purchase a metal profile, always with a reserve;
- Purchase facing aluminum profiles.
Let’s say there is a gypsum plasterboard partition with dimensions: length – 5 m, width 3 m. It has a door 80 cm wide, 2.1 m high. The frame is made of profiles 7.5 cm wide, the gypsum board cladding is 1 layer. The plan diagram is depicted on a regular sheet or graph paper. Based on the design and dimensions, markings are applied to the surface using a laser level, pencil, or meter.
Profile
Wall with plasterboard
with a sliding door has a profile frame. The iron profile for its installation is made of zinc-coated steel. Its types:
guide - for the base of the frame,
- rack-mount - inserted into the guide,
- corner - for designing corners after cladding.
- width - 50, 65, 75, 100 mm,
- height - 37 or 40 mm,
- length - 2750, 3000, 3500 or 4000 mm.
The choice of profile size depends on the height of the partition, the number of layers of sheathing, the size, thickness and weight of the plasterboard sheet. The heavier the gypsum board cladding, the stronger the profile is needed. Fasten it to the wall using dowels and screws. The guides and rack profiles are fastened together with zinc-coated self-tapping screws and non-pressed washers. The pitch between the profiles is 600 mm. If you need a stronger wall, you can install the rack profile more often.
Fundamentally! The required length of the profiles depends on the height of the wall. It is necessary to choose it with reserve: for a partition with a height of 2800 mm, racks with a length of 3000 mm are suitable. It is unrealistic to increase the profile height.
Profile
Instructions for self-construction of a plasterboard partition with a door
The opening for the doors must be laid into the partition at the installation stage . If this is not done, sooner or later it will be necessary to dismantle part of the partition, as well as the profile. And this costs both time and money. If necessary, the sheets are cut with a sharp special construction knife. The technique is this : after marking, you need to make a cut, completely cutting through the cardboard layer and cutting a little into the gypsum layer.
Then the sheet is laid with a cut line on the rail and breaks. Thanks to them, the strength of the frame is achieved . Sections of PS, the length of which is 80 cm. They are bent in such a way that a U-shaped element emerges, where the length of the back will be 60 cm, and the shelves will be 10 cm each. In our case, everything is determined by the width of the plasterboard sheet, which in the standard version has 120 cm.
Based on the fact that the sheet is laid so that there are three profile elements underneath it: two at the edges and one in the middle , the distance between the posts should be 60 cm.
- Marking . The easiest way to do this is to use a level and tape measure directly along the floor and wall. This will also help you get a better idea of what the partition will look like.
- Assembling a metal frame.
- Insulation placement.
- Laying communications.
- Installation of gypsum boards.
Roller mechanism and pencil case parts
The cabinet door mainly consists of:
-an aluminum rail, which is attached every 30 cm using screws in the upper frame crosspiece;
-U-shaped stand;
-bottom bracket, which has a guide flag;
- roller carriage;
- travel limiter, it can be a simple stopper or a locking hook.
Sliding compartment door in a gypsum plasterboard partition
There should be no elements inside the plasterboard partition located in the path of movement of the compartment door. Even if the obstacle is a direct part of the structure. The width of the doorway in our partition is, for example, nine hundred millimeters.
It is necessary to take into account the size of the platbands when calculating the width. We calculate twenty millimeters and get the required width of eight hundred and eighty millimeters. It is important to remember that the height of the opening always corresponds to the height of the door itself.
The frame is covered with plasterboard sheets. The structure is sheathed on both sides and in two layers. The two-layer lining of the partition is not only a prerequisite for installing a sliding door, but also a guarantor of the reliability and long service life of the structure. In addition, only double sheathing with plasterboard sheets can provide the desired sound insulation and thermal insulation. Then the clean floor is laid.
And only after that it’s time to tackle the door itself. Next, mount the partition frame. Already at this stage you will need a drawing so as not to miscalculate the size and location of the profiles. If the room uses floor coverings, special attention should be paid to such elements as the lower door guides.
If you put a carpet in your room, lint from it can get caught in the mechanism, then this can create problems in the future. If you use linoleum, then with friction, the mechanism can easily tear it apart, which will lead to the floor looking unpresentable. The benefit of a pencil case for sliding doors is the creation of free space inside the wall; the door that rolls back into the cassette does not interfere with installing furniture close to the interior partition. The pencil case protects the door leaf from dirt, scratching by pets and other damage.
A load-bearing wall cannot be dismantled. The frame of the pencil case will have to be attached to the surface, and covered with plasterboard on top. The result will be a double thickening of the wall and a reduction in space, but there is no other way out. Plasterboard partition
It can be attached to a solid wall or used as an independent decoration for the room. When closing, the door leaf is recessed into a niche between the two sides of the partition or a solid wall and a false wall.
For smooth door
Handles of a special shape are installed in the plasterboard partition on the canvas.
They are recessed deep into the sash. There are a huge number of options for such handles on sale: round, rounded, rectangular, square and others.
Mounting options
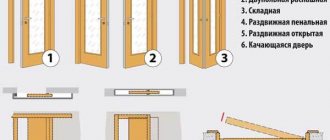
Regardless of the sliding door system, installation methods can be:
Cascading sliding doors: one leaf pulls the other
The simplest installation option is sliding doors. They can be installed independently, not only at the repair stage, but also after it. It is only important that the opening is smooth and the wall has normal load-bearing capacity. The disadvantage of such a system is that you cannot place anything close to the wall in the place where the door rolls back. There is one more thing: very low sound insulation. This is easy to explain: if you look from the end, there is a gap of several millimeters on the sides. It is necessary so that the canvas does not “shuffle” along the wall. And all sounds penetrate perfectly through it, becoming only a little quieter.
Cassette doors are good because when open, the door leaf is located in a niche in the wall and does not interfere. The second advantage is that seals can be installed around the perimeter of the opening, which provide much higher sound insulation performance. The disadvantage of installing a sliding door in a niche is that it can only be done at the renovation stage. The second drawback: to make a pencil case for sliding doors, they usually install a false wall, and this means stolen centimeters of space.
Cascade doors are one of the types of sliding doors. It simply has a larger number of guides: according to the number of movable door leaves. Installation is perhaps the most difficult: there are many parts and high installation accuracy is required. The systems belong to the elite category, and they rarely save on installation: repairs will cost more.
Compartment door in a plasterboard wall
For installation in a gypsum plasterboard partition, it is best to choose an interior door with light weight. Accordion doors and sliding structures are perfect for these purposes, the additional advantage of which is that they save space. Hello. I want to divide one room into two with a plasterboard partition and install a sliding door that will be hidden in the wall. How to make a partition frame where the door is installed? In what order should the work be carried out? The dimensions of the door leaf are 2100x900 mm.
- All drywall joints and screw heads are puttied.
- To prevent gypsum dust from irritating the mucous membranes of the eyes and nasopharynx, you should use a respirator. Also take care of high-quality ventilation in the room.
Tip: cutting out a doorway is especially difficult, so it is best to screw the entire sheet and only then cut, focusing on the frame. The installation of a door into a plasterboard partition is planned at the initial stage of repair or construction. The doorway must be blocked when installing the frame for attaching drywall.
Requirements for the design of pencil cases
Sliding door pencil case
To create sliding door pencil cases, you should install a niche into which the door leaf should move. The requirements for the manufacture of these structures vary. The wall, if it is not load-bearing, can be dismantled. In the place where it was located, a wall partition is re-installed, providing a niche for the panel door leaf. The partition is called a false wall.
The door frame itself should be a partition. At the same time, the area of the room is maintained, and the thickness of the wall does not increase. If for some reason it is impossible to dismantle the load-bearing wall, then you will need to attach a frame made of wood or metal to it, which must be covered with plasterboard.
The pencil case is a good solution that allows you to save space and give your living space an elegant look. You can purchase such door designs with a ready-made pencil case (cassette) in the store. When carrying out the construction yourself, you must take into account that installing a pencil case is not easy, so the approach to this problem must be serious. At the same time, the technology of installing the structure is studied and all its subtleties are clarified.
Plasterboard partition with door, self-installation
If you plan to make a structure from gypsum plasterboard with a door with your own hands without insulation, electrical wires and other communication elements are pulled inside the frame to the plasterboard lining. Electrical cables are packed in advance in corrugated tubes. Both an ordinary hinged door made of wood and a sliding door that is moved to the side or completely immersed in the body of the bulkhead are installed in the plasterboard partition element. You can also equip an arched opening. Taking into account the characteristics of the material, it is possible to construct a hidden panel, making the doorway invisible against the background of the plasterboard partition.
To prevent furniture from interfering with the opening of the sliding door, install a false wall. To do this, install an additional sheathing, the elements of which are spaced from the main partition at a distance of the thickness of the sliding door and 1–1.5 cm of margin for free opening. A characteristic feature of this design is the absence of a frame for the width of the sliding door. When arranging a solid base, the width of the wall increases by 5–6 cm.
All elements of the partition frames are fixed to each other using self-tapping screws. The construction of a doorway in a partition structure made of gypsum board requires strengthening the rigidity of the frame that fits the doorway. For this purpose, a wooden beam is used with such a thickness that it fits tightly into the profile. Or install two reinforced profiles fastened together.
Since the delimiting elements made of gypsum sheets are hollow inside, insulation and sound insulation can be made using modern materials.
Additional information on the topic:
- How to properly glue ceramic tiles to drywall video
- What profile is needed for a plasterboard box on the ceiling
- How to properly make a plasterboard partition on a wooden frame
- Photos of plasterboard ceilings for the living room with lighting in two zones
- How best to make interior partitions from plasterboard
How to treat the surface → Room decoration → How to choose the right paint → Surface treatment technologies → Leveling and finishing the walls → Selecting and applying a primer → Removal from the surface → Stretch ceilings and technologies → Reviews and testimonials