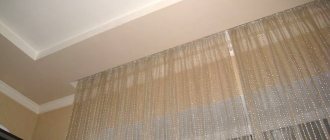
It is often difficult to harmoniously fit the cornices on which the curtains are attached into the interior of the room. The problem becomes more complicated if you plan to make suspended ceilings: you need to think in advance and arrange the fastening of heavy curtains or curtains. In addition, all these elements will be reflected on the glossy surface of the ceiling, which does not look very nice. The solution may be to install a special niche for plasterboard curtains, which will not only hide unwanted elements, but also add elegance to the room.
Preparing the ceiling for a hidden cornice
Before any cladding, the surface must be prepared.
Neglecting this stage will lead to the appearance of the design looking ugly, defects will become more noticeable, and the service life of the materials will be shortened. Therefore, some measures need to be taken. They start by eliminating the previous design. The paint can be removed using a special compound or mechanically; just soak the wallpaper. Whitewash should also be treated with water. Defects, gaps and cracks are sealed with special compounds, such as putty or plaster.
If you do not plan to stretch the fabric or install a suspended ceiling in the area of the box, it is recommended to putty this free space and cover it with white paint. You can come up with a more interesting design, but this is a basic treatment that is best not to be neglected. This will allow the pocket to look more aesthetically pleasing and fit harmoniously into the design.
@passaz-okna.ru
The final stage
At this stage you will need to do the following operations:
- Seal the joints with sickle and then putty them. The places where screws are screwed in should also be puttied;
- we putty the entire structure and prime it;
- sand all the uneven surfaces and apply the final layer of putty.
All that remains is to decorate the niche to suit the interior of the room. To do this, the box can be painted, covered with wallpaper, or decorative stucco applied to it.
DIY installation
It should be recalled once again that installing such a structure is a very responsible matter, not quick and requiring maximum care. But if you decide to install it yourself, it is recommended that you carefully read the instructions for attaching ceiling models to a suspended ceiling.
Installation of an open cornice
To fasten the curtains using this method, you will need a wooden beam and protective rings. The crossbar must be strong in order to withstand the weight of the structure and the proposed curtains. The thickness of the beam is selected so that its lower surface is practically in contact with the ceiling panel; the length should be equal to the length of the cornice.
Work order:
- Treat the beam so that there are no rough spots left on it that could damage the tension fabric. Walk over the surface of the flat block with a special antiseptic solution (to prevent the appearance of mold).
- Decide on the location of the structure and apply appropriate markings to the ceiling.
- Attach the fixing body of the stretch ceiling to the walls.
- Drill holes in the main ceiling, hammer in dowels and use self-tapping screws to pull the beam to the ceiling according to the previously applied markings.
- Stretch the ceiling sheet with pre-glued protective polymer rings and holes burned into them.
- Carefully attach the ceiling profile with self-tapping screws to the beam through the holes in the canvas, being careful not to damage it.
When the work is done correctly, the embedded beam should not be visible.
Installation of a hidden cornice
This installation method is somewhat more complicated than the previous one, since it will require the formation of a niche that will hide the holding structure. It is necessary to correctly calculate its width in order to avoid problems with the movement of curtains. As a rule, the standard length of a niche is from one wall to another. The exception is rooms with complex window configurations.
To make a niche you will need a wooden beam. It must be processed in the same way as for the open type of installation. It is recommended to cover the corners and edges of the structure with masking tape or grind and sand it to avoid damage to the canvas during installation.
Work order:
- Mount the curtain on a concrete ceiling using dowels and self-tapping screws.
- Attach a wooden block using an aluminum profile to the ceiling at a distance of 2–3 mm from the curtain.
- To install a bay window cornice, you will need several small bars attached to the ceiling, on which the solid niche strips will be fixed.
- Secure the fixing body of the tension fabric on the curtain side so that the bar is not visible.
You should pay attention to the gap between the window and the niche beam - it should not be too large, but, at the same time, sufficient for the unhindered movement of the curtains
With this installation method, it is better to purchase the cornice before the final measurements of the tension fabric, since the size of the future ceiling depends on the design of the curtain.
Preliminary marking of plasterboard construction materials
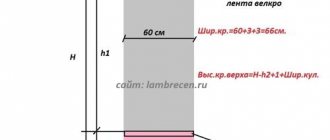
First of all, it is necessary to measure and mark the materials used, and decide what the width and depth of the future niche will be. When determining the width, you need to start from what kind of curtains there will be. If it is envisaged that they will be in several rows, then it is worth modeling how this will fit into the overall design. Measurements take place as follows:
- Using a plumb line on the ceiling, it is necessary to mark a line corresponding to the exit line of the window sill or heating radiator (the extreme point from the window opening).
- To the drawn line you need to add a couple of centimeters (2 - 3 cm) inside the room and draw another line. It determines the area where the 1st row of curtains will be fixed.
- Try on the curtain fabric, placing it along the line closest to the wall. If the distance is too small, you will need to retreat another couple of centimeters.
- By adding another 1 - 2 centimeters to the line that marks the outer border of the curtain, you get the desired width of the future niche.
When determining the depth of the future niche, you need to consider the ease of its installation and, possibly, the installation of an LED strip used as window illumination.
Adviсe
When creating a niche, you can make it more attractive by following some tips.
- Curtains illuminated with LED strip look unique. Using a special remote control, the lighting changes color, creating an emotional mood for each individual moment.
- A niche looks more impressive if it is assembled along the entire wall. But if you select only the window, you can save on building materials.
- The opening for curtains does not have to be an invisible gap in the ceiling; it itself can be a decorative element of the interior. It is highlighted with color, lined with mirrors, decorated with moldings and a wide ceiling molding.
- You cannot make mistakes when calculating a niche; a niche that is too narrow can squeeze and deform the line of curtains, and a wide one can create a hole in the ceiling space.
- Rooms separated by ceiling openings for curtains can be zoned not only with soft curtains; The best division of space is Japanese curtains.
Innovative solution
Another way to create a hidden cornice is a new system of cornices built directly into the ceiling. Today, design solutions require minimalism and simplicity, both during installation and in appearance. Therefore, KRAAB-SYSTEMS successfully implements these requirements.
@kraab-systems.com
The company implements most solutions using a damper, gapless system, which visually makes the structure more aesthetically pleasing and makes installation more convenient. It is worth paying special attention to the fact that such a cornice system is an innovative solution in the field of suspended ceilings: thanks to it, it became possible to embed a cornice in the ceiling without the use of additional profile and installation of niches. Among other things, the cornice can be supplemented with an electric drive and the movement of the curtains can be controlled using a key, remote control or smartphone, since the “smart home” system is now gaining popularity all over the world and is becoming an indispensable attribute in every room
Paying attention to the design, it is worth noting that the engine itself is hidden behind the curtain and does not spoil the appearance of the structure, and the silent mechanism does not irritate or interfere. Another absolute advantage is that the engines are selected according to the client’s needs. If we talk about appearance, the cornice looks like a thin strip of black or white. But when choosing a cornice, a person is often faced with the question of the number of cornice lines. The classic quantity is three lines: for thick curtains, for tulle and for lambrequins. If we return, again, to minimalism and practicality, then the optimal solution today is a one-line solution - for blackout curtains.
Sheathing with plasterboard
It is necessary to sheathe the box with plasterboard only from the bottom and front sides. Therefore, several strips are cut from the sheet. Some will be as wide as the width of the box for the plasterboard niche for the cornice, while others will be as wide as the height of this box. Fastening is done with self-tapping screws using a screwdriver.
There is no point in sheathing the back part of the structure; it will not be visible anyway. Now you can install a hidden cornice in a niche made of plasterboard, and finish the box itself with putty and carry out sanding and further finishing.
So, in the question of how to make a niche from plasterboard in the living room, all the i’s are dotted. This is the simplest option. If any of our readers have any questions or ideas, we are ready to discuss them with you on this page in the comments.
How to choose the right one
The choice of cornice is largely determined by the size of the room in which it is planned to be located. For small apartments, it is best to purchase plastic or aluminum cornices, and for a spacious country house, you can buy classic wooden models. The cornice should be selected according to the style of the room. Thus, heavy, massive wooden classics will not fit in with the modern minimalist trend.
In addition, when choosing a cornice with the simultaneous installation of a suspended ceiling, you should take into account the height of the walls of the room - the method of installation of the structure depends on this. With a low ceiling, it is not recommended to install a hidden curtain mechanism, since it is mounted to the ceiling in such a way that it “takes away” extra centimeters. The overall price of the product depends on the installation method - installing a structure without a niche, directly on the ceiling, is much simpler and, accordingly, cheaper.
Ceiling cornices can be either with rounded edges or with “cut off” edges. The second option is only suitable for installation from one wall to another, while the first can be of any length, at the discretion of the home owner.
When choosing a design, you need to decide whether it will perform only a practical function or whether it will become the main accent element of the interior that attracts attention. The installation method, as well as the harmonious combination with the overall design of the room, depends on this.
Often, curtains are complemented with separate baguettes or built-in blend strips for decorative purposes. Such models also look good on low ceilings; there is no visual reduction in the volume of the room.
Ceiling structures are installed not only on window openings - they can also be used as a dividing curtain in a room. It is better to install partition curtains in a suspended ceiling in a hidden way, hiding the fasteners of the structure behind the canvas. Decorative models in this case will be inappropriate.
How to calculate length
The length of the cornice largely depends on the chosen model: the bus profile is usually purchased for the entire length of the wall, structures with rounded edges can only cover the window opening.
In a modern interior, both options are used; which one to choose - you need to decide for yourself, based on the stylistic features of the room and the shape of the window openings.
For the classic arrangement, which involves covering the window directly with curtains, the length of the cornice is calculated simply: you need to measure the height of the window opening and add 35–40 cm to it. Thus, the suspended profile will be 15–20 cm longer than the window itself on both sides.
Marking
At the initial stage, markings are made:
- The distance from the box to the most prominent element of the window opening should be at least 16 cm. It is laid on both walls and connected by a line on the ceiling. This line will be the boundary of the niche. It is convenient to use painting thread for drawing.
- Parallel to the line, draw another one, which is the inner boundary of the box. The width between them corresponds to the width of the structure.
- Verticals are lowered on the walls, limiting the height of the frame.
USEFUL INFORMATION: Butterfly fastening for drywall: sizes and types of dowels
The following diagram shows a variant of a niche, which is provided in the design of a suspended ceiling.
How to attach?
If you are not confident in your abilities or do not want to waste extra time, it is better to turn to specialists. They will help you select the necessary materials, advise you in accordance with the characteristics of your premises and install the desired mounting option without any problems. Often this can be done simultaneously with the installation of a stretch ceiling. But if you have some repair and finishing experience and available tools, you can carry out the entire installation yourself.
First of all, you need to decide on the type of material for fastening. In most apartments, standard plastic products will do. Next, you need to measure the window opening and set the required length of the cornice. Now it is fashionable to cover the entire wall with curtains, especially if the room is elongated and the window is in a narrow part.
After purchasing the curtains, it will be clear what parameters should be calculated for its installation.
If you neglect these steps, there will be a high risk of damage to the entire surface of the stretch ceiling. The large height of the cornice will prevent the smooth installation of the canvas. Trying to install a curtain mount after completing work on stretching the ceiling in the case of using a niche will certainly lead to tears and defects in the stretched material.
Additional tools and materials that will be useful are a screwdriver, a drill and fasteners - screws and dowels.
Below we will consider two options for installing curtains.
Closed method (with niche)
First you need to fix the curtain to the ceiling at the required distance from the window. The fasteners must be screwed directly into the base of the ceiling. Most often this is a concrete slab. In this case, dowels are used. If you decide to make a suspended ceiling in a wooden house, use self-tapping screws. Then it is necessary to retreat such a distance from the wall on which the window opening is located so that the curtains can move freely and fall without catching on the edge of the niche. As a rule, installation is carried out 20-30 cm from the surface of the walls.
After this you need to nail the wooden beam. An important point will be the pre-treatment of wood with special impregnations to protect against fungi and mold.
A profile is installed to the lower edge of the beam to secure the tension web. After the PVC ceiling is stretched, you can hang the selected curtains and use them with pleasure.
There is one caveat. You can try to wrap the film material behind the block. To do this, instead of a fastening profile, you need to attach a bending profile to the tree from below, and install the fastening profile at the upper edge of the block adjacent to the rough ceiling.
Open way
The first step is to install a profile guide for the tension fabric on the wall near the window. Then markings are made, and a wooden block is mounted at the required distance.
The thickness of the timber is of great importance during the work process. It is necessary to ensure complete contact of the lower edge of the tree with the PVC sheet. You can use mounting wedges to control this moment.
After fixing the base, you can install the suspended ceiling.
Next comes the most crucial moment: the curtain should be secured with self-tapping screws directly through the fabric, carefully, without unnecessary damage. It is better to burn holes for fasteners with fire rather than punch or break through them. For reliability, you can install additional polymer gaskets in the places where the screws pass.
After completing all stages of work, your design is ready for use. The plastic base or metal profile of the curtain can be hidden behind the ceiling plinth for tension fabrics. And the above-mentioned baguette will serve here as decoration for your curtains.
Niche options for curtains
First of all, it should be noted that each project for the hidden location of a cornice associated with the construction of a gypsum plasterboard box is unique. When planning a niche for curtains, the characteristics of a particular room are taken into account:
- Window opening width.
- Wall length.
- Required distance from the window. It depends on the elements protruding into the room, usually a window sill or a heating radiator. The curtains should be separated from them by at least 2 cm, otherwise during operation they will constantly cling or rub against protruding parts, which can lead to rapid wear of the material or breakage of the fastening on the cornice.
Therefore, the dimensions of the box, especially its depth, are determined individually for each room. There are three main options for niche execution:
- Spotlights are usually mounted in a box 25–30 cm wide.
- The narrow design, 5–7 cm wide, does not provide for the installation of additional lighting, with the exception of an LED strip for illuminating curtains. For beauty and smooth transition, a baguette is glued from inside the room. The height of the structure should be slightly higher than its width or equal to it.
You can create beautiful lighting with any type of niche design. The LED strip is placed between the cornice and the plane of the box facing the window, which increases the width of the niche by at least 2 cm. The LED control elements and the electrical supply are retracted inside the box.
- Wide box decorated with baguette.
The ceiling box can have any configuration and size, the main thing is that it fits organically into the interior of the room and fulfills its main task: to hide the suspension elements. Curtains or curtains that fall directly from the surface of the ceiling look very impressive.
Problems of choice
Ceiling surfaces and recommended curtains
According to the methods of designing the ceiling space, it is usually divided into several types:
- reinforced concrete ceilings;
- tension systems;
- rack structures;
- suspended and mirror surfaces;
- false ceilings;
- raster or cassette coverings.
When choosing ceiling curtains, be sure to take into account the type of ceiling in the room. If you have reinforced concrete foundations that are standard for apartments, installing a cornice of any weight to the ceiling will not be difficult
But with tension or suspended plasterboard structures the situation is different. You will have to focus not only on the fasteners that come with the curtain rod, but also on the types of ceiling materials, because the curtain is attached not to the wall, but to the ceiling above the window
Types of designs and materials
Ceiling curtains help out when the window sill protrudes significantly into the room.
According to the type of material from which the cornice can be made, the following types of products are distinguished:
string curtains fit light curtains. Their design is represented by a string stretched between two fasteners. Under the weight of the textile, the cornice will begin to sag. Therefore, a hanging string curtain is suitable for a kitchen with a weightless curtain or a children's room.
wooden cornices will highlight styles such as Provence, classic, country, and rustic. The main advantages are the environmental friendliness of the material and the ability to withstand maximum loads.
profile systems are simple and democratic. However, it is with them that most design ideas can be solved. The design of the curtain is represented by a long aluminum or plastic profile with several rows. This feature allows you to hang tulle, curtains on one product and complement the design with lambrequins.
The profile is equipped with elements that round corners and connect its individual parts.
metal curtain rods are the most durable and can easily withstand multi-layer compositions and heavy printed curtains. This is an excellent solution for high-tech and minimalist styles.
Dimensions
When choosing curtain rods, the question always arises as to what size the curtains should be. If we talk about optimal parameters, then for a spacious room in which the windows are located along a long wall, you need to purchase curtains 50-60 cm wider than the window opening. It is necessary to cover a section of the wall surface to prevent oblique sun rays from entering the room.
For a narrow room, the dimensions of the cornice should be slightly narrower than the window wall.
Box dimensions
The plasterboard niche for curtains has different sizes and configurations. And there are no strict restrictions here. Everything again depends on the design project. But there are certain standards that indicate the minimum and maximum parameters offered as recommended. So the minimum width of the box should not be less than 15 cm. This is understandable, because a smaller structure on the ceiling will look awkward. The maximum width is 1.5 m. This is a fairly large box in which you can, for example, install spotlights or decorate it in other ways. Although for small rooms the optimal parameter is 25-30 cm.
Niche size for cornice
There is one exact size that must be maintained. This is the distance of the curtain from the wall, and accordingly the distance of the box itself from the wall surface. This takes into account the tightness of the curtain’s contact with the protrusions, namely: either to the edge of the window sill, or to the plane of the heating radiator. In both cases, the minimum distance of the curtain from the protrusions is 5 cm. Taking into account the width of the plastic curtain rod, you will have to calculate the distance from the curtain to the edge of the niche: 5 cm plus the width of the tire. And this is the minimum parameter. If we talk about the distance from the wall to the niche for a plasterboard curtain, then the width of the protrusion must be added to the resulting indicator.
If the outer plane of the box being constructed will be finished with a ceiling plinth, then the height of the structure is taken equal to the height of the baguette. In other cases, this size is taken taking into account the design design.
Preparing to create a niche for curtains in a suspended ceiling
Preparation for installation of the recess under the cornice can be divided into several stages, each of which is important in its own way and requires attention and time:
- The choice of design for finishing the upper limit, the possibility of installing a recess under the cornice and ways to implement the idea. From the very beginning, you should decide whether this design needs a niche and, if so, how it will fit in with the overall style of the room design. One of the most important points is the choice of the method of installing the recess for the curtains and the material for the main area of the ceiling - the type of tension fabric, gypsum board or a combination of them.
- Taking measurements on site, determining the amount of materials needed. In order to make the correct calculation of the structure and recess, it is necessary to take into account all the protruding elements of the room and near the window space - the removal of the heating radiator, the window sill (and its length), the arrangement of heating water pipes. Next, you should make markings and preliminary calculations of the amount of material required.
- Preparation of all materials and tools for work. If you plan to entrust the installation of the ceiling to a team, then the specialists themselves will provide the material and the necessary tools. If the finishing is done independently, then before starting work you should prepare the entire set of consumables and fastening materials, and working tools.
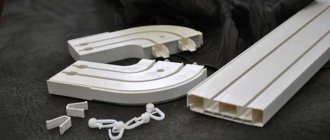
To install a stretch ceiling with a recess under the cornice you will need:
| Wooden beam |
| Aluminum corner |
| Profile |
| Wall profile |
| Platform under the cornice |
| Aluminum suspension |
| PVC fabric |
Required tool:
- Screwdriver.
- Hammer.
- Building level.
- Self-tapping screws, dowel-nails.
- Scissors and hacksaw for metal.
- Painting knife.
- The spatula is wide and narrow.
- Construction tape.
Next, the installation of the stretch ceiling itself is carried out. But before that, its surface should be prepared - clean the place where the profile will be attached and, if necessary, putty it.
Marking and installation of the niche structure
What is a plasterboard niche
A niche for plasterboard curtains is a device that hides well in the ceiling; its purpose is to disguise the cornice. To make it, you need sheets of drywall, guide profiles and fastening parts (screws, brackets). If in the future light curtains will hang on the window opening, then the box can be made small. Heavy curtains will require a deeper design. Using a niche for curtains made of plasterboard has a number of positive characteristics:
- Originally complements the design of the window opening, regardless of the style.
- Thanks to such a niche, the height of the room visually increases.
- Allows you to hide a block with a mechanism on the eaves, with a built-in electric drive, if it does not fit into the intended interior.
The dimensions of such an opening can be varied. It is necessary that they correspond to the dimensions of the suspension structure that fits inside. A niche for a plasterboard cornice is most often made with a width ranging from 10 to 15 centimeters.
Hidden curtain on a suspended ceiling (hidden cornice)
So, the curtain, which refers to the ceiling cornice, can be rod, profile, ceiling and hidden.
In this case, when installing the ceiling, the baguette must be attached to all walls, except directly near the window. In this zone, it must be mounted on a fixed beam (perpendicular to the ceiling) or a simple galvanized profile, the one used for drywall.
A hidden cornice is the best solution when you want to give the curtain the most aesthetic appearance
If you take a profile, you will need slopes
It is important to remember that a suspended ceiling will create a large horizontal load on the profile. You make a 10-20 cm indentation from the wall with the window, and you need to install a hidden cornice in this indentation
Then the cornice is mounted to the rough ceiling, and then the ceiling itself is stretched along the baguette. Everything is ready - you can hang the curtains.
Interior design options
Hidden curtain rods are an excellent solution and almost the only one for rooms with angled ceilings (monsard). The traditional method of fastening the cornice in such cases does not look very nice. Hiding it from view is the only correct solution.
Which is better: heated floors or radiators?
Warm floorBatteries
If the budget allocated for repairs allows, then you can make original lighting as in the photo. Lighting can be installed both inside and outside the curtains. This solution puts emphasis on the window area and allows you to use this space separately. For example, use for a desk or relaxing with a book.
A hidden curtain can also be used to create a canopy over a sleeping area. The room takes on a more aesthetic appearance, because the fastening design does not stand out from the overall interior. A cozy and romantic atmosphere is created if dim lighting is used in this niche.
Design Features
The photo shows the use of various materials for curtains
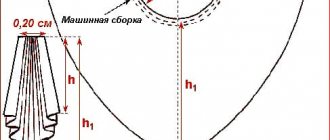
The height of the niche should completely hide the drapery tape sewn to the curtains. In this case, the height of the braid is determined by the weight of the curtains and the length. The standard dimensions of drapery elements usually range from 7 to 10 cm, and the height of the niche must be increased by at least 5 cm. If you make the niche equal to the height of the ribbon, then the person below will see the drapery.
Schematic structure of a niche
The length of the box can occupy the entire wall or correspond to the width of the window opening. If you prefer the latter option, make indents on each side of the window of at least 50 cm. Then the curtains, when hung, will not prevent sunlight from entering the room. For Roman blinds, 10 cm indents are enough.
As for the maximum height of the structure, you should not make it more than 40 cm deep. Otherwise, it will be difficult to attach curtains and hang curtains.
Dependence of niche depth on cornice design
Consequently, if you plan to place curtains and tulle on the cornice and supplement the system with lambrequins, then there will be three profiles, respectively. This is a minimum of 15 cm. Add another 5 cm on each side. The width of the niche is 25 cm.
False ceiling with niche for curtains
Plasterboard ceiling with niche for curtains
Drywall is a universal and practical material that has found application in the construction industries. Gypsum boards are easy to work with, they bend well, so a niche for a ceiling cornice made from gypsum plasterboard will be spacious and attractive. Installation of a niche begins with measurements of the room and the place where it will be installed. From the beginning, you need to decide what function the box will perform - decorative or just to hide the curtain. Before you start arranging the niche, you need to completely finish the work with the electrical wiring if you plan to install a plasterboard ceiling with lighting.
The work is carried out as follows:
- make a marking on the ceiling with an indentation for a niche of at least 15 cm. Then, even if the canvas gathers into folds, unsightly creases will not form;
- Guide profiles are installed along the perimeter of the room, after which the frame for the suspended ceiling is assembled;
- using self-tapping screws, two frames are combined - a niche and a suspended structure;
- sheets of plasterboard are cut to the required sizes, and the frame is sheathed;
- install cornice for textiles.
At the final stage, all joints and cracks are sealed with putty, and the ceiling is decorated in any chosen way.
Box under the cornice in a suspended ceiling
How to assemble a box under a cornice in a suspended ceiling
It is better to entrust the installation of a niche from suspended ceilings to specialists, as well as the installation of the entire decorative structure. Usually the work is carried out in the following order:
First of all, curtain rods for suspended ceilings are attached to the ceiling using dowels with metal or plastic sleeves. Its initial installation is necessary in order to determine the dimensions of the niche. When work on installing the box is carried out, the baguette can be removed to avoid damage during the work; First, the base for the niche is made. To do this, step back 2-3 cm from the cornice and fix wooden blocks to which the profile for the tension fabric will be attached
After the timber is secured with screws, proceed to installing the decorative ceiling; a profile under the tension covering is attached to the inside of the wooden beam, and the canvas is tucked into it using one of the selected methods.
Frame assembly
Before assembling the box, all electrical work related to the placement of cables and spotlights is carried out.
Note! The process of arranging a niche for gypsum plasterboard curtains has an important feature: due to the small distance between the window and the outer edge of the box, attaching drywall to it is problematic. Therefore, this wall is assembled on the floor, and then attached to the ceiling with drywall attached.
The frame is assembled:
- A guide profile is attached to the ceiling and walls along the marking lines. Fastening is carried out using dowels in increments of 40–50 cm.
If the ceilings are wooden, then the process is simplified: the dowels are replaced with wood screws with a wide head.
- Profiles forming the lower edges of the box are attached to the lower ends of the guides located on the walls.
The standard length of guide profiles is 3 m. This is not always enough to form a structure. In this case, the profile is built up using the overlay method, fastening it together with a cutter or metal screws.
- A cord stretched between the lower boundaries of the box on the walls will help control the deflection of the lower edges. Based on it, vertical jumpers made of ceiling profile (PP) are installed. They will also provide the structure with the necessary rigidity and will be useful when attaching drywall. Therefore, the step between these jumpers is 60 cm.
- If the box width exceeds 30 cm, horizontal crossbars are required. They are also made from PP profile. For strength, the elements can be attached to the ceiling using straight hangers or profile sections. In the latter case, the side walls of the profile are removed at the ends. “Tabs” bent at right angles serve to attach such a homemade suspension.
Niche design: creating lighting
It was noted that in addition to the main function, the box allows you to integrate lighting. The organization of additional lighting will look unusual and attractive. The lighting will create the effect that the curtains are airy. To achieve this goal, a strip with LEDs is inserted into a special groove. It can be any color; you don’t have to choose a classic one. This also helps to visually increase the height of the space. Relevant for low rooms.
@remontoffanapa.ru
The box for the curtain rod allows you to hide the auxiliary elements and leave only beautiful curtains for the eyes. There are several methods to implement such a project. One of them can only be performed by professionals. Therefore, if you plan to carry out the work yourself, it is worth taking into account the peculiarities of the methods for creating a recess.
The construction of the box should be planned at the ceiling design stage. Otherwise, it will be impossible to implement such an idea later. A strip of lighting will create an airy effect and add light to the room.
Installing a cornice on a plasterboard surface
Since slatted cornices are already equipped with mounting holes, the cornice should be attached to the intended place of fixation and, using a pencil, through these holes, mark the points through which the cornice will be attached to the ceiling. Next, using a drill or hammer drill, you need to drill holes for installing dowels and install these fasteners in them.
The work is completed by raising the cornice, aligning all the holes and fixing the entire system using self-tapping screws screwed into the dowels.
Detailed photos and videos of the entire process of attaching cornices to a plasterboard ceiling or wall can always be found from specialists involved in such installation work.
LumFer niche with reflective lighting for lamps made from profiles Ba01 and M01
The Lumfer niche with reflective lighting for lamps is made of two parallel running profiles Lumfer Ba01 and profile M02, and is fully integrated into the suspended ceiling (without gaps, cracks, plugs, seals). The niche profile is made in black and white.
Any type of static lamps can be installed in the niche for lamps - linear, spots, etc.
It is possible to mount a niche of any length and shape with a joining angle of 90 degrees or more. Structures with sharp joining angles are not manufactured. The niche does not fit into a two-level structure (with or without lighting). The minimum length of the niche structure is 1 meter. The minimum distance from the walls both to the end of the structure and to its side is 30 centimeters. The distance between niches is at least 30 cm.
Necessary materials and preparatory work
First you need to calculate what shape the plasterboard cornice will have, whether it will be placed only above the window opening or in some other way, calculate the width of the suspension and the shape of its edges, if, for example, curtains of several layers are assumed.
All ideas for decorating a niche for curtains should be presented as drawings and sketches, thanks to which it will be possible to calculate the amount of materials required for installation.
For the simplest drywall box you will need:
At the beginning of work, clean the ceiling and walls from the old coating, and prime the surfaces.
Types of niches for hidden cornices
Sometimes, for some reason, it is impossible to organize a recess under the curtains (for example, the communications running along the ceiling interfere with screwing the cornice). In this case, the cornice is mounted directly on the suspended ceiling, on a base, which can be a beam placed 5 mm above the canvas. From the outside (from the side of the room) the structure is covered with a decorative overlay.
Hidden built-in corniceSource all hereclub.rus
In other cases, a niche is formed in the structure of the stretch ceiling. Stretch ceilings with a niche for curtains can be made in several ways. Technical solutions vary in degree of complexity, which affects production time and cost. The following options for cornice recesses are possible (in order of increasing cost):
Budget niche. The low-cost method mentioned above, in which a niche is formed using a beam that takes on the main load (it is attached to a concrete base). From the side of the room there is a smooth canvas trimmed with decorative edging. The advantages are ease of installation. There are two disadvantages - a visible edging, which does not always look decent, and also the opportunity to get acquainted with the design by looking at it from the side of the window.
The canvas hides the presence of the beam and corniceSource nevapotolok.ru
- With the installation of a plasterboard box. A niche formed from plasterboard separates the cornice and the suspended ceiling. Due to the fact that it is structurally slightly lower than the canvas, you cannot damage it when hanging curtains. The advantage of this method is that the cost of installing the ceiling does not increase. The disadvantage is that the finish looks uneven, and the price includes drywall work.
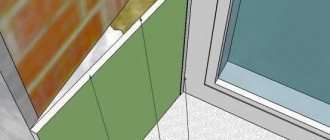
- Aluminum profile with bend. The use of a special profile allows you to get a neat recess with the blade folded upward. The profile is a square pipe, unlike a wooden block, which allows you to insert the blade through the bumper and secure it in the place provided for the harpoon. The advantage of the design is simple installation and aesthetic appearance (no edging), the disadvantage is that if the canvas is lowered too much, the gap in the niche can exceed 4-5 cm.
Using aluminum profileSource euroizum.by
- The fold of the canvas reaches the ceiling. The bend is carried out to the concrete base, for which special profiles made of plastic or aluminum are also used. As a result, all parts are securely hidden under a perfectly smooth canvas without a hint of a gap. The method is desirable if, for example, the window opens onto a balcony. There is only one minus - there is a possibility of damaging the canvas during operation.
- Soaring stretch ceiling with a niche for a curtain. An elegant option for disguising a ceiling cornice: an LED strip creates romantic lighting, while the structure remains out of sight. To increase the effect, you can make indents from all walls, and not just from the window. The advantage of a floating ceiling is beauty, the disadvantage is the complexity of the work, which is reflected in the cost.
Floating stretch ceilingSource m-ok.com.ua
About a niche with lighting on a suspended ceiling in the following video:
link to the CATALOG OF CORNICES, production time for custom cornices is from 2 days and reasonable prices!
MISTAKE 1: purchased and installed with great difficulty - a cornice with rings. Cornice with rings (wall or ceiling NOT INTENDED for installation in a ceiling niche). MISTAKE 2: the cornice is a plastic rail, the cornice will be visible even after installing the curtains. The best option for this ceiling is a profile cornice that could be completely covered with a curtain, but a plastic rail does not have this option. MISTAKE 3: a niche covers the entire wall, and then they decided to make curtains only along the window. or there is even a completely unsuccessful option - a niche that covers the entire wall and a cornice that covers the entire wall, but they decided not to make curtains that span the entire wall. An empty cornice will look very strange. MISTAKE 4: insufficient niche length. In the photo, the niche ended immediately at the window opening. The cornice will have to be made with a sidewall and in the sidewall area, the curtain will be motionless, and if you step back a little, there will be a gap between the wall and the curtain. The curtain will cover a significant part of the window. ERROR 5: furniture elements extending into the cornice niche area ERROR 6: in the photo on the left: the niche is so narrow that it did not even allow installing a 2-row cornice and the client cut out part of the cornice. in the photo in the center: there is no niche, although it would look great with this type of ceiling decoration. A lamp is placed in the area where the cornice is attached. The cornice will have to be placed in front of the lamp and the backlight will not be used. in the photo on the right: a narrow and deep niche. The only option in this case was to attach a cornice for Japanese panels.
MISTAKE 7: Incorrect selection of cornice. In the photo on the left: In the plastic rail curtain rods there is a corner element that allows you to maintain the mobility of the curtains in the corners. But the best choice for a corner and bay window would be an aluminum profile bent to the desired angle. In the photo on the right: the length of the cornice and the size of the sidewall are incorrectly calculated. The distance from the walls of the niche should be at least 2 cm if the curtains are stationary and 5 cm if the curtains are moved. The sidewall plug should rest against the wall, and in this case the sidewall is 7 cm shorter.
MISTAKE 8: There is little space left in front of the cornice - 2 cm, as a result the curtains do not move. The client was forced to lower the curtain using clamps. For some unknown reason, an anodized silver cornice was chosen. The anodized, slightly rough texture of the curtain rod made the movement of the curtains even more difficult. When ordering new curtains, we selected similar but white curtain rods and placed them according to the recommendations. MISTAKE 9: the size of the niche will not allow you to install a cornice that will cover the length of the pipes. What needs to be covered will remain in plain sight. MISTAKE 10: The design provides for large niches for a three-row cornice. Subsequently, the planning solution changed and it was decided to hang only Roman blinds. To disguise the free space in the niche, tulle was additionally placed. (see photo in PORTFOLIO) The inside of the niche is trimmed with molding, which is completely unnecessary.
Briefly about the main thing
When installing a stretch ceiling, you cannot do without arranging the mounting location for the cornice. To do this, create a niche that will allow you to effectively secure the curtains, save on purchasing a cornice to match the style of your interior, and arrange decorative lighting.
The dimensions of the eaves niche are calculated before the start of repair work. Its dimensions are influenced by the model of the cornice, as well as the width of the radiator or window sill, the pomp of the curtains and some adjustments.
Several methods are used to create a niche. It is popular to use an aluminum profile with a bend, a plasterboard box, a floating ceiling, or bending a PVC sheet (or fabric) to the ceiling.
Sheathing and further finishing
Sheathing of the GK box with sheets is carried out only on the front and bottom sides. One sheet is suitable for cutting several blanks. Fastening is done with a screwdriver and self-tapping screws. It is recommended to leave the back side of the structure unsewn, since it is located in a vast area.
Then install the hidden cornice in the formed niche. The partition is treated with putty, sanded, and veneered.
Knowing how to build a niche from gypsum board in the hall, there is no doubt about the choice. After all, this is one of the best simple technologies in the world.
Advantages
The niche is part of the design project; it is made in advance during the renovation.
If it is difficult to decide on such an opening in your ceiling, you should familiarize yourself with the advantages of this design:
- all the fastenings on which the curtain is held and all the mechanisms with whose help it moves are hidden in the ceiling;
- the appearance of curtains flowing from above without any visible support is magnificent;
- if the room has a glossy ceiling, flowing curtains look twice as long and seem to stretch the room, making it visually taller;
- the niche will suit any style, you just need to choose the right textiles for the windows;
- such types of curtains as roller, Roman, Austrian, Japanese; screens, when lowered, become flush with the wall and create the impression of a single whole;
- In the niche you can hide LED lighting, thanks to which the curtains will acquire a fabulous charm.
Assembling the frame of a narrow box
With this option for arranging a niche for curtains, a single-plane frame is constructed. Drywall is attached to both sides of the profile, forming a narrow box:
- Guides are installed on the walls and ceiling.
- A thread is pulled, showing the lower border of the box.
- The bottom guide is screwed on.
- Using the thread as a guide, install vertical jumpers.
USEFUL INFORMATION: Profile for fastening plasterboard: ceiling, wall, load-bearing and guide