On the windows of almost any person’s home there are either various curtains or curtains, which depends on the purpose of the rooms. As a rule, these decoration elements are located on special structures, which are mainly called cornices, although other names are also found. The main thing is to know how to fasten the cornice correctly and securely.
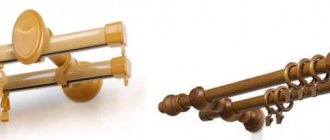
Installing a forged metal cornice on a wall
- We measure the dimensions of the window opening using a tape measure. Based on the measurements and length of the cornice, we mark with a pencil on the wall the places where the brackets are supposed to be attached. We apply the support plates of the brackets to the marks and use a pencil to mark the points for drilling through the holes for the screws.
- Using a drill or hammer drill and a concrete drill, we make holes for fasteners at the designated points. We insert dowels into the holes, attach the support bracket and secure with self-tapping screws.
- We install the bracket cup on the support plate, aligning the screw part of the base and the internal thread of the cup. We twist it clockwise.
- We insert the bracket rod into the cup and connect the parts using a hex key. Do not tighten the fastening screw completely - a small gap is needed for possible changes during the final installation of the cornice.
- We adjust the position of the brackets relative to the outer ones using a building level.
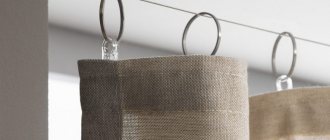
- Having attached the brackets, we insert the cornice pipe into one of the holders, and put on the rings for hanging the curtains.
Advice from OLEXDECO:
- Leave one ring on the outside of the brackets - this will prevent unnecessary movement of the curtains towards the center of the cornice.
- We place the pipe with the placed rings in the second (third) bracket. Use a hexagon to tighten the fastening screw that holds the holder rod in the bracket.
- We install decorative tips along the edges of the pipe, also securing them with a hex key. The task of “hanging a curtain rod” is completed!
Good to know!
- The optimal lateral distance from the window opening for mounting brackets is 15-30 cm;
- For models longer than 2 m, it is reasonable to use an additional bracket. This will make the mounting of the wall curtain rod more reliable and its appearance more aesthetic, as it will save the pipe from sagging and allow the curtain to be evenly distributed.
- The classic solution is to install a wall cornice 1/3 of the distance from the ceiling to the top edge of the window opening. If the wall gap is small, attach the cornice as close to the ceiling as possible. This technique will visually make the room larger and the ceilings higher.
- For reliable fixation when assembling the bracket and the decorative tip of the cornice, it is enough to make one or two turns with a hex key. Tightening the mounting screw all the way can render the bracket parts unusable.
Dismantling rules
If you need to remove an old curtain hanger, there are a few rules to follow.
- First, remove the curtain from the rings, clothespins, or hooks.
- Next, carefully unscrew the screws, being careful not to touch the facing part of the brackets.
- After the last screw is unscrewed, the suspension can be freely removed.
The dismantling process is best done by two people. This way you are guaranteed to save the product.
If you are hanging a new cornice, you need to drill out the old dowels from the holes and seal the wall with cement mortar.
Check out the selection of photos below that show different methods of attaching curtains to walls.
The mounting of curtain hangers on walls can be determined by different cases. The presence of suspended ceilings that do not allow the brackets to be fixed without damaging the integrity of the coating, incorrect ordering of window textiles according to the length - all these shortcomings are easily eliminated by installing them on the wall.
Installation of profile aluminum cornice on the ceiling (wall)
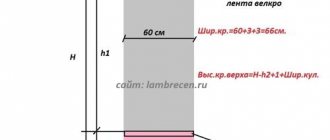
- We measure the most protruding part of the window sill or heating radiator, add 1 cm and subtract the width of the baguette (if there is one). The resulting distance is measured from the baguette (or wall) along the ceiling. We get a mark for the cornice, which will be aligned with the reverse side: where its reverse side begins, the very edge.
For example, the length along the protruding part is 17 cm + 1 cm – 6 cm width of the baguette = 12 cm the distance that needs to be set back from the baguette along the ceiling.
- We measure the curtain rod, if necessary, cut off extra centimeters. On the cornice we measure the pitch of the mounting holes from 50 to 80 cm.
- Using a screwdriver and a 3-point drill, make holes according to the marked marks.
Advice: in a double cornice we mark in a row, in a triple cornice - in a checkerboard pattern.
- Using a 10mm drill, we roll the edge of the hole so that the burrs do not scratch the ceiling, and without them the cornice will be better pressed to the ceiling.
- Raise the cornice to the ceiling and align it with the mark, parallel to the molding or wall. We mark points for fastening on the ceiling and make holes for them, insert dowels there.
- We begin to screw the cornice to the ceiling using self-tapping screws, first securing the hole in the middle. Check the distance from the wall again and adjust if necessary. After this, we fix the ceiling cornice along its entire length.
It is worth paying attention that when installing a profile aluminum cornice, you need to watch the edges of the products: sharp metal cuts can damage both the installer’s hands and the wallpaper on the walls or ceiling of the room.
Characteristics and Features
Suspensions of this type are made of plastic and can be presented in the form of a hollow part with slots for the movement of runners with hooks, or in the form of a part of the same shape, but filled with different materials. Filling increases the strength of the product and gives it slightly different characteristics.
Conventional curtain fasteners made of plastic are 100% resistant to water and are not inferior in wear resistance to their metal counterparts. At the same time, the cost of such products is much lower. Externally, such curtains look like a flat box with slits on the bottom side. It is in these slots that the design feature runners move, to which the curtain hooks are attached.
The ends of the hollow part are closed with special plugs, and to prevent the hooks from falling out, the grooves through which they are inserted into the structure are closed with stoppers. The entire curtain weighs very little and is attached to the wall using brackets. At the same time, it is possible to fix the structure on the ceiling if desired.
Related article: How to decorate the walls in a living room with modern design
When mounted on a wall
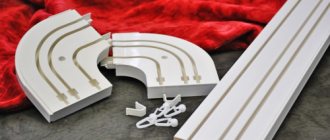
Necessary tools for work
The curtain element in question comes with certain fittings for its installation. But fastening the cornice should be done with a number of additional tools:
- hammer drill,
- screws and dowels,
- level,
- hammer,
- roulette,
- pencil.
An expensive hammer drill can be rented; it is not necessary to spend financial resources on purchasing it for the sake of one shed.
Here you can see a standard set of equipment and accessories for installation. It should be supplemented with bolts, screws, a hammer and a level
Mounting a ceiling cornice made of plastic
We determine the size of the indentation from the wall so that the curtain goes behind the window sill or radiator.
To do this, we apply the cornice with the outer slot to the protruding part and use a tape measure to measure the distance to the wall, for example, 20 cm. If you purchased a cornice without holes for fastenings, we also calculate their location. We measure the distance between the slots of the cornice, divide by two - this will be the place where the self-tapping screw is attached. From the total distance we subtract the length of the segment from the slot to the place where the screw is attached (for example, its length is 2 cm). That is, 20 cm – 2 cm = 18 cm: this is the distance we will measure as an indent along the ceiling. We mark all the fastening points on the cornice itself (step 50-80 cm) and on the ceiling (it is more convenient to use a laser level) and make holes for the screws with a 6 mm drill, performing through drilling of the profile, as well as the ceiling itself. We insert the screws into the cornice, and the dowels into the holes on the ceiling. Starting from the middle, we screw the cornice to the ceiling, using a self-tapping screw to hit the dowel. Starting to fix the cornice from the middle is important for a person who installs the cornice alone, since even with one fastener the cornice can hold on.
If you need to install a cornice with corner turns, follow the following sequence: attach the corner parts to the cornice.
If necessary, we insert a decorative strip, attach the caps and install the cornice in the same way as attaching a straight ceiling cornice.
Advantages
There are two types of plastic curtain hangers - round and tire-shaped. Ordinary round parts do not stand out in anything special and look like a simple tube with tips on the ends, attached to the wall. They do not have any particular advantages or disadvantages compared to standard metal or wood hangers, except for the difference in price - plastic parts are cheaper. Another thing is plastic wall curtain rods in the form of a tire. They have a certain set of advantages:
- The design is very light.
- The cost of the cornice is low.
- If necessary, installation can be carried out both on the wall and on the ceiling.
- There are one, two and three row models.
- The length of the structure is practically unlimited, since several tires can be connected into one large composition.
- There are corner curved modules that will allow you to assemble a structure with curves.
- The color of the plastic is white and does not stand out against the background of a standard ceiling design.
- If necessary, you can decorate the outside of the product using a special decorative tape.
- Installing the suspension is no more difficult than installing standard rods.
- Caring for the product is very easy, thanks to its water resistance.
The only disadvantage of such tires is the restriction on the weight of the fabric used to make curtains. However, a plastic tire can easily withstand most modern curtains.
How to attach a cornice to a suspended ceiling if there are no mortgages?
If for some reason the room already has a suspended ceiling without an embedded system, but there is no cornice, and installing a wall-mounted version is impossible, do not worry: installing a ceiling plastic cornice or ceiling rail is possible.
Option 1.
We correctly determine the size of the indentation from the wall, place the ceiling cornice on top and, using a pencil inserted into the holes on the cornice, mark the attachment points on the ceiling.
We take plastic rings with a diameter of 30-40 mm, coat them around the perimeter without gaps and glue them exactly in the center of the marked attachment points (the marked point is the center of the circle) with super glue. If necessary, you can glue the ring, moving it slightly from the center - this is necessary so that the ring does not peek out from behind the curtain.
Using a knife, cut a hole inside the ring, insert a hammer drill or drill under the suspended ceiling and drill a hole for the fasteners. We insert a dowel into the hole made, press the cornice and fix it to the ceiling.
The downside of this option: the ceiling rail at the mounting location will not fit tightly to the ceiling, since even a small thickness of the ring of 2 mm will not allow it to do this.
Advice: if the holes in the curtain are large, it is better to fix it not with screws, but with press washers. This fastening option prevents the fastener from falling into the hole, and also protects the curtain from damage in the event of strong tightening of the fastener.
Option 2.
We mark the attachment points on the ceiling by analogy with the first option.
We cover the marked point around the perimeter in the shape of a square with an adhesive plaster, inside of which we make a cross-shaped incision.
We insert a suitable tool into the resulting slot in the ceiling and make a hole into which we insert the dowel. We press the cornice against the ceiling and fix it using the chosen fastening means.
Tip: if after attaching the curtain remains sufficiently movable, you can use the following trick. We take a piece of polypropylene pipe, insert it into the hole in the ceiling until it stops and mark the place where it is at the level of the stretch ceiling. We saw off the pipe according to the mark and before fixing the cornice, insert this pipe into the hole, and only after that screw the cornice to the ceiling. We do this action with each hole. An additional fastening in the form of a pipe will remove the mobility of the cornice, since it will now be pressed not just against the suspended ceiling, but against the pipe in it.
What is important to consider
When purchasing a particular model, pay attention not only to the material, but also to the design features. Manufacturers offer pipe, frame, string and rack cornices. Of all the features of their designs, reliability of operation is most influenced by the type of mounting plates used. The following types of plates are used for fastening:
- Single point. The hole is located in the center of the part. A dowel selected according to the type and length will allow you to firmly fix the bracket even on a hollow base. The weight of the fabric may cause the structure to deform slightly.
- Three-point. The ideal way to attach curtains to a wall made of concrete or wood. Some types of three-point plates (those with closely spaced holes) are not suitable for installation if the substrate is porous. Aerated concrete can simply crumble under load. If the base is a hollow material, only the top hole is fixed with a dowel. Self-tapping screws are screwed into the rest so that the bracket does not rotate.
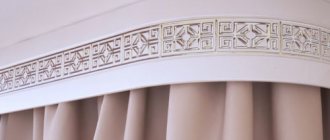
Description
Curtains are curtains made of thin and soft fabric. Used to close a window or doorway. In almost all models, the canvas reaches the floor, but there are short curtains. Hang separately or combine models.
Curtains and cornices should be in harmony with each other and match the overall style of the room
Kinds:
- Classic curtain shape. They are called scissor curtains. Go down to the floor with the same length on both sides.
- Narrow, long scarf curtains.
- Thiers, curtains covering several parts of the window.
- Swags are curtains with a complex shape. Decorative variety with two hanging edges.
- A canopy is a decorative, elegant element.
To curtain windows and doors, the first option is often used - classic scissors, and the rest are used as decorative decorations for the interior.
Classic curtains are most often used to decorate door and window openings
The main function is to decorate the room, but there are also significant purposes.
Functions:
- decorative purpose;
- give comfort and tranquility;
- easily allow air to pass through;
- protect from the sun and cold air;
- prevent interior elements from fading;
- protect the room from prying eyes.
Combining destination functions, they become an integral part of the room. They are able to preserve the unique features of a separate room and add the finishing touch to the interior.
Curtains are a great way to give your interior a new lease of life.
Safety precautions
Even such installation work requires compliance with some safety precautions. Hazardous activities relate to working at height. The cause of injury when operating on a stepladder or ladder can be: insufficient lighting, burrs, sharp edges, roughness of the surfaces of tools, mechanisms and workpieces. Ladders/stepladders must be equipped with a device that prevents them from moving, folding or tipping over during operation. To work at height, all necessary tools should be placed in a box. When attaching the curtain rod, only one person should be on the stepladder. It is prohibited to add additional drawers or other elements to the stairs to increase the height.
The picture shows the presence of a limiter for the stepladder, the same one that prevents folding and tipping over when performing work. It must be firmly fixed to the surface
Wear safety glasses when working with a hammer or similar device. Before starting work with a hammer drill or electric drill, you should check for any external defects. During operations, you must firmly hold the equipment strictly horizontally relative to the floor.
The photo shows how to correctly position the hammer drill relative to the wall and other objects. You can also see that you need to hold it firmly with both hands.
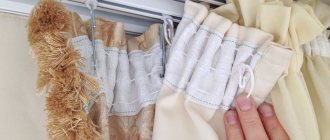
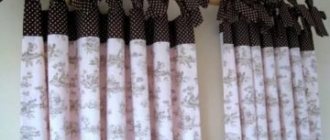
Photo of curtains
PreviousCurtains Wall curtain rods: three-row, two-row, designer
Next
CurtainsTypes of components for roller blinds for plastic windows
Tips for choosing
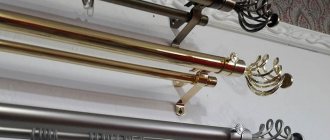
The choice of a suitable wall cornice should be approached very responsibly. It must be as durable, high quality and reliable as possible.
If you want to buy a curtain rod for thick and heavy curtains, then you should choose more durable and reliable options. For example, it could be a wooden or metal cornice. Inexpensive plastic or string versions are unlikely to be suitable for such curtains, since they are not designed for such loads.
When choosing a cornice, you must consider the following parameters:
- Product dimensions. Models that are too large and massive are unlikely to be suitable for small rooms. In such conditions, cornices with thin bases will look harmonious.
- Room size. If you select and install the cornice correctly, the area will visually appear more spacious and the ceiling will appear higher.
- Size and format of the window opening. So, for a round-shaped window it is better to choose a flexible cornice. If we are talking about an attic window, then it can be supplemented with an interesting double model.
If it is calculated incorrectly, the material will be crushed at the point where the obstacle occurs. The cornice should match the style of the interior of the room. For example, luxurious models with artistic forging will look organic in elaborate ensembles, wooden cornices with carved details - in classic ones, and simple white plastic products - in modern ensembles in the high-tech or minimalist style.