The window opening is an important part of the interior. Various design techniques are used to decorate it. However, the most common type of window decoration remains textiles and structures used to fasten the canvas. The choice and installation of curtain rods causes difficulties for many ordinary people. Before purchasing a suitable device, you should solve a number of problems, for example, take into account the correspondence of the appearance of the product to the style of the room, the ability of walls, finishing materials, and the item itself to withstand certain loads.
Wall cornice
First of all, we will talk about the wall cornice. Well, how to hang a cornice on the wall? To begin with, it is important to determine the distance from the installed device to the ceiling.
Curtains look most advantageous when there is approximately a third of the total distance between the window opening and the ceiling to the ceiling, and two thirds to the window opening. It should be borne in mind that the minimum gap from the window opening should be 5 cm.
What is important to consider when buying a baguette
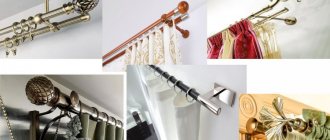
Before you figure out how to install a curtain rod on a wall, we’ll tell you what to look for when purchasing a product. There are different designs on the market:
- pipe;
- frame;
- strings;
- rack and pinion
Each of them has its own advantages and disadvantages. They definitely need to be taken into account. But the installation is greatly influenced only by the type of brackets that come with the products. Depending on the material, there are several options:
- Plastic. The cheapest, but the most fragile. They are great for tulles and light curtains. When hanging a heavy canvas, the fastening sags and eventually breaks.
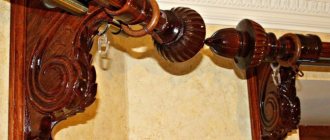
- Wooden. They help bring vivid design solutions to life. Their strength directly depends on the quality of workmanship. Therefore, components must be carefully inspected to ensure there are no knots, chips or cracks.
- Metal. The most reliable and durable curtain rods. If your budget allows, preference should be given to them.
Photo: Instagram @karniz_atyrau
Photo: Instagram @karniz_atyrau
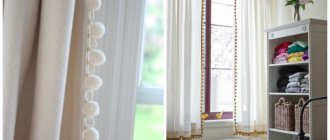
Photo: Instagram @regina_lourini_design
Each option has its own design features. Many of them only affect appearance. But the type of mounting plate determines the reliability of fastening to the wall:
- Three-point. Makes it possible to firmly secure the structure and avoid turning the rod holder. This is ideal for installation in concrete and wood. If the holes are located close to each other, installation in porous materials becomes more difficult: aerated concrete, hollow brick and others. A fragment of the weakened surface may crumble or break off.
- Single point. The only hole for the dowel is in the middle of the installation “cup”. In this case, under the weight of heavy curtains, the bracket may tilt down slightly. But this makes it possible to firmly screw it to a surface made of hollow materials. It is enough to choose a dowel of the desired type and length.
If you have to attach a three-point “cup” to a hollow base, drive the load-bearing dowel only into the upper hole. We screw small self-tapping screws into the other two to avoid turning the bracket.
Required markup
Having placed the cornice level, it is necessary to place marks at the points where the brackets will be installed, that is, at a certain distance from the window opening and ceiling and at a 15-centimeter distance from the edge of the profile.
Now you need to remove the cornice, remove the bracket, install it in a certain place, and then mark the holes for the fastenings. It is important to emphasize that it is necessary to make all available marks.
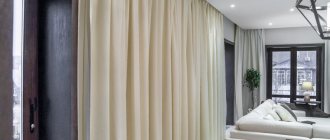
Variations of tires for curtains and use in the interior
Everyone has long known that curtains are a decoration for any room. For precise installation, you need to select high-quality curtain rails. When choosing, you should consider a number of factors:
- the profile from which the product is made must be simple and safe;
- the cornice must be in harmony with the overall style of the interior and fit into its color scheme;
- the material of the curtains and the volume they will create are taken into account when choosing it.
Ceiling rails vary in purpose and size, color design, method of fastening the cornice and the materials from which they are made. For example, wooden ones are suitable for all types of curtains, they are very durable, look beautiful in any interior style, and are reliable in use.
Metal products for curtains are made of aluminum, since this material is quite resistant, too light and has a long service life. Aluminum rails complement tulle curtains well and can withstand heavy curtains. You can hang lambrequins on them. These cornices are very harmonious in classical style interiors.
Plastic tires are made of durable plastic. They are installed very simply and can hold a noticeable weight, despite the fact that they are very light. They are very popular due to the excellent combination of quality and cost.
You may also be interested in: String for curtains - types, installation of string curtain rods
The form of execution of the curtain rods also differs from each other:
- String - products with metal strings that hold the curtains. Usually one to three rows of strings are used, and maybe more.
- Round - these cornices, while performing a decorative function, are not covered with a curtain. They come in plastic, metal (wrought iron, brass), stained or painted wood.
- Profile row products are a plastic rail for curtains or a double-row curtain rod made of aluminum.
- Baguettes are a decoration for a tire called a baguette strip.
Mounting holes
Holes should be drilled according to the marks, the diameter of which will depend on the dimensions of the dowel. After the hole has been made, a dowel must be inserted into it.
It is important that the dowel goes in completely. However, if you can’t “drive” the dowel a few millimeters, the extra piece can be cut off with a knife.
Advantages
Ceiling curtain rods have a number of advantages:
- made from high quality materials (plastic);
- They are particularly durable and provide easy movement;
- do not change shape during prolonged use and loads of up to one hundred kilograms;
- used in rooms, on terraces, this will help expand the space;
- thanks to the lightness and strength of the bus plate, it is possible to fix curtains of various types in two or three rows (organza, thick tulle, curtains, etc.);
- the ability to mount on different types of ceilings (regular, tension or suspended);
- wall-ceiling fasteners make it possible to visually enlarge the room;
- affordable price;
- wide range of colors.
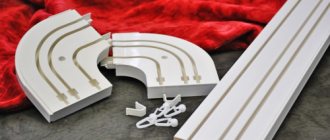
Tire cornice
Now we will talk about how to hang a ceiling cornice. By and large, it is possible to install wall fixtures with round holders on the ceiling due to their versatility.
In this case, the installation procedure is actually the same: you need to mark, make holes, install the holders, and then insert the guides into them. However, there are plastic curtain rods, also called tire rods, which are designed slightly differently.
How to install a curtain on a suspended ceiling
It will not be possible to hang the curtain directly on the tension fabric - it is not able to withstand the load. Before installing the covering, it is necessary to pre-install the embedded bars for the cornice or provide a niche. Let's consider both options.
Mortgages
A prerequisite is that the lower parts of the bars must be in the plane of the PVC coating. If they are higher, you risk damaging the suspended ceiling during installation of the cornice.
Ceiling cornices are attached to the bars using self-tapping screws. Use long fasteners, but note that their size should not exceed the height of the bar. The diagram shows an example of the design.
Mortgages for cornices in suspended ceilings
Installation procedure
After the holes have been made, you need to take the cornice, center it on the window, level it and make marks. Next, you need to mark on the ceiling with any writing object the points where the holes will be drilled.
If several people take part in the process, the work will be somewhat easier - while some are holding, the other is marking. If there is no one to help, you can perform this procedure alone.
To do this you will need double-sided tape. You need to cut three or four 5cm pieces and attach them to the back of the tire facing the ceiling. Two at the edges and in the middle - this is enough for a 4-5 m plank.
Now you need to remove the protective covering and secure the cornice according to the marks made. Double-sided tape holds the device quite securely, which means you can continue without fear. If necessary, it is worth adjusting the position by tearing off the adhesive tape.
Features of the installation process
There are many ways to attach a ceiling cornice, but what they all have in common is that the structure must be attached to a solid base. Such a basis is the ceiling, timber, frame, wall.
Installation on a concrete ceiling or wall
The installation principles are similar in both cases. Here's how to attach a cornice to a concrete ceiling step by step:
- Assemble the product, prepare fastening accessories. Calculate the segments between the points for installation, guided by which curtains need to be hung. If they are heavy, then it is recommended to reduce the distance (step) between the fasteners to 20-30 cm; if the curtains are light, 60-70 cm is enough.
- Holes are drilled in the product for future fastening.
- The structure is joined to the ceiling and markings are made on the ceiling through the holes.
- Using a hammer drill, recesses are drilled at the marked points, into which dowels are hammered and self-tapping screws are screwed in, attaching the holder. Then plugs, decor, hooks or rings are put on the product.
There are circumstances when it is impossible to install a model on the ceiling. Then they act differently, choosing to mount the cornice to the wall. For this you will need:
- metal corners with bend stiffening ribs, brackets;
- bolts, nuts.
Instructions for fixing the ceiling cornice to the wall:
- Prepare the fasteners, following the same rule as when installing on a concrete ceiling (points 1, 2).
- Calculate the optimal distance of the structure from the wall and select the corners according to size.
- Holes are drilled in the corners. There are configurations that include special strips for attaching to the corners.
- The structure with corners is fastened with nuts.
- Compare it to the wall and ceiling end-to-end, mark and prepare mounting holes.
- The holder is mounted on the wall on the installed brackets using anchor elements.
- Upon completion of installation, plugs, rings, hooks, and decor are put on.
Recommendations for installing a cornice to a plasterboard ceiling
It is possible to attach a ceiling cornice to a plasterboard ceiling, but the load-bearing capacity of plasterboard is limited. In this regard, the curtains and the bar itself should be light. In order not to take these limitations into account, you need to strengthen the ceiling by installing a block of wood in the area where the holder will be fixed. To secure heavy curtains, select a block measuring 50x100 mm. The installation is done like this:
- A cornice is attached to a plasterboard ceiling with a block using self-tapping screws.
- The structure is installed on an unreinforced ceiling using anchor fasteners.
Methods for installing cornices with suspended ceilings
A stretch ceiling does not involve securing any elements to the stretched fabric, so the installation of the curtain holder is carried out in a special way:
- Before installing the tension fabric on the ceiling, install the embedded parts. Marks are placed at the bookmark location. Thermal rings are attached to the canvas (where the fasteners will be screwed in) so that the canvas does not tear.
- You can mount it in another way - in the form of a niche near the window. The beam is attached to the ceiling. The tension fabric is mounted to it, without reaching the wall. The structure is installed in the resulting niche.
Related article: How to attach a large mirror to a wall
Attaching the cornice with glue
A very simple way of fastening is with glue. It is used when it is necessary to attach a holder for light curtains to smooth surfaces, for example, to a suspended ceiling. It is necessary to choose the right glue; it should be suitable for:
- composition of the ceiling cornice tire;
- finishing of the ceiling surface.
Fastening is carried out as follows:
- The structure is assembled completely to size, after which it is applied to the ceiling, checking the quality of the joint in order to avoid the formation of cracks and gaps in the future.
- Places where glue is applied are pre-degreased.
- The curtain holder is leaned against the ceiling for marking.
- The glue is applied along the entire length of the structure, applied exactly along the markings to the ceiling and pressed for 3-5 minutes.
- After the glue has completely dried (according to the instructions, usually in a day or two), you can use the product for its intended purpose - hanging curtains.
- It happens that it is not possible to completely glue the fasteners. Then, first of all, the transition plate is glued, and after the glue has completely dried, the main parts are glued.
In order for the installed cornice to hold tightly and reliably, you need to choose the appropriate installation method and perform all installation steps step by step. Be sure to take into account the type of ceiling, since it is impossible to attach a cornice to some types of suspended ceilings without prior preparation.
The final stage
After the marks have been made, you need to remove the tire, drill holes and install plastic dowels. Now all that remains is to put the cornice in place, connect the holes and screw in the screws.
If double-sided tape was used during the work, this would allow you to hold the bar, but if not, you should mount the mount first at the ends, and only then in the middle. After this you can hang the curtains.
What tool might you need?
To secure the cornices you will need:
- A stepladder used in rooms with high walls.
- A hammer drill for drilling concrete or solid brick walls, or a drill for other cases.
- Screwdriver.
- Marking and measuring tools: pencil, rulers, tape measure, building level.
- Masking tape is used when it is difficult to erase pencils from the walls and paper pockets to collect dust when drilling porous materials (glued to the walls just below the attachment point using the same masking tape).
Photos of cornices
Work on mistakes
What to do if mistakes were made when choosing or calculating the mounting locations for the cornice? The main thing is not to rush to despair and get upset. Let's look at two of the most common mistakes made by beginners.
The problem of a cornice that is too long can be solved with the help of a hacksaw; the only limitation is the presence of decorative elements; there is a high probability that the cornice will lose its visual appeal.
If the cornice turns out to be too small or the standard models are not suitable for a long wall, you will have to go in search of special connecting elements that will easily allow the main length to join the additional one without disturbing the movement of the hook-runners.