The design of a room consists of many little details that, in harmony, create a unique room. Each of them plays its own role in the interior, emphasizing one or another detail of the room. One of these little things is polyurethane wall moldings. Some people underestimate their importance in the interior and do not pay enough attention to the choice of installation of these products. Moldings are used quite often in the interior, decorating the surface of walls and ceilings. They are used as platbands, baseboards, baguettes, cornices.
The material itself from which moldings can be made varies. This includes wood, metal, plaster, and plastic. But thanks to modern technologies, a molding made of fairly durable polyurethane saw the light of day. Why are they so good? What is the advantage of polyurethane moldings? What types of products are there? How to install products? You will find answers to these questions in the article.
What is polyurethane molding
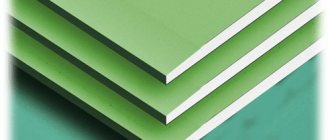
First, let's figure out what polyurethane is. In simple terms, this is foamed plastic. But moldings are the same cornices or baseboards that are used in finishing and decorating surfaces. We will talk more about the scope of application below. Look at the photo to understand what these materials look like.
Thanks to them, they finish floors, ceilings, doorways, cornices, walls, arches, etc. The polyurethane products themselves can have different sizes, shapes, surfaces and purposes. And thanks to the method of filling the molding mold with a polymer mass at high pressure, the decorative elements have a dense structure and at the same time flexibility. You can nail, cut and glue polyurethane moldings to any surface.
What are the advantages of using polyurethane moldings in the interior? Let's take a closer look at them:
- Polyurethane moldings are lightweight. This means that they are easy to work with, easy to transport and do not load the structure.
- The products are quite durable, despite their length.
- Polyurethane moldings are elastic, which allows them to be used for complex structures. For example, finishing an arch or shaped furniture overlay will not be difficult. Only with such moldings can you successfully and simply design arches.
- Polyurethane moldings can accurately imitate the texture of another natural or artificial material. This means that if you want imitation wood on the walls or plaster, but cannot afford it, polyurethane moldings will be just right for you.
- Installation of the products is quite simple. It is enough to use special glue for polyurethane moldings, putty or plaster, and also fix everything with liquid nails.
- The finishing, namely the coating on the products, is water-based.
- The molding is not afraid of moisture and is bioindependent.
- You can decorate the overlay part with foil to imitate gilding, bronze or silver.
- A huge number of models and varieties of polyurethane moldings.
- Affordable price. You can afford to use polyurethane moldings for your home.
If we compare polyurethane moldings with the same plaster molding or wood, then they are no worse. In addition, the material will not load the structure. Over the years, the surface of the products will not crack, turn yellow or crumble. Natural materials can rot or dry out over time. But this will not happen with polyurethane.
What are the disadvantages of the material? After all, it cannot be that he is completely ideal. You are right here. We will note only 3 disadvantages that polyurethane molding has:
- the main disadvantage is that the products burn quite well. If you expose them to an open source of fire, the finish will ignite like a match. If the junction box is located under the ceiling and shorts out, the consequences can be tragic. Also, when products burn, toxic smoke is released;
- moldings are not perfectly white, but have a grayish tint. Therefore, they may differ in tone from the ceiling. Some people cover the ceiling with acrylic paint with a yellow tint;
- when the temperature rises, the polyurethane molding can change its size. That is why, immediately before installing it, you simply need to condition the moldings in the room.
That's why these moldings are so popular. And since polyurethane is not afraid of moisture, cast elements can be installed in a kitchen, bathroom or other room with high humidity and temperature fluctuations.
Safety and practicality of polyurethane stucco for arched frames
Moisture resistant
. Arches made of polyurethane can be installed in damp rooms and in doorways between them. Compared to wood and gypsum, polyurethane has the lowest moisture absorption capacity.
Non-flammable
. The flammability of polyurethane determines its belonging to three fire hazard classes: C (self-extinguishing), TC (hard to combust) and TV (hard to ignite). The material resists fire for a long time and begins to melt only at a temperature of 300 °C.
Durable
. The density of polyurethane blanks is 180-200 kg/m³, which is comparable to the density of pine and fir. The density of primed polyurethane arches reaches 800 kg/m3. This figure is only slightly less than the density of one of the hardest tree species - boxwood. This density guarantees the strength and wear resistance of the material. For arched frames, as architectural elements of a passage area, this is extremely important, as it eliminates the appearance of scratches, chips, and abrasions.
Decorative
. Polyurethane is a white, smooth material. Almost any paint fits perfectly on it: acrylic, silicone, latex. Arches made of polyurethane are stylized to resemble several dozen materials, including wood of various species, stone, metal and marble. Polyurethane arches can be gilded, silvered, or patinated.
Scope of use of polyurethane moldings
Due to their aesthetic appearance and variety of forms, moldings in the interior have taken their stable position. Floor and ceiling plinths, rosettes, pilasters, crowns, bas-reliefs can decorate bedrooms, kitchens and hallways. Polyurethane products are used for arched spaces and windows to give it a sophisticated look.
Due to the physical and chemical properties of the products, foam polymer moldings are even used outdoors. The fact is that they are not afraid of frost, heat, or the influence of precipitation. They can easily withstand this aggressive environment without losing their integrity and properties.
Nuances of choosing stucco elements for polyurethane arches
The dimensions of decorative elements for polyurethane arches are strictly fixed, so selecting arched stucco molding for an existing opening can cause certain difficulties. The task is greatly simplified if polyurethane arches are combined with flexible (FLEX) moldings. In this case, to select a frame, it is enough to know the radius of curvature.
Do you need help selecting elements for a polyurethane arch? Call us by phone +7
and
+7 (966) 192-25-17
or send an e-mail We will help you choose and buy polyurethane stucco for the arch, decide on the size of the decor, and tell you about the features of installation and maintenance!
Here's how to use polyurethane moldings
For decorating and decorating adjacent surfaces. Usually the seam between the wall and the floor is usually hidden using a plinth. Polyurethane molding of different shapes and colors can not only hide this seam, but also turn this area into a work of art.
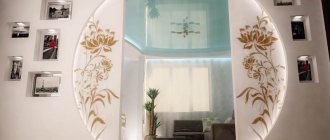
There is a polyurethane ceiling molding on sale that you can use to decorate this part of the structure. Thanks to a curly and beautiful patterned rosette, fixed with glue near the chandelier mount, the ceiling can be enlivened, transforming this boring place. In addition, you can use imitation decorative stucco around the entire perimeter of the ceiling, creating a classic interior with these products. And if you have a high room, you can buy a wall molding made of polyurethane in the form of a geometric figure or a complex ornament.
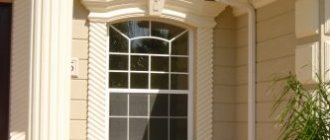
For decorating window and door openings. Flexible polyurethane products are suitable for this purpose. With their help, you can easily transform a window opening or arch. Then these structural elements will not be gray and boring, but will stand out against the general background. And the openings between rooms can be decorated with pilasters, porticoes and crowns. Look at the photo to see what polyurethane arch molding looks like.
Decoration of furniture elements. To create a classic or baroque style in a room, the method of treating cabinets, fireplaces, mirrors or other elements with figured moldings with color is used. It turns out quite beautiful and elegant.
As mentioned above, there are facade moldings made of polyurethane, which are used to treat window openings, the facade or the perimeter under the roof.
You may have noticed that this is a versatile material that can be used for different purposes. But, we would like to draw your attention to some tips that will help you correctly implement polyurethane molding into the interior:
- there is a certain pattern: with a large surface of the facade or a large room, you need to choose massive and complex moldings for decoration;
- for small rooms and gables of rooms it is better to use narrow white moldings, placing them around the perimeter or in a vertical position;
- for high ceilings, it is recommended to use horizontal inserts, panels and lines to visually reduce the space;
- the use of contrasting molding is acceptable for a spacious hall and on a large surface;
- We must not forget that the ceiling, arched or facade molding must fit into the overall interior of the hanging.
Note! To decorate complex surfaces, outline corners and fill joints, you need to use polyurethane moldings with different profile sections.
Types of polyurethane moldings
We have already said that these are universal products. Therefore, it is not strange that they can be selected for all surfaces in the house. There are colored moldings with a coating that imitates marble, wood, various types of metals or leather. They are most often used to create an interior in a classic style. As for the facades of houses, cornices and platbands are fixed on them, which repeat the texture and color of concrete, natural stone or wood.
For arched structures, windows and doors, there are flexible polyurethane linings. In addition, such elastic products can be installed on a furniture facade or door leaf. And the monograms and curls are covered with patina or gilding.
But to facilitate the task of decorating the perimeter of a room with a ledge, column, rectangular niche and other elements, corner moldings were created. After all, achieving a perfectly even angle using only horizontal segments can be very difficult. And the task is complicated by the fact that moldings can have ornaments and patterns.
There are also cast products that decorate living rooms, kitchens, hallways and other rooms. They are used to decorate the junction of walls with floor and ceiling. The products have a wide variety of shapes and patterns. You can choose the option that you like best.
Note! White polyurethane moldings can be painted any color you desire. But not all paints are suitable for this work. It is recommended to use only water-based paints and varnishes.
The installation process of polyurethane moldings
The good news is that the installation process of polyurethane products is quite simple. The principle is the same, but there are several options. For example, some people first paint the molding, and then glue the product in place. Others, on the contrary, first fix the molding in its place, and then begin to tint. The advantage of the first method is that the glued strip can be fixed directly to the wallpaper or finished wall. In the second case, you will have to bother with masking tape and precision painting of all the parts.
Another nuance concerns the method of fixing the moldings. Typically glue is used for this purpose. This can be polyurethane or acrylic glue. The work can also be done using liquid nails. This is if we talk about massive and large polyurethane moldings. As for thin planks, you can install them on sealant or putty. And if we talk about very large parts that are used for the facade, then it is recommended to fasten them with self-tapping screws. Which option to choose is up to you.
So, the process of installing moldings begins at the stage of purchasing everything necessary. Here is a list of tools and materials that will be required for the work:
- roulette;
- pencil;
- level;
- stationery knife or saw;
- miter box;
- primer;
- glue for fixation;
- polyurethane moldings themselves.
Place polyurethane products in advance in the room where they will be installed. They must adapt to these conditions. After that, a fastening line is applied to the wall surface. Now you need to clean the place where you will attach the polyurethane moldings and treat them with water or primer.
Now you need to apply glue to the polyurethane molding using dotted movements. The first step is to glue the corner elements. If there are none, then using a miter box, cut the ends of the planks at an angle of 45 degrees, so that when joining the products, you get an angle of 90 degrees. Then glue the horizontal pieces between the corners. Adjust the butt cut as necessary. In the end, all that remains is to cover all the cracks and joints of the moldings with putty, sand them and sand them when everything is dry. That's all. The installation of polyurethane products is easy to do even by yourself. To make it even easier for you, watch this video.
Types of finishing
Decorative design can make an opening in a wall a real masterpiece, and decorating an arched opening with your own hands is accessible to every owner.
The following materials can be used to decorate such structures:
- Decorative plaster;
- Wild stone;
- Wallpaper;
- Stucco molding made of polystyrene foam or gypsum;
- Ceramic tiles;
- Cork;
- Textile;
- Mosaic;
- Tree;
- Plastic;
- Parquet board;
- Lining;
- MDF, etc.
Types of finishing materials
There are a huge variety of materials suitable for decoration, but let's look at the three most common ones.
Wallpaper is the most economical option
One of the simplest ways to decorate is to wallpaper the arches. This method is also popular because of its cost-effectiveness, since the price of the materials necessary for such finishing is one of the lowest. In addition, you can paste over the arch with the same wallpaper that was purchased for the walls.
The photo shows an example of wallpaper decoration
To decorate an opening with wallpaper you will need:
- Wallpaper glue;
- Wallpaper;
- Brush;
- Ruler;
- Pencil;
- Scissors.
To ensure that pasting the arch does not cause any problems, the following instructions must be strictly followed:
- First you need to prepare glue, which in its consistency should be slightly thicker than the glue prepared for gluing wallpaper on the wall . This way, it will be possible to move the wallpaper in order to achieve a complete match of the pattern. The first strip of wallpaper is glued to the wall near the arch. The next strip of wallpaper is glued so that the canvas covers part of the opening;
- The protruding part must be trimmed, leaving an allowance of approximately 2.5 cm . The allowance is cut maintaining a cut interval of 2-2.5 cm;
- Using a brush, bend the allowance and glue it tightly to the top of the arch;
- The arch is glued on the other side in exactly the same way.;
- Next, you need to wallpaper the surface of the slope itself, for which a strip of width equal to the width of the slope with a small allowance is cut out . An allowance is necessary in order to achieve complete matching of the pattern. The strip is smeared with glue and glued to the inner surface of the arch and to its side walls;
Advice. If the arch is too high, the strip should be cut into two parts so that the joint is at the very top of the opening.
- The wallpaper must be ironed thoroughly so that no air remains under it..
Work order
Decorative plaster in an arched opening
If, wondering how to finish the opening between rooms, you have given your preference to decorative plaster, do not be afraid to do everything yourself. In fact, working with plaster is not as difficult as it might seem from the outside.
Decorative plaster for decoration
First, you will need to sand the drywall from which the arch is created. Sanding is necessary so that the seams under the layer of applied material are not noticeable, and the surface after such processing will be perfectly smooth.
Note! Decorative plaster for finishing arches is not like paint, so there is no need to be overzealous in uneven places. It is enough to simply cover the most obvious irregularities with the material.
The application process is simple
A primer should be applied on top of the sanded surface, which will provide the necessary adhesion characteristics of the surface and the material. In order for the primer to dry completely, you need to wait a day, and then begin applying the plaster.
In the photo - the arch after priming
Using a sponge, trowel, spatula or embossed rollers, the wet plastered surface can be given the desired texture. When the surface drying process is complete, the plaster can be painted in any desired color with special paints. If colored plaster was used, the surface can be secured with a protective finishing layer.
Finish example
Decorating arches with decorative stone
The question of how to decorate an opening in a wall using decorative stone worries many today, because this material allows you to create the most vibrant and impressive design.
But this type of decoration is distinguished not only by its attractive appearance, but also by its labor-intensive nature. The main difficulty in decorating arches with stone is that the internal curved surfaces also need to be finished with stone.
Note! If the arch that you plan to decorate with stone is a structure made of plasterboard, special attention should be paid to the weight of the decorative material. An overly heavy stone can cause deformation and even destruction of such a structure.
Fastening the part to the surface
Step-by-step instructions for lining an opening in a wall using decorative stone are as follows:
- All surfaces are treated with putty in order to smooth out the largest nerves;
- After the putty has dried, it is coated with a primer;
- Prepare the solution necessary for facing the surfaces with stone. The composition of this solution directly depends on which stone was chosen. Often such solutions consist of lime, glue, sand and cement;
- The first stone is laid at the very bottom of the structure so that it is located at the junction of the wall and the inner surface of the arch. After which the stone is leveled and pressed tightly against the wall. The stones on the wall and the slope of the arch are overlapped so that there is no need to finish the corners;
- Stones that are attached along a curved surface are cut, strictly maintaining the radius of the arc. The stone cut is polished using a file;
- During the process of laying the stone, it is necessary to ensure that drops of the solution do not stain the front surface of the material;
- After laying the stone, it is necessary to seal the joints with a special solution.
Laying scheme