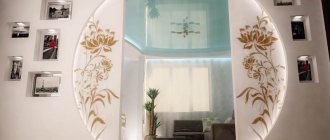
After any repair, for example, wallpapering, installing doors or windows, finishing work remains, including attaching corners to slopes. They will protect walls and other surfaces from mechanical damage that occurs from careless touch, for example, when moving furniture, and will give the interior an aesthetic appearance. They are used to hide corner joints, which is especially important when using different materials. Most often, rigid PVC is chosen for finishing, which is made by “hot” bending the sheet. You need to know how and with what to glue such corners to the slopes so that the product lasts as long as possible.
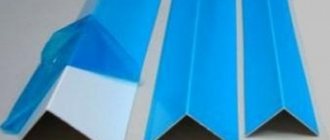
Wall plastic corner
Material characteristics
Buyers choose plastic corners for slopes for the following positive qualities:
- ease of use - when installing and cutting out the desired size and shape, which is done using scissors or a knife, and the burrs and ends are sanded with appropriate paper;
- smooth out unevenness, forming a 90° angle in the finishing areas;
- strength - protect corners from damage, while remaining unharmed;
- resistance to moisture, ultraviolet radiation, temperature changes;
- light in weight, which is also important for ease of installation;
- long service life - 20-25 years, during which they do not lose their qualities, including color;
- affordable price;
- do not require painting;
- unpretentiousness in care, in which they are easily washed using home remedies.
It is worth mentioning the disadvantages of the material:
- melts in the event of a fire, releasing harmful substances;
- fades after the expiration date;
- contact with sharp objects leaves unsightly scratches.
Liquid plastic
This type of glue is only suitable for PVC corners (made of polyvinyl chloride). For this type of decor, this would be an ideal choice, since the product glues plastic well to absorbent surfaces, ensuring high adhesion. The disadvantage of this composition is that the glue that gets on it can be removed from the wallpaper only with the help of a special solvent.
Types of plastic corners
Before gluing a plastic corner, you need to understand its types in order to choose the right option. The product is available in a wide range of colors, including plain versions, as well as wood, marble, metal and other natural materials.
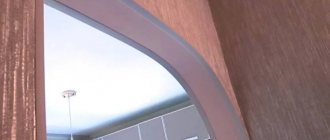
They are made in different shapes and sizes. The most popular two options are in the shape of the letter L with the same or asymmetrical width of the shelves (from 10 to 50 mm in width, from 2 m in length), and curved, which are used for similar openings (arches, etc.), from Why are they called arched corners? They are produced in two versions – for angles of 90° and 105°. Standard length – 3 m.
Plastic corners of different sizes
They are also manufactured in a T-shape, which hides the joints between the slope and the wall cladding. The most rarely used option due to the increased cost is removable. This corner is made with a latch, which allows you to carry out repair work without removing the profile. It bends easily, and at the end of the process it falls into place.
Corners are also classified by type of finish - external and internal. The latter are made with double-sided coloring.
Important! The wider the sides of the finishing material, the greater the load it can withstand, which is especially important on curved openings.
Glue selection
Before gluing corners to slopes or other architectural elements, it is necessary to select the correct installation composition. Today there are 4 solutions to the problem. Let's look at each of them in more detail.
See also: Catalog of companies that specialize in decorative forms.
Liquid nails and sealant
In modern construction markets, sealants with liquid nails are presented in gun tubes or tubes. Moreover, they have the same volume. Buyers often get confused in this variety.
For installing lightweight plastic, only 2 options are suitable: liquid nails or adhesive-sealant. Here it is necessary to pay attention to the fact that the composition also exhibits good adhesion to the base. So, for absorbent surfaces you can use acrylic-based or neutral adhesives. They practically do not emit odor, can be wet cleaned before drying, and dry quickly. If work is carried out on concrete, plastic, metal or glass, you will have to make a choice in favor of universal compounds.
Universal composition Source stpulscen.ru
Sealants are often used to install corner profiles. This is justified by additional waterproofing. However, this approach is incorrect due to the weak adhesive ability of the material, and the dry residue can only fill the voids. A corner fixed with sealant does not always last for a year.
Liquid plastic
Liquid plastic is sold in the same containers as liquid nails. But the cost of the composition differs significantly from them in a larger direction. This is justified by high performance and technical characteristics. So, among the advantages the following are highlighted:
quality indicators and shape remain unchanged 10 years after installation of the fittings;
color change under the influence of ultraviolet rays, oxidation does not occur over time;
Due to minimal shrinkage during the drying process and good adhesion, a monolithic structure is formed, which additionally protects the base from moisture penetration.
Liquid plastic Source pvcwindow.ru
Liquid plastic belongs to the group of universal building materials. They can be used for gluing corners on slopes and filling/sealing joints between the window frame and adjacent planes. In addition, the composition is characterized by high mechanical stability, which allows it to be used for fastening window sills and sheet finishing of the opening. The only drawback against the background of numerous advantages is that the use is limited to PVC bases.
Polyurethane glue
Before gluing the plastic corner to the plastic panel, you should find out in advance about the color of the synthetic glue from light beige to dark brown. If the work surfaces are white, then the excess will be visible here. It can only be removed using organic or special solvents until it dries. Before using the material, you also need to find out about the working time of the glue in the open state.
Classic version of polyurethane glue Source sdelais.ru
The main advantages of polyurethane adhesive are as follows:
- resistance to biological damage and corrosion, which is important for areas with variable humidity;
- low thermal expansion allows the glue to be used in conditions from -60 to +150℃, which is not typical for the listed analogues;
- resistance to oils and organic solvents allows the composition to be used for finishing in laboratories and industrial enterprises;
- plasticity helps maintain the characteristics of the dry residue under vibration load;
- high adhesive ability determines the versatility of the glue to work with any substrate.
They also note the uniqueness of the polyurethane composition regarding the drying process. The higher the relative humidity, the more active it is. This allows you to install decorative corners for slopes in the bathroom without prior ventilation.
Types of adhesives
Before gluing the plastic corner, choose the right product for the procedure. Today, there are four items to choose from, familiarize yourself with the characteristics of them before work - how to apply, how long it takes to set, whether it is suitable for the material, etc.
Types of glue for plastic corners
- Liquid Nails.
They have good durability. This glue spreads easily over the surface of the plastic corner. Apply dotted or zigzag. Liquid nails are capable of connecting glued products for more than 20 years without losing their properties. The setting force after complete hardening is 40 kg/m2. It has anti-corrosion properties and does not damage or pollute plastic. When purchasing, give preference to a colorless composition, especially if you have to work with light-colored surfaces.
- Silicone sealant.
Used to connect corners with wallpaper, as well as tiled and ceramic walls if acrylic is present in the composition. It is characterized by the absence of toxic chemicals and high adhesive properties.
- Polyurethane glue. Durable, elastic and does not leave stains. Hardens quickly.
- Liquid plastic. Suitable for use only on plastic surfaces (for example, window slopes). Fast-acting, highly durable and reliable.
You need to apply glue from the inside of the part, closer to the middle. The spaces between dotted drops are 1-1.5 cm.
Example of glue application
There are also self-adhesive corners, which are glued immediately after measuring and creating the required size and shape. To do this, remove the protective tape and press the product against the protruding corner.
How to attach corners to the ceiling
Since the place for manipulation is considered quite complex, before fixing the element, due attention is paid to preparing the base. You will need to remove dirt and prime the surface, and then prepare a comfortable and serviceable ladder, reducing the risk of injury when working at height.
A lot depends on the choice of glue; if the mixture has extra-strong fixation, then there will be no problems with installation; liquid nails have proven themselves well.
To ensure that the product lies flat under the ceiling and fits perfectly to the surface, the surface can first be thoroughly cleaned with sandpaper. And until the composition is completely polymerized, secure the section with adhesive tape; masking tape has come to the rescue of professional tilers more than once in such situations.
Preparatory work
Before you start finishing the walls with plastic corners, you should clean the working surface from dirt, dust and other construction debris. To apply glue, purchase a glue gun, and for installation, additionally the following tools:
- scissors or hacksaw for metal;
- square (preferably metal);
- stationery knife;
- roulette;
- masking tape.
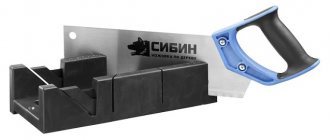
You may also need a miter box, which can be used to make blanks with an angle of 45°. But if a tool is missing, you can cope without it using certain skills and our recommendations.
Tools
Degrease the place where the corner is attached and the part itself using a weak solvent or white spirit. The workpiece must be clean. Avoid exposure to moisture.
How to cut finishing corners
Almost always, corners have to be cut to protect the corners of walls. They are sold in strips from 2 to 3 meters long. The cutting tool is selected depending on the type of material. For wood and metal, thick plastic, you will need a hacksaw, but the blade is different - for wood, and with a fine tooth for metal or thick-walled plastic.
Thin plastic can be cut with a construction or stationery knife or sharp scissors. If you need to cut perpendicularly, it is easier to use scissors. We use them to cut to the corner on both sides, bend the corner, and cut the remaining millimeters with a stationery knife. If there are flaws, they can be easily corrected with the same knife or very fine-grain sandpaper (polishing).
How to cut protective plastic corner (PVC)
If the plastic corner needs to be cut along the fold, cut it along the inner corner using a stationery knife. There is no point in cutting through the entire thickness. You just need to leave a noticeable stripe. Then we bend the piece that needs to be removed. It comes off at the cut site. We remove irregularities with a knife or sandpaper.
Options for installing corners on walls
Before gluing the corners, decide on the installation method. There are two of them.
- To the wallpaper.
This option is suitable for wallpaper with shallow relief, but be careful when finishing slopes with deep embossing, as due to the loose fit of the corners, cracks may form in which dust collects.
- With cutting a strip on the wallpaper to apply the glue directly to the wall. To do this, follow this action plan:
- Attach a corner to the installation site, level it and press it to the wall surface;
- using a sharp knife, cut off the wallpaper on both sides of the overlay;
- Apply glue to the plastic corner and install it in the intended place;
- secure the corners with tape designed to set the adhesive;
- After 24 hours you can remove the tape.
If you are not sure of the accuracy of cutting the blanks, you can first try on the part for the finishing area, and mark the place of the cut with a pencil.
Marking
Silicone sealant
Sometimes silicone sealant is used instead of glue. This approach cannot be called successful, since corners in most cases are not just decoration, but protection of external corners. The sealant interacts poorly with plastic and will not provide a good result for a long time. If you still choose this option, then you need to choose not from acidic sealants (based on acetic acid), but from neutral ones.
There are brands of neutral sealants specifically designed for working with plastic, such as BARTON'S. They have high tensile strength - up to 1.2 MPa - and will provide high adhesive strength for a long period. The disadvantage of neutral sealants is their higher cost compared to acid sealants and assembly adhesive.
The sealant is applied to the dry, clean surface of the bend - in a strip - or on the flange of the corner - in dots or snakes. Setting occurs within 5 minutes, and complete drying occurs within 5 days.
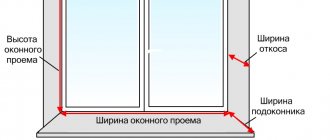
How to glue a plastic corner to a door and window slope
Before placing corners on the slopes of windows or doors, you need to check the quality of the surface finish. This is done using a level, bar or rigid ruler. If the surface of the slope is severely curved, and this cannot be corrected, then it is better to install flexible plastic corners here.
There are three types of slopes:
- plasterboard;
- covered with wallpaper;
- painted after plastering.
Regardless of the choice, the installation technology is the same in each case. The only important thing is the choice of adhesive composition so that it is suitable for both the plastic and the finishing surface.
- Measure the height to make the blanks. Leave a margin at the top. The cuts are made with metal scissors. You will get an angle of 90° from the inside, and 45° from the outside.
Example of a cut
- Place the part on the glue and wait for it to set.
Press the corner firmly
- Now measure the width and cut the required size with a margin to match the side strips.
- The face blank is cut at an angle of 45° from both ends.
- Test the corner against the side slopes to make marks in place with a cutting knife.
- Take a ruler, apply it to the glued part and cut off the excess.
- Now apply glue to the top strip and attach it to the corner. Secure all elements with tape for a day.
Example of securing corners with tape
If the slopes are decorated with wallpaper with a three-dimensional relief, then you first need to cut strips on them for plastic corners. Be careful that no drops of glue or liquid nails remain on their surface.
What to attach to
The choice of method for attaching corners to protect the corners of walls depends on the material of the corner and on what surface they will be attached to. The most commonly used glue is glue. Moreover, “liquid nails” are among the leaders. This is a universal compound, but before purchasing, check that the specific brand can bond the materials you need.
You can put a corner on the glue if it is even, without large flaws. If there are holes/depressions, you are unlikely to glue it. In this case, you can use silicone. If you are gluing white corners, you can use white silicone. For colored ones it is better to take transparent ones. It is not advisable to use acidic everywhere. Although it is cheaper, it can damage metals or paint.
In both cases, the wall and corner must be clean and dry. The compound is applied to the corner, it is pressed against the corner, and fixed with strips of masking tape. We grab it after 40-60 cm. If everything is smooth, you can do it after 60 cm; if you need to repeat the shape, after 40 cm or even more often.
How and with what to glue a PVC corner to the wallpaper
Leave it in this state until the glue dries or the silicone hardens. See the packaging for the exact time. Then the masking tape can be removed. It differs from ordinary tape in that it comes off even from paper wallpaper without damaging the surface. But to be sure, try sticking and peeling in an inconspicuous place.
Foam rubber corner - L-shaped and universal with self-adhesive backing
There is another option for how to glue corners to a wall with wallpaper or paint. You can use double-sided tape. First glue it to the corner, then, after removing the protective coating, press it to the corner. There are corners to which the tape is already glued. Some types of foam rubber or plastic (usually flexible or universal).
Recommendations from professionals
Useful tips will help beginners with DIY installation.
- Be precise when marking so that there are no gaps between the joints. To prevent this, you can increase the length of the workpiece by 0.5-1 mm. They will still fall into place due to the elasticity of the material.
- It is not recommended to fill the joints with silicone, as over time it will darken and it will stand out against the background of the slope.
- To be on the safe side, do not glue the corners right away, but first attach them with tape and take the necessary measurements.
- To create the correct shape for the arch, use a hair dryer.
- When processing areas in openings where the angle is not 90°, but more or less, it is necessary to take measurements locally and cut them with a knife.
Plastic corners serve as reliable protection for slopes from damage, and also add aesthetic completeness to the entire interior. Among the wide range of shapes, sizes and colors, it is easy to choose the best option for a specific design. And it’s also easy to attach them yourself, having all the necessary tools and work skills. Reinforce your knowledge by watching the video.
The main purpose
As noted above, the main reason for attaching a protective PVC corner for wallpaper, arches and tiles to the corners of walls is not only the decorative function, but also the protection it provides for certain construction or finishing materials in the interior of apartments and houses. With this design, you can protect various vulnerable areas from damage that can be caused by impacts from pieces of furniture of various sizes, careless handling of household appliances, and sometimes overly playful children and pets.
Attention! If you decide to stick on a decorative plastic corner, then be sure that this mounting element will not only provide safety for wallpaper, PVC panels and window slopes, but will also make the interior of the room more “complete” and attractive. So, let's look at the gluing process in more detail.
Types of plastic corner
It should be noted that in terms of its purpose, as well as in appearance, this fastener may be different. The following types can be distinguished: external, internal, perforated, colored, decorated “like wood”. In addition, some of its types can be used for work on the ceiling.
Advice! If you are not satisfied with the color of the PVC corner and want to paint it, then you should use the same rules and instructions as when painting other PVC surfaces.
As for which size is better to choose: look at the situation, guided by both aesthetic and practical considerations.
Related article: Ceiling design in the hallway: plasterboard design