Today, a lot is said about the correct installation of plastic windows, “warm” installation of windows, while little attention is paid to such an important factor as the location of the window in the wall. The WINDOWS MEDIA portal will tell you about common methods for installing windows in thick walls and the consequences of their work on the building.
With the widespread use of sealed windows, the properties of building joints are becoming increasingly important. As a result of incorrect placement of the window in the wall, the advantages of using a window structure, even with very good thermal insulation parameters, can be completely negated.
Location of windows depending on wall design
To prevent uncontrolled heat loss around the windows, you need to install them in the right place:
- Single-layer walls: the window frame should be located in the middle of their thickness (GOST suggests installing windows at a distance of ⅔ of the opening depth from the inner surface of the wall);
- Double-layer walls: the frame is mounted as close as possible to the face of the wall, in close proximity to the insulating layer. The best solution is to settle the frame so that the window fully or partially protrudes beyond the wall surface and is surrounded by thermal insulation material around the perimeter;
- Three-layer walls: windows must be installed in a layer of thermal insulation;
- Prefabricated walls: similar to a single-layer wall, the frame is installed in the center, about half the thickness of the wall. However, if the wall is insulated from the outside, the same rule applies as for double-layer walls;
- Insulated log walls: the insulating layer is here in the middle of the wall thickness - the frame should be installed at this line;
- Log walls: Windows are installed in the same way as in the case of single-layer walls. If the logs are insulated from the outside, the same rule applies as for double-layer walls.
WINDOWS MEDIA recommends reading: At what stage of construction should windows be installed (part 1)
Options for fixing windows in walls made of cellular concrete
For proper window operation, the temperature on the inner surface of the enclosing structure is important. To avoid damage that may be caused by moisture, the temperature in the entire plane separating the interior of the building should be greater than 13 ℃. This is related to the so-called dew point. The dew point is the temperature at which the air, at a given temperature and relative humidity, is no longer able to accept more water. Dew point temperature is defined as the temperature at which the surface relative humidity reaches 100% and the air is saturated.
Below are various options for fixing windows in a wall made of cellular concrete 24 cm thick, with an outer layer of thermal insulation 15 cm thick. Additional conditions: outside air temperature -5 ℃, inside +20 ℃.
- The window is mounted in the middle of the wall thickness, the frame is not protected by a layer of insulation: Isotherms 10 and 13 ℃ pass through half the wall thickness and very close to the inner surface of the window-wall junction. Very large distance between isotherms at temperatures below 13℃. A significant part of the wall and assembly joints are cooled.
- The window is mounted in the middle of the wall thickness, the frame is covered with a layer of insulation: the 10 ℃ isotherm is largely shifted outward, and the 13 ℃ isotherm is closer to the outer surface of the wall. A significant part of the wall is cooled, but the temperature of the cross section of the assembly joint is higher.
- The window is mounted at the level of the outer plane of the wall, the frame is not protected by a layer of insulation: Isotherms 10 and 13 ℃ are shifted to the outer side of the wall. Very high density of isotherms on the low temperature side.
- The window is mounted at the level of the outer plane of the wall, the frame is protected by a layer of insulation: The 10 ℃ isotherm passes completely outside the plane of the wall. Almost the entire section of the wall and the installation seam has a temperature above 10 ℃. The 13 ℃ isotherm is significantly removed from the inner surface of the assembly seam.
- The window is mounted in an outer layer of insulation, the frame is not protected by a layer of insulation: The 10 and 13 ℃ isotherms are completely shifted to the outside of the wall. High concentration of isotherms on the low temperature side. Strong cooling of the assembly seam. The passage of the 13 ℃ isotherm is very close to the inner surface.
- The window is mounted in an outer layer of insulation, the frame is protected by a layer of insulation: The 10 and 13 ℃ isotherms are shifted outward, deep into the insulation layer. Low cooling of the assembly seam.
Thus, it is least preferable to install a window in the middle of the wall thickness without protecting the frame with a layer of thermal insulation. In addition, in this embodiment, less light enters the room.
Correct location of the window in the wall
The best solution is to install the window in a layer of insulation and cover the frame with insulation. Protecting the window frame in each case significantly improves the thermal performance of the installation joint. To a large extent, this solution allows you to avoid problems with the formation of mold on the surface of the connection between the window and the wall.
In practice, experts recommend the following window installation:
- In old buildings, when replacing windows in a wall without thermal insulation, install them in the middle of its thickness,
- In newly built houses, with an external layer of insulation, install the window as close to the insulation as possible. Ideal installation is in a layer of thermal insulation.
WINDOWS MEDIA recommends reading: Installation of plastic windows must be of high quality
Methods for attaching windows to the wall
In order for the windows to be firmly fixed to the wall, the window frames should be connected to them through carefully selected systems of anchors and fasteners. It should be noted that one type of fastener is intended for walls made of solid materials, for example, sand-lime brick, aerated concrete, solid brick, and the other is used for hollow walls.
Special anchors are used to connect windows and wooden building structures. They must compensate for the stresses that arise at the junction between the window and the wall, which operates, among other things, as a result of changes in the moisture content of the wood.
A plastic window provides high-quality isolation of the interior space from the street, but only if installed correctly. Errors when installing plastic windows negate the efforts made and money spent.
Measuring the installation depth of a plastic window.
The manufacture and installation of plastic window openings is a complex technological operation, it is performed only by an experienced specialist. However, the construction market is filled with fly-by-night companies and unprofessional workers. It’s good if a window manufacturer was recommended to you by friends.
It's good when you are confident in the quality of the work being performed. But what to do if you found the manufacturer of double-glazed windows through an advertisement or were recommended to you by people you don’t know? Here is a list of criteria that will help you evaluate the quality of window installation and promptly detect mistakes made.
Meaning
So, flush is a term that is widely used in construction jargon, but is fairly unknown to other people. If you say “flush” in an everyday situation, then only those people who have some experience in construction, repair and other similar areas will understand you. So you have to understand that “flush” is flush with something. However, this term cannot be used in absolutely all cases - as mentioned above, it is intended for a narrow area and has a rather specific meaning.
Scope of use
Now you know: flush is a construction term that means both elements are on the same level. However, this is an incomplete definition, and if you say that people of the same height stand flush, then you are admitting a serious feature of this term is the fact that it describes one object that penetrates another object. For example, when you drive a screw into a wall, you can leave the head outside so you can paint the picture. If you don’t need such functionality, then you screw it in all the way - and it turns out that the screw is screwed in flush with the wall. This can be used in any situation where one object penetrates another, while being flush with it, without any protrusions.
Kitchen window sill as an additional work area
A window sill as an additional tabletop is the most successful option . Its height in standard houses is at the same level as the work area (approximately 90 cm), so implementing such an idea is not difficult.
There are several advantages to this:
- natural light from the window;
- quick release of cooking odors through the open window;
- expansion of space and space in the kitchen;
- aesthetics (cooking dinner is much more pleasant while looking out the window).
Synonyms
Now you understand that flush is on the same level as something, but in a rather narrow, specialized sense. A synonym for this term can be words and phrases such as “level,” “level,” and so on. However, now you know that these synonyms have a much broader meaning than the word described in the article. And you can safely say that a group of people has become on the same level, on a level or level - but in no case can you say that they have become flush, as this will be a lexical error. But you can always say that you screwed the screw flush with the wall, since this is the context in which this term should be used.
All photos from the article
You can cover a house with siding yourself and quite quickly; you definitely don’t need any special skills for this. You just need to think through all the details in advance, because the work consists not only of installing panels on the wall sheathing, but also in designing the base, as well as window openings. It is the finishing of the window with siding that can confuse a beginner.
Window finishing methods
When finishing window openings with siding, the type of window plays a big role.
There may be such window installation options as:
- flush with the wall. In this case, wide or narrow trims are used to decorate it. In terms of complexity of work, this is the simplest option;
Note! If you need to design an arched window, then it is better to use a narrow casing; its mounting part can simply be cut at a certain pitch and then bent. But if the bend radius is too large, then bending may become difficult.
- the window is recessed into the wall to a small depth (no more than 200 mm). To decorate it, you can use a finishing strip or J-profile, and a special near-window strip for siding will cover the slope;
- For deeper recessed windows, the option of using offcuts of wall panels is suitable. Additionally, you will need a J-profile and a corner for decorating the outer corners.
In all the cases described, the finishing is done even before the wall panels are attached around it. In this case, during installation, their edges will simply be inserted into the groove on the edge of the window profiles. If you start finishing after covering the walls, then it will be more difficult to do.
As for the technology itself, the general rules remain in force. That is, self-tapping screws/nails/staples should be placed in the center of the mounting holes, without fixing the profile rigidly, the gap between the head and the surface of the material should be approximately 1 mm, this will allow the element to move freely when the ambient temperature changes.
Note! The installation instructions allow for fixing elements in any location.
Also, a common point for all cases of window finishing can be considered the installation of lathing. The bars are attached around the perimeter of the window opening, and small strips will also need to be placed on the slope directly next to the frame, so that you can install the finishing profile or J-profile (for windows recessed into the wall).
Constructive solution
One of the structural installations
If you look at the market offers, you can see that the price of ready-made engineering solutions is quite high. This is explained quite simply.
Modern serial invisible cameras are made of metal. This is the easiest way to make a durable solution that meets any requirement. If we consider a short list of wishes for which users choose such designs, it will look something like this:
- Possibility of installation flush with the wall;
- perfect closure, the structure should be invisible on both sides;
- the canvas must have high strength so that any finishing can be applied to it, for example, pasted over with decorative stone;
- the fittings must be hidden and ensure reliable long-term operation even in conditions of strong changes in the mass of the sash.
Such rather stringent requirements form the picture of the market. The price is high, since solutions are used that provide a margin of safety, reliability, and also guarantee long service life:
- load-bearing structural elements are made of metal, most often a lightweight and durable aluminum profile is used;
- the elements of the box, which are responsible for rigidity, are moved beyond the plane of the opening;
- the door leaf is also formed according to the rules for the manufacture of steel products; it is taken into account that the external finish cannot be responsible for strength, since it can be anything;
- fittings are used, in particular, hidden hinges, designed to control a sash that weighs much more than the actual weight of the finished leaf;
- serial solutions are immediately designed for invisibility on both sides, so the concept of a cover strip almost disappears, it is replaced by a metal corner.
All finished products are calculated for a certain wall thickness. A structure of any thickness can be made to order, and the price increases accordingly. But for the money the user gets a truly high-quality solution.
Finishing methods
Painted and decorated to match the wall
You can use any materials to decorate the door leaf. Ready-made solutions are typically offered in adhesive finishes for subsequent paint and adhesive coatings. The following materials are common among production models:
- veneer;
- acrylate, a thick, highly durable plastic that is scratch and abrasion resistant;
- glass;
- thin overlays made of wood or MDF, often pre-primed, intended for subsequent painting or wallpapering.
In cases where glass and acrylate are used, there can be any colors, as well as light refraction effects. Coatings intended for subsequent finishing allow the application of decorative plaster.
Window finishing technology
For each case, the procedure is slightly different; it is also worth considering the finishing of arched windows separately.
Window without slopes
Covering the window with siding from the outside is carried out using special platbands or a regular J-profile.
- first we specify the width of the frame (the width of the window frame is measured);
- Next you need to cut the platbands. They must be solid; the joints cannot be masked. The required length of the strip is determined by the formula L = 2*b + l, where b is the width of the casing itself, and l is the length of the window frame;
- profiles can be joined at a right angle or at an angle of 45ᵒ, there is not much difference, except that a joint at an angle looks better. When joining, it is imperative to ensure the tightness of the junction of horizontal and vertical elements; this is achieved due to the fact that a cutout is made on the side of the vertical strips, and the section on the horizontal ones is cut and bent;
Finishing a window recessed into the wall
Window strips are ideal when it is not very deeply recessed into the wall (up to 200 mm). Special strips completely cover the slopes, and the side parts of the trimmed wall panels are inserted into the grooves on the sides.
The design begins with installing the finishing profile directly next to the frame. If the slopes are concrete or brick, then it is better to install a wooden block near the frame and attach the finishing profile to it.
After this, the window strip is inserted into the groove of the finishing profile, and its outer part is attached to the sheathing around the perimeter of the opening. When joining the planks, cutouts are made on the vertical parts adjacent to the slope, and on the horizontal parts the material is cut and folded, this is necessary to ensure a tight joint.
At this point, finishing windows with siding with your own hands is considered complete.
If the window is recessed to a greater distance, then it will no longer be possible to use window trims. In this case, the finishing is done using small pieces of wall panels, as well as a corner for decorating the outer corner and a J-profile.
A special flashing can be installed, its edges are trimmed and bent under the vertical strips. For greater reliability of fastening the ebb, you can use sealant (coat the joint between the ebb and the window frame).
Do-it-yourself window siding is installed as follows:
- first, a J-profile is attached around the perimeter (the joint with the frame can also be coated with sealant);
- Next, pre-prepared cut pieces of wall panels are installed;
- The final stage is the installation of the corner profile.
During installation, the same rules apply as when installing siding in the general case. That is, all connections are made with 5-6 mm deformation gaps.
Note! If the work is carried out in the cold season, the size of the gaps increases to 10-12 mm.
Working with arched windows
Arched windows look great, but their finishing is somewhat more complicated than ordinary rectangular window openings. Finishing arched windows with siding is complicated by the fact that its upper part is curved.
For finishing, you can use a special flexible J-profile, but its price is noticeably higher than the cost of a regular one. Therefore, they often make do with its budget substitute - they take a simple profile and make deep cuts on the mounting part (the part in which there are holes for nails/screws), after which you can bend the profile, giving it the desired radius of curvature.
Note! Sometimes cuts are made on the front side of the profile; if this operation is performed carefully, it will look like an unusual design technique.
As an option, you can consider replacing the arched window opening with a polygonal one. In this case, to decorate it, the same technology is used as for finishing in a normal case, just large profile cutting.
If you decide to try to bend a regular J-profile, then the material is of great importance, for example, a steel element will be more difficult to bend, so plastic is more suitable in this case. Finishing windows with vinyl siding will allow you to easily bend it into an arc of the desired shape and secure it to the sheathing. To make bending easier, you can warm up the vinyl thoroughly, but without fanaticism, the plastic should not melt.
Measurements and model selection
How to measure a standard window without quarters: the width is measured along the inside of the opening between the slopes, the height is measured from the top slope to the window sill.
When calculating the dimensions, you need to add the amount of the installation gap on both sides to the width, and to the height - twice the amount of the gap and the height of the stand profile. Measurements should be taken in two or three places for both width and height, and in both cases choose the smaller number.
Quarter window (these are often found in brick houses). The measurement is taken from the outside of the window. Width is defined as the distance between the quarters plus twice the overlap of the quarter on the window (up to 4 cm), height - the distance from the top quarter to the low tide plus the overlap of the quarter (up to 4 cm). There is usually a cement screed under the window sill and ebb, which can be used to increase the glazing.
The optimal window installation depth is approximately a third of the width of the opening wall from the facade wall. This distance should not be shortened. Moreover, it is not recommended to install the window flush with the facade: it is the coldest here, and in winter you are guaranteed condensation on the glass.
In conclusion
The overall impression of the house largely depends on the quality of window finishing, so you definitely shouldn’t treat this type of work with disdain. The technology largely depends on the shape of the window, as well as how far it is recessed into the wall, but this work is not difficult even for a beginner in the construction business.
And the suggested tips will help you avoid mistakes when finishing. The video in this article shows the window finishing process.
In the comments to the material, you can ask any question about finishing the window with siding.
Installation of window sills
During a major renovation of an apartment, an operation is inevitable.
window sills
from the developer
installed window sills
will still have to be replaced: careless installation, the window sill itself is of poor quality, damage when renting out the apartment.
In most cases, the customer gives preference to inexpensive PVC (plastic) window sills in white matte color, which are unpretentious in operation. This option is acceptable for budget renovations if your windows do not face the sunny side or you plan to have blind curtains. Otherwise, under the influence of sunlight, the budget window sill
will quickly lose its presentation: temperature deformations, fading of plastic (yellowing, etc.). Such
installation of a window sill
is not always financially justified.
When making high-quality apartment renovations for yourself in the long term, it is better to give your preference to higher-quality window sills (Moeller, Danke, Werzalit). These are no longer just plastic painted in bulk, but window sills
made on the basis of wood-polymer mass from environmentally friendly materials with various acrylic coatings, imitating the textures of wood or marble of various colors, allowing to please the refined tastes of any client for the implementation of his design project.
In addition to decorative qualities, such a window sill
has great torsional rigidity, durability and wear resistance, and high-quality geometry. When installing a window sill, you must be guided by certain technologies.
When purchasing a window sill, you need to take the dimensions in advance and understand how it will be positioned. Since in the store you will be cut to the required length for ease of transportation, and the width of the window sills are produced in multiples of 5 cm (20,25,30 cm, etc.). When installing window sills correctly, it is necessary to agree with the customer on the overhang of the window sill relative to the wall. The “flush” option (flush with the wall) is shown in Fig. 1; this option for installing a window sill is preferred by those who plan to hang curtains and tulle to the floor so that the protruding window sill does not interfere. Those who plan to use the window sill functionally (storing decorative items, flower pots or making a window sill-tabletop) prefer a large window sill overhang (Fig. 2).
It is necessary to take into account that the large protrusion of the window sill in further operation will interfere with the convection of hot air from the heating radiator upward in order to create a barrier to cold air that penetrates into the apartment through the double-glazed windows. To improve convection in the protruding part of the window sill, it is necessary to make ventilation holes or install a ventilation grill (Fig. 3), which will not interfere with the rise of hot air.
To install the window sill correctly, it is necessary to make a groove in the slope (if it is already made) into which the ends of the window sill will be placed to create additional rigidity of the structure in the coupling. On the side edges of the part that will fit into the groove of the slope, cut off the window sill (Fig. 4). At the end of installation, special end caps will be installed on the remaining part of the end (sold separately from the window sill).
The window sill can be installed on mounting or plaster mortar. For better adhesion with the adhesive, small length (25mm) self-tapping screws (25mm) should be screwed into the smooth back side of the window sill (not the front) in a checkerboard pattern (Figure 5.6), which after the solution (or foam) has hardened, will ensure reliable fastening
Covering a house with siding yourself is quite simple. For such work you will not need to master any special skills. It is necessary to prepare thoroughly in advance. The quality of the result depends on how well all the subtleties of the process are thought out. The work includes not only the installation of panels, but also the cladding of the basement and windows. That is why a beginner, when faced with the need to perform such work, often finds himself in a dead end. To understand the cladding process, you will need to read the step-by-step instructions for finishing a window with siding yourself.
An important nuance when performing outdoor work
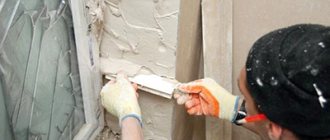
When installing plastic windows and performing dismantling work, installers often do not remove the external slopes. However, even the most careful work leads to the formation of chips and cracks on old slopes.
The gaps between the new window and the wall of the building are simply filled with polyurethane foam, as a result of which some of it protrudes out. After completing the installation of a window structure, often only the internal slopes are installed, while the external cladding is completely forgotten.
After installing double-glazed windows at the ends of the opening, a lot of foam remains, which must be removed
It would seem that this option is acceptable for apartments on the upper floors - from afar, no one will see the absence of external slopes and a slight protrusion of foam.
But in fact, the foam will sooner or later begin to collapse under the sun's rays, which will lead to the formation of pores and, as a result, a decrease in heat and moisture insulation.
Reduced protection from external influences will not only worsen your comfort, but will also lead to an impact on the windows themselves, which will significantly reduce their service life. In the end, the main protection from the cold will be the internal slopes, which play a more decorative role and are not intended for thermal insulation at all. Thus, there will be moisture and cold in the apartment, and constant condensation on the windows.
Methods for finishing openings
When creating an attractive window treatment, the type of window installed makes a huge difference. It depends on what technology will be chosen for installing siding panels. There are several types of installation of double-glazed windows:
In each of these cases, finishing is carried out even before the wall panels that will be located around the window are secured. In this case, the edges of these elements simply need to be inserted into the groove on the edge of the profile. When performing finishing after installing the panels, the work will cause certain difficulties.
The installation technology is common to all siding panels. The screws should be tightened in the center of the mounting holes. In this case, a gap of 1 mm should be left for cases where thermal expansion will occur. This way the panels will move freely without deforming. If you follow this rule, installing siding panels on the window will be much easier.
Features of window siding finishing can be found in the video:
Attention! According to the instructions, during installation you can fix the elements in arbitrary places.
The sheathing bars must be fastened around the perimeter of the window. Small planks are installed on the slope. This will make it easier to install the finishing profile. The bars must be the same size. This will make the wall surface more even. All work is carried out with a level.
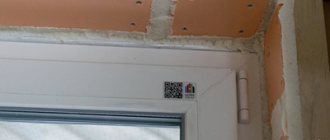
Error - insufficient installation depth
Insufficient distance between the double-glazed window and the outer surface of the wall will result in the windows getting wet in winter. This occurs due to the condensation of warm air on the cold glass of the window. If the plastic structure is located close to the line of the outer wall (and the outer window sill is narrow), the glass from the outside is exposed to sub-zero street air.
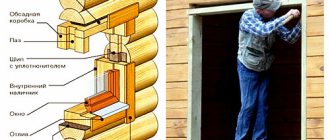
Fastening elements for installing a window into a window opening.
The outer glass is cooling. The cold is transferred to the inner glass. Following it, the warm air of the interior cools down. When warm air cools, moisture drops out of it. Drops of water condense on the cold surface of the glass and frame, flow down, collect in puddles on the windowsill, or are absorbed into things near the window (books, toys, phones). Similar processes occur when a glass jar is brought into a house from the street. It quickly fogs up (becomes covered with small drops of water).
Condensation, or wetting, of windows does not occur if the glass unit is correctly positioned from the line of the outer wall. Installing a window in a recess of at least 1/3 of the wall thickness significantly limits the entry of cold air into the glass and frame. There is no cooling of the air layer along the glass unit - no condensation drops.
Some owners mistakenly believe that the process of condensation and wetting of windows occurs only in domestic premises. This is wrong. In domestic rooms (kitchen, bathroom), moisture condenses much faster and windows get wet more often. Windows in living rooms get wet more slowly because the air contains less water vapor.
You need to know that any air contains a certain amount of water vapor. Thus, in the space of a residential apartment, the air humidity is 30-60%; with an increase in the number of people in the room, the humidity increases (a person constantly exhales carbon dioxide and water vapor). There is no absolutely dry air in rooms, therefore, window wetting is determined not only by the humidity of the room, it occurs when the installation depth is incorrect and there is a lack of ventilation.
Preparatory stage
High-quality window finishing from the outside requires certain preparation. Such work includes:
- removal of decorative elements;
- cleaning the surface from old plaster;
- removal of old wooden parts;
- dismantling of communications.
In addition, technical devices and fixtures are also removed - antennas and air conditioners. The surface is cleaned and dried. It is better to carry out such preparation if it is planned to cladding the entire façade of the building.
Frame installation
When deciding to decorate a window opening with siding, it is worth considering that before such work, lathing should be done. It will be needed for the following reasons:
- so that the material is securely fastened;
- cladding will be much easier;
- to level the surface of the wall.
The following options are suitable for lathing:
- wooden beam with a cross-section of 4x6 cm.
- metallic profile.
Advice! When using wooden beams, before starting cladding, it is necessary to treat the elements with an antiseptic. This will help prevent the wood from rotting and being damaged by insects.
The frame parts are attached at a distance of 20 cm from each other. This step is optimal. If it is larger or smaller, the strength or aesthetics of the structure will decrease.
Insulation
Finishing windows during siding installation involves creating an insulating layer that will protect the window frame and the room behind it from the effects of cold. Insulation is best done with polystyrene foam boards. It is mounted on dowels with wide heads.
Advice! To protect the insulation from moisture, a film should be laid on top.
Since cracks cannot be avoided during installation of the window frame, it is necessary to prepare the sealant in advance. Thanks to the use of this material, it is possible to increase the hydro- and thermal insulation properties of the structure as a whole.
Other installation errors
Adjusting plastic windows.
- Insufficient cleaning of the opening from construction debris and other dirt. This leads to weakening of the installation and leakage of the connection between the window profile and the wall opening.
- Insufficient treatment of seams (seams are foam between the frame and the opening). At the beginning of the era of plastic windows, they were installed simply: fastenings, foam - ready! Modern installation technologies provide protection of the seam from moisture penetration. To do this, the material is provided with vapor barrier from the inside and waterproofing from the outside. The vapor barrier stops the penetration of moisture from a warm room into the foam. If moisture gets inside, it may freeze with micro-tears in the material. The vapor barrier of the seam is tape, which is used to seal the seam from the inside.
- External waterproofing protects the mounting foam from street moisture. It is done with a special tape, sealant or cement mortar.
- Limiting the seam material from any moisture (street or room) guarantees its reliable and long-term operation. The seam is covered with steam- and water-resistant materials after the foam has hardened.
- Gaps or holes in seams. Any through holes in the seams are not allowed. This leads to the formation of “cold bridges” and the blowing of cold air into the room. Possible cracks are detected visually.
- Gaps in the window sash. The presence of this defect is checked by hand; it must be brought to the dividing line of the glass unit/profile. If there is a feeling of a breeze blowing, then there is a gap. This defect is eliminated by adjusting the window fittings (rotating the eccentrics at the ends).
- There should also be no gap between the window and the window sill. If the inner window sill is laid firmly and does not move, the gap can be filled with foam or filled with sealant. If the window sill is “playing,” ask the worker to eliminate the detected defect.
The listed violations occur at the stage of installing the finished profile in the window opening. In-house inspection of the installation of a plastic window gives confidence in the quality and reliability of the work performed.
One of the important details of the external decoration of the house is the finishing of plastic windows from the outside, using various facing materials and building mixtures. This seemingly small touch completes the appearance of the facade; in addition, the finishing details have a number of technical functions.
Window finishing technology
For each of these cases, actions may have a different order. Separately, you should familiarize yourself with the decoration of windows without slopes. Siding in this case includes the use of special platbands.
Advice! For greater reliability, the elements are sealed with sealant.
The panels are cut at the top and bottom of the window structure. The slot should be slightly narrower than the width of the window strip. You can learn more about the technology of cladding window structures with siding from the video:
Recessed structures
Window trims are great in cases where the window is not very deeply recessed into the wall. Thanks to the use of planks, the slopes are closed.
Then the window strip is placed in the hole of the finishing profile. When joining the planks on the vertical elements that connect to the slope, it is necessary to make special cutouts. Horizontal elements are cut and bent.
If the window is recessed quite deeply, the use of window strips is not required. For such structures, small pieces of wall panels are used. During the installation process, a corner is used.
Installation can be carried out using a special ebb. Its edges must be trimmed and folded under the vertical elements. To increase the reliability of fastening the ebb, a sealant is used.
Installation of siding on windows is carried out in the following order:
- first, a J-profile is attached around the perimeter of the structure;
- then the installation of pre-prepared elements of the frame panels is carried out;
- At the final stage, the corner profile is installed.
During installation, you must follow the same rules as for the general installation of siding panels. Each connection should be created with a gap of 5 mm.
Attention! When performing work in autumn or winter, the gaps should be increased to 10-12 mm.
Arched windows
Such designs look great, but finishing them is fraught with some difficulties. Installing siding on arched windows is complicated by the presence of a curved part in the upper part of the structure.
For finishing, a J-profile is usually chosen, which is quite flexible. However, its cost is significantly higher than that of a regular one. For this reason, its standard counterpart is often chosen. To do this, several cuts should be made in a regular profile, which are made on the mounting part. It is then bent to give the required radius of curvature.
Attention! In some cases, cuts are created on the front side of the product. If carried out carefully, this solution will become an effective design technique.
An alternative option is to replace the arched opening with a polygonal opening. The design of such a window is performed using the same technology. However, the profile cutting will be large.
The ease of bending a regular J-profile will depend on the material from which it is made. In the case of metal, it will yield much harder than plastic. To create an arc of the required radius of curvature, you should choose vinyl siding. To make bending easier, it should be warmed up well. However, do not overuse this - the plastic can easily melt.
What is the window sill board made of?
Modern window sills can be made from a wide variety of materials. Depending on this, the installation method also changes.
Made of plastic
PVC products are becoming increasingly popular in construction from year to year. The situation is similar with plastic window sills, which have a whole list of advantages:
- Easy to install with your own hands;
- Manufacturers place a special laminating film , which can be decorated with different images and colors, which makes it possible to choose the model that best suits the style of the room;
- Retains heat well indoors;
- Plastic tolerates moisture well and is not afraid of mold and fungi, which is especially important for lovers of indoor plants;
- The surface is easy to clean;
- Thanks to stiffening ribs, modern plastic window sills withstand mechanical stress;
- Temperature changes are not scary;
- Under prolonged exposure to sunlight, the characteristics of a plastic window sill do not deteriorate.
However, despite a lot of advantages, PVC window sills also have a number of disadvantages:
- High temperatures on the surface, for example, the lid of a hot pan, can damage the product, causing deformation;
- The laminating decorative film is easily scratched, in addition, over time it can peel off;
- Artificial origin of the material.
And although PVC products have some disadvantages, most often the owners of apartments and houses choose it when installing a window sill themselves.
Stone board
Connoisseurs of natural materials often prefer stone window sill boards. , marble and granite are used for this . Of course, stone models are distinguished by their unique natural image on the surface and beauty in general, but such a pleasure cannot be called cheap!
Along with this, you can easily get an unsightly scratch on the carefully polished surface of natural stone; their thermal insulation leaves much to be desired, and many stains, be it tea, wine or coffee stains, are easily absorbed by the material. In addition, the large mass and cost of the material leave no chance for independent installation, forcing you to hire professionals for this.
A worthy alternative to natural material is considered to be a window sill board made of artificial stone . It is made of acrylic and is not inferior to its natural counterpart in beauty, heat resistance and strength. An additional advantage of a stone acrylic window sill is that the surface is not scratched, and the product itself is noticeably cheaper.
MDF and chipboard
Window sills made of chipboard and MDF panels remain a more budget-friendly option compared to wooden products. Many manufacturers make window sill boards from fiberboard and particleboard. Such models are covered with a special film on top.
Chipboard is a less moisture-resistant and durable material than MDF - if the protective film is damaged and moisture gets on the chipboard, the latter may begin to swell, which will lead to noticeable deformations of the window sill. MDF boards are more stable, but their price is higher.
Window sill boards made of wood fiber and shavings are easy to wash, the main thing is not to use abrasives for this !
Made of wood
For a long time, types of wood such as pine, cherry and oak remained common materials for the production of window sill boards. Wooden window sills remain very popular today.
Installing a wooden window sill with your own hands begins with thoroughly drying and treating the material with varnish and an antiseptic composition .
The main advantage of wooden window sill boards is its noble appearance and natural origin. However, solid wood is subject to deformation, and the material itself is not cheap. You can increase the performance characteristics of a wooden window sill if you avoid contact with aggressive chemicals, water and abrasives. In addition, it is worth updating the coating from time to time!
Subject to compliance with all technological standards and requirements, window sill boards made of laminated veneer lumber are more resistant to negative external factors and have a lower price tag.
conclusions
The overall impression of the facade of the house depends on how well the windows are finished. That is why such work should be treated with the utmost caution. The installation technology is determined by the shape of the window, as well as the degree of its recess into the wall. Such work will be simple even for a novice builder.
If you follow the suggested tips, finishing a window with siding will not be difficult, and the result will be pleasing to the eye.
Before cladding, it is better to take care of the proper preparation of the opening. It should be cleaned thoroughly. To protect the interior from the cold, it is necessary to create a thermal insulation layer. It is made from polystyrene foam boards.
If windows are properly covered with siding, decorative elements will not be deformed under the influence of temperature changes and weather conditions. The process of finishing a window with siding can be learned from the video:
Anyone who wants to install stylish doors in their home has heard that there are doors flush with the wall, also called hidden doors. Their design feature is that the entire product is installed directly into the wall, hiding the hinges from view. Nowadays, this is a very popular version of the product, as it can be styled in absolutely any way.
How to install doors flush with the wall
We believe that it is better to trust the professionals in their field, since this is a rather complex process during which it is necessary to follow technology, and mistakes can lead to the door being damaged.
Before installation, you need to understand what kind of design you need. There are quite a large number of variations, so the choice must be taken quite seriously. Firstly, it is important to understand whether you need a completely hidden product, or whether you want to use more classic options. Some of the designs can be wallpapered or painted in the same color as the wall to create the effect of an enclosed space.
Doors flush with the wall can be made in different variations:
- Swing;
- Sliding;
- Book doors.
Each design has its own characteristics and design options. For example, swing doors can be installed in any room where a classic style is used. But their disadvantage is that they take up quite a lot of space. Sliding structures, the doors of which go directly into the wall, cope well with this problem.
A door flush with the wall can also be styled. In each case, this happens in different ways, but the most important thing is that they can be completely hidden from prying eyes. This is achieved in several ways: firstly, they are installed without platbands, which makes the transition with the wall sharper. Secondly, the structure is stylized to match the color of the wall.
You can always add additional elements to the design. These could be hidden handles, a door closer or an automatic threshold. Additional options depend only on the customer’s wishes, so you should understand whether they are needed or not in each specific case.
Design solutions
It is no secret that the technical perfection of modern materials and fittings allows us to create any engineering solutions. One such product that can literally take you back to childhood is invisible doors. This is a sash installed flush with the wall. When applied to the surface with a finish similar to the walls, interior passages literally disappear, and the use of hidden handles enhances the effect.
In addition to the fact that such doors bring back the atmosphere of childhood with hidden rooms, secret passages, and so on, they are capable of solving very specific problems of manipulating space and more.
Changing the layout in a small apartment area. In this case, quite often there is a need to form clearly defined thematic zones. Then the presence of a doorway can spoil the picture and prevent you from creating a space with the desired design. An invisible door solves this problem by hiding interior passages, making the visual perception of a solid wall.
Fans of minimalism will also find invisible doors a successful element for interior design. Such interior designs are distinguished mainly by their compliance with style. Typically, smooth sheets made from various materials are used.
To create a bright and modern room design, even in an abstract style, invisible doors are very useful. Here the factor of their installation comes first. The canvas is flush with the wall, the box is completely hidden, the surface can be painted in any color or covered with any finish. There are ideal opportunities to incorporate such an element, to make it part of any abstract painting or neat geometric design of a wall area.
Interior products of this type are useful in offices. This is a very convenient way to change the space, get rid of cluttered entrances or hide unexpected interior passages, storage rooms and other service areas.
There are other, more unexpected uses. It all depends on the designer’s imagination. You can place shelves on the canvas, hang pictures to completely hide the entrance to the dressing room, or create a separate work area, completely isolated from the rest of the environment.