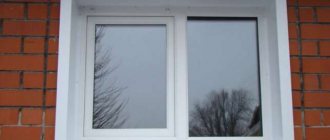
For example, there is an increase in the cost of heating a room because the room is cold and damp.
There is condensation on the glass, mold on the slopes. You can cope with such phenomena with the help of high-quality insulation of slopes.
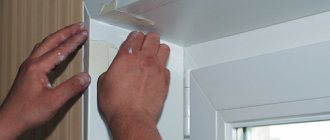
If you follow the technology correctly, you can make warm slopes from the inside of the room yourself.
Why do you need to implement it?
Insulation of slopes is one of the important final stages of installing a window structure. If additional protection is not provided, problems will begin to appear during the cold season :
- Cold bridges will appear through which air from the street will begin to flow. It is the slopes that are the main conductors of cold and moisture into the room. It will be difficult to maintain a comfortable temperature in the room, and the cost of heating the room will increase.
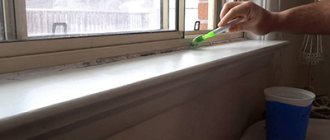
Condensation forms and settles on the walls, window sills and glass.
Over time, a fungal infection joins it and mold appears. The fastening elements are destroyed, the window sags.This has a bad effect not only on the performance of the product, but also on people’s health.
- If the window frame does not fit tightly enough to the wall, a seam is formed. It is filled with polyurethane foam. This material is very sensitive to temperature changes and ultraviolet radiation, so without shelter it quickly collapses. It needs to be decorated and insulated.
- Voids are formed due to profile shrinkage, through which moisture and cold penetrate. Warming will help remove these manifestations.
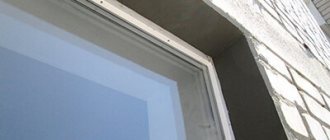
In addition, the insulated slope gives the window a beautiful finished look.
Important! If the insulation of external slopes is carried out correctly, it is not necessary to insulate the internal ones.
Only effective insulation on the side of the cold air intake will help to avoid dew. To do this, the outer element is mounted on a warm profile (about 5 mm) with an “overlap”, then it is decorated with reliable insulating material.
There is also no need for internal insulation of slopes if the walls in the house are well insulated and laid out in several rows. Warm walls make it possible to do without insulation of slopes.
Setting the clamping mechanism
Over time, under the influence of mechanical and climatic factors, the sealing gum may lose volume. Because of this, air begins to penetrate into the room. Fortunately, to insulate plastic windows, it is not necessary to change the gasket. It is enough to adjust the clamping mechanism.
Important! If the gasket has completely deteriorated, it will have to be replaced.
To insulate plastic windows by adjusting the mechanism, you need to find protruding cylinders in the slots of the metal plugs. These are called trunnions and fit into hooks on the frame.
To insulate the frame, move the hooks to the desired position. Or adjust the trunnions. To change the position of the hook, you need to loosen the bolts. Moving towards the street increases the pressure, and towards the room decreases it. Here is a detailed video on how to insulate a plastic window yourself by adjusting the clamping mechanism:
Basic methods
There are several ways to insulate products. They differ depending on the chosen material and design option for the window design :
If the slope is made of plasterboard, then for thermal insulation it is better to use polystyrene foam, mineral wool or special foam.
The material absorbs moisture; only moisture-resistant drywall should be used.It is durable and well decorated. In rooms with high humidity, it is better to use other methods.
- A popular modern method of internal insulation of slopes is the installation of sandwich panels. Installation is carried out on profiles.
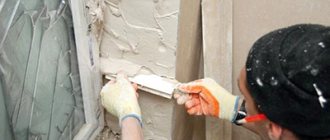
- When plastering surfaces, it is important to ensure that there are no gaps left.
Then you need to paint a layer of plaster. If you take decorative plaster, then the need for painting is completely eliminated. The method requires professionalism. This is a labor-intensive process that not every master can perform. In addition, the thermal insulation characteristics of plaster are not great. An alternative is warm plaster.
Exterior works
External work is carried out according to the same instructions as inside. But you must adhere to several additional rules:
- You cannot use building materials that do not withstand temperature changes, operating conditions with high humidity or other atmospheric influences. On the outside, products wear out faster, so it is better to give preference to the most durable raw materials, for example, sandwich panels.
- It is better to use those materials that are easy and quick to install. This will help minimize financial costs for specialists.
- Don't forget about safety precautions. It is not recommended to undertake outdoor work without insurance and experience. In this case, you should not focus on saving and turn to specialists.
In general, usually one insulation is selected, for example, penoplex. But the top finishing materials inside and outside the apartment/house may differ.
Regardless of what kind of work is being carried out - internal or external, it is recommended to select them to match the window profile. It is also important that the insulation materials are in harmony with the overall style concept.
Properly thought out and executed insulation has a positive effect on the formation of a comfortable microclimate, as well as on saving thermal resources. Heat loss after slope insulation is reduced by a third.
Safety precautions
During work, it is necessary to comply with safety rules and requirements. This will help avoid unpleasant consequences. The main attention should be paid to the properties of the insulating material :
- Mineral wool. You need to work with it in a well-ventilated area. The cutting tool must be well sharpened, gloves, a respirator and special glasses must be worn.
- Sandwich panel. If the material needs to be cut, the respiratory tract must be protected from dust. To do this, just wet the panel with water or put on a mask (respirator).
Important! Before starting work, be sure to familiarize yourself with the safety precautions for each type of insulating material.
Features of internal insulation
After you choose insulation for the slopes of plastic windows, you can get to work. And so, before you insulate the window slope yourself, familiarize yourself with the sequence of work (you can watch the video above):
- Remove any protruding foam.
- Apply an antibacterial primer to the surface to prevent mold from forming.
- Plaster the perimeter of the window so that the evenness of the surface allows you to easily fix the foam sheet on it.
- Clean the surface and prime it.
What materials can be used for insulation?
This is one of the important questions before starting work. There are several types of insulation used inside rooms. You can give preference to the best of them only after familiarizing yourself with the characteristics of each :
- Styrofoam .
A very accessible and cheap option. Its advantages are non-flammability, the ability to make a workpiece of any shape, low weight, and good thermal insulation characteristics. For internal slopes, you should take sheets with a thickness of at least 20 mm and a density of 35. Polystyrene foam is produced in the form of slabs that are easy to cut. Disadvantages - not resistant to temperature changes, absorbs moisture, susceptible to destruction during long-term use. - Penoplex . Another name for insulation is extruded polystyrene foam. Good thermal insulation performance. In addition, it is much stronger and denser than polystyrene foam, resistant to dampness and moisture, and has excellent resistance to fungal pathogens and mechanical pressure. It is used less frequently for interior work, but is of high quality. The downside is the cost of the slabs.
Minvata .
Also not exactly a budget option, but considered affordable. Permitted by building codes for insulation of children's premises. Available in rolls and slabs.The advantages of the material are durability, thermal insulation characteristics, non-flammability, good air conductivity.
It can be used in wooden and frame houses where high-quality ventilation is needed.
Disadvantages - insulation is required due to strong hygroscopicity (membrane) and subsequent plastering. Also, rolled wool shrinks; tile wool has the worst thermal conductivity.
- Sandwich panel . It features a reliable structure consisting of PVC plates and a layer of foam between them. The foam is well protected from external factors and retains its heat-insulating properties for a long time. During installation, you need to seal the ends of the panels; no additional finishing is required. The downside is the cost.
- Warm plaster .
The material combines the properties of two insulation materials - foam and putty. In liquid form it reliably fills voids, and after drying it forms a frame for the entire window structure. If additives (ceramic and polymer) or foam balls are added to the composition, the insulating properties become higher. Refers to effective and cheap materials.
Important! You should choose the material according to your needs and room parameters.
How to make external slopes for polystyrene windows step by step diagram
Step 1: Preparing the adhesive
Before proceeding with installation, you need to prepare a suitable adhesive solution in advance. According to experts, Ceresit adhesive brand st-85 is most suitable. The adhesive composition is mixed very thoroughly so that there are no lumps left in the mixture. Stir until the mixture thickens: the glue should not flow down the spatula. Don't forget to prime the area around the window where the slopes will be installed.
Step 2: Installation of slopes
After this, we rub glue into the wall - this method will ensure the highest quality adhesion between the surface of the walls and the foam. Next, having already made a foam blank, we apply glue to the products, and for convenience it is best to use a notched trowel. They begin gluing work from the bottom of the product, while also checking that the products are glued correctly. To do this, use a building level. It is advisable to properly glue the joints of our slope strips. Having finished pasting around the entire perimeter, you need to coat the existing seams with glue once again.
Don't forget to apply glue to the area where the window sill will be installed. After this, we proceed to the installation of the side slopes in contact with the window frame. When carrying out work, you should not skimp on glue; otherwise, voids may form between the frame and the slopes. Excess composition is carefully removed with a damp sponge. We coat all the joints between the material again - this completes the work on installing the slopes.
Step 3: Finishing the Material
While the adhesive dries, we finish the foam to give it a good appearance. In this case, we once again treat the slopes with an adhesive solution and install the fiberglass mesh
Don't forget the importance of covering the outer and inner corners with perforated corners. After the surface is completely dry, the foam is covered with facade paint in several layers
To prevent the composition from getting on the glass (which will be very difficult to clean), cover the perimeter of the glass unit with a wide piece of construction tape. But for the finishing (finishing) finishing, rely on your tastes, since modern manufacturers will be able to offer you a wide selection of products. So, you can purchase a color that will change the color of the slopes; acrylic paint with small particles will also work - this will create an unusual effect.
Tools and Supplies
To properly insulate a window slope, you need to stock up on the necessary equipment. Each type of material requires a corresponding set.
The general list of tools looks like this:
- roulette;
- perforator;
- hacksaw;
- level;
- marker;
- stationery knife;
- miter box;
- grater;
- putty knife;
- brush and container for primer;
- foam gun;
- putty knife;
- protective glasses;
- respirator;
- gloves.
Supplies are also needed:
- synthetic rubber glue;
- deep penetration primer;
- antiseptic;
- silicone sealant;
- polyurethane foam;
- mineral wool, polystyrene foam or sandwich panel.
Important! When calculating the amount of material, add 10-15% to cover possible losses.
Preparatory work
Regardless of what material the consumer chooses, a number of preparatory work will be required. You should not be careless about this process, since the quality of the final finishing and insulation directly depends on it.
Preparatory work includes:
- Visual assessment of the entire structure. In cases where double-glazed windows were installed relatively recently, you can skip this step. If they have been standing for a year or more, then you need to check the quality of the polyurethane foam and update it, if necessary. The easiest way to check is with a lighter. You need to release the flame and pass it around the perimeter (do not touch the window!), Observe whether the fire deflects. If yes, then there is a serious heat leak in specific places, accordingly, the foam needs to be updated there.
- Apply polyurethane foam and wait until it hardens.
- Remove protruding pieces of polyurethane foam using a regular knife. If you don’t have a special tool at hand, then an ordinary sharpened kitchen knife is quite suitable for performing this procedure.
Also, preparatory work should include the purchase of tools and fasteners. The required quantity is calculated in advance. It is recommended to buy with a reserve of 10-20%, so as not to run to the construction market again.
Then the instruments are prepared. This must be a tape measure, a level, a screwdriver. Also, if you have to work with foam plastic, you need to prepare a special painting knife. But again, you can get by with an ordinary knife, preferably with a thin blade. If you make the slopes yourself, you will need cement, sand and a spatula. But usually they work with ready-made window slopes.
Step-by-step description of the technology
When working with any material, the insulation process must begin with preparing the base. To do this, follow these steps :
It is good to clean the space between the window opening and the frame.- Level out any unevenness inside the opening.
- Remove dust and dirt using a spray bottle and brush.
- Seal all visible holes and cracks with sealant or cement mortar.
- Treat the work surface with an antiseptic, followed by deep penetration primer.
- Seal the joints.
After this, you need to give the base time to dry thoroughly. Algorithm for subsequent actions :
- Level the planes of the openings using gypsum mortar, polyurethane foam or plaster. They must acquire the correct geometric shape.
- Treat window openings with impregnation, antiseptic, or a product with hydrophobic properties.
- Take the insulation, cut strips of the required sizes from it.
- Attach it to the adhesive base and allow time to dry.
- Finish the slope with plasterboard, sandwich panels, plastic, and plaster.
Important! The mineral wool blank must be made taking into account the elasticity factor of the material, 2-3 cm larger than the planned size.
If you use drywall, you need to take moisture-resistant one. You will first need to form a frame from a metal profile, into which you then insert the material. Fasten with self-tapping screws, recessing the caps.
When covering with plastic, it is also necessary to make a frame base . The starting strip is stamped onto it, then the rest of the structure is assembled.
To install a sandwich panel you will need a starting profile and an F-profile. Attach a layer of insulation to the adhesive composition. Fix the starting profile in the corner near the window, at the bottom and top of the opening. Insert a sandwich panel of the required size into the groove. Complete the installation by installing the F-profile. In this option, excellent thermal insulation and beauty will be ensured without further finishing.
The most popular solutions for finishing insulated slopes:
- flat tile or decorative stone;
- plastic imitating timber;
- white plastic;
- plastering;
- modeling;
- coloring
You can choose other options that fit perfectly into the interior of the room.
Heat-saving film
Film for insulating plastic windows can significantly reduce heat loss in the house. However, in order for its application to have the desired effect, it is necessary to properly prepare the surface. In this case, you will need the following tools:
- stationery knife;
- hair dryer;
- scissors;
- scotch.
First, the surface must be cleaned of dust and dirt. Wipe the glass thoroughly (a layer of dirt and dust makes it difficult for sunlight to penetrate inside). To check the quality of cleaning, take the paper and press it across the glass; you should hear a distinct squeak.
The perimeter of the box is covered with double-sided tape. The edges of the film are separated with a stationery knife. Cut it with scissors to the size of the window and stick it on the previously attached tape. Take a hairdryer and blow warm air over the film. Burst the resulting swellings with the tip of a knife. This is the easiest and most inexpensive way to insulate platinum windows.
Possible difficulties and errors
In the process of work, errors occur that should be stopped. When insulating, the following actions should be avoided :
- Cut the foam product exactly to the measurements. During installation, the part may change shape, then you will have to prepare another one. This will increase the volume of waste and the amount of costs.
- Use mineral wool with an unsuitable density (less than 75 kg/1 m³). The material will not withstand the required load. The same requirement applies to foam plastic with a density less than 30 kg/1 m³.
It is very easy to avoid such mistakes. The result will be high-quality insulation of slopes from inside the room.
How to insulate window slopes
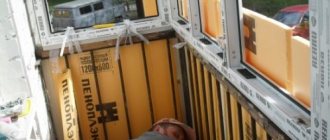
Extruded polystyrene foam and penoplex are more often used as insulation used to insulate window slopes. These materials do not allow moisture to pass through and do not accumulate it inside. At the same time, these are excellent materials for insulation: their heat transfer capacity is very low.
Why can't you use foam? Polystyrene foam and soft insulation materials, such as stone wool, absorb and retain moisture. And window slopes are a constant humid environment.
It is necessary to insulate window slopes on both sides in order to protect the window from both the internal humidity of the room and external precipitation.
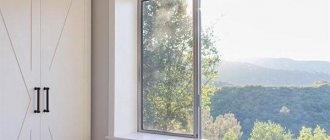
Finishing options
After completing the insulation work on the slopes, if desired, they can be given an attractive and original look. There are several ways to do this.
- The most common method of finishing a slope is painting. There are several technologies for performing this type of work. The easiest way is to apply paint with a sponge. Imprints are made on the surface with a sponge pre-moistened in paint. You can make a combination of several colors. Another way is to apply paint using a stencil.
- An interesting solution would be to use balsa wood. This material has good thermal insulation qualities. Therefore, its use will solve not only a decorative problem, but also make the slopes even warmer. If desired, balsa wood panels can be coated with a layer of varnish.
- You can also put wallpaper on the slopes.