provides services for replacing seals on plastic windows in Moscow and the region at a price of 100 rubles per linear meter.
Plastic windows, like any other type of window system, lose some of their properties over time. They begin to blow or poorly isolate from extraneous noise. But don’t sound the alarm right away. These problems can be solved by replacing the sealing rubber. Our company has extensive experience in this field. We will do everything efficiently, in the shortest possible time and at a minimum cost for you.
Why is a seal needed, and what malfunctions can occur?
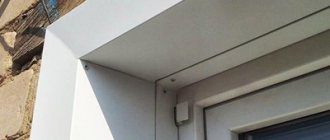
One of the most important elements of a window system is the seal. Thanks to it, the profile is hermetically adjacent to the sash, and the double-glazed window to the frame. This in turn provides thermal insulation, protection from drafts, precipitation, noise and condensation.
You may encounter various problems:
- Ice began to form in the window system due to freezing;
- the appearance of condensation due to a decrease in the temperature of the glass on the inside;
- the appearance of drafts and, as a result, dust from the street.
Replacing its seal with a new one will allow you to get rid of all these problems and return PVC windows to their original performance.
How to choose the right tires?
To understand what kind of seal is needed for a PVC window, it is necessary to study the market for these materials, as well as determine the exact geometry of the cross-section of the element in order to buy an identical product. In addition, you need to identify the place of blowing :
If there is air blowing from under the bead, two problems may arise with the seal - on the bead or along the perimeter of the glass unit.
In both cases, the clamping strips should be dismantled and the space around the perimeter of the junction of the translucent structure with the plastic should be inspected.- When the window sash is blowing, but the adjustment was carried out correctly, the winter mode is set to maximum pressing force, you should pay increased attention to the seal around the perimeter of the sash.
When choosing a material, you should choose one of the following compositions, each of which has technological features :
- Rubber – has increased strength and durability, but is not resistant to significant temperature changes.
- Ethylene propylene - can withstand any climatic conditions, is characterized by increased strength, but consists of toxic components, and when fixing it, adhesive compounds are required.
- Silicone is one of the most high-tech materials for sealing window structures, the only disadvantage of which is its high retail cost.
- Polyurethane is the most durable material that will last a long time on windows, but breaks easily in the cold and also leaves residual deformation when bent.
- PVC materials – increased elasticity, consists of environmentally friendly components, but its condition and shape depend on climatic conditions.
Note. Each type of insulation is presented in a wide range at retail outlets in our country. In order not to make a mistake with your choice, you also need to know the installation location and operating conditions.
Price list for insulation of plastic windows in Moscow
| Service | Note | Price, rub |
| Replacing the rubber seal | Insulation of plastic windows with rubber or silicone sealant. | from 100 per m.p. |
| Installation of Euro-Strip seals made in Sweden | Installation of high-quality silicone seals with a diameter of 8 and 10 mm on plastic windows. | from 180 to 250 per m.p. |
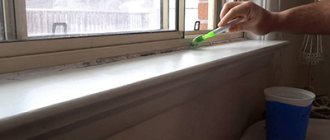
| Sealing joints, slopes and window sills | The sealant is applied to the seam around the perimeter of the window on a clean surface or to replace the old sealant. | 50 - 100 per m.p. |
| Eliminating the causes of window fogging | Eliminating the causes of window fogging allows you to prevent and eliminate the formation of condensation on the glass. | from 1000 per window |
To clarify the price, contact our specialists at: +7.
Comparative assessment of the difference between EPDM and TPE materials
Which insulation for PVC plastic windows is better:
Insulation for plastic windows is manufactured using two main lines of raw materials:
- EPDM – rubber, based on synthetic rubber (produced by extrusion from ethylene-propylene-diene rubber).
- TPE is a modified plastic based material (produced by extrusion from a thermoplastic elastomer).
For greater clarity, we have indicated their main parameters in the table below:
| Indicators | EPDM | TPE |
| Maintains elasticity over a range of temperatures | from -45°С to +80°С | from -40°С to +70°С |
| Permanent deformation | low | average |
| Life time | over 10 years | 4-5 years |
| Impact resistance | ozone, UV rays, oils, weak alkalis and acids, bacteria and fungi, moisture, wear and fur. damage | UV rays |
| Ease of use | easy installation/disassembly | easy installation |
| Thermal and sound insulation | high | high |
| Elasticity | high | low |
| Safety | eco-friendly clean, non-flammable | non-flammable |
| Shade range | only black | in assortment |
| Price | from 170 rubles | from 220 rubles |
Examples of work on replacing seals on PVC windows
Our specialists often carry out work to replace the seal. Below you can see how one of the trips took place.
- Departures: 1
- Time: 3 hours
- Cost: 4900 rub.
- Quantity: 1 piece
Our craftsmen replaced the seals in plastic windows throughout the apartment and in the plastic balcony door.
The total cost of the work, including the cost of a new seal, was 4,900 rubles.
The worn sealing rubber was first dismantled and a new one was installed in its place.
Call a specialist
Installing the rubber band yourself
Replacing the self-adhesive seal on wooden windows follows the following scheme:
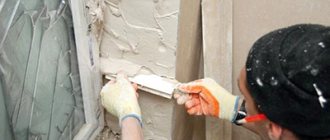
- thoroughly clean the window surface from dirt;
- degreasing and drying it;
- determining the installation location (sash or frame);
- actually securing the material.
In this case, you need to take into account some nuances:
- the tape is cut into strips of the required size (you can first divide it in half);
- the protective layer should be removed carefully so as not to stretch the seal itself;
- during fastening, the tourniquet must be pressed, but not very hard;
- the window will be ready for use after 2 hours.
Rubber adhesive or sealant is used to attach a regular rubber seal to the frame. Except for this point, replacement is carried out using the technology described above. It happens that consumers use a stapler to install such insulation. But this method leads to a deterioration in the appearance of the sash over time, so it is not advisable to use it.
The groove seal for the sash of wooden windows is fixed using Swedish technology. The sashes are removed from the frame, and a groove is made along the contour using a milling cutter (angle - 45° relative to the flashing). The groove is cleared of chips. A tubular sealant made of silicone or TPE is placed into the resulting recess. A gap is left for the hinges with a small gap (up to 15 mm on each edge). The seal is installed with a seam into the channel and pressed with a roller specially designed for this operation. To avoid stretching the product, you need to move the tool “back and forth.” After installation is completed, the sashes are returned to their place, and the ease of opening and closing the window is checked.
This is interesting: How to make glass frosted: illumination in general terms
Reviews about our work
Anton Antonov 05/23/2019
I contacted Window Repair Service when ice began to appear on my window. They replaced my old seal with a new one. Everything was done quickly, I paid a penny and was pleased with the result. Now nothing bothers me anymore.
Regina Bazhieva 04/17/2019
My husband and I began to notice that there was a draft coming from the windows. He said it was because of the sealing rubber. She served her time. We contacted and they replaced it with a new one. And so quickly that even my husband is happy. And for the price everything was more than satisfactory. In general, everything is cool.
Read all reviews
Replacing the rubber seal is one of the most popular topics in the field of window repair. In terms of popularity, it is comparable, perhaps, only with the notorious “window adjustment for winter mode.” If you have read my articles before, you will not be surprised at the skeptical attitude towards these manipulations in general - because, without understanding the reasons, neither one nor the other is a panacea for blowing, freezing and drafts.
However, sometimes replacing the seals on windows is really necessary. First of all, this applies to conventionally “old” structures - those that have served for 10, 15 or more years from the moment of installation. The elasticity of the window rubber, and therefore its ability to “hold” heat, gradually decreases over time. And if repair or plastering work was carried out in the room, then the service life of the seals can be reduced significantly.
Contents: Do the seals on windows need to be replaced? How to check if the rubber is “tired” What types of window seals are there? Is it worth using “universal rubber bands” on a window How to determine which seal is suitable for your windows KBE rubber Types, appearance and features REHAU rubber Appearance and features VEKA rubber Attention! VEKA seals and the specifics of their replacement How to choose a rubber seal for a window? Selecting the type, color and length of the seal Replacing the seal on windows Removing the old and installing a new seal Nuances of the process and “life hacks” Features of replacing co-extruded seals What is it and can you do it yourself The finishing touch Finishing the window to “standard”
How can you determine whether the rubber on your windows requires replacement or not?
Indirectly, this can be done by the “organoleptic” method - that is, visually and by touch. The seal is in good condition, has more or less the same height around the entire perimeter, is soft and elastic, and holds normally in the corners and grooves. At the same time, it can be pulled out without any problems and inserted back into its place (with the exception of co-extruded ones). Very old rubber is hard, flattened, and sometimes even breaks when trying to dismantle it.
Meanwhile, a not-so-good-looking “elastic band” can actually last for more than one year. So, the most reliable criterion for making a decision to replace the window seal is the undoubted and obvious blowing in the vestibule, with the clamping pins correctly installed and fully pressed. The sash and frame, of course, should not have any deflections or distortions (and this is not difficult to determine with a regular pencil). Of course, you can replace the seal on the windows as a preventive measure - without waiting for the old rubber to “fail” in severe frosts.
We decided - let's change! And for what?
If you plan to replace the window seal yourself, first you should determine the manufacturer (that is, the name) of the plastic profile. And the craftsmen need an eye and an eye - many of them use only one type of rubber for all windows. As a rule, this is a KBE 228 seal, or the so-called “universal” one, but it also happens that it is a Eurostrip “noodle”, which is actually intended only for inserting into old wooden frames.
However, plastic windows that look so similar to each other have a different shape, depth and location of the groove for the seal. The manufacturer calculated the profile exclusively for “its” rubber, taking into account all its design features. And if, for example, for REHAU the KBE seal is at least suitable (only the appearance of the window will suffer), then for the VEKA profile only the original “elastic” is suitable - another one will not stick to it properly. The “universal” seal for plastic windows, which has recently appeared on sale, is only very conditionally “suitable” for such different profiles, and the result is usually quite mediocre (for the reasons stated above).
No need to chase the thickness of the seal! This is one of the common mistakes - after all, a window with abnormal, excessively thick rubber will not close properly. A seal intended for installation under glass (double-glazed windows) should also not be used as a replacement for the elastic band of the rebate - this will not lead to anything good.
So let's determine the name of the profile. On some windows it is printed by the manufacturer, on others it is not. You need to look at the white (plastic) part, and not at the metal fittings (its brand is not important when selecting rubber). You can also look for remnants of protective films with inscriptions (often left on the street side), or agreements with installers.
Very conditionally, we can divide the whole variety of window “rubber bands” installed in the vestibule into 4 main groups.
1) Type KBE. 2) REHAU type. (I write “type” because these seals fit both the original profiles and their numerous analogues, or clones). 3) VEKA. 4) Everyone else.
Why did I divide them this way, “offending” many well-known and worthy brands? It’s simple, these “rubber bands” are usually always available for free sale, they are sold by the meter, and if necessary, they will fit most windows from other manufacturers - you just need to choose them correctly. In addition, a significant number of modern profile systems are partial or complete copies of the same KBE and REHAU.
Even if you set out to find the original seal for your exclusive window, and eventually find it, buying at least 300 meters of rubber for this from a wholesale warehouse is, to put it mildly, impractical. Keeping a large assortment is also unprofitable for repair companies, so in the vast majority of cases, by default, they will “roll” the same KBE seal into your windows.
Sealing rubber for KBE windows and their analogues
KBE seals come in two types - 227 and 228. Their main difference is the air chamber of 228 rubber, which gives it greater elasticity. It is most often used as a “repair” and universal one. The main feature of KBE rubber is the “step” that corresponds to the shape of the groove in the plastic profile, which ensures its correct fit. The “leg” is thin and quite long.
Sealing rubber for REHAU windows and their analogues
REHAU rubber does not have an air chamber, but it has two “petals” of sealing that cannot be confused with anything else. Based on this feature alone, you can most likely conclude that this is a REHAU profile or its equivalent. The rubber on both the frame and the sash is the same.
Many people replace the REHAU seal with KBE rubber, citing its larger width and the presence of an air chamber. However, the appearance of such windows deteriorates - the rubber protrudes beyond the edge of the sash, forming a “mourning border”, which is absent in the original.
In most cases, there is no need for such a replacement at all - you just need to align the doors, and the original REHAU rubber will last for many more years. Such “castling” is advisable only in case of serious “jambs” in the installation or production of windows, and then a wider KBE seal will help to bridge the gaps between the sash and the frame.
Sealing rubber for windows VEKA
The VEKA seal is the widest of the trio. Large air chamber with a petal, the “leg” is short and thick. It is very difficult to push this seal into other profiles, but someone else’s will, on the contrary, dangle in it. Therefore, if we see a blue diamond with the inscription VEKA on the window, we are looking for original tires!
Be careful! The main feature of replacing the seal in the VEKA profile is the different type (thickness and shape) of window rubber on the frame and sash! Very often, unscrupulous or inexperienced “craftsmen” install the same (sash) seal in them, which leads to excessive load on the fittings and, paradoxically, to blowing! The fact is that with such a replacement, the thicker sash rubber, being in the frame, “squeezes” the ledge away from it, and the window soon begins to blow again, and the handles stop closing normally. So, for your own money, you can easily get a bunch of problems out of the blue.
Selecting a replacement seal
If the window profile is unknown, the easiest way to do this is to insert a piece of new seal next to the “original” rubber. Before purchasing, you can ask the seller for a small piece of rubber to try on; usually no one refuses. The main thing is that it holds well, the width, height and position of the “petal” match - then you can safely replace the old tires with new ones. First, try replacing the seal on one window, and if the result suits you, change it on the others.
The color of the seal is definitely black. The point is the composition of the rubber - colored (white, gray) seals are often based on plastic, not rubber. Accordingly, their elasticity decreases sharply in cold weather, and the service life of black EPDM seals is much longer. I have repeatedly encountered cases of VEKA windows with gray rubber blowing, and REHAU windows with white rubber whistling.
Determining the amount of tires to replace
Everything is simple here, we use a tape measure to measure the perimeter of the sash, and, in the case of the same seal with the frame, multiply by two (for double-circuit windows). It’s worth taking a meter or two more - after all, it’s unacceptable to stretch the rubber, it’s better to leave a little extra.
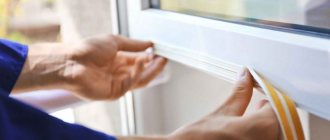
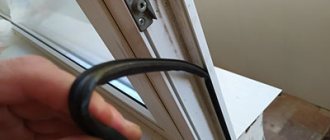
How to replace the rubber seal on a window?
First, of course, you need to remove the old tires. We hook it with something and pull it - it should come out of the groove without any problems (with the exception of very old windows, when you have to literally take it out piece by piece). In the upper part, the seal is usually glued together (and glue is often used generously), so here you can help the process with a knife, which removes all residues, including inside the groove. From under the top loop, we simply pull out the rubber. And we throw it away.
Next, during the replacement process, you need to insert a new rubber band into the installation groove, using the same side. It’s better to start from the top loop, from under which we so famously pulled it out. How to lay a seal under it - after all, on, and only then hang the hinges?
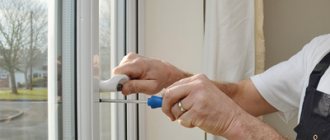
Do I need to remove the sash and hinges? No, everything is much simpler than it seems.
If you have a tilt-and-turn window in front of you, you should find the so-called lock, and with the window open, turn the handle up to the “tilt” position. Thus, by opening the window in two positions at the same time, you get the opportunity to freely lay the seal under the top hinge. After replacing the rubber, in exactly the same way, the handle comes back.
For a pivoting sash, you first need to get to the screw for adjusting the pressure of the top hinge to the frame and loosen it as much as possible.
Without this, it is very difficult to stretch the seal under it, and some unfortunate craftsmen simply cut off the elastic near the loop, which is absolutely unacceptable.
To make it easier to push the rubber, you can cut it at an acute angle. Don't forget to adjust the hinge pressure again, otherwise there will be blowing from the corner of the window.
Now we move on to the process of “filling” the seal into the groove. In production, where the wages of assemblers depend on the speed of work, the rubber is “pulled” by pressing it into the groove - this is significantly faster than “pushing” it, pressing it without stretching. But this method is fraught with subsequent contraction of the stretched seal, which is observed everywhere - the rubber, after some time, peels off from the corners. That is why the seal is always glued together at the factory - so that it does not separate at the joint.
The best course of action when replacing window rubber is a combination of “pushing” and “stretching”. This means that if you push the rubber with your fingers, you definitely need to smooth it out, and if you pull it, remove excess tension (the main thing is that wrinkles do not form).
At the corners, it is necessary to lay the seal evenly, if necessary, removing plastic burrs with a knife (in production they often don’t do this - there’s no time!).
Correctly executed corners look, I would say, beautiful.
The joint should always be on top , and there is no need to glue the seal - just leave an extra centimeter of elastic, and it will press itself.
What if you have a window with a co-extruded seal?
Extruding the seal together with the profile is a technology designed to simplify and reduce the cost of the production process of plastic windows. The seal and plastic form a single unit, which significantly reduces the number of workers. But, as usual, cheap is never good, and if this is quite acceptable for a glazing bead, then for a sash (where the seal is constantly working on compression) it is not very good. After all, such a “rubber” of a window is usually not rubber at all, but the same modified plastic. In countries with a temperate climate, this is not a problem, but in the Russian frost, such a seal quickly “stubs”, causing a flurry of calls from angry customers in winter. Quite often, completely new windows are blowing!
Of course, most large manufacturers have also provided the possibility of replacing the co-extruded seal with a regular one. It’s just that the procedure itself is much more complicated, since you need to not only tear out (with considerable effort!) the old rubber, but also clean the corners by milling grooves into them. For this operation , I would still recommend finding an experienced window repairman (especially since, to replace such a seal, you usually have to completely remove the sash from its hinges).
The seal has been replaced. But that is not all!
You have successfully coped with replacing the rubber band of the window, but the problem is that the handle has become difficult to close? The new seal, of course, is more elastic than the old one, but that’s not the only reason. Most likely, you forgot to adjust the window back to “summer mode”. I recommend “once and for all” setting the factory (average) position of the trunnions , or even the minimum. This way the seal on the window will last much longer. After this, you must lubricate the fittings and the handle itself. As they say, feel the difference!
Now you can relax and congratulate yourself on your success!
Possible difficulties
When working independently , you need to be careful to avoid such mistakes :
- Installation of non-standard seal. In this case, it is important to accurately select the thickness. Even the slightest deviations will lead to severe wear of the fittings (thickening of the contour) or insufficient rebate (thinner).
- Replacement of only one product. Both types of seals need to be replaced at once.
- Lack of gluing at joints. Such negligence threatens to rupture the seal after it dries out. If you replace gluing with overlap laying, you can get two problems. First, when the overlap is less than necessary, a gap will appear. With a large overlap, an “accordion” is formed. Both options are considered unacceptable.