Modern plastic windows with double glazing are installed in most apartments and private residential buildings.
Manufacturers have long worked on every element of this translucent structure.
They present consumers with a complete kit for filling a window opening with ebbs, slopes and window sill boards made of different materials.
A window sill is an internal structural element of a window, which is often subject to mechanical stress and can quickly lose its original appearance.
If a part breaks, you need to know how to repair a plastic window sill.
When might it be required?
Depending on the material from which the window sill board is made, repair and restoration work may be required if any of the following situations occur :
- Wooden.
damage to the paintwork – the appearance of scratches, peeling areas; - drying out of the wood structure with the formation of cracks;
- bending of the material over time;
- the formation of fungus and mold from moisture and the development of bacteria.
- Plastic.
- change in original color under the influence of ultraviolet radiation;
- chips, dents, cracks from mechanical damage;
- melting of individual sections under the influence of elevated temperatures or accidental contact during operation.
- Stone.
- chips and cracks formed under impact loads;
- discoloration due to exposure to sunlight;
- abrasion due to physical wear.
- From chipboard or MDF.
- lamination peeling due to aging of the adhesive composition;
- cracks in the laminated coating due to plastic deformation of the material;
- saturation of the structure of the window sill with moisture, swelling, partial destruction.
- Glass.
- loss of structure from impulse loads;
- scratches and abrasions due to prolonged use without care.
Note. To repair window sills, various techniques, tools and consumables are used.
In most cases, structural elements are subject to restoration and, after a series of measures, regain their original appearance.
When doesn't it make sense?
In some cases, when irreversible damage to the window sill occurs, repair work does not make sense, and such a part will have to be replaced. Recovery is impossible for the following damage :
In case of breaking and complete loss of integrity of a stone or glass product.- In case of severe wetting and swelling of structures made of chipboard or MDF.
- In case of severe melting of the plastic window sill.
- In case of severe delamination or rotting of a wooden window sill board.
- In case of significant damage to the tree structure by pests, with the presence of powdery waste.
When inspecting a wooden window sill for its repairability, it is necessary to tap it with a small hammer to identify voids.
Are you unhappy with the appearance of your window sill?
What are the reasons for damage to the appearance of a window sill?
1.
Leaving an unextinguished cigarette, a candle, you put something hot, for example, a frying pan, in general, all this leaves a thermal burn.
2.
The pots containing indoor flowers scratched the surface of the windowsill. The constant accumulation of water under the stand led to swelling of the window sill covering.
3.
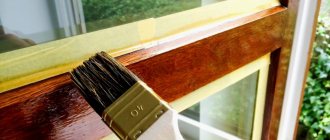
You have a wooden window sill installed: it has dried out, the paint has peeled off.
4.
You have a concrete window sill installed, which often has a scoopy, ugly appearance.
There are two solutions to this problem:
Solution one:
We can dismantle the damaged one and install a new plastic window sill. But in this case there is a high risk of damage: the integrity of the wallpaper, the wall under the window sill and the slopes at the ends may be damaged. And you need to understand that when dismantling the window sill, it is quite possible that there will be a lot of construction dust. Which will have to be wiped, taken out, collected everywhere!
Solution two:
Our company provides a very good service for the restoration of window sills by applying plastic overlays.
The rigid PVC trim is installed on the damaged window sill without any dismantling and the entire installation process takes only a couple of hours.
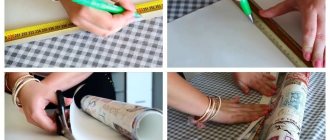
We make window sill covers of any size!
The maximum length can reach up to 3 meters and be wide from 5 to 150 cm.
So that we can calculate the approximate cost of such an overlay, you must tell us the approximate dimensions of the replaced window sill.
You can call us and get all the information you need by phone
In any case, installing such an overlay will cost you less than installing a solid window sill.
| And once again we want to remind you! You don't have to remove the old window sill, the trim is installed on top of it! |
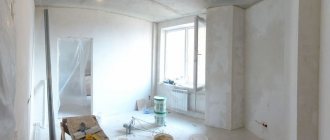
Photos of finished works:
The works are very clean and silent! We will be happy to help you and your window sills!
Materials for work
The market offers a wide range of materials and products for restoring aged or damaged window sills. Among these repair mixtures, the following compositions are most often used :
- Paint thinner or acetone to remove old paint.
- Putty for wood or plastic, if necessary, to seal cracks.
- Polymer elastic sealants that can elongate and not lose elasticity over time - for sealing and sealing seams.
- Fire-resistant penetrating liquid mixtures to protect wooden and chipboard structures from fire.
- Antibacterial compounds.
- Water-repellent chemicals are especially relevant for chipboard and MDF materials.
- Polishing compounds for stone and glass window sill boards, which are used in conjunction with special soft abrasives.
Advice. It is recommended to purchase materials and protective coatings from well-known manufacturers that have gained popularity in the consumer market, and their products have many reviews on online forums from satisfied customers.
DIY window sill restoration
Often, for the sake of saving money or for other reasons, we try to give a second life to worn-out things.
Today we will talk about restoring one of the key design elements of window openings. Restoring old window sills with your own hands can be quite a troublesome task. But the game is definitely worth the candle. And it’s not just the cost of new parts and materials. Often old window sills are stronger and thicker than modern ones. About some of them you can even say “made to last.”
How to restore a window sill with your own hands? In a nutshell: enough padding. This is the simplest solution. A special pad instantly turns an old item into a new one. If you are not looking for easy ways or the indicated method simply does not suit you, read on.
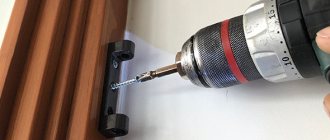
What tools are needed?
When repairing window sills for plastic windows, depending on the material of the product, a different set of basic and auxiliary tools is required. To carry out standard repair and restoration work, the following mechanical and electrical equipment is required :
Spatulas and blades for removing old paintwork.- Chisels with different shapes and edge sizes for removing traces of fungal infection.
- A rag or fiber cloth for degreasing the surface before applying a new coat of paint or varnish.
- Electric drill with circular polishing attachments.
- Polishing discs with different structures, depending on the type of surface and material used.
- Brushes of different widths and bristle hardness for painting window sill boards.
- Spatulas with rubber tips for applying putty to wood, plastic or MDF.
- Clamps and plywood boards for pressing glued veneer and distributing pressure on MDF, PVC surfaces.
- A construction or household hair dryer for drying and quick polymerization of paint and varnish composition after application.
- Mounting gun, if necessary, sealing joints and installing construction foam.
- Sandpaper, circular abrasive attachments on a drill, with the help of which the surface of wood is prepared.
- Tools for laying ceramic tiles or mosaics, if necessary, creating a special design for stone products.
Important. To achieve the expected result, all tools must be in good working order, cleaned of dust and dirt, and fully ready for work.
Window sill repair or complete replacement: what to choose
Of course, almost every one of us will say: why waste time. After all, you can take and replace the old copy with a new one and forget this question forever. Moreover, modern construction technologies offer us various options for solving this issue, starting with plastic products and ending with decorative granite window sills.
In reality, this is true, but replacing an old window sill is not always the right decision. Many people simply do not pay attention to the positive aspects that simple window sill repairs give you. Here are some of them that may prompt you to decide in favor of repair rather than a complete replacement of this part of the window unit.
- Saving money is probably the most important point in any repair and construction issue. In fact, major cosmetic repairs will be much more profitable than installing a new element of the window unit.
- No inconvenience from dismantling work - a planned replacement of a window sill will always be accompanied by the dismantling of the old one and, accordingly, the subsequent installation of a new one. In this case, you will not be able to avoid destruction and natural construction debris, which causes enormous inconvenience in a residential apartment or house.
- Possibilities of design solutions - if you have started repairing a window unit, then with the right creative approach you can give your old window sill almost any look. Due to the huge selection of materials for decoration, a window block can be turned into a masterpiece according to your special project.
In any case, before starting such work, you need to carefully weigh everything and make the only right decision.
Step-by-step instructions: how to repair?
Restoring and repairing window sill boards is a painstaking operation that must be carried out in compliance with safety precautions and a technological map. Each material uses its own methodology. Basic methods for repairing window sill boards made of different materials are described in detail below.
Wood
Repair and restoration work for wooden surfaces with minor or moderate wear is carried out in the same way as any other product made from this natural material:
The surface is inspected for defects. The master determines its suitability for restoration.- The old paint and varnish material is removed mechanically using spatulas.
- If necessary, a solvent is used to soften the structure of the worn coating.
- The surface is refined with abrasive discs until the wood is completely cleaned of polymer materials.
- If fungus and mold are identified, areas prone to rotting, they must be completely removed using chisels.
- The resulting gaps, as well as cracks, are filled with wood putty, or a composition of epoxy glue and fresh sawdust.
- The repaired surface is carefully ground and brought to a flat, smooth plane.
- After restoration, the wooden product is covered with a layer of penetrating antibacterial and fire-retardant composition.
- After the sewn materials have dried, the surface is primed and painted in the desired color that matches the interior of the room.
Important. Operation of a restored wooden window sill is allowed 2–3 days after the varnish layer has dried, since the delicate polymer material is highly susceptible to abrasion and mechanical damage in the first days.
Plastic
Restoration work for a plastic window sill depends on the nature of the damage, since different techniques are used for each defect. The main methods of repair are carried out according to the following algorithm :
- If marks from flower pots have formed on the plastic surface after prolonged use, chemical reagents based on octane additives and rags are used to give the original whiteness.
- When there are minor cracks, chips or dents on the surface of the PVC material, they can be easily repaired using a special plastic putty and a spatula, which is included in the kit. This mixture, after application and polymerization, completely replicates the structure of the plastic.
- In case of fading or damage to the structure of the PVC coating due to aggressive exposure to sunlight, the installation of a laminated film, which is applied by heat shrinking using a construction hair dryer, will help.
- In case of deep damage and cracks, as well as in the event of plastic deformation, you can stick a PVC overlay on the entire surface of the window sill board, which will completely imitate the old product and cover all defects.
If the PVC window sill has significant damage, before restoration you should estimate the cost of the work, since, in many cases, with a low retail price for plastic, the best solution would be to replace the element instead of repair.
More details about repairing a plastic window sill:
Stone
Natural or artificial stone is considered one of the most durable materials for window sills. If it breaks accidentally, it can no longer be restored, as it crumbles into pieces. However, if small cracks, chips or abrasions occur, it can be returned to its original appearance :
- The product is cleaned of dust, old debris, and fatty deposits.
- Next, the surface is polished using multi-stage technology.
- All cracks are sealed with a polymer composition containing fine agglomerate filler.
- After filling the cracks, the surface is polished again to an ideal plane.
- If necessary, the leveled composition is varnished, but, as a rule, natural stone is polished to a glossy shine.
Note. After restoration, high-quality natural material lasts for decades without any problems, provided that initially there were no through cracks or other irreversible damage.
From chipboard
When restoring a particleboard window sill, it is important to pay attention to the integrity of the structure. If delamination has occurred, then there is no point in starting repairs, since swelling will progress, regardless of the degree of treatment. If the chipboard remains intact, then the work is carried out in the following order :
- The old veneer or laminated film is carefully removed from the surface of the chipboard.
- If necessary, the remnants of polymer materials are removed using a heat treatment with a construction hairdryer.
- If traces of adhesive remain on the surface, it can be removed using acetone or another solvent.
- Next, the chipboard is impregnated with a silicone-based moisture-proof material. It is important that the material does not contain water, as it negatively affects the quality of the structure.
- After processing, a new veneer is glued onto the finished surface and pressed with a clamp through the distribution plywood.
If a decision is made to laminate the chipboard surface, then this should not be done without a thin leveling sheet, since, over time, traces of the structure of the heterogeneous material will appear on the film.
MDF
The structure of MDF is distinguished by a finely dispersed filler composition - sawdust, as well as dusty waste from wood production, are used in the manufacture of the material.
The preparatory process for restoring such a window sill exactly repeats the algorithm for a chipboard product.
The only difference is that MDF can be covered with laminated film, since its structure is characterized by increased uniformity.
Important. Before installing a polymer coating, it is necessary to treat the structure with a penetrating composition based on silicone or acrylic additives.
Glass
Tempered glass is used extremely rarely in interiors as window sills, due to the complexity of manufacturing and the high cost of each product. As a rule, such elements are installed in expensive apartments or public buildings with high-tech finishing.
If a part breaks, it cannot be restored, but if there is minor damage, work is carried out according to a certain algorithm :
- The surface of the product is inspected for chips, potholes, cracks and other defects.
- For filling, special silicon-containing polymers with chemical hardeners are used, which are often used in the repair of automobile glass.
- The substance is applied to a completely cleaned and degreased surface.
- For hardening, a hair dryer or an ultraviolet lamp is used, which quickly removes liquid impurities from the chemical composition.
- After hardening and the structure achieving homogeneity, the glass is polished with delicate abrasives using a special paste.
It should be remembered that any repair of defects on the surface of the glass does not eliminate scratches or cracks from the product, but simply masks them. This means that, after restoration work, the window sill should be used with extreme caution.
Ready solutions
Reinforced concrete window sills are not only decked structures on site. First of all, these are finished products of standard size and modifications. To make them, special molds for window sills made of concrete and the solution itself are used in a special ratio. The result is structures of various modifications that are completely ready for installation. Moreover, the weight of a concrete window sill of this type depends on its size. All that remains is to buy and “plant” such a structure in place.
If we compare a concrete window sill of a factory and a self-produced one, the second one clearly wins in economic terms. Its price is slightly lower than the cost of a finished product.
Regarding the quality aspect: a monolith in construction has always been considered more reliable than prefabricated structures - although factory-produced concrete, as a rule, has a higher level. Therefore, the choice depends only on you, which is more convenient and profitable to choose in each specific case.
Possible difficulties and errors
In the process of carrying out restoration activities, beginners often make a number of serious mistakes that do not allow them to obtain the desired result. When performing window sill repair work, you should pay attention to some nuances :
All chemical reagents and paint and varnish compositions are purchased only for the material from which the window sill board is made.- When cleaning the surface before repair, it is necessary to use only smooth spatulas and blades, without nicks or defects, so as not to damage the base material.
- The repair of cracks and chips is carried out in strict accordance with the technological map for a specific type of putty or sealant. In some cases, a hardener is required, without which the structure will not be able to polymerize.
- When treating MDF and chipboard with penetrating compounds, you need to ensure that they do not contain water molecules that will cause delamination.
- When polishing and grinding surfaces made of stone or glass, you should not use coarse abrasive compounds, as they will not achieve the desired shine.
- Considering the place where the window sill board is used, paint and varnish compositions must have increased resistance to the aggressive effects of ultraviolet rays.
Advice. Before starting restoration work, it is recommended to study detailed videos and master classes from experts and professional installers in order to take into account all possible difficulties and nuances, as well as select the appropriate tool.
Useful tips
- Since concrete hardens quickly, do not mix too much mixture at one time, especially if you have little experience in finishing work.
- Before applying the protective layer, wipe off any sanding dust from the surface.
- When drawing up a drawing, take preliminary measurements (if the window sill block turns out to be too thick, cracks will appear on its surface in the future). The protrusion at the top should be moderate so that the heat from the batteries flows upward without hindrance. Other data depends on the size of your window.
- Since the poured concrete will be subject to grinding, make the board with a small margin.
The window sill is the very element of the window that is difficult to do without. When making it, you should listen to the advice of the craftsmen and choose materials that suit all parameters. Concrete will help create a durable, beautiful window sill that will last for many years.
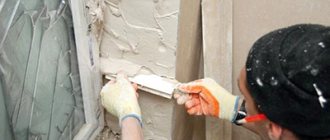
Final stage: cleaning, sealing and jointing of masonry joints
Required tools:
- for cleaning seams - the same as those used for cleaning and sealing cracks;
- for filling the joints with mortar - a trowel, vertical and horizontal jointing, a wooden lath, a plaster falcon.
Work order:
- cleaning damaged seams from dirt and remnants of old mortar to a depth of 15–20 mm;
- wetting the masonry with water;
- filling the joints with mortar;
- compacting the mortar and creating the desired shape of the seam using jointing of a suitable size (after the mortar has set a little to a plastic state);
- remove any remaining solution using a brush or cloth.
Recommended Posts
Recently viewed by 0 users
No registered user is viewing this page.
12 projects from the pros, using the example of which you can design a kitchen-living room with an area of 12 square meters. m
How to properly position and attach roof rails in the kitchen
Beautiful window design in the kitchen: taking into account the type of opening and interior style
The best articles on the IVD website
Are you a professional architect or designer?
IVD. Repair and finishing
Are you a professional architect or designer?
On our website you can choose comprehensive design solutions; view detailed reviews of the market for construction and finishing materials, furniture, machinery and equipment; compare your own ideas with design projects of leading architects; communicate directly with other readers and editors on the forum.
Are you a professional architect or designer?
Source
Torquetting of concrete
Torquet concrete materials are successfully used for restoration and repair work. In this way, shells, cracks, and damage are sealed. The base must have load-bearing capacity, be durable, and clean. It is permissible to torquet reinforced concrete surfaces and work on a metal mesh. Before work begins, the concrete is moistened, but the presence of puddles is unacceptable.
If there are microcracks or potholes on the base, they will give access to chlorides, water, carbon dioxide, which will accelerate corrosion processes. It is recommended to seal with anti-corrosion compounds before applying a protective coating. Leaks are eliminated using hydraulic seals.
Work order:
- the application of the working mixture is carried out using compressed air or a pneumatic concrete pump;
- in one cycle a layer up to 3 cm thick is applied;
- the surface is treated layer by layer. The number and thickness of layers are determined by the project.
Identifying cracks in masonry and the causes of their occurrence
Before starting to repair any crack in the masonry of the fence, it is necessary to find out and eliminate the cause of its occurrence, otherwise the repair will be useless. Cracks in brickwork occur for the following reasons:
- Combined exposure to moisture, frost and sun.
- Use of unsuitable types of bricks.
- Poor foundation waterproofing.
- Using different brands of bricks and types of stone in one masonry.
Obviously, problems caused by the use of materials that are completely unsuitable for laying a fence (for example, unfired, hollow, silicate or insufficiently frost-resistant bricks), as well as the use of different types of stone in one masonry, can only be solved by dismantling and replacing the entire problem area of the masonry. The same applies to cases where the waterproofing substrate between the foundation and the masonry was not initially installed correctly.
Grinding discs
This category of discs is intended for rough work on metal
. The sharpening wheel can be used for cleaning welds, chamfering cut metal parts, and also for sharpening tools (drills, chisels, etc.) if there is no sharpening machine nearby.
It is worth knowing that when installing such a disk, the speed on the grinder must be set to the minimum or not exceeding the values indicated on the abrasive wheel.
A sharpening wheel can be distinguished from a cutting wheel by its thickness (at least 5 mm) and by the presence of a recess in the center for more convenient use of the disk plane for sharpening the tool.
Often, the start of renovation is complicated by the presence of an old layer of paint on the walls. To continue cosmetic procedures, you should carefully study all the nuances of how to remove old oil paint from walls. Otherwise, further improvement of the premises will be impossible, and all efforts made will result in a series of failures.
Before you worry about how to remove paint from walls, you need to decide whether to get rid of it completely. In most cases, walls were painted with oil-based paints. If the wall texture remains smooth, without chips, falling off pieces or bubbles, and further procedures do not involve, for example, applying wallpaper or priming, then you can paint over the old layer.
The modern dye market provides a lot of reliable options. Paints based on water, silicone or mixed with acrylic adhere well to the surface, ensuring a reliable fit. But even with the use of high-quality materials, the entire overlapping process will go down the drain if the surface is uneven.
Oil paints are the most difficult to remove from the surface, which is why the technology for getting rid of them is the most labor-intensive. The more layers have been applied, the easier it will be to clean. Much also depends on the material on which the dye was applied. Removing oil paint from porous plaster will not create any special problems, but you will have to think hard about how to remove paint from concrete.
Cleaning walls of old paint requires some preparation. First of all, to remove paint from walls you will need the following set of tools:
- elements protecting the face and hands - respirator, mask/construction glasses, rubber gloves;
- a blowtorch, or better yet a special hair dryer used in construction;
- sharp spatula, scraper, knife and chisel;
- a chemical liquid for removing old paint from walls and a small brush that you don’t mind;
- a large sharp object like an ax for cutting notches;
- electric drill, hammer drill and grinder;
- attachments for hammer drills and electric drills.
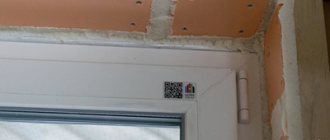
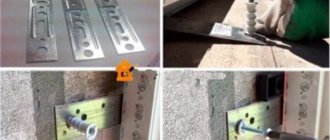
Mounting Features
Before installing the window sill, you should check the quality of the window installation seams. On the room side, the joints are covered with a special waterproofing tape and treated well with construction foam. The lower part of the structure is the most vulnerable. Typically, cold air creeps into the room from this area.
The craftsmen know for sure that the window sill needs to be foamed well. This will help eliminate all the shortcomings made when installing the window. It also increases rigidity. The surface will withstand heavy loads.
It is important that the product foams around the perimeter. First, the seam is at the junction of the window sill and the window. Then the sides are processed. The joints along the wall are processed last. The thickness of the polyurethane foam layer should not exceed 5-7 centimeters.