It often happens that some small thing breaks down in the house. There is no point in calling a specialist because the work is simple, or it only takes 5 minutes.
Now we are trying to keep up with the times, and new devices or new materials appear in the house. Should plastic windows be classified as such, given that they have been on the Ukrainian market for quite a long time? But nevertheless, many small but unpleasant problems arise with them, which we still have not learned to solve.
But this is not a problem, because you can learn quickly and easily. And so, we will talk about independent non-overhaul repairs of plastic windows. Of course, we will not talk about cases where it is impossible to do without professionals and special equipment. And to minor problems that are not included in the warranty list.
Do-it-yourself plastic window repair
Of course, it’s worth taking proper care of your windows so that they last a long time. But if there is already a situation where the breakdown is obvious, you also need to be able to cope with this yourself.
Situation one. The apartment is being renovated, the walls or ceilings are being cleaned, and all the windows are opened wide so that dust can be blown out and there is a little more air. At the end of the work planned for the day, the owners try to close the windows, and discover that this cannot be done.
You can, of course, try to use brute force. But as practice shows, this option ends with the installation of new windows. Which, you see, will be quite expensive.
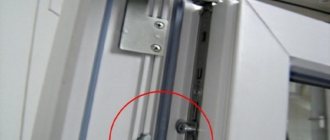
Reasons: the fittings with which the opening/closing mechanism operates are clogged with lime dust on the walls and ceiling.
Solution to the problem:
- firstly, do not try to “forcibly” close the window,
- secondly, clean the fittings.
The problem with clogging of the mechanism is not included in the warranty list. Therefore, this procedure is paid. But, it is significantly cheaper than replacing broken windows due to incorrect attempts to fix the problem.
Therefore, you can contact the company that installed the windows. They will be disassembled, washed and lubricated, and everything will be put back in place.
Actually, this is the action plan in this case. Therefore, if you are one of those who have “golden hands” or simply have basic plumbing skills, you can fix the problem yourself.
What you will need: screwdrivers that match the bolt slot, a paint brush, pliers, kerosene or white spirit solvent, and lubricant. Regarding lubricant, it is better if it is a specialized product for PVC windows. But the situation will most likely be unexpected, and such a thing will not be at hand. You can get by with any neutral type WD-40, or machine oil without additives.
Step-by-step instruction.
Find yourself a helper, because it will be difficult to get by with just one pair of hands. When removing the sash, ask an assistant to hold it in the window. Next, tilt it towards you and lift it up. This will remove the sash from the hinge on the frame located below. Don't be fooled by the apparent lightness of the sash. It may turn out to be much heavier than you thought.
The hinges should have decorative caps that should be removed. And then remove the axle from the top loop.
The next step is to unscrew the handle. To remove it, you will have to unscrew two screws, after first turning the protective plate. In this case, it is better to place the door at hand level, or slightly lower, on a sofa, table, moving the chairs, but not on the floor.
The next step is under the bold exclamation point, you will have to learn how all the parts are located. Otherwise, you simply won’t be able to put the window back together, and you’ll still have to call in specialists.
Only after doing all of the above can you remove the fittings themselves.
- Unscrew all the screws around the sash,
- With an assistant, remove the fittings from the groove,
- Rinse it thoroughly and efficiently using a brush,
- Allow to dry completely, it is better to blow with air,
- Gently, without moving anything, liberally process those parts that move,
- We make the way back with fittings, screws and a handle, do not forget to process the hinges,
- We put the sash back “as it was”, putting it on from below, then insert the axle from above.
- We return decorative elements to their place.
If everything works, you did everything right. Otherwise, call the professionals.
Basic prices for repair of PVC windows
The price list with basic prices will also help you find out the approximate amount of work:
The cost of adjusting plastic windows
| Name of works | Unit change | Price, rub.) |
| Adjusting the plastic window | PC. | 300 |
| Adjusting the plastic door | PC. | 700 |
| Aligning the geometry of a plastic window | PC. | 1100 |
| Aligning the geometry of a plastic door | PC. | 1400 |
| Maintenance of a plastic window (adjustment of one window sash with lubrication of mechanisms and rubber seals) | PC. | 800 |
| Maintenance of the plastic door (adjustment with lubrication of mechanisms and rubber seals) | PC. | 1000 |
Cost of work to replace/install mechanisms in PVC windows
| Name of works | Unit change | Price, rub.) |
| Replacement/installation of tilt and turn mechanism up to 1500mm. | comp. | 5000 |
| Replacement/installation of tilt and turn mechanism over 1500mm. | comp. | 6500 |
| Replacing the main drive | comp. | 2500 |
| Replacing/installing a strike plate | PC. | 300 |
| Replacing/installing a white/brown front door hinge | comp. | from 2500 |
| Replacing/installing an entrance door hinge in RAL color | comp. | from 3500 |
| Replacing/installing a push-on headset | comp. | from 4000 |
| Replacing/installing a single-point lock | comp. | 3600 |
| Replacing/installing a three-bolt lock | comp. | from 6000 |
| Replacing/installing a multi-point lock | comp. | from 10500 |
| Replacing/installing a balcony latch | comp. | 500 |
| Installation of anti-burglary fittings up to 1500 mm. | PC. | 7500 |
| Installation of anti-burglary fittings over 1500 mm. | PC. | 8500 |
| Installation of a door closer | comp. | from 4500 |
| Installation of remote transom opening with rigid drive | comp. | from 9500 |
| Installation of remote transom opening with flexible drive | comp. | from 17000 |
| Installation of remote fanlight opening with automatic drive (without network connection) | comp. | 17000 |
| Installation of a multi-stage (discrete) opening system | comp. | from 2500 |
| Installing a child lock | comp. | 2500 |
| Replacing the lock cylinder/with opening | PC. | 1200/3000 |
Cost of replacement components (window handles, combs, decorative trims)
| Name of works | Unit change | Price, rub.) |
| Replacement/installation of white/brown window handle | PC. | 500 |
| Replacing/installing a handle with a white/brown key | PC. | 1500 |
| Replacement/installation of office handle (bracket) white/brown/silver | comp. | 3500 |
| Replacing/installing the opening limiter (comb) white/brown | PC. | 450 |
| Replacing/installing a hook handle on a white/brown balcony door | PC. | 500 |
| Replacement/installation of decorative overlays in white, brown/color RAL | comp. | 300/900 |
Cost of replacing sealing rubber (beads)
| Name of works | Unit change | Price, rub.) |
| Replacing black sealing rubber | m.p. | 150 |
| Replacing sealing rubber with gray | m.p. | 250 |
| Replacement/installation of glazing bead with black sealant | m.p. | 400 |
| Replacement/installation of glazing bead with gray seal | m.p. | 600 |
Replacement/installation of window sashes in PVC windows
| Name of works | Unit change | Price, rub.) |
| Installing a pivoting sash in a solid frame | PC. | from 10000 |
| Installing a swing-and-turn sash in a solid frame | PC. | from 12000 |
| Converting a sash into a tilt and turn sash | PC. | from 2500 |
Elimination of scratches and seams
| Name of works | Unit change | Price, rub.) |
| Removing shallow scratches on a white profile by sanding | ed. | from 200, but not less than 2000 |
| Removing deep scratches on a white profile using liquid plastic | ed. | from 500, but not less than 2000 |
| Removing scratches/painting over welds on colored profiles | ed. | from 200, but not less than 2000 |
Refinishing work on plastic windows
| Name of works | Unit change | Price, rub.) |
| Drilling drain holes | ed. | 400 |
| AirBox Valve Installation | PC. | 1500 |
| Installation of the Aereco valve | PC. | 7000 |
| Installation of sound-absorbing substrate under the ebb | m.p. | 500 |
| Sealing external seams with silicone/Stiz-A sealant | m.p. | 300/800 |
| Installation of hard cover | m.p. | 1200 |
| Installation of self-adhesive stripping | m.p. | 900 |
| Replacing/installing a hidden clamp, regular/adjustable | PC. | 500/600 |
Installation of window sills
| Name of works | Unit change | Price, rub.) |
| Plastic window sill Moller/CPL Premium/Russia up to 200 mm. width | m.p. | 1600/1400/1200 |
| Plastic window sill Moller/CPL Premium/Russia up to 250 mm. width | m.p. | 1800/1600/1400 |
| Plastic window sill Moller/CPL Premium/Russia up to 300 mm. width | m.p. | 2000/1800/1600 |
| Plastic window sill Moller/CPL Premium/Russia up to 350 mm. width | m.p. | 2600/2400/2200 |
| Plastic window sill Moller/CPL Premium/Russia up to 400 mm. width | m.p. | 2800/2600/2400 |
| Plastic window sill Moller/CPL Premium/Russia up to 450 mm. width | m.p. | 3000/2800/2400 |
| Plastic window sill Moller/CPL Premium/Russia up to 500 mm. width | m.p. | 3500/3300/3100 |
| Plastic window sill Moller/CPL Premium/Russia up to 600 mm. width | m.p. | 3800/3600/3300 |
| Plastic window sill Moller/CPL Premium/Russia over 600 mm. width | m.p. | 5200/4900/4500 |
Installation of ebb tides
| Name of works | Unit change | Price, rub.) |
| White tides up to 100 mm. wide/with glazing | m.p. | 900/1300 |
| White tides up to 130 mm. wide/with glazing | m.p. | 1200/1600 |
| White tides up to 170 mm. wide/with glazing | m.p. | 1300/1700 |
| White tides up to 200 mm. wide/with glazing | m.p. | 1500/1900 |
| White tides up to 240 mm. wide/with glazing | m.p. | 1600/2000 |
| White tides up to 300 mm. wide/with glazing | m.p. | 1800/2200 |
| White tides up to 340 mm. wide/with glazing | m.p. | 2100/2500 |
| White tides up to 400 mm. wide/with glazing | m.p. | 2300/2700 |
| White tides over 400 mm. width | m.p. | from 3000 |
Installation of plastic slopes
| Name of works | Unit change | Price, rub.) |
| Slopes made of white sandwich panel 10 mm, up to 250 mm. width | m.p. | 1100 |
| Slopes made of white sandwich panel 10 mm, up to 400 mm. width | m.p. | 1500 |
| Slopes made of white sandwich panel 10 mm, up to 600 mm. width | m.p. | 1700 |
| Slopes made of white sandwich panel 10 mm, from 600 to 800 mm. wide | m.p. | 2000 |
| Slopes made of 10 mm colored sandwich panels. | m.p. | plus 30% |
Cost of installation/dismantling of plastic windows
| Name of works | Unit change | Price, rub.) |
| Installation of a plastic window | sq.m. | 1500 |
| Installation of a plastic loggia | sq.m. | 2000 |
| Removing a plastic window | sq.m. | 1000 |
| Dismantling a plastic loggia | sq.m. | 1500 |
| Removing a plastic window while preserving | sq.m. | 1500 |
| Dismantling a plastic loggia with preservation | sq.m. | 2000 |
| Reinstallation of a plastic window | sq.m. | 2000 |
| Reinstallation of a plastic loggia | sq.m. | 2500 |
| Foaming under low tide | m.p. | 500 |
Prices for delivery / visit of a specialist in Moscow / Moscow region
| Name of works | Unit change | Price, rub.) |
| Departure of a specialist to Moscow | departure | Free upon conclusion of the contract, if not, then 1000 rubles. for inspection |
| Departure of a specialist outside the Moscow Ring Road | rub./km. | 20 rub. for 1 km |
| Delivery in Moscow / Moscow region by master | 500/+20 rub. for 1 km. | |
| Delivery in Moscow (gazelle) | 1500 | |
| Delivery in the Moscow region (gazelle) | 1500+20 rub. for 1 km. |
Basic breakdowns that everyone who has PVC windows should be able to fix
There are a number of minor breakdowns that happen all the time. For example, when you want to open for ventilation, but did not turn the handle, and the sash hangs in a certain middle position. Either the handle is broken, or you need to install a limiter.
Such minor faults can be easily fixed without damaging the window. And the skills to unlock a handle that won’t turn will be very useful and absolutely free. Below is a “quick guide” for the most common cases.
Case 1 : change the handle or install a limiter
If the handle is damaged, or there are other reasons for wanting to change the handle, you can do it yourself with one screwdriver and half an hour of time.
Step-by-step instruction.
- At the base of the handle there is a cap that needs to be turned
- Unscrew all the screws that you see under it,
- Remove the broken handle
- Place a working one in its place and screw it on (you can use the same screws).
That's all.
You can also deal with “comb” type opening restrictions yourself. To do this, the device is “slipped” under the base of the handle, having first untwisted it. The price of such a “comb” does not exceed 200 rubles.
Situation 2 : unlock the handle rotation lock
This happens when the handle is turned quickly, and it does not have time to “understand” what position it should be in. The handle remains motionless and the window itself does not close. In this case, most likely, you need to “blame” the blocker. Most window handles have a mechanism that is activated by turning the handle while the window is open. They are installed so that the window mechanism cannot be accidentally broken. But sometimes the lock works, and the window can neither be closed nor opened.” But you can also deal with this yourself.
Step-by-step instruction.
Find out the manufacturer of the installed fittings. The desired engraving can be found on the lock. If you read “AUBI”, then within the handle you should see a protruding thin plate with a spring. Press it closer to the seal so that it does not stick out, and turn the handle.
It is also important whether the sash is straight or slightly curved. In the second case, you need to press the plate closer to the seal, align the window vertically, and move the handle so as to close the window.
With inscriptions like “GU”, “Roto” or “Winkhaus” you need to do the same. To do this, feel for a similar protruding plate just below the handle. And it will be enough to click on it to understand how it should become. Move it parallel to the seal and close the window.
The situation may take a slightly more complicated turn. When such a metal tongue does not fall into place, slipping past the desired position. Then the handle will be motionless. If such a situation occurs, take out a screwdriver.
You will need to find a counter element on the frame and remove it by unscrewing the screws. There you will find an element on which the metal plate should click.
Secure the position by placing something between the lever and the frame to engage the locking device and the counter part on the frame.
Situation 3 : fix Winkhaus scissor lock
Among “representatives” of the Winkhaus brand, the turn blocker is often the first to suffer. It's in a part called the scissors. If the blocker fails, the handles can continue to function, but selectively: for ventilation and for opening.
To get out of this situation, you need to remove the blocker. You can do this again in two ways: by calling a specialist and preparing about 1,500 rubles, or by understanding the diagrams, understanding what needs to be extracted, and doing it yourself.
Step-by-step instruction.
- Remove the window sash
- To do this, remove the decorative inserts and remove the pin from the hinge at the top (use pliers and a screwdriver),
- Position the sash comfortably, unscrew the screws securing the fittings and remove the scissors,
- Remove the blocker, return the scissors and everything else to their original position.
Situation 4 : fix the handle if it is difficult to turn or does not go all the way
It is necessary to determine the reason for this “behavior” of the pen. Basically, this is either because the parts are dry and rubbing against each other, or the window sashes are askew. It is better to stock up on spray before, but if necessary, take a universal neutral lubricant from the car store. First, put a tube on the cylinder and spray all moving parts. Don't miss the top corner passes. If nothing changes, proceed to plan B.
Step-by-step instruction.
- You need to turn the screws installed in the hinges,
- Remove the decor from the loop below,
- Try to lift the sash by turning the screw with a hexagon in the middle of the hinge itself,
- If the top corner of the sash falls onto the striker, turn the screw from the top as well.
If you have the opportunity to look at the adjustment instructions, it is better to look at it before starting repair work.
The main problems with the operation of plastic windows
All PVC windows have characteristic signs of one or another breakdown. The most common damages and malfunctions are as follows:
- Defect of the lower or upper loop. Can be detected by visual inspection. With such a defect, the hinge must be replaced with a new one.
- The door opens in both directions at the same time. In this case, the scissors or loop scissors contain damage. Repair is carried out only by complete replacement of the part.
- Scrolling the handle around its axis. The main lock or drive has failed. It is also necessary to replace it with a working one.
- Difficulty closing the window sash. This indicates deformation of the corner switch or its complete failure. In any case, this part cannot be repaired, but replaced with a similar new one.
- The handle is blocked. The comb in the corner switch mechanism jumps. It needs to be disassembled and the defect eliminated.
The door is skewed
To adjust the position of the sash, you need to understand in which direction the shift occurred. The plastic window is adjusted using a hex key set to “4”.
Correcting left-right skew
To eliminate this type of malfunction, you need to act on the lower hinge. To do this, remove the decorative trim and examine the adjusting groove into which the end of the key is fixed. If you turn the tool counterclockwise, the sash will slide out to the right. Turning in the opposite direction will move the sash to the left.
Reference! In order to do the same with the upper sash, you need to completely open the window to expose this nesting part. The same actions with the elements located on the sash will help to install it correctly relative to the window. The evenness of the position of the sashes vertically and horizontally is established when the window is fully opened.
Correcting down-up skew
To correct the position of the sash in a vertical position, you need to find the bottom hinge and remove the decorative plug from it. The lowering and raising of the sash is fixed by an adjusting groove located at the top. The sash is lifted by turning the hex key in all directions.
A gap is visible when ventilating or there is strong blowing from the sealing rubber at the top
There are PVC windows without vents. This design helps save material and give a more attractive aesthetic appearance to the window as a whole. At the same time, maximum heat is retained in the room, and extraneous sounds penetrate to a lesser extent. Such windows are ventilated by setting the sash in the open position to the “Ventilation” mode. The gap may increase over time if the sash is opened frequently. In cold weather this causes a lot of trouble. To fix the problem, you need to adjust the pressing force against the frame structure of the window sash.
To complete this task you need to do the following:
- Switch the sash to ventilation and opening mode at the same time to gain access to the corresponding part and adjust the mechanism.
- To prevent restriction of the action of the 2-mode simultaneous opening of the sash, you need to advance the tongue on the handle mechanism.
- After this manipulation, supporting scissors will appear in visible accessibility. They will open in the upper area of the window. The scissors contain an adjusting element, which, when turned with a hex key, allows you to move the sash away or press it.
If after performing these sequential actions there is no result, then most likely the reason lies in poor fit of the slats or locking mechanisms to the window. To adjust them, you must sequentially perform the following steps:
- Adjustment is required for slats or locking mechanisms. It depends on the type of fittings.
- If there is a control mechanism, adjustments are made with a hex key. This tool is used to correct the oval elements of the sash located at its end. In the absence of a controlled mechanism, simple pliers will help.
- Depending on whether the seal is pressed against or, conversely, it moves away from the locking mechanisms, you need to choose rotation in one direction or another.
- After completing the adjustment, you need to make sure that the sashes are tightly and smoothly pressed against the window when closing it, and that when opening it there are no hitches in operation and no clicks or other extraneous sounds are heard.
The window does not close
The defect occurs after repeated sharp pulling of the handle. The locking mechanism is damaged. To return to the previous mobility, first determine the brand of existing fittings on the window. Depending on the manufacturer, parts may differ in their design features. Under the handle, in the place where the tongue protrudes, there is a lock. This part must be moved to such a position that the direction coincides with the location of the sash. It is necessary to ensure a clear parallelism of their location. After this, the handle is returned to its original position.
Attention! AUBI brand fittings require a completely different approach to adjustments. We'll tell you more about it.
Before starting work with AUBI brand fittings, you should make sure that the sashes are open vertically. If they are open in two modes at the same time, then the handle will not be turned. There is a spring element on the side of the sash, and there is a metal plate in it. This part must be pressed tightly against the seal and the handle must be turned. If there is no proper result, check the fit of the blocking element to the response mechanism.
You can find the response mechanism on the window frame. This can only be done when the window is open. When closing, a lock is engaged in the mechanism. When unwinding this mechanism, all the parts filling it are removed. A durable plate of the required size is placed in the open space. It turns out that blocking will occur between the frame zone and the response mechanism.
Difficult to turn the handle
There may be no connection between the mechanism on the frame and the lock. This occurs due to temperature deformation of the elements. Restoring communication with the blocker is done by applying a thin plastic plate to the mating element. If the handle creaks while turning it, first of all, check the sash for sagging. Height adjustment is made through the lower loop with a hex key. To lift the sash, you need to turn the key clockwise. To lower it - against it.
If the window handle breaks, you will need to do the following procedures:
- Check that there is sufficient lubricant in the mechanism. Over time, it can dry out and cause sagging, which requires its renewal.
- Adjust the sash if it deviates horizontally or vertically. If it is necessary to lubricate the sash at the same time, this is done after adjustment, so as not to impede the movement of the mechanisms.
- Treat the parts with a universal spray or a composition for double-glazed window fittings, which has a special directional effect.
- According to the attached instructions, make the necessary manipulations to improve the rotation of the window handle.
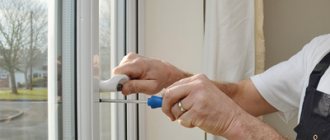
The handle is broken or loose
It is easy to fix such a breakdown on your own. To do this, you need to buy a handle of the same size. It is desirable that it be from the same manufacturer as the previous one. After this, look for the plastic plate on the handle that covers its base. It rotates horizontally. This action allows you to open the bolts that fasten the part to the sash. To replace them with a new one, you need to twist them with a screwdriver and remove them.
Attention! A loose handle most likely has poor screw fixation. These parts are screwed tightly so that the handle does not move. No replacement required.
If the handle is cracked due to the fault of a child who constantly grabs it, then it would be advisable to replace the part with a new one with increased control functions. To do this, purchase a similar handle, but with an additional control function, on which a special lock is installed. In the disabled position, a child will not be able to open the door and loosen the parts.
If the handle is cracked due to an accidental blow, it can be easily fixed by turning it 90 degrees. With this manipulation, two screws will be visible, which are located below and above. With their help, the handle is attached. They should be unscrewed with a simple screwdriver and removed from the grooves. When removing the old handle, the screws can be used for the new one. When installing additional opening limiters, you first need to fix the ventilation control plate or comb, and then proceed to install the handle itself.
To cover all existing screws, the handle should be turned well. If this is not done, it will jam even in the open position. This phenomenon can also be observed with proper installation. If this happens, then the issue may be a faulty blocker. Its installation is carried out on almost all brands of fittings in case of protection against accidental window breakage. The position of the handle is fixed and it cannot be turned in the tilt-and-turn and open positions.
The sash opens in a pivoting and tilting position at the same time
To resolve this problem, the sash is turned vertically and pressed tightly against the frame. If the desired result is not achieved, turn off the locking mechanism and close the window. In this case, the handle is turned straight down. To check the success of the action, set the window in different positions and at the same time turn the handle slowly and quickly.
Blowing from under the seal
The fittings of a plastic window consist of a trunnion or an eccentric. They ensure a tight fit of the sash to the frame. To eliminate blowing, you need to rotate these parts to their original state so that the position of the valves is leveled. To do this, use a hex key set to “4”. The sequence of actions is as follows:
- If the fittings are branded Sigenia and AUBI, then on the sash they find the numbers with key sockets and turn the rollers a little closer to the seal.
- The Winkhaus marking indicates that it is possible to rotate the eccentric by hand without the use of additional tools.
- In the Roto brand you cannot do without a hex key. It is inserted into the required holes on the response plates and rotated to the desired position of the sash.
Important! The degree of pressure depends entirely on the location of the point relative to the seal. To prevent the tires from wearing out, in the summer I adjust the eccentrics to the desired location.
If there is air blowing from the side of the hinges, then the sash is pressed tightly in this place and fixed. To do this, insert the nozzle into the existing hole in the lower loop and carefully turn it. The top loop contains a pull-up mechanism that is attached to the scissors. It is adjusted in the same way with tighter pressure and rotation of the tool.
If the profile bends in an arc, then the reason may lie in poor-quality installation. For example, the profile is often stretched by anchors, which causes the middle clamp to become loose. Straightening plates may fall or may not be installed at all during production. They should be located in the middle of the sash, namely between the double-glazed window and the profile.
Reference! Repairing plastic windows is not an easy task. If the plastic windows are under warranty, then you will not need to do the repairs yourself. You need to contact a company where all faults can be adjusted by experienced technicians free of charge. If the warranty period has expired, then the plates will have to be installed on your own.
The mechanism is faulty
The following parts may be broken in the fittings:
- mechanisms for opening, closing and holding the window frame;
- ventilation mode.
For full functioning, the well-functioning operation of all incoming elements, including constipations and locks, is necessary. But they can be repaired only after adjusting the bent elements that move. It may be necessary to lubricate all existing small parts first.
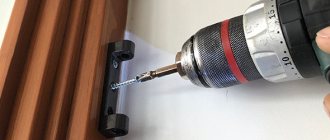
There can be many reasons for such phenomena. The fittings become clogged with dust or dirt and stop functioning normally. A common occurrence is contamination of transmission mechanisms during repairs. To eliminate this problem, the sashes are removed from their hinges along with the decorative trims. It is quite difficult to do this work alone. Ideally, two people should carry out repairs. One will hold the rather heavy sash, and the second will take it out and help lay it on the table.
Remove the handle and unscrew all existing screws that directly fasten the fittings. The mechanism is removed from the groove, and the fittings are placed on the floor, which is previously covered with film. After this, the entire mechanism is coated with a brush. This is done by washing, which is poured into a sterile container. After drying, all transmission parts are treated with a special lubricant for PVC windows, the fittings are put back on and screwed in place. Install the handle and lubricate the hinges, and then hang the sash.
Broken glass unit in a plastic window
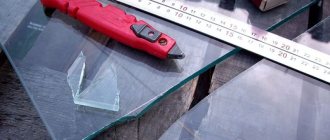
A complete replacement of the glass unit is required, since such a malfunction cannot be repaired. You can remove it using a metal spatula or rubber mallet. Glazing beads are removed by inserting a tool into the joints between the frame and the glass unit and applying a light blow. After removing the glass unit, it is placed on the floor and all the necessary parameters are measured to purchase a new one. The width, thickness and height of the part must be recorded.
A new double-glazed window by installing straightened plates at the bottom if the sash is blind. If it opens, then it is necessary to make an indentation of 10 cm in the corners. We observe the correct geometry of all distortions and the sash itself. If necessary, you can also add straightened plates. After this, the glazing beads are installed.
Seal wear
The sealing material becomes completely unusable 5 to 10 years after the end of its service life. Due to frequent mechanical damage, this can happen much earlier. To replace the seal, you need to do the following:
- Using a screwdriver or a sharp tip, move the damaged sealing cord to a corner.
- It is carefully removed from the window frame or around the perimeter of the sash. If only one part is damaged, you can limit actions only to the distance to the end of the element.
- The groove is cleaned and washed to remove accumulated dirt and rubber seal residues. Then dry thoroughly down to the smallest indentations.
- Glue is applied along the entire length where the sealing cord will be inserted.
- The seal is inserted smoothly and accurately into the groove without clamping or stretching.
What to do if the window is blowing from under the rubber seal
There is such a part in the PVC window fittings as an eccentric or trunnion. By turning it, you can eliminate this problem. But to do this, stock up on a four-point hex wrench. Here again there are minor differences depending on the type of fittings, but the essence is the same.
Step-by-step instruction.
- For the "Roto" version, look at the strike plates,
- Find the place approximately in the middle where the hexagon fits,
- use the key to turn the element,
- If you see the inscription "Winkhaus", grab the trunnion with your fingers and turn it
- For options like “AUBI”, “Sigenia”, also find on the door where to put the key,
- And turn the roller so that the point located on it is closer to the elastic.
Keep in mind that the sash pressure depends on how close this point is to the seal. And in the summer it is better to return the eccentric to its place so that the rubber does not wear out.
If nothing works out after the first option, then the eccentric simply does not fit into the right place. This can be corrected by changing the position of the plate. Unscrew the bolts that secure the strike plate and adjust it so that the roller fits exactly under it. If none of what has been done helps, you won’t be able to do without the experts.
The handle doesn't turn
If the handle does not turn
The reason that the handle stops turning when the window is closed or that a certain force has to be applied to perform this action is the displacement of the turning “tongue” located at the end of the sash relative to its “response” (on the window sash post). In this case, you will have to adjust the position (the adjustment methods were described above) so that the “tongue” rests against its “response” when closing the window.
If the handle does not turn when the sash is open, then you just need to press the “tongue” with your finger, pressing it into a vertical position.
We repair the profile bent by an arc and eliminate the blowing from the hinges
In fact, no type of fittings is protected from bending of the profile and blowing near the hinges.
There may be several reasons. The most common are:
- poor work of the builders who damaged part of the mechanism,
- falling in the middle of the sash of straightening plates,
- or lack thereof at all.
A professional will cope with the task in half an hour, installing the required number of straightening plates in the middle. In fact, the only thing you need to do for this is to remove the bead from the sash.
If you take on this task yourself, you will solve the problem without calling a technician.
Step-by-step instruction.
- “Arm yourself” with a chisel or trowel, it’s better to take it wider,
- Fix the tool at the joint at the sash,
- Apply a little pressure and pry so that the glazing bead comes off,
- Find the straightening plates in the middle between the sash and the frame,
- Move the sash about 3 mm, maybe a little more, placing a plastic spacer under the glass spatula,
- Center the plates. It’s quite possible to make such records yourself, for example, from a stationery ruler. Make sure that the plates have a thickness approximately equal to that of the glass unit itself. And when installing them, make sure that the edges do not rest against the glass. This may damage the glass unit.
Start by moving the sash 3 mm, if it is not enough, add the same amount.
How to fix broken PVC windows yourself
If you need to fix minor damage to a plastic window without the help of a professional, this article is for you.
With the growing demand in the market and the number of buildings and apartments equipped with plastic windows, the number of services to maintain them is also growing. They do not require particularly expensive or sophisticated care, but it must be correct for the window to last a long time.
Over the years, companies offering installation and maintenance of PVC windows, and the users themselves, have compiled a list of the most common problems.
Such breakdowns that you can fix yourself include:
- Handle malfunction
- Limiter failures,
- The sash and/or handle getting stuck when the window is open,
- When it blows at the window joints,
- When it blows near the hinges,
- Damage to the glass unit and/or glass.
Let's take a closer look at each problem and how to solve them.
Everything about replacing handles and stops
When cracks appear on the handle, it breaks completely, or a child appears in the house, this element will need to be replaced. If you choose the option of repairing it yourself, you will need an understanding of what to do.
Step one is to buy a new, working element. Where to buy is up to you - in markets or stores.
Step two is to remove the broken part. How to do it:
- At the base part of the handle we find screws, hidden under the plate,
- We unscrew them and take out the broken handle,
- We install the purchased working part,
- We fasten it with the removed screws.
If necessary, the so-called comb, pay attention to the design of the handle and the structure of the plate. It is simply inserted under the base of the handle, like the ventilation regulator. A screwdriver is also enough to install them.
Installing a new handle
Replacing a plastic window handle is not a complicated or expensive procedure. You only need a screwdriver.
First you need to remove the old fittings. Each handle is held on by two screws; they themselves are hidden under a decorative plate located under the handle. To find them, rotate the plate at the base 90 degrees. Then unscrew them and remove the old fittings.
At the end, place the purchased handle and tighten the screws. After tightening, turn the plate back. In this way, you can install both standard plastic handles and special children's handles with a lock. In terms of costs, self-installation will cost about 2 times less than calling a specialist.
The window is open, but the handle is jammed
A similar situation has happened to every second person who uses plastic windows. The window “hangs” in some middle position between opening and ventilation, and the handle does not move. This happens when you change the position of the window too quickly.
The whole problem is some kind of blocker. It is not necessary to know its structure, but understanding how to correct the situation will be very helpful.
Step one - find an inscription on the fittings (mainly on the lock) that will indicate its manufacturer.
Step two - we act depending on what is written there:
- If we see “GU”, “Roto”, “Winkhaus” - below the handle mechanism we feel for a protruding metal tongue,
- Press it towards the seal (should be vertical), turn the handle to the closing position,
- If you find the inscription “AUBI”, look for a protruding small plate with a spring there,
- Make sure that the sash is vertical and do the same as with the tongue in the first case.
Do not apply significant force, otherwise the mechanism may break.
Slopes made of gypsum fiber (GVL)
The technology for installing slopes made of gypsum fiber sheets is practically no different from attaching drywall, the advantages will be the same. At the same time, GVL does not have the disadvantages of GCR: it is much stronger and stiffer, and its moisture-resistant version is not at all afraid of a wet environment.
Expert opinion
Anton Tsugunov
Construction expert. Entrepreneur. 17 years of experience. More than 100 completed objects.
I believe that when installed correctly, gypsum fiber board slopes are superior to other options in terms of performance and appearance. But their use is justified only when finishing from scratch or during a major overhaul. Since during finishing it is necessary to install painting corners and putty not only the slopes, but also the adjacent wall.
USEFUL INFORMATION: GKL or GVL, which is better: differences, what is the difference, what to choose?
Advantages of gypsum fiber slopes:
- Fairly simple installation.
- High strength and rigidity.
- Possibility of high-quality insulation.
- Ideal design geometry.
- Long service life - more than 10 years.
- Maintainability: a damaged element can be easily puttied and tinted.
- Moisture resistance.
- The paint is easy to clean.
- Any decorative coverings can be mounted on GVL: from wallpaper to tiles.
Making a slope from gypsum fiber
GVL installation process
USEFUL INFORMATION: How to choose high-quality plastic windows and not overpay: professional advice
Flaws:
- Relatively high price (compared to gypsum board and plastic).
- The need for finishing.
- Cutting gypsum fiber is more difficult than cutting drywall.
If, after priming and puttying, you paint the GVL slopes with high-quality latex paint, then they can be washed without fear. And repainting will be required no earlier than after 5–8 years.
Difficult to turn the handle completely
Another common problem. If the problem is not irreversible, most likely it is due to sagging of the sash, or a simple lack of lubrication.
You can fix the last problem using basic car WD-40. But, if such steps do not help, you will have to take a screwdriver. Or rather, for a hex key.
Step one - observe whether the sash is in contact with the stop on any side, and how smooth it is.
Step two - remove the plates installed to protect the hinges,
Step three - use a wrench to tighten the hinge fasteners.
Plastering slopes
This option for repairing slopes is low cost. To seal, all you need is a finishing mixture, a set of simple tools and water-based paint.
This option also has disadvantages:
- To obtain a very smooth surface, you need to put in a lot of effort and spend a lot of time. An experienced installer performs this work much faster;
- Cracks often appear after plastering. This may be due to a single-layer surface coating, when a thick layer slides down. In addition, cracks appear due to changes in humidity or poor quality of the mixture;
- low thermal insulation of the window structure;
- lack of adhesion to the plastic from which the window is made.
It is believed that plaster looks more aesthetically pleasing for internal slopes than plastic and drywall.
Plastering begins with the correct selection and preparation of the mixture. In this case, it is necessary to take into account the location of the slope.
- External slopes are subject to special conditions: precipitation, wind, temperature fluctuations. It is recommended to use cement and heat-insulating mixtures with a water-repellent effect. This can be a product or a regular mixture of cement and sand.
- Internal slopes must have an aesthetic appearance. To ensure a smooth surface, gypsum mixtures are suitable. Starting and finishing putties are very common.
In any option, the drying time of the solution is taken into account, since further decorating work continues after it has dried.
The slopes will be of high quality if you follow the advice of experts.
Important!
1. Do not dilute a large amount of solution. This is due to savings - the unused solution dries quickly.
2. The solution is applied in several layers. The next layer is laid after the previous one has dried.
The repair sequence is as follows:
- The dry mixture is diluted according to the instructions on the package.
- The location of the corner is determined. Using a building code and a level, a lighthouse is marked on the wall.
Determining the starting point of the angle
Using a beacon and staff
View from above - The solution is applied by spreading or throwing. The plaster starts at the bottom and moves up the slope.
- Using a spatula, remove excess mortar from bottom to top and create an angle.
- Decoration can be done in any way. The easiest way is to paint. It is performed after applying a two-layer primer.
If you have any questions, watch our video:
If there is a little siphoning on the side of the seal
Here you need to make friends with such a window detail as the eccentric. It is also called trunnion. By the way, understanding the principle of its operation will also be useful in order to set the window to summer and winter modes.
To cope with the problem, you will also have to first find out the manufacturer of the accessories and stock up on a “four” hex key.
Step one - find the engraving on the fittings parts, Step two - adjust the part as follows:
- If you have fittings “AUBI”, “SIGENIA”, “GU” - find the connector for the key and turn the roller counterclockwise (watch the hump on the roller, the closer it is to the seal, the stronger the sash will be pressed),
- In the case of the “ROTO” brand, insert the key and turn until the desired effect,
- For “WINKHAUS” you don’t need a hexagon - grab the trunnions (you can use pliers), move it in a horizontal plane, turning it a little if necessary, to the desired degree of pressure.
If you fail, so as not to damage the double-glazed window even more, contact a specialist.
If it is very windy near the hinges
The culprits for this problem most likely could have been the installers who installed the windows. Or the manufacturer directly, having made a certain flaw. But you can try to fix this without shelling out a lot of money.
We'll make do with a trowel or spatula, but we may have to make thin plates. We'll come back to this later.
Step one - we pick up the glazing bead with a tool so that it comes off,
Step two - we find plates between the frame and the sash, which are called straightening plates,
Step three - place these plates exactly in the center, moving the doors a few millimeters, but not more than 5,
Step four - collect everything in its original form.
Returning to the plates, they can be made from a plastic stationery ruler. Make them the same thickness as the glass unit itself. And install it without tipping its edges over the glass unit, otherwise you can completely ruin the window.
A little about slopes
Slopes are divided into external and internal and represent a part of the wall that is directly adjacent to the window block at a certain angle. It is necessary to approach the finishing of those areas that are located indoors most carefully.
Why is it necessary to install slopes of plastic windows? There are a number of functions that they directly perform:
- Creating external attractiveness and aesthetic completeness. Indeed, it is difficult to imagine how new windows will look if the adjacent surface is poorly finished.
- An additional source of heat and sound insulation. This means that the slopes allow you to protect the room from the penetration of cold and noise pollution.
- Protection of assembly seams from external influences, as well as preventing windows from fogging up.
Finishing slopes is a procedure that is not only decorative in nature, but also a protective function.
Thus, sealing window openings is carried out not only to restore damaged areas, but also to create a whole complex of additional protection.
Is it possible to change a double-glazed window yourself?
Speaking about correcting minor defects or breakdowns in plastic windows, a logical question arises - is it possible to completely change the double-glazed window yourself.
To give a comprehensive answer to this question, it is first worth talking about the dismantling process. And also about what difficulties may arise and what is needed for such “handicraft”.
If for some reason the strong recommendation to entrust this matter to professionals does not work for you, read the text below in detail.
You may need: a screwdriver, a 4-point hexagon, a spatula, pliers, adjusting plates, and a few other small things.
Step one - remove all the glazing beads one by one, Step two - remove the unsuitable glass unit, Step four - carefully measure its dimensions, Step five - place the whole glass unit in place of the previous one, placing adjustment plates under it, Step six - use the plates to perfectly align the sashes , Step seven - collect everything “as it was”, but with a new double-glazed window.
But before the procedure, remember that it is much easier to read than to do in reality.
Plastic windows can be repaired with your own hands
There is a reason why so much is said about quality and, in this case, window repair. They do not play an aesthetic role at all. Poorly installed windows will lose heat, “threaten” with drafts, and constant dust. And a high-quality window is very easy and cheap to keep in working order.
But many can argue with the “panacea” of PVC windows. Especially speaking about the quality of installation. New houses are built very quickly, and not always with high quality. And having bought a new apartment, you may find that water is blowing from the plastic window, or even leaking.
In such cases, I would like to remember the good old wooden windows.
Replacement of glass unit
Replacing a double-glazed window is a rather difficult and dangerous task for a non-professional, so if you are inexperienced in repairs, it is better to spend some money and call a specialist who will do everything himself. If you are sure that you will not have to collect broken glass on the floor, follow these instructions.
Before replacing, you need to take the dimensions - height, width and thickness, and order a new double-glazed window that is suitable specifically for your window. You can either do the measurements yourself, or entrust it to a specialist - you will have to spend a little money, but then the double-glazed window will definitely fit.
To replace, you will need a spatula and a rubber hammer. If the glass is large, there is also a second person. Insert a putty knife end-to-end between the frame and the glass, and carefully remove all the glazing beads.
When the new glass arrives, insert straightening plates at the bottom of the sash and begin inserting the glass unit. Don't forget to put the glazing beads back.
All about repairing wooden windows
When talking about repairing wooden windows, first of all we are talking about the quality of the wood itself. If the frames show even the slightest signs of rotting, such a window will have to be thrown away, and nothing else. If the window looks normal on the outside, start inspecting it.
Step one - remove the glass. Step two - we get rid of the coating, and only using an industrial hair dryer and/or special solvents.
Removing old paint will allow you to better evaluate the quality of the wood. You can also put the frame up and swing it in different directions. This way you will check the “margin of safety”.
Step three - work with putty. It is worthwhile to dwell on this point in more detail.
Possible problems
The finished window opening should look beautiful and retain heat well in the room. In principle, this is where its functions end. However, over time, the performance properties of the finish decrease, and sooner or later certain problems arise.
What could happen?
- The first and most common malfunction is mechanical damage to the slope surfaces . They can be very different, ranging from minor scratches to through holes.
- Next on the list are more extensive damage associated with deformation of drywall or plastic . In this case, the surface of the opening swells, and sometimes one edge of the sheathing panel even comes out of its fasteners.
- A separate group of problems is mold contamination of the slope . It is very unpleasant because it indicates problems with removing moisture from the assembly seam.
Mold on the trim
All these problems can and must be fought. Instructions for troubleshooting problems that arise are given below.
About the intricacies and stages of puttying wooden windows
The lion's share of not only the external qualities of the window, but also the issues of its tightness depends on the quality of the putty and its elaboration.
Don’t be lazy or skimpy, find a high-quality putty that’s suitable for exactly the wood you have. After drying, you will appreciate the advantages of high-quality material at the varnishing stage.
Step one - arm yourself with a special rubber spatula for putty, Step two - fill and smooth out all the gaps, cracks and uneven spots, Step three - use the corners to get rid of the gaps, they can also be puttied, leveling the surface. Step four - wait for it to dry completely and sand the surface (preferably using special tools).
If you are unsure about the quality of fastening the frame to the wall, it is better to break the slopes and double-check them again. Because even the highest quality glass will not change anything if the problem is in the frame.
You can seal, insulate and fix the window with polyurethane foam. You can also handle it yourself if you are extremely careful. And the glass itself “sits” on special sealants. Don’t skimp on them; the quality of glass fastening will depend on the presence or absence of blowing, dust penetration and unpleasant rattling.
What are window fittings?
A special metal structure consisting of tilt-and-turn elements is installed on balcony doors and room windows. These parts allow moving wings and doors to swing open completely or extend from above while in a stationary position. In the second option, the lower part of the sash remains attached to the frame. To adjust the tilting depth, there are special scissors with a limited stroke. To open the doors, you must first overcome the resistance provided by the seal.
There are several types of fittings for PVC windows and doors:
- folding transom sashes;
- tilt and turn;
- rotary.
Basic elements of window glazing
the following:
- Frame. Each window has a supporting frame made of PVC profile, which is reinforced with metal.
- Sash. To open the window, sashes made of reinforced profiles are placed inside the frame. If opening is not necessary, then the glazing is done directly into the frame.
- Impost. This is the internal part of the frame, which serves to provide the necessary rigidity and divide it into parts.
- Glazing bead. Fixes infill elements such as sandwich panels and double-glazed windows. This is a removable structure made of PVC profile. It is equipped with a rubber seal.
- Double-glazed window. The transparent filling of the frame opening consists of 2 or 3 glasses. They are separated by a spacer frame containing moisture-absorbing material.
- Accessories. A unique set of mechanisms and components that ensure the fixation and functioning of window sashes when they are opened and closed.
- Windowsill. An element of covering the internal space at the bottom of a window block. The most common products are made from hollow plastic profiles. Expensive and practical options are solid reinforced polymers.
- Low tides. A plate made of metal or polymer with a specific profile composition. It is installed from the outside to drain water.
Reference Information! During installation work, profiles are also used to help correctly connect the parts of the block. Peculiar panels form internal and external slopes. The junctions can be covered with decorative overlays. The presence or absence of these parts is determined by the brand of the window model and its manufacturer.
Returning to the metal-plastic window
There are non-standard breakdowns and situations, but basically all faults of PVC windows can be reduced to the following:
- Damage to glass
- Window jammed half open
- Handle malfunction
- Problems with the opening limiter,
- Presence of a draft in the area of the hinges or seal.
PVC window mechanisms are quite easy to use. But you need to be careful with them. So, when you try to move the handle too quickly from one position to another, the window may jam. If this has already happened, then you can definitely handle the problem yourself.
Step one - determine what kind of fittings you have.
Step two - for the “AUBI” brand, look for a protruding thin plate (with a spring) at the base of the handle. For all other accessories, look in the same place, but with a protruding tongue.
Step three - for “AUBI” we make sure that the sash is strictly vertical, clamp the plate in the direction of the seal, and close the window. For all other fittings, use your finger to hold the tongue in a vertical position and immediately close the window by turning the handle.
The situation with replacing the handle is a little more complicated. The only difficulty is that you need to buy a new handle and have a screwdriver in your arsenal. Whatever the reason for the replacement, the installation itself is easy to handle.
Step one - get a working handle, Step two - unscrew the fastening screws on the handle and remove it, Step three - replace the faulty element with a newly purchased one, Step four fix the new handle with screws in the same way as the previous handle was screwed on.
Installation of additional accessories
Sometimes it becomes necessary to install additional equipment not provided for in the initial installation:
- Mosquito nets;
- decorative blinds;
- limiters;
- roller shutters;
- handles with key;
- children's locks.
Order double-glazed window repair
Adjustment of PVC windows
Troubles in the form of partial failure of the handle to work can be caused by a lack of lubricants in moving parts, or sagging of the sash.
In such cases, the handle works with some tension, or does not turn completely. If the lubricant has dried out, regular automotive WD-40 will save the situation. Take this lubricant and thoroughly work on all the moving parts.
If the problem is that the sash is sagging, you will have to take two tools.
Step one - remove the plates that protect the sash. Step two - insert the hex key (No. 4) into the hinge fastener and tighten it.
You can remove minor drafts, or set the windows to summer and winter modes, using an eccentric. You will also have to deal with it based on the installed brand of fittings.
Step one is to determine the manufacturer. Step two - in “Winkhaus” models, the eccentric is moved manually or with pliers, turning and moving up and down until the pressing force is satisfactory. For “Roto” you will need a hex wrench to move the eccentric into the required position. All others, for example, Veka”, “Gu”, are adjusted by turning the roller with a key or screwdriver. Please note that there is a dot on the video. It helps to navigate the pressing force - the closer the point to the seal, the higher the pressing. And always remember – if you couldn’t fix it yourself, don’t break it – call a specialist.
You can adjust the window even if there is a real blow from the hinges. This is a problem with the quality of the window itself, or its installation.
You can try to correct the situation with plates
Step one - use something wide and flat, for example a chisel, to separate the glazing bead at the joint. Step two - find the location of the straightening plates. Step three - move the sash 3-5 mm and place it in the middle of the plate.
There are a couple of nuances regarding these records. You can make them yourself; a thin plastic ruler will do. As thick as the glass unit itself. Do not let the plate touch the glass.
All these breakdowns and shortcomings bring a lot of discomfort, but there is no need to spend money on repairing them. With the instructions posted above, everything is done by hand. If not, call a specialist.
How to repair the fittings on PVC windows yourself
Plastic window repairers confirm that half of the calls concern minor faults that clients could handle themselves. The fittings are easy to use and replace.
To repair basic breakdowns, you don’t need to be a mechanic. But there should be screwdrivers and pliers in the house. If it so happens that you cannot cope with hanging a shelf, it is better not to take on repairing the fittings. Otherwise, you can do everything yourself.
Installing a new handle
You can install another handle because the previous one is faulty, or if you want to have a better one. Whatever the reason for replacing the handle, almost anyone can handle it.
Step one - remove the plastic cover that covers the fasteners with a simple twist. Step two - unscrew the screws that hold the handle and remove it. Step three - place a new handle in place of the unscrewed one, and screw it in the same way as the previous one.
Please note that the ventilation regulator is installed in the same place. It simply locks under the handle. You can also replace this “comb” yourself.
When the handle is jammed with the window open
This situation is possible due to a part called a turn lock. The system is triggered when the plate or tongue in the locking mechanism is in the wrong position to avoid profile breakage.
This is perhaps one of the most common problems. It can occur when you don’t tighten the handle a little, or you decide to change the position of the window too abruptly. The skill to correct such a defect will be useful.
Blockers also differ depending on the brand. And it’s better if at least once you see how a master solves this problem. But the system is something like this: you need to press the protruding plate or tongue, and after aligning the sash, turn the handle to the closed window position.
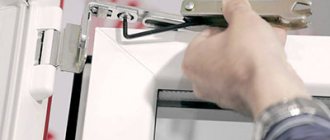
Installation of the comb (opening limiter)
Not everyone has a micro-ventilation function on PVC windows. In order not to open the sash completely, it is propped up with something heavy. A plastic window opening limiter allows you to do without such stands. This device consists of two parts - a bar with recesses and a pin. Because of its characteristic shape, the limiter is called a comb, clamp or crocodile. This is no longer a repair of plastic windows, but their modernization, but this operation can easily be done with your own hands.
This is what a PVC window opening limiter looks like
To install the comb on a plastic window, you must first remove the handle on the sash that you will use for ventilation (see above). A lock is put on the removed handle (look at the photo). It is unfolded so that it sticks out of the window sash.
How to install a ventilation restrictor on a PVC window
The handle with the lock is installed in place. Now you need to screw the locking bar. For it you will need two small screws and a drill with a 1.5-2 mm drill.
PVC window ventilation limiter installed
We place the bar on the window frame so that it “clings” to the protruding stopper. First we apply it, check if it works properly, put marks in those places where holes need to be drilled. You must drill carefully so as not to drill through the frame. Next we screw the bar. That's it, the comb (lock) is installed on the plastic window.
The handle is tight and/or does not reach the end
Before calling a technician and disassembling the fittings, lubricate the moving parts. Lack of lubrication can cause all the problems. Regular WD-40 purchased for the car will do.
But spare parts need to be worked out efficiently. Therefore, take lubricant with a special tube, or use improvised means such as a brush, syringe, or cotton swab on a stick.
Only if lubrication does not help, move on to heavy artillery - try to eliminate the sagging of the sash.
Step one - take a four-point hex key and find the hinges of the sash. Step two - tighten the screws in the hinges, bottom and top, if necessary.
Draws air into the seal area
The PVC window fittings include a part with which you can change the clamping force. This part is called an eccentric or trunnion, and working with it will help eliminate this problem.
Trunnions can be found on the frame, on its inside. It is located just opposite the handle, but can be hidden under the panel.
Step one - remove the cover and find where the hex key goes in (the same 4-piece), Step two - find a point or strip on the eccentric, Step three - insert the key, adjust the trunnions according to the principle: the mark indicates the degree of pressing more from the outer edge , less towards internal.
Application of plasterboard sheets
How to seal slopes using gypsum boards? There are several methods, but the most acceptable is the one that involves installation on putty. The process is:
- The work area is well prepared. No voids should be allowed. The polyurethane foam is cut off in advance.
- Measure the surface. It is necessary to obtain the dimensions for height and width. Considering that the slopes consist of three parts, each is measured individually. Although it would be much better to install the top part, and then, taking into account the new dimensions, measure the side sections.
- The measurements are transferred to the drywall. The necessary fragments are cut out.
- Putty is applied to their reverse side. They do this pointwise, capturing the edges and center of the element.
- The fragment is pressed to the surface and a support is placed. In a day, adhesion should occur.
- Perforated corners are applied and a layer of putty is applied. If required, other decorative material (tiles, stone, wallpaper) is laid.
Slopes made of plasterboard are excellent when the walls are lined with gypsum plasterboard. In this case, they can be included in part of the frame being built.
Do-it-yourself plastic window repair
Regardless of price and quality, mechanisms have a service life. The more active the moving parts, the faster the mechanism itself wears out. You need to understand this and be prepared to replace or repair individual parts.
The same applies to PVC windows themselves. We use them often, and some elements may malfunction or simply wear out.
In the window, replacement and repair may require: fittings, individual parts of the mechanism, locks, handles, etc.
A malfunction does not always equal calling an expensive specialist. If the breakdown is trivial, then you can easily handle it yourself.
Slope finishing options
When renovating an apartment in a new building or replacing windows, you will have to choose how to finish the openings after installing modern structures with double-glazed windows.
Window slopes can be finished using the following materials:
- plaster;
- drywall (gypsum plasterboard);
- gypsum fiber (GVL);
- plastic panels.
We recommend
Open type roller blinds.
Attaches directly to the frame, no drilling required.
Excellent protection from the sun and heat.
They don't take up space.
Many colors and sizes.
Price from 600 rubles for a complete set. Delivery is free from 3 days.
Lots of positive feedback. Verified seller! Read more >>>
We repair fittings
If you think about it, the most important part of a plastic window for us in everyday life is the handle. This is what we use most often, and this can lead to wear and tear on parts that we cannot see. Or the handle may be subject to external influence: burst, melt.
When there is a clear reason to buy a new handle, or you notice jamming and decide to prevent its complete failure, the old one will have to be replaced or corrected.
About fixing a wobbly but still working handle:
- Grasp the protective cap at the base of the handle along the edges,
- Turn the pad at a right angle,
- There you will see bolts that need to be tightened,
- Replace the cover.
Next, if you decide to add a new element:
- Complete the first two points from the previous list,
- This time, unscrew the bolts located there,
- Without brute force or sudden movements, remove the broken handle,
- Place the working element in its place exactly as the previous one was,
- Secure the handle with bolts and cover them with a plug.
If there are no problems with the handle, but the window sticks when opening:
- Remove the handle using the instructions above,
- Go over the parts with a rough brush, clean with a vacuum cleaner, do not use water, or, in extreme cases, glass cleaner,
- Treat the metal parts with neutral oil such as WD-40, you can use a brush,
- Replace the handle.
If the handle stops moving in the open or half-open position of the window:
- Find the lever plate under the handle, press it, or move it to the side,
- Rotate the handle to one of its original positions.
Remember that when buying PVC windows, you pay a significant part of the money for the fittings. Even if you don’t see these details when the window is standing, they will provide you with either comfort, warmth and high-quality work, or draft, dust and new expenses.
Is it possible to manage on your own?
Turning to professionals always guarantees full functionality of the PVC window, as well as the opportunity to re-apply free of charge if the problem arises again. Carrying out independent repairs of fittings is technically possible in the following cases :
When performing maintenance on mechanisms that do not involve major repairs.- If the technician has minimal experience working with PVC windows.
- If the exact cause of the malfunction is known, and the technician has the necessary tools and consumables at hand.
In such cases, you should also familiarize yourself with the detailed technological map. - When the warranty for window installation has already expired, and the next call to a specialist is paid according to the price list of the service company.
Simple repairs usually do not cause problems for a DIYer. Before carrying out maintenance or restoration of mechanisms, you should also watch several popular master classes from professionals who talk about various nuances during repairs.
How to carry out the process?
To carry out preventive maintenance and repair of PVC window fittings with your own hands, you must follow a certain technological map :
- If the sash is skewed, you should adjust the screws at the interface between the hinge mechanism and the plastic profile.
There are two screws installed on the top and bottom sides of the window structure, which are responsible for the play “right-left” or “up-down”. To select the desired position, it is necessary to rotate the screws no more than one turn, and then test the sash in the operating position. - If a large gap forms when the window sash is closed, the technician needs to set the handle to a diagonal position and open it simultaneously in two directions. The adjustment screw will be hidden behind the locking bar. The position is adjusted by turning the hexagonal screw using the appropriate L-shaped key.
- When the sash does not close, two problems may arise.
One of them is skew, the correction of which is described above. Another reason is the accidental activation of the blocking element in the corner part of the structure. If an element breaks, it must be replaced. In case of a false alarm, the part is removed to its original position by pressing the hand. - If problems arise with turning the handle, you need to check the grip design itself and replace it. The defect may also be hidden in too tight abutment of the blocking elements when closing. They are subject to adjustment by turning a screw located directly on their end part.
Important. One of the main problems with PVC window malfunction is loose fittings, which occurs due to the loosening of several fasteners. In such cases, it is necessary to tighten each self-tapping screw or screw until it stops.
We adjust the pressure and set up summer and winter modes
For tightness and good pressure, a seal is installed in the plastic window. Such an elastic band may perform its job worse during operation. Drafts, poor sealing, and too much audibility may occur.
The same problems can arise from external influences, such as temperatures. But the clamp in the plastic window can be changed:
- To do this, find an eccentric (trunnion) at the end - this is a cylindrical part, slightly moved forward.
- Turn the trunnions inside the window to increase the pressure, and outside to decrease it.
To adjust the clamp using an eccentric, you need to determine the brand of fittings. And based on this, get to work:
- If there is a recessed strip on the trunnion, turn it with a screwdriver,
- Having fixed it with your fingers or pliers, you can scroll it or move it.
It is recommended to work out eccentrics in this way even as part of prevention. This should be done approximately once every 6 months. This way you can monitor the condition of the seal and influence its wear.
Difficulties and errors
When performing repair work, beginners often make mistakes that can lead to serious damage and costly replacement of PVC window parts. To prevent this, every novice master must observe a number of nuances, which are mentioned by experts on online forums :
Before starting repair and restoration work, it is necessary to accurately determine the cause of the design defect.- Before adjusting the fittings, you should find out which screw is responsible for the specific direction of straightening the sash.
- If a rupture of a steel element is detected, it must be replaced, since welding will not be able to provide the original freedom of movement of the sash.
- Each repair must be accompanied by cleaning the metal from dust and lubricating the parts.
The main advice that experts give is that the design should be tested for normal performance. If a home mechanic is unable to repair the fittings with his own hands, you need to turn to professionals for help. Further intervention may completely damage the structure.
We repair other mechanisms in plastic windows
We often say that my window is broken. But, most likely, a separate part of it failed. And first of all, you need to figure out which mechanism has failed, and then understand how to replace or repair it.
Do not skimp on elements and parts of mechanisms. Their service life depends on their quality. Even if you decide to repair the window yourself, it is better to buy spare parts in a store where you will be advised.
And do not forget that PVC windows require minor but regular maintenance. And it’s not just the glass and window sill that you need to take care of. Treat moving mechanisms with neutral lubricant a couple of times a year.
Replacing the seal
One of the most common problems is blowing around the perimeter of the sash. There are several treatment methods. The first is to strengthen the pressure on the sash, which is done by adjusting the trunnions. If this does not help, the seal may have become inelastic and does not provide a tight seal. Then the repair of plastic windows consists of replacing the sealing rubber. It is installed around the perimeter of the sashes and on the frame of PVC windows and requires regular maintenance. In autumn and spring it should be washed, dried, and lubricated with silicone grease. But even under such conditions, it loses its elasticity over time and may even crack or tear. Changing the seal on a plastic window is very simple, but first you need to buy the right one. The fact is that different manufacturers have different profiles (see photo).
Forms of seals for the narthex and double-glazed windows of different src=»https://kak-sdelano.ru/assets/uploads/2016/05/remont-plastikovih-okon-11.jpg» class=»aligncenter» width=»840″ height= "624″[/img]
Using a seal of a different shape does not guarantee the proper degree of thermal insulation. If you don’t remember what brand your windows are, you can take the removed seal with you. So you definitely can't go wrong. So this time, repairing a plastic window begins with a trip to the store.
Please note that the seal must be whole - one piece. Composite of two or more pieces do not provide normal tightness.
The old tires are removed
First, remove the old gum. You can simply pull it with your fingers. If it doesn’t work, use something thin and sharp to pry it off. It will come out easily. Then the dust that has accumulated there will be removed from the groove.
Laying the new seal begins from one of the corners. Bring the new rubber band to the groove and insert it, pressing it with your fingers. Some effort is required, but not overwhelming. It will be more difficult in the corners. Here you need to try to lay it out evenly so that it does not wrinkle, but also does not stretch.
Install the seal from one of the corners
When the seal is laid around the entire perimeter, it can be trimmed. This is done with sharp scissors, and the joint is glued with good rubber glue. This is how easy it is to change the seal on PVC windows. Repairing plastic windows like this with your own hands takes about 20 minutes.
We repair window locks and locks
Now there are many models of PVC windows on the market, and in particular turnkey fittings. Such methods help to be calm when there is a child in the house.
These locks also require maintenance and can break down. Most often this happens when:
- The lock itself is defective or of poor quality,
- It broke due to external mechanical influences,
- It failed over time and became worn out.
And replacing one lock is much more reasonable and cheaper than completely changing the fittings.
Necessary tools for repairing PVC windows
Every self-respecting owner should have a small set of tools in order to carry out minor repairs around the house at any moment. To repair plastic windows you will need a small number of tools, such as:
- flat and Phillips screwdrivers for unscrewing screws;
- pliers;
- screwdriver with speed control;
- hammer with protective rubber pad;
- star and hex keys;
- Aerosol WD-40 for processing parts.
Rice. 2. Tools for repairing PVC windows.