Engraving is the ancient art of applying patterns, ornaments and inscriptions to various materials.
Currently, it is a very common way of designing and decorating various products, giving them specialness, sophistication and uniqueness. Engraving can be applied to different materials, the most popular of which are metal, wood, plastic, stone and glass. Initially, engraving was considered a part of jewelry; now it is a separate decorative process.
It is used to decorate various products - from small souvenirs to large interior items.
Engraving on glass, how to do it?
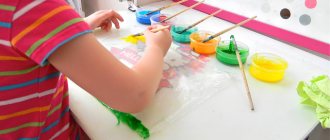
The easiest way is to use a special etching paste. It contains acid, which leaves matte marks when it comes into contact with the treated areas. This will allow you to create unique designs on any glass surface. Let's try to consider the option with dishes.
For work you will need the following materials and tools:
- glass etching paste;
- sponge brush;
- self-adhesive film;
- stationery knife;
- computer drawing;
- self-adhesive tape;
- scissors;
- glass with a smooth smooth surface.
The first thing to do is to stick a film that will protect the surface of the product from damage. Its edges should protrude a few centimeters beyond the drawing. Make sure that no bubbles form when gluing, because the design is applied on top of it. All unnecessary residues are removed along the contour of the selected stencil. Now it's time to apply the paste. To do this, take a brush, with which you carefully distribute the substance over the surface. The acid should not get into unprotected areas of the product; it will be impossible to correct the situation. You can remove the paste after 20 minutes, after which you need to rinse the product under running water. Then the stencil is removed and the residue is washed off.
As you understand, engraving on glass at home is not such a complicated process, which means that all you have to do is purchase the necessary tools and get to work.
How to drill glass?
It turns out that the need to drill glass does not arise so rarely. For example, if you need to attach a handle to it.
The right tool
Glass is drilled with a carbide spear-shaped or tubular diamond-coated drill.
It is best to use a special drilling machine, because installing the drill strictly vertically is not an easy task, in addition, the glass may burst due to pressure.
Technology:
- The product is placed on a soft lining, for example, rubber or carpet.
- Drilling is done in a water bath. To do this, the drilling area is surrounded by a plastic or rubber ring into which water is poured.
- You need to drill the glass halfway on one side, then turn it over and continue what you started.
Tips for Beginner Engravers
But engraving on glass using special tools is a very complex process that takes a lot of time and consists of various technological stages, however, if you want to try, here are some practical tips:
- Workplace lighting. It should be your main assistant, because only with the help of light can you constantly monitor the treated surface and ensure that the pattern is reproduced correctly. When engraving on glass, dust will constantly fly from under the bur, which settles on the product and interferes, so a simple lamp will not be very appropriate, because you will need to interrupt to clean its surface. The most successful option would be an LED strip that meets all the requirements.
- Engraver. Even if you are not planning to become a professional engraver, don’t overpay twice: it’s better to immediately buy a good tool and start creating with it. Among people who are engaged in this kind of work, engravers from German manufacturers are in great demand. They are considered the most suitable for quality work.
- Bors. To avoid wasting time and money, buy diamond options with a ball-shaped head of various diameters. They can be used to create any design.
- Workplace. Mechanical engraving is a noisy and dusty process. Remember this and try to protect others from unpleasant sounds and debris. Additionally, take care of the sound insulation of the table; place foam rubber between it and the object being processed, which will not allow the product to slide and reduce the sound.
Polishing and grinding attachments
As already noted, engravers are used to polish objects made from different materials.
Typically, for this kind of work, a felt nozzle , which is pre-coated with a special polishing paste, which acts as an abrasive component.
Polishing discs can be used for both rough and final finishing. They are also often used when there is a need to refine a surface that has an irregular shape.
To choose the most suitable paste, you must first determine the properties of the material of the product that needs to be sanded. To process a hard metal surface, for example, it is advisable to use pastes based on polishing powder and paraffin .
from diamond dust with various fractions of grains are perfect . They can very effectively get rid of scratches on glass and wooden surfaces and bring them to a perfectly smooth state. In this case, the most recommended powders are those containing diamond fractions 5/3 and 3/2.
Felt attachments for grinding can be used both when processing wood, metal, glass, and to equip drills in dental clinics or simple hand-held devices.
Work kits for professionals
The professional series equipment is represented by a separate category of attachments.
Good craftsmen usually have at their disposal sets of tools that differ in design, materials of manufacture, and shape of the working part.
In most cases, such kits consist of the following components:
- Various cutters for engraver.
- Abrasive, diamond and felt nozzles.
- Drill, thanks to which the installation can be used as a drill.
- Cutting discs.
- Wire nozzles used to clean the surface from dirt and corrosion.
All these components of the kit allow a specialist to carry out accurate and high-quality work on even very small parts. To do this, of course, quite often it is necessary to change the tools used to select a more suitable equipment option for a particular situation.
But the end result is worth it. The presence of a large set of masters is often evidence of his professionalism and experience.
DIY glass engraving
Mastering how to work with an engraver can be compared to learning to write at school. The first thing you need to do is learn to write words, then texts, and only after that start reproducing drawings. First, you need to get used to the device, understand how it works and what it can do. To begin with, it is better to exercise for up to 2 hours every day for a month. During this time, you should achieve certain skills and draw smooth lines with ease. You can gradually change the thickness of the strokes (to do this, go over it several times).
Need building materials?
no common phrases or standard advertising texts
automatic selection of the best offer
statistical summary of offers from all suppliers
On this topic:
Other interesting publications:
Support the project, share with friends!
Let's move on to practice: how to decorate glasses?
Engraving on the glass of glasses is carried out using the following materials:
- engraver;
- champagne glasses;
- paper;
- pencil;
- adhesive tape;
- Swarovski crystals or beads for decoration.
Draw the desired pattern on paper or print a ready-made one. Secure with adhesive tape and use an engraver to mark the outline of the image. Using the side surface of the nozzle, paint over the outline and gradually get rid of the resulting dust. If you like a picture in a frame, you can make it using an oval stencil. Now you can stick on crystals or other beads of your choice. The gift is ready, you can present it.
Homemade attachments for engraving machines and drills
For simple engraving work in a home workshop, you can make a cutter, cutting disc, grinding and polishing wheels yourself. As a simple cutter to equip an engraver or drill, you can use a grooved wheel from a regular lighter or a dowel, on the head of which working teeth are cut. Making a working attachment for grinding or polishing is also quite simple: for this you can use a wooden drum with a shank, sandpaper glued to the side surface of it.
Many homemade attachments for an engraving machine (if they are used to perform not too complex work) perform well, and the cost of their production is minimal.
In terms of functionality, the use of an engraver is in many ways similar to the operation of a grinding machine or drill. But there is one important distinguishing feature - it is used for processing miniature parts.
Thanks to the use of this device in combination with a set of attachments for the engraver, it is possible to perform such technological operations as grinding, milling, drilling, engraving, etc.
Laser engraving
As you know, glass is a fairly fragile material. It is not difficult to break it, the slightest effort - and a crack appears. In this regard, laser engraving on glass is the most suitable option for processing it. The laser beam will allow you to delicately apply the desired image to the surface and will not damage the product itself, and the process itself will not take much time. This type of engraving will most accurately convey the plot with a large number of small details. The process is fully automated, so any errors in the work itself are excluded. What is he? Essentially, this is spraying the outer surface layer of a product using special equipment. It is thanks to the laser system that you can capture the smallest and subtlest details of a sketch, which is inaccessible to other methods.
It is noteworthy that laser engraving can be done both on the outer layer and on the inner one. These methods are significantly different. When engraving internally, two beams are used at once, which heat the glass, forming bubbles, which create the pattern. The program allows you to adjust the direction of the rays, which gives free rein to your imagination. If you watch the creation of such a drawing, you might think that you are in a fairy tale. This engraving does not fade or wear off over time, which means it will please you for a long time.
What kind of glass can be processed with a laser engraver?
Cheaper cast glass is easier to engrave due to its low lead content. The result is a more uniform structure.
Expensive hand-blown glass or crystal may be subject to stress on the material, exacerbated by heat during laser engraving, which can lead to cracks.
CO2 laser
The equipment processes window glass, mirrors, glasses, glasses and bottles.
In addition, mirrors can be processed using a fiber laser
, which only removes the reflective layer on the back of the glass.
At the same time, the fiber laser itself does not engrave the glass.
We decorate the decanter and glasses using glass engraving technique
1. Diamond tip engraver No. 9929-DREMEL ENGRAVER.
2. Drill (engraver) - I have this FIRSTPOWER.
3. 6 kinds of engraving diamond bits for drill.
a) cylindrical 1mm diameter fine fraction;
b) ball 1mm diameter fine fraction;
c) oval with a narrowed end 2.5 mm, tip 1 mm fine fraction;
d) ball 3.5 mm average fraction;
e) ball 2.5 mm average fraction;
e) ball 3 mm coarse fraction.
4. A sheet of paper, tracing paper, pencil, glass marker.
5. Alcohol, can be diluted 50%.
6. Cotton pads, napkins.
7. Glass decanter, cup (you can use any homogeneous glass object).
8. For safety while working, you need to use a dust mask and goggles.
We select a design that we want to engrave on the decanter (we come up with it ourselves or find a suitable one), create a sketch on paper (in this case, I simply traced the decanter with a pencil on A4 paper, then applied the design I liked and added something of my own).
We transfer the drawing to tracing paper and cut out the image of the decanter along the contour.
Then use tape to attach the tracing paper to the surface of the decanter. It is important that the tape does not touch the contours of the drawing!
Using DREMEL ENGRAVER we transfer the design to the surface of the decanter. We pass the engraver along all the contours of the drawing, without missing details. It is important to start tracing with the details that are inside the image of any object in the sketch, since after tracing this detail may fall out of the picture (it will be cut off with a cutter).
We remove the tracing paper from the bottle.
This is what happened - we have a clear outline of our drawing.
In order to clearly see the outline on the glass, take a dark soft cloth and cover the working surface of the table with it. Now it will be easier to continue working.
At the first stage we will need attachments for the drill:
d) ball 3.5 mm average fraction for large parts;
e) ball 2.5 mm average fraction for smaller parts.
Using a drill, we process the surface in the drawing in places where we think the image should be the lightest.
Comparison table of characteristics
In order to better understand which of the presented engravers is better, let’s resort to a table where we compare the characteristics of all models:
| Power, W | Working surface, cm | Dimensions, cm | Weight, kg | |
| KKMOON Engraving Machine | 3000 | 80x80 | 155x166x143 | 0,56 |
| Moski-MSQ Laser AS-5 | 1500 | 140x200 | 320x300x210 | 3,5 |
| Wolike Mini 3000mW | 3000 | 500x650 | 790x70x110 | 4,9 |
| Neje DK-8-KZ | 1000 | 90x90 | 198x160x146 | 1,7 |
| Moski-MSQ CNC-2418 | 500, 2500, 5500 | 240x300 | 400x310x210 | 6,0 |
| Vassal 5065 | 1000 | 500x650 | 670x410x110 | 4,5 |
| Feungsake PD271 | 1500 | 1000x1000 | 2800x3200x 230 | 3,6 |
Master class on glass engraving at home with step-by-step photos and training videos
A master class on engraving yourself quickly and easily on glass is quite a useful thing. Because, having mastered this subtle and elegant art, you can discover a whole world of airy and elegant inscriptions and drawings. Again, new opportunities open up - from the fact that you can delight your family and friends with original and interesting gifts, and ending with opening your own business. You can decorate wedding glasses with your own hands, make a memorable inscription on a vase, and much more.
Consider a step-by-step master class on do-it-yourself glass engraving
Glass engraving at home can be done in two ways - mechanical and chemical. The mechanical method involves deforming the top layer of glass using a special engraving tool. As a rule, sets with an engraver include many attachments, changing which you can create real masterpieces on glass.
It is better to apply engraving lines in one direction - at least along the contour. If we are talking about a surface being shaded, then the completeness of the picture depends on the direction of the hatching. By changing the direction of shading and nozzles, you can achieve a play of shadows and light in the image.
For chemical engraving, a special etching paste is used, which also deforms the top layer of glass and leaves behind an even matte mark. This option is suitable in cases where you need to create a continuous pattern without transitions or thin lines.
When engraving on glass, you must wear a protective mask and safety glasses. The finest glass dust can cause serious injuries. If dust gets into your eyes, you should never rub it, you need to put in eye drops and immediately go to the doctor, otherwise there is a risk of losing your vision.
In addition, many masters recommend working “wet”. That is, after the drawing is transferred to the glass, it is moistened with water, and only after that they begin to draw lines with an engraver.
When working with etching paste, you also need to take care of your health. You need to work not only in a mask and glasses, but also in gloves. The room must be equipped with an exhaust hood or very well ventilated. You can remove remaining paste in stainless steel dishes, because porcelain or enameled cast-iron utensils will be irreparably damaged.
You can use any drawings you like as templates or stencils. However, for beginners, it is better to choose images that do not have small details or details that require complex shading. Simple, laconic drawings, monograms and geometric designs will be an excellent trainer and will allow you to quickly improve your skills.
Also, for the first works, you should not take thin glass, but experiment with thick-walled jars, old window glass and similar planes. It will be possible to handle thin-walled glasses when the hand itself knows and understands the force of pressing on the instrument.
To work you will need:
- engraving paste
- brush
- stationery knife, scissors
- glass
- self-adhesive polypropylene film
- drawing
- masking tape
- gloves, mask, glasses
- alcohol and cotton wool
First step. Degrease the surface with alcohol. Cut a piece of film larger than the design by at least 3 cm on each side. Glue it onto the glass, smooth it carefully, it is important that there are no bubbles. Place the design on top of the film and secure it with masking tape. Using a utility knife, carefully and evenly press the blade to cut out the image so that it is cut into the film. Remove the paper, masking tape and cut out inner film. The stencil is ready.
Second step. Gently apply etching paste to the stencil with a brush and distribute it evenly. Leave for ten minutes, then remove the excess with the same brush (you can put it back in the jar, the paste will not lose its properties). After another ten minutes, wash off the rest of the paste and remove the stencil. The engraving is ready.
A wide range of stencils are available for sale, but this homemade option is also perfect for training. For beginning engravers, we can advise using large images, and only then moving on to more detailed ones.
To work you will need:
- engraving kit
- glass
- drawing
- water, sponge, mask, goggles
- alcohol and cotton sponge
First step. Degrease the surface with a cotton sponge soaked in alcohol. After this, you need to apply the design to the glass. This can be done with a marker, or by attaching an image to the inside of the glass. Alternatively, the image can be applied to tracing paper and attached to the outside of the glass. After this, you need to wet it evenly.
Working attachments for grinding and polishing
An engraving machine, as mentioned above, can be successfully used for fine grinding and polishing of products made from various materials. A roller cutter made of felt is used as a working attachment to perform such technological operations. Since felt does not have outstanding abrasive qualities, such a tool is used only in conjunction with special polishing pastes.
Polishing discs can be used for roughing or finishing, as well as for finishing irregularly shaped surfaces
The choice of polishing pastes of a certain type, which differ significantly from each other in their characteristics and chemical composition, depends primarily on the properties of the material that will be processed with their help. Thus, grinding of hard metal surfaces is performed using pastes based on paraffin and polishing powder. Special polishing pastes based on diamond powder of various fractions are intended for work on wood and glass. With their help, you can not only effectively remove scratches from the surface of wood and glass, but also bring the product into a perfectly smooth state. Experts recommend giving preference to those in which diamond powder has a fraction size of 3/2 and 5/3.
Accessories such as felt grinding attachments for working on wood, metal, glass and other materials are successfully used not only in conjunction with a specialized engraving unit: they can be equipped with a dental drill and simple hand-held devices.
Replaceable sanding attachments
Glass engraving - methods and subtleties of art: Review + Video
Engraving is the ancient art of applying patterns, ornaments and inscriptions to various materials.
Currently, it is a very common way of designing and decorating various products, giving them specialness, sophistication and uniqueness. Engraving can be applied to different materials, the most popular of which are metal, wood, plastic, stone and glass. Initially, engraving was considered a part of jewelry; now it is a separate decorative process.
It is used to decorate various products - from small souvenirs to large interior items.
Diamond burs for engraving work
The most popular types of working attachments used to complete engraving installations include diamond burs for engravers. The base of such a tool is made of tool steel, and diamond powder is applied only to their working part. The mechanical characteristics of diamond powder make it possible to successfully use the attachment for processing hard materials such as steel, ceramics, glass, artificial and natural stones.
Expensive dental diamond burs have a long service life
Diamond burs (or cutters) are used primarily for finishing shaped holes. As a rule, diamond consumables for engravers are sold in whole sets of 10–20 tools of various shapes and sizes. When working with them, you should strictly follow the rules of their operation so as not to damage the diamond coating. The standard shank diameter of diamond-type engraving bits is 3 mm.
Basic methods of engraving on glass
- — Manual engraving is a labor-intensive, time-consuming, but delicate process, performed exclusively by hand by a master engraver using special equipment - a hand pantograph. The basis of the process is the hands of the master, conveying the mood and character of the product. Hand engraving results in a unique piece of art. Of course, this type of engraving is the most expensive.
- — Laser engraving is the most common type of engraving, in which an image is applied to an object using a special laser beam.
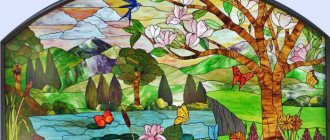
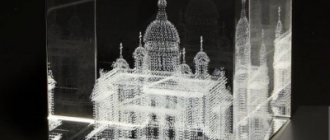
The process is actively used in production, it is fully automated and allows you to perform very complex and delicate work. It is this type of engraving that makes it possible to create a three-dimensional image inside a glass product (3D engraving), which is very popular nowadays.
- — Sandblasting is a method of decorative treatment by exposing the glass surface to an abrasive material (a jet of air with sand under pressure). The sandblasting method allows you to obtain a three-dimensional image on a completely matte surface or apply a matte pattern of any complexity to glass. The technology is used mainly for application to flat surfaces, decorating products and interior structures.
Working attachments for professional engravers
A separate category of working attachments that engravers are equipped with are professional series tools. Specialists for whom working with an engraving machine is their main activity, as a rule, have at their disposal entire sets of various attachments that differ in the material of manufacture, design and shape of the working part. If we talk about the most typical composition of such a set, then it necessarily includes:
- cutters for engravers of various shapes, sizes and designs;
- drills that turn the engraving machine into an effective drill;
- diamond, abrasive and felt rollers;
- wire nozzles, with the help of which they clean the treated surfaces from traces of corrosion and other contaminants;
- cutting discs for engravers, which are quite difficult to purchase individually.
Read also: What is the name of a mason's hammer?
For professionals, each attachment is designed for a specific operation.
The presence of such a capacious set of tools for a specialist who uses an engraver in his professional activities is explained very simply. Often, high-quality and accurate work on the smallest details on the surface of the workpiece is not possible only with a milling cutter, a cutting disc for an engraver, and other tools of the same size. That is why, even within the processing of one product, tools often have to be changed, choosing attachments suitable for performing a certain technological operation.
In addition, the presence of a specialist set of tools, which includes drills, cutters, cutting wheels for engravers and cutters of many other types, is an indicator of professionalism and indicates that this is an experienced person who is good at his job. Craftsmen who constantly work with engraving devices choose expensive sets of tools from the professional series for another reason that it is quite difficult to purchase individual tools from such sets (in particular, a cutting wheel for an engraver).
Special holders allow you to quickly change the necessary attachments
Engraving techniques are constantly improving
Modern technologies make it possible to simplify and speed up the process of applying an image to glass.
3D engraving is a new type of laser engraving in which a three-dimensional image is created inside the glass space, formed using many volumetric dots obtained by the intersection of two lasers. 3D engraving is actively used in the manufacture of souvenirs. Engraving a photo inside a glass figure has become especially popular.
Among glass souvenirs, bottles, glasses, cups and anything with a glass surface are common. When making an engraving, you can engrave both the entire product and part of it on glass. Glass souvenirs with engraving are interesting products that can become an original and creative gift for any celebration, helping to emphasize the attitude towards the recipient, or simply can be a beautiful thing in the interior of a home or office , giving the room a special style.
Engraved glass products do not require special care. When they become dirty, they should be wiped with a damp cloth using glass and mirror cleaners. No need to use abrasives!
Glass engraving can also be done at home, but it should be noted that high quality images in this case are extremely difficult to obtain, especially for beginners. Where should I start? First you need to choose the design for engraving, the item to be decorated and the method of work.
What to look for when choosing
When choosing a device, first of all, you need to decide on the purpose of the machine and what materials will be processed. Even if you don’t intend to process metal or plastic at first, you should give preference to models with advanced functionality in order to be able to be widely used in the future. It would be useful to have a cooling system - this way the device can work longer without the risk of damage due to overheating. Also, do not chase power - it makes practical sense to choose a device with lower laser power but greater accuracy.
There are two ways to engrave glass at home
- - chemical - a type of engraving in which the surface of the material is exposed to various reagents that destroy silicon compounds. It involves frosting the glass, or applying a matte image to the glass surface.
- - mechanical - performed using a drill with a diamond attachment. Depending on the strength and quality of the material being engraved, a dry or wet method is used, the difference being the presence of water in the process.
What is it for? When operating the device on a thin or fragile surface, there is a risk of glass breaking due to overheating. To avoid this, water is supplied dropwise to the engraved surface through a tube, which cools the material being processed.
The dry method is considered more common, but very dirty, as it leads to the formation of a large amount of glass dust, so it is especially important to protect your eyes and respiratory organs when working, using a transparent mask and a respirator.
Main features of nozzles
The tool is designed for finishing a fairly large number of various materials. They can process ceramics, wood, glass and plastic products, and hard steel.
To work with each of them, different nozzles with different design specifics are used.
Today, specialized enterprises offer a wide range of different attachments necessary for carrying out operations with this tool. Their design contains two main components:
- the working part that performs the main function when interacting with the product being processed;
- a shank that secures this element in the equipment socket.
When choosing this device, pay attention to certain points: the technological goal that needs to be achieved, and the material being processed, or more precisely, its characteristics.
In addition, take note that some engraver models are equipped with collet chucks. Only certain brands of attachments are suitable for them. To use such equipment, you must additionally acquire universal collets .
The use of diamond burs in engraving
Among the most popular types of attachments included in professional kits are diamond burs. The basis of such equipment is made of tool steel.
In this case, the working part is coated with diamond powder . Thanks to the latter, the device is capable of quite successfully processing steel, glass, ceramics, natural and artificial stones.
The use of diamond burs is most advisable if there is a need to refine a shaped hole. They are most often sold in sets of ten to twenty pieces , differing in shape and size.
The operation of burs must be carried out in compliance with certain rules that help prevent damage to the diamond coating. Standard models are equipped with a shank with a diameter of three millimeters.
How to engrave on glass with an engraver?
Engraving: where to start
Are you planning to get into engraving? Whether you want to spice up everyday items or give someone something special, engraving is the best choice: the result of decoration is a practical yet unique item. In this beginner's engraving guide, we'll walk you through everything from choosing the right materials to choosing the right Dremel attachments, so you can get started on your engraving project in no time.
Choose the right engraving attachment
There are three main types of engraving bits:
High Speed Attachments – A variety of attachments that are well suited for engraving, machining, grooving and rabbeting. For engraving soft materials such as wood and leather.
Engraving cutters – also suitable for small jobs, especially on soft materials. Processing wood and plastics, as well as soft metals such as brass.
Diamond-coated circular bits are designed specifically for precision work. They are coated with diamond particles, making it easy to engrave hard materials such as glass.
Find the right attachment for your engraving project
Attachments will help your project run more smoothly. The flexible shaft attaches to your Dremel in seconds, and the 127mm cable adds convenience and flexibility to use. The tool is almost weightless - which is very convenient for engraving, for example, on a glass. The next attachment is a comfortable handle that fits any rotary tool with a threaded tip. It transfers the weight of the tool into your palm, improving the tool's balance and control—especially useful for precision work such as engraving, carving, etching, and polishing.
Choosing a material for teaching engraving
If you are just learning engraving, it is better to choose something softer. Why? These materials make Dremel tools easier to control, meaning they are better suited for beginners. Metals like brass and copper are the softest (put away that titanium watch until you get more experience!). Soft materials also include leather, plastics and wood.
When choosing an object to learn how to engrave, it is important to consider more than just the material. Consider not only the softness of the material (such as soft metals, leather or wood) but also the shape of the surface. Best form for beginners? Any flat. In this case, you don't have to think about angles or constantly move the object or tool. You just need to focus on the feel of the tool when engraving - as is usually the case with beginners. Glass coasters, metal plates, and wooden cheese boards are good places to start. Other? Leather phone case. See our step-by-step instructions here.
Follow relevant safety regulations
Now that you've selected your tools and engraving surface, you'll probably want to get started quickly. But before that, you should remember about safety precautions. Protect your hands with leather gloves; Not only will they prevent cuts and scratches, but they will also be more resistant to wear and tear. Goggles and a respirator are also necessary for engraving - you don't want glass or metal chips getting into your lungs or eyes. If your antique serving platter shows signs of rust, remove them with an engraving tool. Rust particles are harmful to health.
Brief overview of brands
Today, finding engravers and working attachments to equip them on the domestic market does not present any problems. At the same time, the variety of equipment and tools available for free sale allows you to choose them to suit your needs and financial capabilities.
Professional grade attachments
Those craftsmen who engrave wood, metal and other materials at a professional level and already have the appropriate equipment at their disposal should pay attention to working attachments produced under the Dremel and Dexter trademarks. The high cost of such equipment for an engraver is fully justified by its exceptional reliability and durability. Another important advantage that a milling cutter, cutting wheel, drill, as well as any other tool of these brands has, is high processing accuracy.
High-quality consumables are purchased by both professionals and home craftsmen who respect their craft.
When choosing Dremel or Dexter working attachments, keep in mind that one such tool can last as long as 10 Chinese-made attachments. The fact that in the assortment of these companies you can find nozzles of various purposes and standard sizes speaks in favor of purchasing fairly expensive but high-quality products from well-known manufacturers. So, these can be various cutters for a drill or engraver, drills of different diameters, disk tools, as well as any other types of cutters designed for working on wood, metal, ceramics, and glass.
Cheap, but decent quality attachments are offered by the domestic manufacturer. At affordable prices you can purchase sets of attachments, including up to 180 tools of the most popular types, designs, sizes and shapes. These sets contain tools for drilling, cutting discs for a drill or engraver, milling attachments, diamond and abrasive cutters, and much more.
All attachments included in the Zubr brand set are placed in a plastic case, making it easy to both store and carry to the job site.
Nozzles from Chinese manufacturers
There are two opinions about Chinese-made nozzles. On the one hand, their quality and reliability are in question, on the other hand, they cost significantly less than branded equipment. A Chinese milling attachment for an engraver, a cutting disc or a drill bit for drilling will not last long, but it won’t be such a shame to throw them away, given their cost. If a professional works behind the engraver, then even a cheap Chinese cutter will not prevent him from doing the job efficiently (although he will have to change such a tool more often).
Chinese attachments for a drill or engraver can be recommended to beginning engravers, who can use them to acquire their first skills in this matter.
Affordable prices of Chinese attachments allow beginning engravers to purchase large sets “to try”
LiveInternetLiveInternet
—Categories
- Textiles. Various ideas for working with materials (868)
- Rag rug or what can be made from old things (275)
- Sewing (175)
- Teddy bears (120)
- Leather (97)
- Clothing designers, fashion (57)
- Fabric flowers (48)
- Batik (33)
- Indian patchwork (11)
- Soutache (7)
- Knitting (854)
- Spokes (502)
- Hook (244)
- On the fork (9)
- On fingers (7)
- Furniture and everything related to wood (518)
- Wood carving. (96)
- DIY furniture (65)
- Wood painting (38)
- Birch bark (31)
- Sawing (30)
- Burnout (13)
- Leaf products (12)
- Furniture of the 21st century. (12)
- Screen (12)
- Products made from matches (7)
- Art Nouveau. Furniture and craftsmen (5)
- Art Deco. Furniture and craftsmen (1)
- Home renovation and design (517)
- Interior detail (148)
- Interior (123)
- Mosaic (93)
- Interior painting or frescoes (42)
- Stained glass (39)
- Cleaning and means for it. (36)
- Everything from garbage (16)
- Cooking (450)
- Baking (173)
- All meat (91)
- Blanks (41)
- Drinks (18)
- Korean dishes (13)
- Soups (12)
- Salads (10)
- Milk and dairy products (10)
- Fish (5)
- Sauces (5)
- Embroidery (434)
- Beads (80)
- ribbon embroidery (41)
- Cross stitch (24)
- Satin embroidery (10)
- All made of paper (291)
- Papier mache (60)
- Cardboard (36)
- Corrugated cardboard (7)
- Arte Francese (4)
- Paper mosaic (4)
- Weaving (227)
- Macrame (36)
- Wire (24)
- Wicker furniture (8)
- Notebook (217)
- Painting (186)
- Modeling (177)
- Plaster (78)
- Cold porcelain (20)
- Salt dough (7)
- Art history. Cultural studies (168)
- Philosophy Stars (3)
- Art (157)
- Watercolor (32)
- Health. (150)
- Felt (140)
- Cottage.Garden.Vegetable garden (100)
- Stories from life. Life in France (46)
- Plastic and everything made from it (43)
- Introduction to Drawing (42)
- Eggshell carving and embroidery (30)
- Sculpture (30)
- Metal. Working with it (18)
- Candles (16)
- Glass.Working with it (13)
- Bone (8)