With a competent approach to work, the canopy over the porch can make a stronger impression than the building itself; it complements and emphasizes the style of the house, contributing its share to the overall ensemble. It should be remembered that the canopy over the entrance plays not only a decorative role. This structure performs a number of practical functions related to issues of comfort and safety of people, protection of load-bearing structures and the entrance group from the negative influence of the environment. To make a canopy over the door, you need to familiarize yourself with the properties and structure of this design.
Why do you need a canopy over the porch?
- Installation of a canopy is considered an integral part of the entrance group. A well-executed design significantly improves the exterior of the structure;
- The canopy protects the front door and its decoration from snow, rain, and fading from sunlight;
- The protective function of a visor is also necessary for a person - here you can hide from rain, hail, and the sultry summer sun. Additionally, it creates security for the home owner during a long stay near the door, at the time of opening or closing it in inclement weather. Often, debris rolls off the roof, snow melts, ice and icicles fall off the roof structure, from which the visor reliably protects!
Choosing a roof for a canopy
Another important point is the choice of a protective coating that will perform the task of protecting the area under the canopy from rain, snow, hail and other atmospheric phenomena. For a single-pitch, gable or hip structure, you can use almost any roofing material. Usually it is matched to the covering of the main roof of the house. If metal tiles have already been installed, then it makes more sense to use it for the canopy.
Keep in mind that a canopy, despite its small size, is another type of roof. All additional roofing elements must be installed during its construction. If necessary, you can install a drainage system to drain rainwater.
It is also worth considering possible loads on the frame, therefore, when using heavy roofs (for example, ceramic tiles), you need to select bars with a larger cross-section (about 100x100 mm) and appropriate fastening of the structure to the wall. You can also use metal elements as supports during construction.
Standard visor options
- Construction – steel, wood, plastic, concrete, forging, cast iron, combined materials;
- Covering materials – corrugated sheets, metal tiles, polycarbonate, glass, plastic, awning, slate, soft roofing and others!
Today, polycarbonate canopies based on a steel structure are more popular. They are durable and noticeable in the exterior design of any structure, but the pricing policy for such products is always above average!
The main advantages of modular canopies
Modular visors have undeniable advantages:
- The design is lightweight, compact in size, and can be installed quickly and easily. It has removable sections, which allows you to assemble such canopies from a variety of materials;
- The canopy is durable, as it has a three-layer structure, it can withstand changes in temperature, the adverse effects of precipitation and perfectly protects the window opening;
- Canopies of this type can be installed both in private houses and over the windows of apartment buildings;
- Installing such a canopy in an apartment building does not require special permission.
Classification by installation type
- Support models are the most reliable, durable and stable, as they are based on columns, pillars, racks;
- Cantilever canopies - these models are mounted on the surface of a wall structure on special mortgages. They have good strength, safety and load-bearing capacity;
- Suspended structures are ready-made systems that are mounted directly on the walls, creating a load. Hanging canopies are manufactured with the mandatory requirement of their own strength combined with low weight!
The most practical option is considered to be the support model of the canopy, since on the basis of this design many additional accessories and elements of the entrance group can be installed. Also, it becomes possible to quickly add a warm vestibule at the entrance to the house. And this is additional space for storing clothes and shoes, as well as a warm room to cut off cold air from the street!
Types of products
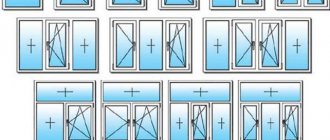
Previously, we talked about the fact that there are many different canopies located above the entrance of a residential building. To choose the right one, you should find out what they are. To decorate the entrance, there are the following types of design:
- Spherical or dome. The advantages are as follows: the design has the smallest surface area compared to other types. Dome visors have no corners. These factors allow you to save on material. Due to its shape, the visor is well-flown with air, which is useful in areas with strong winds.
- Concave. An original design, which is mainly the highlight of the entrance. The shape of the canopy allows snow and precipitation to slide off without obstruction.
- Arched and semi-arched. Good drainage is ensured. It has increased resistance to stress, which is important when snow falls. Low material costs.
- Single-pitch. Simplicity of design, ease of installation, low material costs. Water flows only from one side.
- Gable. Thanks to the stiffening rib, they have a higher degree of strength than that of single-pitch structures. Water flows freely from both sides. They go well with a building that has the same roof.
- Flat. Simplicity of design. Most often used for growing greens. Water can accumulate on the surface, which is beneficial for vegetation. The material used is glass.
It is clear that not everyone will fit into the entrance of the building. It is important that the approach to it is completely protected from both the sun and precipitation. The dome shape will not work in this case. Concave, single-slope, gable and flat structures look much better.
Note! It is also important to consider where the water will flow. To prevent puddles from forming under the entrance, you can build a drainage system. All liquid must be directed to a special tank or drainage system that the building has.
Visor components
Regardless of the type of system, the method of mounting it on the wall, as well as the cost and standard size, each canopy consists of the following elements:
- Frame base on which additional elements are installed:
- The roofing structure is a direct outer covering, protection from bad weather, the basis for absorbing all kinds of loads, as well as a decorative element;
- Accessories for fastening elements together, making adjustments, mounting the system on a flat wall!
Useful tips and general recommendations
A few simple recommendations that will help you build a canopy over your porch yourself:
- Correctly calculate the size of the structure and the need for materials, prepare the site for assembly, think about safety precautions and invite a friend to help. A mistake at the first stage of design can lead to disappointment and a lot of wasted time and money.
- To install the roof firmly, use self-tapping screws with press washers.
- Fit the frame elements tightly to each other using connecting elements. The most reliable fastening when installing brackets is anchors. Metal spacers are suitable for brick walls, chemical ones - for aerated concrete.
- If you use soft tiles for the roof, prepare a solid base. For metal profiles and polycarbonate, the distance between the lathing can reach 50 cm, because such flooring does not bend under the weight of precipitation.
- Attach the frame to a load-bearing wall, and not to facade systems, finishing or insulation.
- At the same time, include calculations for the blind area into the development of the project so that the flowing water is drained away from the foundation.
- When choosing materials, consider the architecture and color combination with the overall style of the cottage.
On the construction market you can find a ready-made base for a canopy. The product was created using professional equipment and coated with compounds that prevent its destruction under different weather conditions. Each model has its own style and high-quality design. Installation of such a product is carried out according to instructions that even a person with little construction experience can understand.
Which canopy to choose for installation above the entrance to the house
First of all, you need to choose the right material from which the structure will be assembled. It is necessary to compare ready-made systems offered by manufacturers, as well as components from different manufacturers. It's important to consider durability, practicality, design options, and DIY installation! But first, start from the following requirements:
- Durability;
- High degree of resistance to atmospheric influences;
- UV resistance;
- Strength, both in compression and in bending;
- Resistance to various deformation loads;
- Heat resistance, frost resistance and fire resistance;
- Plastic;
- Maintainability;
- Practicality of application;
- Possibility of improvement, modernization;
- Reasonable cost;
- Nice design!
Due to such qualities, many materials for assembling the structure, their colors, standard sizes and other characteristics, today you can choose a canopy of any format that is exactly suitable for protecting the porch of your home, office building, retail outlet, exhibition salon!
Wooden door canopy
Owners of buildings made in a rustic style should pay attention to wooden canopies. They have a frame made of wood. Slate, roofing felt or tiles are laid on it. There are also completely wooden sheds. But we must take into account that wood is susceptible to swelling and rotting, and attack by insects. Therefore, it is important to additionally treat it with protective compounds. Wood is a malleable material. You can make a visor of any shape from it. It is decorated with carvings. Painted in different colors.
How to install a canopy over a porch with your own hands
First of all, you need a schematic sketch of the project, measurements, markings on the plane, selection of materials to implement the idea. Everything is strictly individual, depending on visual perception and the need to protect a certain space. Width, offset - everything is determined only by a special case, depending on the size of the doorway, the type of porch and other requirements for equipping the entrance group with a canopy.
A canopy made of steel and polycarbonate is considered a practical and reliable option. Therefore, we will focus on it, despite the fact of its high cost!
Metal roofing
Metal tiles are produced by different companies, but their maximum dimensions are almost the same: length 3650 mm, width 1190 mm and wave pitch from 30 to 40 cm. Metal tiles are a strong and durable roofing material. Metal tiles, like corrugated sheets, should only be cut with saws or cut with metal scissors.
Canopies made of metal tiles photo
Canopies over the porch made of metal tiles begin to be laid from any edge of the bottom row. Docking in one row is done on one upper wave, and joining between rows is done by overlapping the top sheet onto the bottom sheet by about 15 cm. The sheets need to be fastened to the sheathing with hexagonal roofing screws in pre-drilled holes for them. You only need to drill 5 cm below the ridge so as not to deform the sheet. The fastenings of the metal tiles to the sheathing should be staggered every two tiles, both horizontally and vertically.
Installation of the frame part of the visor
A steel pipe of different parameters and section thickness of the metal itself is well suited for the frame. The configuration of the material is determined by the loads, but also by external data. This is a fairly light option, therefore, even in view of the increased strength, it is not worth using a 60x60 mm or 80x80 mm pipe, which can withstand up to several tons of weight per meter span. As a standard, the visor is a system measuring about 1200x600 mm. Therefore, taking into account snow loads, a profile pipe of 20x30x1.5 mm, 20x40x2 mm is sufficient. If the structure is large, the material parameters can be increased!
- The main frame is a U-shaped structure, and it is mounted on the wall. Taking into account the specified dimensions, the horizontal carrier is attached at a set height above the entrance using 4 anchors. Two fasteners along the edges, with a distance of 50-80 mm from the ends of the pipe, and another pair of fasteners with an equal spacing between them;
- Next, vertical posts are attached, welded to an already fixed horizontal carrier. One additional anchor is sufficient here. If the structure is more massive and heavy, the frame material, as well as the number and characteristics of anchor bolts are calculated individually, taking into account the total weight of the canopy and possible snow and wind loads;
- Having received the base, you need to create a frame for the extension of the visor, as well as jumpers - stiffeners, which are also full parts of the frame. They are welded on site, or pre-welded on the ground. Different assembly options are possible, and they depend on the weight of the metal and the convenience of the installers!
The finished frame is a load-bearing structure with supports on the wall to evenly distribute loads, as well as a plane for installing the covering!
Where to start: preparatory activities
Before erecting a canopy, analyze the factors that may affect the choice of materials and structure design:
- Climatic conditions. It is necessary to take into account the maximum amount of precipitation, extreme temperature values, and the possibility of glaciation. The higher the load on the canopy in winter, the greater the importance of the angle of inclination and additional supports. The design must ensure rapid snow removal without delay on the surface of the canopy.
- Environment. If the main entrance to the house is not protected from wind, then this factor must be taken into account when choosing roofing material. During installation, additional fasteners will be required.
- Availability for repairs. During operation and atmospheric influences, the visor requires timely maintenance - replacement of worn parts, painting, etc. Accessibility for any renovation work must be taken into account during the design process.
- Storm runoff. Melt and rainwater must be promptly removed from the building. The project must include a drainage system.
- Appearance. The porch should fit well into the overall architectural ensemble.
- Purpose. If the goal is only to protect the entrance, then it is enough to make a small protrusion. When planning to create a large covered space, a canopy structure should be considered.
- Budget. You can reduce the cost of construction not only by doing it yourself, but also by choosing inexpensive but high-quality materials.
Project development and drawings
Before building the canopy, it is necessary to calculate the required dimensions of the structure.
Before building the canopy, it is important to calculate the dimensions of the structure.
It is optimal if the protruding structure covers not only the upper platform, but also the steps of the porch:
- the width depends on the entrance door - to prevent slanting streams of rain from falling on the floor, add at least 30 cm to the existing indicator on each side;
- the height is selected taking into account the angle of inclination of the product, which should be at least 20° (the greater the angle of inclination, the higher the structure must be installed);
- the depth is taken based on the function of the product - according to the standard, at least 1.2–1.5 cm.
The drawing allows you to see what the attached structure will look like. Planning helps to eliminate mistakes when installing a canopy and correctly calculate the required number of consumables, roofing, supports and draw up an estimate.
With a roof length of 6 m, builders advise using 4 pairs of pillars with a pitch of 1.5 m. At the design stage, it is important to decide how water will be drained.
You can make the drawing yourself, take ready-made sketches, or ask an architectural bureau for help.
Required materials and tools
To build a canopy, you need to prepare the correct amount of consumables and tools.
Wooden beams are used for supports and sheathing.
The choice depends on the architectural design and preliminary calculations:
- for supports and rafters, use a wooden beam 15x15 or a metal profile with a square section of 10x10, 8x8, 6x6 cm;
- for lathing - wooden beam 75x75 mm and board 25 mm or square pipes with a cross section of 20x20 mm;
- roof covering (polycarbonate, tiles, slate, etc.);
- bracket for installing a canopy over the porch or other fastening tools, anchor bolts, screws, staples;
- ladder;
- plane, saw, hammer, sandpaper, bitumen, fire-retardant compounds (for wooden consumables);
- grinder, welding machine, drill, hacksaw, anti-corrosion mixtures (for metal work);
- screwdriver, tape measure, level, marker, shovel, primer, paint, brushes or spray;
- self-tapping screws, slate nails;
- personal protection - construction gloves, goggles when working with a welding machine, respirators to prevent construction dust from entering the respiratory tract.
Installation of polycarbonate on the visor
Polycarbonate is a malleable material. It can be bent, depending on the density and thickness, and attached to curved load-bearing parts of the frame. But this must be done carefully, and also taking into account the requirements of the technology:
- Installation of the sealing tape on the plane of the steel frame of the visor;
- Laying a polycarbonate sheet on the load-bearing surface, with the protective film facing up. You should know in advance that the sheet bends along its own stiffeners;
- If the surface of the visor is assembled from several sheets of polycarbonate, a gap of 8-10 mm must be left between them;
- The sheet is fastened using a special profile, complete with a sealant, to through fasteners;
- The profile is pre-drilled to install fasteners. Self-tapping screws are screwed into the polycarbonate fastening profile in increments of 400-500 mm;
- The protective film is removed from the surface of the sheet, immediately after this the ends are glued with a special protective tape;
- Next, an aluminum end profile is used, which is placed on the edge, the end of the sheet;
- The end that is connected to the wall surface is being sealed!
The last point is also important so that water from the roof or falling raindrops do not fall under the canopy, but run down to the sides along its surface. There are several ways to waterproof a joint, but the simplest involves the following steps:
- Installation of the end aluminum profile with a seal before installing the polycarbonate sheet on the canopy frame;
- Sealing the joint with a waterproofing cord;
- Additional protection against moisture and water with a thin line of sealant!
Working with polycarbonate canopies is noticeably simplified and accelerated when choosing ready-made systems with standard dimensions already established in production. This is a quick-assembly construction set, for which the only important step is the precise marking and mounting of the main load-bearing elements on the wall. The rack parts, the extension of the visor, its ribs are simply snapped onto the base, and then polycarbonate is laid on the surface in the same elementary way. But such systems will cost even more, especially if they are installed by an employee of the selling company. The difference in cost is about 2-5 times!
Materials for racks, frame and covering
There are no restrictions on the choice of materials from which you can make a canopy over the porch. To create a stylish, beautiful and practical structure, you can use profiles and coatings made from wood, ceramics, metal and plastic. To make the best decision, you need to familiarize yourself with the new and time-tested materials on sale.
Wood, metal, forging
A wooden canopy over the door is used to decorate houses built from logs, timber, or panels or slabs finished with these materials. Wooden structures look good on brick and stone buildings. The material is easy to process, environmentally friendly and lightweight. The disadvantage is that organic matter is susceptible to rotting, is flammable, and fungus and mold can develop in it or insects can settle in it. Timber and boards must be regularly treated with special liquids.
The metal canopy over the porch is durable and reliable. The parts are connected using welding, bolts and rivets. Steel structures have a long service life and are resistant to temperature changes and ultraviolet radiation. Stainless steel should be chosen, as black iron is susceptible to corrosion and must be regularly cleaned of rust and painted.
Using forged fragments, original and beautiful canopies are created that attract everyone's attention. The products are associated with refined taste, luxury and wealth. According to the type of manufacturing, structures can be forged entirely or made from individual elements that focus on the style of the object.
The disadvantages of forging are the high cost of products and the need to attract craftsmen to install and fasten them.
Metal tiles and soft tiles
The surface of metal tiles is made plain or imitating natural stone, fabric or wood. The design of tiles is extensive, which allows you to choose the best option for arranging a structure of any style, shape and size. The material is resistant to solar radiation, moisture and temperature changes. Installing tiles is not very difficult. The fragments are laid on a horizontal sheathing. The disadvantages of the coating are its heavy weight and the noise it makes when it rains.
Soft bitumen shingles are an analogue of roofing felt. This type of roofing is laid on a smooth and even base made of plywood, boards or OSB. The advantage of the material is its affordable price, ease of installation and sound absorption. The disadvantages of the coating are the limited color range and susceptibility to mechanical damage.
Polycarbonate and plastic
You can make a beautiful and practical canopy over the door from polycarbonate with your own hands. To create curved structures, honeycomb panels with good flexibility are used. For the construction of structures with flat slopes, it is advisable to choose monolithic sheets, which are characterized by high strength and resistance to impacts.
Manufacturers produce transparent, colored and matte models of polymer boards. The products are resistant to dampness, temperature changes and ultraviolet radiation. The disadvantages of the material are its high price and processing complexity.
Plastic panels are lightweight, easy to install and come in a wide range of colors. PVC slabs are rarely used as roofing material, as they do not have sufficient strength. More often, panels are used for the construction of gables in pitched structures. Plastic fades in the sun. Tarnished panels can be painted or covered with colored film.
Profiled sheet, slate and glass
The profiled sheet is durable due to stiffening ribs, resistant to moisture, temperature changes and ultraviolet radiation. The unpresentable appearance is compensated by the variety of colors of the products on the market. The outer surface can be single-color, imitating stone or valuable wood species. Corrosion protection is provided by double-sided polymer coating.
The sheets are fastened to the horizontal sheathing using screws and rubber washers. The disadvantage is the noise that the metal canopies above the front door make when it rains.
Flat and corrugated slates are used for finishing pitched roofs. The advantage of this material is its affordable price and ease of installation: the sheets are nailed to the frame. Disadvantages include the heavy weight of the slabs, their limited service life and lack of color variety. A gray slate corner canopy is not able to decorate a residential building.
Glass is rarely used as a roofing material. Transparent panels look good on stainless and chrome profiles, but these materials are difficult to adapt to the facade of the house. In addition, only tempered or laminated glass can be used for slopes. These materials are expensive and difficult to work with.
Additional decor of the polycarbonate visor
Welding the main frame in the workshop, or on the ground near the installation site, makes it possible to simultaneously, or after fixing the frame, decorate it with cold forging elements. This is quite affordable, because the price for products of this type remains acceptable.
You can improve the appearance and further strengthen it by installing lintels from a profile pipe. The result will be something like a load-bearing truss, as for the frame of a large canopy. All such work is carried out at our own discretion, but always taking into account additional costs of time and finances!
Decoration and design
The functional relevance of the visor does not overshadow its decorative value. When choosing an architectural project, the main role is played by general design principles: combination of colors, general stylistic concept of the building, and sometimes of the entire environment. A canopy can be a fresh note that emphasizes the peculiarity of the house, or a stain that, with its appearance, can greatly spoil the impression of the architecture of the building.
For a canopy in a rustic or Provence style, a flat wooden base is suitable. Forged products are suitable for buildings in the Gothic style. The idea of high-tech can be realized using polycarbonate or glass; strict classics will be reflected in metal tiles. Decorative elements, lanterns, and flowerpots will help create a cozy atmosphere.
If you are not ready to risk finances and time, you should turn to designers to create a high-quality project. Specialists will give recommendations and create a design taking into account your requirements and architectural features of the house.
Choosing roofing material for a window canopy
Window awnings are covered with different types of roofing.
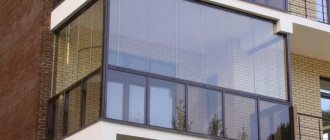
The widest range available on the market makes it possible not only to ensure that the canopy fully matches the exterior style of the building, but is also affordable, since the roofing material is the most expensive of the entire structure. Polycarbonate can be considered the most inexpensive, but at the same time reliable and lightweight option. The big advantages of this material are that it can be given any shape, it is easy to cut, it comes in different thicknesses and colors.
Polycarbonate allows sunlight to pass through well, but dims it a little. Therefore, in order not to darken the room, it is best to install such canopies over windows facing south.
Profiled metal sheets can also be called an affordable budget roofing material. But profiled sheets have disadvantages; in particular, noise will be created during rain. In addition, such canopies weigh much more than polycarbonate ones.
It is also worth considering that a metal canopy will not let sunlight into the room. If this is a problem for you, use transparent materials, such as polycarbonate or triplex.
So, we looked at the functions and advantages of a canopy over a window, its design features, and the options for roofing materials with which such canopies are sheathed.
The choice is yours. One thing can be said for sure: such a design is a functional, practical, useful and attractive element of modern architecture. It will reliably protect the window from adverse weather conditions, extend the service life of the glass unit, and help create a more comfortable microclimate in the room. Such awnings can be installed both in private homes and in multi-storey buildings, so no matter where you live, you always have the opportunity to protect your window and make it more attractive and stylish.
Drawing up a diagram
The choice of materials, complexity of manufacturing and installation depend on the configuration of the canopy. The following recommendations will help you decide on the design.
- Climatic conditions, the amount of precipitation in winter and wind load will affect the visor, so the safety margin is sufficient.
- The location of the building on the site, the presence of shading from trees and other objects, the height of adjacent buildings. The stability must be sufficient to withstand drafts and gusts of wind.
- Ease of maintenance and repair, because the structure is subject to wear and tear and will have to be restored.
- Purpose of the canopy: protection of the door in inclement weather, shelter for the terrace or gallery in front of the entrance.
Canopy requirements
Before you make a canopy over the porch with your own hands, you need to learn the following rules:
- The material must be strong and withstand heavy loads caused by natural phenomena.
Polycarbonate canopy Source alstroy.kz
- Be careful with fastenings. To build a frame that is attached to the wall of the house, you will need about ten metal anchors. If you are planning a canopy more than two meters long, then you will need supports made in the form of racks. When installing support pillars, it is necessary to make a recess of at least one and a half meters and concrete it. You can begin further work only after the filling has completely hardened.
- The slope of the visor must be at least 20 degrees. The maximum slope is allowed no more than 50 degrees.
- In the place where the canopy meets the wall, it is necessary to install waterproofing.
- The canopy must have a drainage system for melt and rain water. To do this, you can use filling containers, a storm drain or a gutter.
- The length of the visor should be 60 centimeters greater than the width of the doors. On each side you need to set aside at least 30 centimeters.
- The width of the visor must be at least 70 centimeters.
- In order for the door to open comfortably and the canopy not to interfere, it must be raised to a height of at least 30 centimeters.
- When using thin roofing material, the sheathing must be made continuous.
- The canopy should be a complement to the overall structure.
The canopy complements the entire building Source bezgoroda.com
Important ! It is recommended to build a canopy along with the construction of the entire house. This way you can save significantly on your budget by using leftover building materials.