12937 0 11
Icer September 16, 2016Specialization: master in the construction of plasterboard structures, finishing work and laying floor coverings. Installation of door and window units, finishing of facades, installation of electrical, plumbing and heating - I can give detailed advice on all types of work.
Today I will talk about how to install upper and lower balcony sills correctly. The fact is that at least half of the specialists carry out this type of work incorrectly, let alone those who manage on their own. We will figure out how the elements should be located, what type they are, and what main aspects need to be taken into account when carrying out installation work.
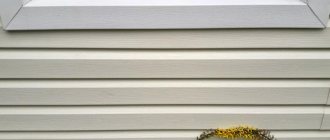
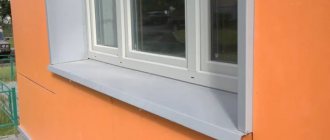
In the photo: a well-installed ebb looks great and provides protection from moisture
Drainage as an integral part of the window structure
Low tide is an important element in the drainage system of a building structure.
Fitting tightly to the wall or window profile, it prevents water from entering seams and other installation joints, maintaining the integrity of the brickwork, concrete fencing or facing material. Without drainage, melt water and rain will cause irreparable damage to the facility, gradually destroying it and forcing unscheduled repairs. As a rule, ebb tides are installed together with the balcony glazing. This service is offered by any installation team that installs plastic windows. But there are situations when the drainage element has to be repaired or replaced with a new one after glazing, for example, if the owners are not satisfied with the appearance of the ebb or it does not fulfill its purpose well. It is not always possible to do such work yourself, especially when it comes to installing the upper ebb on the balcony. However, knowing what options exist and understanding the specifics of their installation is advisable for every customer who wants to get a high-quality result.
Drainage is a mandatory element of balcony glazing
A selection of videos on the topic
Tips for choosing drainage systems for plastic windows from the pros:
Installation of drainage systems and sealing of the loggia by industrial climbers:
Structurally, the drainage system looks simple, and its fixation is carried out using standard fasteners. The difficulty lies in the fact that the main work is carried out on the outside of the balcony. Therefore, it is important to follow safety measures and, most importantly, not expose yourself to excessive risk.
YOU MAY ALSO BE INTERESTED
How to install correctly?
The ebb on the loggia can be mounted in the upper or lower part of the structure. If you do it from above, slanting rain will still fall on the balcony, and the moisture will not leave. Installation of the lower structure is more fruitful, as it helps to collect and remove all rain flows.
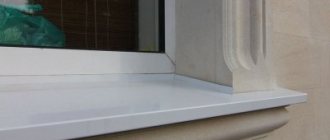
The most convenient place to place the product is the space immediately under the frames. In addition to the useful function of combating moisture, the ebb also has an aesthetic purpose: it helps to complete the appearance of the window.
Purpose of chimneys
Chimney smokers are not only a decorative decoration. A weather vane on the roof can really emphasize the overall style of the building and become a separate architectural device, but in fact, the functions of the chimney cap are much more important than the overall appearance of the roof. A properly installed roofing wind vane will eliminate turbulence in air flows—there will be no “howling pipes” in the house. The cap on the pipe increases the efficiency of the heating system by at least 15%, because With a chimney, the circulation of hot air improves.
Low tide selection
Types of tides
In order for the service life of the ebb and flow to be long and reliably protect the frame structure from moisture, it must not only be installed correctly, but also made of a material that is not subject to rapid destruction. These materials include the following types:
- zinc coated steel;
- galvanized steel coated with polyester;
- aluminum;
- plastic.
In addition, the positive factors of ebb tides include a high-quality coating that will protect it from corrosion, the ability to withstand deformation, as well as a beautiful appearance.
Cink Steel
This type of casting is made of steel, which has a fairly high resistance to deformation. The optimal thickness is considered to be 0.55 mm. To protect against corrosion, zinc is sprayed. If the window structure is made of metal-plastic or aluminum, then the optimal height of the ebb edge is about 20 mm, and the relief chamfer is 100 mm. But in the case when the window structure is installed on a load-bearing wall or with a good degree of insulation, then the width of the ebb should be taken larger.
What is the advantage of galvanized steel flashings? They are quite resistant to acid precipitation. Everyone knows that this is not uncommon, especially in urban areas. It is in these places that metal corrosion begins to develop very quickly. Therefore, when purchasing, you should definitely inquire about the thickness of the zinc coating. A good indicator is a zinc consumption of 275 g per 1 m2. Such a cast can last a couple of years longer than with 180 g per 1 m2.
It is important to carefully ensure that ebbs of this type are not damaged by scratches or chips.
Polyester coated ebb
To strengthen the protective layer of galvanized steel flashings, special polymer coatings are used, for example, polyester or a mixture of acrylic, polyvinyl chloride and pastisol. Their use significantly increases the resistance of the structure to corrosion and, importantly, to mechanical damage. They are also valued for their ability to withstand temperature loads, and are therefore recommended for use in regions with problematic climatic conditions. It should also be noted that good quality goes well with a relatively low price. Service life reaches up to 30 years.
Aluminum
This product is made from aluminum sheets, the thickness of which is 1 mm. The width varies from 9 to 36 cm. Aluminum must be treated with polymer compounds. This makes it possible to give the product a wide range of shades and discover high-quality and modern materials. After processing, the structure is coated with a double layer of varnish and then fired at fairly high temperatures.
This processing process provides:
- increased protection during operation;
- resistance to mechanical damage, almost impossible to scratch;
- resistance to chemical influences and acid precipitation;
- resistance to fading in the sun.
It is able to maintain its characteristics at temperatures ranging from - 400C to + 800C. They are easy to maintain and can decorate the facade of any building.
If the length of the aluminum drainage window structure reaches 1 m 30 cm or more, then it is recommended to reinforce it with a special bracket.
Plastic
Plastic products also perform their function quite well to protect the window frame from exposure to water. But compared to products made from other materials, they have a number of disadvantages:
- when made from recycled materials they will turn yellow very quickly;
- at high temperatures, especially when exposed to direct sunlight, they have an unpleasant odor;
- are not resistant to mechanical stress, are very fragile, and therefore have a short service life.
Element characteristics
Manufacturers mainly use the following materials to make droppers:
with a protective polymer coating.
Sometimes you can find drippers made of aluminum sheet. Even less common is a part made of polyethylene.
Manufacturers most often use galvanized steel to make drip pipes Source tincraft.com.ua
On our website you can get acquainted with the most popular plots in the Moscow region for the construction of a country house. In the filters you can set the desired direction, the presence of gas, water, electricity and other communications.
Galvanized steel is a traditional material for drainage work. It has gained wide popularity due to its availability, both in mass production and in the price category. Steel sheets with a thickness of 0.4 - 0.5 mm are hot-dip or electrolytically galvanized, which allows them to be reliably protected from corrosion. But the service life of such sheets is much shorter than that of polymer-coated material.
For such products, steel sheets of smaller thickness (up to 0.3 mm) can be used. In addition to galvanizing, chrome plating, primer and polymer compounds are applied to both sides of the material. Various polymer mixtures can be selected taking into account climatic zones. This enhances protection against environmental aggression.
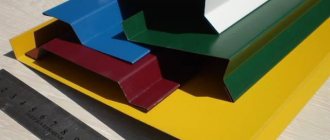
Adding different coloring pigments to the composition allows you to achieve a wide variety of colors.
The high price and deterioration of anti-corrosion properties due to mechanical deformation make this material less in demand Source stroyvklad56.ru
Due to its low price and availability, some developers have fallen in love with PVC products. An additional advantage is the wide range of colors and low weight. This material does not corrode and has a high degree of protection from ultraviolet radiation. But the service life of only 15 years and the fragility of the product at high subzero temperatures make this material not popular for many areas of our country.
Types of drips differ from each other in shape. Of the two bends of the cornice element, the first creates a skirt and an apron, and the second is needed as a stiffener. Dippers for soft roofs have three bends and are distinguished by a wider design. All parts are produced in a length of 200 mm. This simplifies transportation and subsequent installation.
How to choose?
Before you begin installing ebb tides on the balcony, you need to choose the right design. There are a fairly large number of options, so when choosing a shimmer, you can think about aesthetics. It should fit well into the overall picture of the window and facade; in addition, a high-quality product has a stainless surface, otherwise the ebb will not last long and will quickly become unusable.
Most often, products are purchased from galvanized steel. They have an attractive appearance, can be painted in various colors, do not rust, have a long service life, are easy to install and are quite strong, which helps them withstand various mechanical impacts, for example, caused by wind or hail.
When choosing what the ebb will be above or below the balcony, be sure to pay attention to the characteristics of the coating. It should not be afraid of corrosion, the material should not have a large mass, but it needs high strength. The appearance can be anything, the attractiveness depends on your personal preferences.
Upper ebb
The most common types of ebb tides for balconies:
- The steel usually used is stainless. The width of the sheet is 0.55 mm, this is the optimal option in terms of weight and rigidity; the product is coated with a zinc layer on top, which protects it from corrosion. If the window frames are plastic, a large side height is not needed, 2 cm is enough. The chamfer is made in relief, its standard length is 10 cm. When choosing a drip flashing, you should take into account that there are situations when the drip flashing has to be mounted too tightly to the wall, in this case it is recommended purchase a wider product.
Galvanized steel is not afraid of acid precipitation and aggressive detergents. However, it should be taken into account that the zinc coating is not too thick, so it can be damaged: most often this happens accidentally, mechanically. If the product becomes rusty, it will have to be replaced due to its unattractive appearance. If you use a rusty flashing for a long time, it will rot completely and allow water to leak through. The manufacturer usually indicates the thickness of the zinc layer. A high-quality product has a thickness of at least 275 g/m2; cheaper, but less durable castings have a zinc layer thickness of 180 g/m2 and last 5-7 years less.
- Galvanized steel coated with polyester. Most often, the protective layer consists of acrylic or pastisol. Both materials have similar qualities and reliably protect the structure from moisture. In addition, the material protects well from scratches and other mechanical impacts. Polyester can have different colors, which makes the products visually attractive. The price of such materials is slightly higher, but they also last two to three times longer than simple galvanized steel. On average, such a tide will last 30 years.
- Aluminum. Upper or lower ebb on loggias made of this material is quite common. The products are available in different widths from 90 to 360 cm, the sheet thickness is 1 mm - this ensures good rigidity. To create a product, the metal is degreased, chrome-plated, and impregnated with a polymer composition for additional protection and giving the desired color and shade. After paint is applied to the part, it is coated with an additional two layers of varnish and processed at high temperatures. The result is a product suitable for outdoor use, capable of long service life and good resistance to damage and corrosion. The material is resistant to chips and impacts, and is impervious to acids and chemicals. This tide does not fade in the sun and tolerates temperature changes from -40 to +80 degrees. They are easy to wash and repel dirt well.
- Plastic castings are the most fragile and short-lived. But they are not afraid of temperature changes, rust, they repel water one hundred percent, and do not rot. When choosing, you need to pay attention to what kind of plastic the product is made of. If it is secondary, it will quickly turn yellow and an unpleasant chemical smell may appear.
Types of balcony sills (configuration)
Standard low tide
The most common form of low tide on a loggia. Standard sizes : bend on the wall - 150 mm, drip - 200 mm, hem - 100 mm.
Z-shape flashing
Z-shaped flashing is used as a window, plinth or parapet flashing (same as standard flashing). Its main difference is a reverse-curved .
Basic principles of water drainage from balconies
Open balconies are undoubtedly beautiful, especially in sunny weather. But when there is wet snow or slanting rain, then it is necessary to take protective measures: lay reliable waterproofing under the finishing coating along its overhang, be it wooden or tiled floors, with the obligatory installation of a metal drip line for the roof. Despite the ease of installation, it is able to prevent the lower and vertical parts of the structure from getting wet and thereby free the owners from constant repairs for many decades.
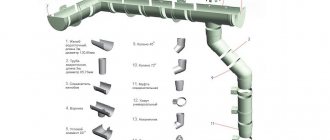
External drain
External gutters can be used exclusively for drainage from small surfaces of balconies. Their length should not exceed 5 meters. For comparison, we note that the width of a balcony gutter should be about 70 mm, while gutters working on large roof areas have a width of up to 250 mm. As for the diameter of the pipes, it ranges from 60–150 mm. The umbrella tin is carefully glued between the layers of insulation.
In other cases, it is necessary to organize the design of internal drainage, ensuring that the surface declines by 1.5-2% towards the drainage opening.
Internal drain
Drainage from a balcony is not always convenient or advisable to use roof drains, since they are large in size and have a throughput capacity. Internal drainage in these areas is often organized using small drains and funnels - they are also called “balcony”. The installation principle of such drainage elements is similar to conventional roof drains.
They resemble parapet ones, but, unlike them, are made of plastic. Balcony funnels are equipped with several outlet pipes: one main and two emergency ones, but of smaller diameter, which are located at different levels. When calculating emergency discharge systems and funnels for draining water, in any case, even in the process of designing the roof structure, it is also important to take into account the risk of extreme loads.
If one water intake funnel is used when installing drainage, then a small drain is used as a place for emergency drainage of water from the surface. It is best to use multi-element funnels.
In addition to funnels, in these cases water can be drained using
- ladders of small dimensions, which allows them to be placed in the “pie” of the balcony or
- siphons that are connected to drainage pipes.
In addition to draining water directly from the surface, it is also necessary to ensure the possibility of draining water that may leak onto the waterproofing. It is also connected to the aprons of the elements of the roof water intake funnel.
Balcony drains
The architectural features of buildings do not always allow the use of gutters or balcony siphons. In such cases, you can use direct discharge of water to the outside, say, through a special “balcony” drain. Modern plastic drains are usually equipped with a drain nozzle, which is discharged through a balcony railing, or they simply use the drains themselves.
Why do you need a drip
A drip edge is an overhang apron that is attached to a cornice or gable. Its main function is to protect the facade of the building from moisture flowing from the roof. Streams of water during rain or melting snow can wash away building mixtures from the masonry, creating the risk of wall collapse. Therefore, you need to direct them to the drainage system. A dropper can easily cope with just such work.
It also protects the cornice itself from rotting, which can form as a result of moisture accumulation in the area of the lower rafters of the roof. If excess moisture is not removed from these parts of the building, then fungus and mold may form on their surface.
The drip line is installed under the lower waterproofing layer of the roof and all accumulating condensate from the space under the roof or precipitation flows from the roof will be redirected to the gutters. Next, excess moisture is removed through drainage away from the building.
Thanks to the drip line, the boards on the sides of the roof slope remain dry and their service life is significantly extended Source rydo.ru
In addition to its aesthetic function (giving completeness to the eaves), the drip edge on the roof strengthens its edge, protecting it from strong gusts of wind. And in winter it prevents ice build-up from getting under the roof. Drip caps are also installed above windows and entrance doors. This way the openings are protected from precipitation.
Installation of ebb tide on the balcony
Glazed balconies also need protection from precipitation. For these purposes, special products are used - sills, and they can be installed in the lower or upper part of the frames.
If the space between the frames is poorly sealed, then the upper location of the plate does not completely prevent rain flows from entering it during the wind.
Therefore, the ebb is mainly installed from below under its frame.
How to properly install drip sills made of aluminum or galvanized steel
The formation of the plate begins with the edges, which are slightly bent upward, and a special protrusion is made on the lower edge, of course, if the ebb is not factory-made. It should be slightly longer than the window. The ebb is attached from its upper part using galvanized self-tapping screws in increments of 16-20 cm.
As a rule, one drain on the balcony is not enough - several are installed, fastened to each other with self-tapping screws with a washer or paper clips.
Mount the ebb at an angle of 10–15° to the window with an adhesive surface or polyurethane foam, holding it tightly for the drying period. If the ebb is quite wide, it is necessary to install appropriate brackets.
Upper ebb device
This ebb is fixed to brackets mounted into the walls. For a long balcony, you will need to join several panels together using galvanized self-tapping screws. During installation, initially maintain the correct angle of inclination of the drain, since it is not always possible to correct something later. The connecting seam of its upper part and the wall is treated with silicone sealant. The upper ebb should be wider than the balcony to prevent water from flowing into the window unit.
Upper ebb fastening
Let's look at this type of construction; most often, tinplate products are used, which are well suited for such purposes. To begin with, I will show you a diagram according to which our work process will take place, and below I will tell you in what order to carry out the work:
This is what the ideal mounting option for an element looks like
- The installation of the upper ebb on the balcony is ideally carried out simultaneously with the installation of window blocks. In this case, the process will be as simple as possible and the highest quality of work will be ensured. If windows have been installed before, then the main thing is that the upper part is not filled with foam; we will do this during the work;
- The process begins with drilling holes in the flashing through which it will be attached to the concrete slab. They need to be done in increments of 40-50 cm to ensure the necessary strength. If the windows are already standing and secured with anchors, then we need to make cutouts on the ebbs for the anchors in order to insert them to the position we require;
Ideally, if the windows are fixed to plates, then nothing will interfere with the fastening of the upper ebb
- Next, the holes on the low tide are marked on the slab, and drilling is done using a hammer drill. The work is not difficult, but during the process dust flies in different directions and it is better to use safety glasses;
- The ebb is secured with dowels, the PSUL tape is inserted into the outer joint, it is important to place it quickly and carefully, since it expands quite quickly, and if you don’t have time, it is unlikely that you will be able to push it into the gap;
- The space under the ebb is filled with polyurethane foam; do this carefully, since excess composition can raise the element, and you will have to correct your mistake for a long time by cutting the foam out of the gap. It is better to use a special gun; with its help you can dose the foam much more accurately;
- The remaining elements are placed in the same way; they must overlap each other by 6 cm to ensure a reliable connection. The joint is coated with silicone sealant and twisted with short self-tapping screws to ensure reliability;
- The cracks above the flashing also need to be filled with sealant to provide protection from moisture. Do not regret this composition, it will avoid many problems in the future
Conclusion
Setting the tide correctly is not that difficult if you know the basic rules and do everything carefully. The video in this article will show some important points of the process clearly and allow you to understand them in more detail. If you have questions on the topic, write them in the comments below.
Did you like the article? Subscribe to our Yandex.Zen channel
September 16, 2016
Balcony and loggia, Windows
If you want to express gratitude, add a clarification or objection, or ask the author something, add a comment or say thank you!
Incorrect installation of upper sills on balconies and loggias
Of course, all these options that you will see below cannot be called completely wrong. Each option has a right to exist, but I consider it simply necessary to point out gross errors.
First, we will consider the most acceptable option with the type of opening design, where the fence is attached from the outside. And if the client categorically does not want to move the PVC window inward, then the window is installed on a concrete or metal existing fence. And the upper part of the window comes into a fence, which, as it were, belongs to a neighbor and protrudes onto your balcony or loggia.
The difficulty of installation in such an opening is that there is a certain distance between the fence and the concrete slab through which water can flow onto your balcony or loggia. And this can happen if the neighbor above does not have a glazed balcony. This means our task is to install the upper ebb so that water does not get to us, or rather, so that the water goes out.
If the balcony or loggia of the neighbor above is glazed, you can use the correct form of the upper ebb, which I mentioned above. If not, then you need to use this form.
This option also has another difficulty. In this option, the order of installation changes, that is, the upper ebb is attached first, and then the window structure. In the first option, which I talked about above, it’s the other way around. First the window, then the overhead ebb.
The problem here is that again we need a highly qualified master. Here you need:
- set the top ebb in one straight line
- at the same time, the installer has absolutely nothing to hold on to
- the configuration of the ebb in this case is such that it becomes bulky and heavy (it is not convenient for installation)
- The window structure must be mounted on elongated plates
- it is necessary to insulate that part of the ebb shown in the figure
It should be noted that in this embodiment, the PSUL tape is used in two rows. This is necessary because the top concrete slabs in our houses do not have a perfectly straight line. The surface of these slabs has potholes and roughness.
Whereas in the first correct version of the upper ebb on balconies and loggias, these irregularities can be additionally sealed from the outside. In addition, polyurethane foam will be the second barrier after PSUL from cold air.
Undoubtedly, there may be other options for installing upper tides. Now let's look at the errors. I found all subsequent images in Yandex, and marked the errors with colored arrows.
.
Further, according to the next picture, it’s almost the correct option, but instead of “noise-absorbing pad” there should still be PSUL (although that’s probably what was meant). And where PSUL is indicated, in my opinion, PSUL is not needed.
Well, that's probably all. the top ebb on a balcony or loggia should be and what types of openings there are. Leave comments. The topic of upper tides will always be relevant.
Good day.
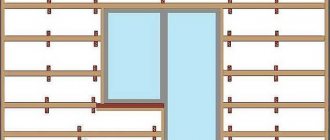
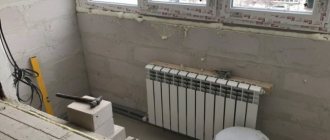
On the balcony there is a problem area - a large number of fencing rods and a massive corner around the perimeter. Different temperature expansions of the screed and metal will renew cracks (which currently exist in the old foundation). You can leave 6 fencing fastenings around the perimeter, and cut the rest from below to a height of 15 cm. Then fasten everything with a square by welding with an additional fastening in the wall.
For layers I would do this:
Fix the ebb on the metal with mounting foam, and on the screed with driven dowels. Apply waterproofing over the flashing. Coat the joint between the ebb and the screed with fiberglass or mesh.
Your option is also possible. But I like this solution better when the insulation goes out:
The less opportunity water has to penetrate the screed, the longer the structure will live. In all your options, the tiles extend beyond the rods. This will all have an ugly appearance (based on the number of rods). You are right, you can make a slot on the ebb opposite each rod, and then a round hole. The slots can be covered on top with fiberglass insulation, as in the roller. The holes can be partially filled with sealant before installing the dowels. The driven dowel will seal and fill all the cracks.
The less opportunity water has to penetrate the screed, the longer the structure will live. In all your options, the tiles extend beyond the bars. agree.
It will all look ugly (based on the number of rods). Well, I’ll try to cut it out more carefully: 1).a simple rectangular square cutout +/-1.5-2mm on the sides, grout tightly, tightly, and over the ebb and coat with plus sealant as I wrote above. 2). cut a hole with an indentation using a crown, then make two cuts in parallel, and grind it with a disc, we get a straight cut and a round “bottom” - for the fence reinforcement. 3). stupidly make a cutout on the edge with a crown, half a circle, you get a semicircular cutout. The only thing is that the profile of the reinforcement is not round, but rather closer to an oval with notches, and slightly twisted, i.e. the oval is, as it were, slightly “twisted” at an angle, welded to the corner
or I’ll pay and cut it with hydraulic jet
OPTION 3 – The tile should lie on top of the ebb, and not the ebb cover the tile. OPTION 1 – It is better that the insulation covers the ebb. But even in this option, you can start laying the whole tile from the rods. OPTION 2 – Incomprehensible fasteners through the tiles. OPTION 4 – The most deplorable. I don’t think it will last five years. In the Krasnodar Territory it may remain idle. In the Irkutsk region - no.
It is difficult to understand the entire structure from words. As far as I understand, everything looks like in the picture. If we start the list of layers from the balcony, then it is like this: PORCELAIN TILE WATERPROOFING KILTO 5 CM SCREEDS WITH REINFORCEMENT BITUMEN INSULATION OSB SHEET
Where did the wall begin to get wet? Near the main wall or in the drip area? If the balcony is not heated, is there thermal insulation on the ceiling? Which layer and which one? Is there a vapor barrier? Did you get wet when the house was not heated? How low was the temperature when you started heating? And what area (city) is this approximately? The fact that the screed layer above the drip is thick is not entirely good. Water flows along the end of the screed and saturates it with moisture. Over time, the end will begin to collapse. He needed to be protected. But destruction and leakage could not have happened so quickly. Moreover, there is roofing material at the base.
what to do? the lower part of the balcony is always wet... the top is tiles, the end is dry. There is an ebb tide, but it is minimal... local experts claim that the water flows down the end and then disperses along the lower part of the balcony...
This way you can check it without waiting for the rain. Pour a bucket of water onto the balcony and watch it flow down the tide. At the end of the ebb there should be a bend (tear cap) that prevents the drop from sticking to the ebb and flowing down the end of the balcony slab. If this happens, then you need (if possible) to substitute a new one - the correct one - under the existing ebb.
Is it possible to order work? or just consultations? I don't see a contact phone number. Thank you in advance!
Add a comment Cancel reply
This site uses Akismet to reduce spam. Find out how your comment data is processed.
Source
Step-by-step installation of the upper ebb
Scheme of fastening the upper ebb (visor)
Installation of the upper ebb is carried out in a certain sequence simultaneously with the installation of the window block.
- Initially, the ebb sheets are applied to the upper balcony slab and cut to size. Particular attention is paid to the formation of corners and cutouts in the places where the window block is attached.
- In increments of 40 - 50 cm, mounting holes are drilled in the canvases.
- The sheets are re-applied to the balcony slab to mark the mounting holes. After drilling, dowels are inserted into the holes.
- To ensure good tightness of the canvases, silicone sealant is applied to the place of their fastening.
- The sheets are attached to the balcony slab with zinc-coated screws, and the outer joint is sealed with PSUL tape.
- The free space under the canvases is filled with foam. The operation requires care, since excess foam can raise the tide.
- Silicone sealant is applied to the joints of the panels, and short self-tapping screws are screwed in, which increase the reliability of the connection. To hide the unattractive appearance of the joints, they are sealed with a plastic strip.
- The cracks above the canvases are sealed very carefully. If you do not skimp on the sealant, you will be able to avoid many problems in the future.
Thorough sealing of the upper ebb with a balcony slab
Workflow Description
Now let's figure out how to carry out the work and how to select ebb tides. First of all, let's figure out how to determine the optimal width of the elements you need, everything is quite simple:
- The upper ebb should protrude beyond the plane of the window frame by a maximum of 10 cm; if the protrusion is larger, then in a strong wind it can create vibrations or simply knock on the frame and nothing can be done about it . It must be installed simultaneously with the windows; this is the only way to ensure proper quality of work;
This is what the structure looks like in cross-section; this option will prevent moisture from entering through the upper joint
- The lower ebb should protrude beyond the plane by at least 40 mm, so you need to select options taking this parameter into account . This element can also be installed after fixing the window, when you can take the necessary measurements and determine the optimal dimensions of the structure.
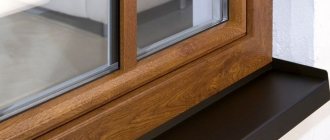
The lower ebb is placed under the window blocks and protects the joint between the window and the parapet from moisture.
Required materials and tools
Before you start work, you need to stock up on everything you need; for the upper ebb, the set of materials is as follows:
- Casting the length we need, most often we have to connect several products together, and cut one of the elements, so calculate the required number of products, taking into account the overlap at the joints of 6 cm;
- PSUL tape 20x40, with its help we will cover the joint well and ensure its reliable waterproofing, while moisture from inside can evaporate unhindered;
Self-expanding tape will very reliably and tightly fill the joint between the ebb and the concrete slab
- Polyurethane foam is used to fill voids and thermally insulate the joint; its quantity depends on the size of the gap and the length of the structure;
- A soft plastic flashing will allow you to very reliably and quickly close the joints both from the outside and from the inside. This is a very convenient solution, which is perfect for inexperienced craftsmen, because with its help you will quickly and efficiently refine the joint;
The strip allows you to reliably close joints even on uneven surfaces
- Quick installation dowels - with their help the ebb will be attached to the concrete; options measuring 6x40 mm are suitable;
- Silicone sealant is needed to fill all joints and strengthen the connections of the drip parts.
Step-by-step installation of the lower ebb
Scheme for fastening the lower ebb. Installation of the lower ebb is simplified due to the presence in modern windows of a special groove for attaching the ebb panel. Installation of the drainage system in the lower part of the frame is performed in the following sequence.
- The canvases are placed under the installed window block, marked and trimmed.
- Holes for fastening are drilled in the canvases at 50 cm intervals.
- Using a special gun, silicone is applied to the joints of the profile and ebbs.
- The canvases are inserted one by one into the profile on the window frame. After this, each is pressed tightly at an angle so that the sealant fills the joints. To increase reliability, additional fastening is used with special self-tapping screws up to 20 mm long.
- The joints of the canvases are reinforced with self-tapping screws and treated with silicone.
- The free space under the ebb is filled with foam. The work is done carefully so that the foam does not raise the ebb.
Low tide on the open balcony
In most cases, installing a low tide is associated exclusively with glazed balconies, while installing such an element on open objects is the exception rather than the rule. We will clearly demonstrate below why the absence of this detail is the main mistake when using open balconies.
What does the lack of drainage on open balconies lead to?
As you know, “water wears away stone,” in this case concrete. In the absence of drainage, moisture penetrates into the internal cavities of the concrete base and slowly but surely destroys the slab. Especially during the transition period winter-spring, when during the day melt water penetrates into microcracks and crevices, and at night it freezes and expands, destroying the structure from the inside.
Note! Sealing and waterproofing concrete does not always work when there is no low tide on an open balcony. In this case, the water, instead of being drained down, flows onto adjacent surfaces and the source of destruction moves to the ends, lower plane and walls.
To understand why the metal flashing should be located around the perimeter of the concrete slab, let's delve into the theory of drainage. The fact is that water has good adhesion to concrete, that is, it is able to stay on its surface for a long time. During the process of rain or snow melting, water droplets do not immediately come off the concrete surface, sometimes seeping inside or moving onto neighboring structures. A completely different situation is observed in the presence of low tide. In this case, moisture does not linger on the metal surface, so drainage works more efficiently.
Structural solutions for protecting concrete foundations
Not every drainage system is capable of protecting a concrete slab from destruction. First of all, such an element must be installed correctly. A regular end cap will not work properly if mounted on top of the base. For drainage to be effective, the flashing must be below the surface of the slab. Therefore, it is either immersed in a layer of screed or placed under the tile. Naturally, in both cases, the base of the balcony must have a layer of reliable waterproofing.
Some tile manufacturers offer their customers interesting design solutions for water drainage, which can also be applied to other coatings.
- Profile with curved visible part
This design is installed under the tiles in a layer of adhesive and serves as reliable protection for protruding concrete edges. The invisible part has a special wavy structure for better connection with the tiles and reduces the likelihood of cracks in the screed. The visible bell-shaped part acts as a cornice, protecting the end of the balcony from water drops.
- Profile with straight visible part
If the previous option is installed on both straight and curved ends, then the L-shaped profile is intended solely to protect the smooth side edges. Provide a gap between the visible part and the end of the slab. If you install such a flashing close to the balcony slab, it will lose all meaning, since water will flow from the metal onto the concrete.
- Semicircular profile
In addition to the fact that this design looks very aesthetically pleasing after installation on the balcony, it has a special drainage element. For the profile to work effectively, its junction with the slab must be sealed.
Note! If ebbs of a standard design are placed under the tiles, this will eventually lead to a violation of the integrity of the tile layer, since an even sheet of metal in the screed will contribute to the appearance of microcracks.
Tips for installing and repairing drainage systems on balconies and loggias
Nuances that will make drainage on the balcony as reliable as possible in operation.
- It is advisable to make the overhang of the upper visor larger than the overhang of the lower drain. In this case, raindrops and icicles will not fall on the cornice located below the window, which will reduce the noise level and extend its service life. It is important to take into account that the protrusion of the top visor should not be more than 10 cm. Otherwise, with a strong gust of wind, it may be bent and even torn out.
- Flashings made using professional equipment, that is, not a homemade product, are initially covered with a protective film. Its function is to maintain the integrity of the coating during transportation and installation of the element. Some craftsmen advise leaving the film after installation, since this, in their opinion, will allow the visor to maintain its appearance longer, and after removing the film, after a few years, get a completely new look for the product. Doing this is fundamentally wrong. Under the influence of sunlight, the film will begin to deform and may stick to the base so securely that it can no longer be removed.
The film must be removed immediately before or immediately after installation.
- Sound insulation of low tide on the balcony must be done using a vibration- and noise-absorbing coating, such as linotherm or vibroplast. The material is glued to the invisible side of the drain; it removes the lion's share of the noise that occurs during rain and hail.
Some manufacturers immediately equip their products with noise-absorbing material
- In the case of repairing the low tide on the balcony, it is necessary to completely dismantle the metal and clean the installation site of construction foam and sealant, and then reinstall the product according to the instructions given above. Targeted elimination of a defect, as a rule, only leads to a temporary solution to the problem.
- When using polyurethane foam, it is important to consider the degree of its expansion. To prevent the metal from deforming, during foaming, leave free space under the ebb and, if possible, load it with a weight tied to the window frame.
Installation nuances
- To ensure that the upper drainage system complies with building codes and fully performs its functions, the following rules are observed during installation:
- installation is most often carried out in conjunction with the installation of a window structure on the balcony;
- the canvas is placed with a slope of at least 10 degrees.
Standard dimensions of the upper ebb
- the canopy should hang no more than 100 mm over the window frame, since with a large protrusion it will vibrate during the wind, and such noise cannot be eliminated.
- If the balcony is long, the drainage can be strengthened with special brackets.
- During installation lower drainage The following nuances are taken into account:
Standard bottom ebb sizes
- It is more convenient to install after installing the window structure on the balcony;
- The projection of the ebb above the balcony opening must be at least 40 mm.
- During installation work, the level controls the position of the canvases. If the canvases are not installed horizontally, then rainwater will be unevenly distributed over their surface.
- To create a slope during installation, you can use special wedges.
- The rigidity and stability of ebbs made of aluminum and plastic is improved if installation is carried out using support brackets.
- To prevent the canvas from rising after the foam has hardened, they are pressed down with heavy objects for several hours.
In general, you should not refuse to install upper and lower ebb tides on the balcony. Such work is easy to do even on your own. The glazed balcony with ebb tides is reliably protected from dampness and has an attractive
Subscribe
How is an incorrect installation of the upper sill detected?
- Firstly, it is freezing in winter, followed by the appearance of fungus.
- Secondly, it is blowing in the fall or spring. This is revealed simply. You need to lean your hand against the internal joint of the upper ebb and the upper concrete slab. Better yet, bring a lighter or a candle. The blowing will be immediately visible.
- Thirdly, this is a banal leak.
- Fourthly, the upper ebb is not visually set exactly along the horizon (if you look at the ebb from the room, this unevenness will be visible).
Why do you think that one installation team installed the top ebb correctly, while the other installed it incorrectly? And why don’t window companies have a generally accepted system for installing overhead sills? Leave your answers in the comments.
Sources
- https://arbolit.org/tehnologii/otlivy-na-otkrytom-balkone.html
- https://oknanagoda.com/balkony-lodzhii/otliv-dlya-balkona-dlya-chego-nuzhna-yeta.html
- https://vasha-stroika39.ru/dizajn/ustanovka-otlivov-na-lodzhii-i-balkone.html
- https://balkon.expert/otdelka/vneshnyaya/otliv-na-balkone.html
- https://SpecKrov.ru/otlivyi-balkonnie-radiusnyie/
- https://balkonidea.ru/vodootvod-s-balkona-varianty-zashhity-ot-osadkov/
- https://me-remount.ru/balkon-i-lodzhiya/remont/otliv.html
- https://obustroeno.com/stroitelstvo/elementy-konstrukcii/okna/70156-otlivy-dlya-balkona
- https://nalichnik33.ru/lodzhii-i-balkony/verhnij-otliv-na-lodzhii.html