How to make a canopy over a window with your own hands
All parts of the canopies are made on the ground, starting with triangular brackets with struts.
Attach them to the wall of the house, then make beams and install them on top of the brackets. But before you start building a canopy, inspect the window or door where you plan to secure the structure. Make sure there is a solid wooden base on either side to support the brackets, as well as clearance for the exposed ends of the beams.
We attached the window awning (left) to the existing trim boards adjacent to the window frame. And for the canopy over the door, I had to partially trim the wall sheathing to secure the brackets (photo A). Below we will talk about this in more detail.
EVERYTHING YOU NEED FOR THIS ARTICLE IS HERE >>>
We made all the details of the canopies from well-dried thuja boards. We recommend using weather-resistant wood. If you plan to paint your shed, you can get by with cheaper woods such as poplar or pine.
How to fix if the wall is multi-layered
Recently, more and more buildings have multi-layered external walls - ventilated facades, insulation... The load-bearing part of the wall turns out to be covered with a couple of layers of materials, the load-bearing capacity of which is only enough to hold its own weight. You won't be able to attach anything to them. The entire load must fall on the load-bearing wall.
How to attach a canopy over the front door to a three- or two-layer wall
Even if the outer layer is a finishing brick, it costs nothing to attach to it. Masonry is usually carried out in half a brick. So it only looks durable on the outside. Even the smallest and lightest canopy cannot support the weight, and the supporting columns do not help either.
Therefore, with any multi-layer wall, holes are made in all finishing/insulating layers, and the structural elements are attached to the load-bearing wall.
Work on a window awning begins with brackets
1. For brackets that will be attached to flat trim or trim, as in our version of the window awning, cut out mounting boards A from 19 mm thick material. If the brackets need to be installed over embossed sheathing (plastic siding, exposed boards), make these parts from 38 mm thick boards and make triangular cutouts on the back side (photo A).
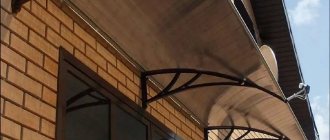
This canopy over the patio doors is assembled from consoles, beams and cross bars with curved ends (parts B, C, E and F). A transparent weather-resistant coating made it possible to preserve the natural beauty of the natural material.
Drawing of mounting boards. Fit the mounting board (A) into place, pressing it against the wall. Spread the legs of the compass to the thickness of the sheathing boards. Then move the point along the part, pressing against the sheathing, to transfer the wall profile to the edge of the part. After this, make the cuts with a band saw.
2. Cut out consoles B of the specified length from beams with a cross-section of 90×90 mm (Fig. 1) and leave a piece of such timber at least 300 mm long for decorative bosses C. Saw off the bevels at one end of each console (photo B). Then make bevels on both ends of the short piece before sawing off the bosses to the specified length (the version with rounded ends is shown in Fig. lb).
3. Cut two pieces 762 mm long for struts D from a beam with a cross-section of 90×140 and mark them (Fig. 2). Cut out the parts to shape and sand smooth.
4. Apply waterproof glue to the ends of the consoles B and attach them with screws to the mounting boards A (Fig. 1). Then add braces D, securing them in the same way. Finally, attach bosses C at the bottom.
Pyramids are made simply and quickly. Make markings on all four edges of the 90x90 timber, drawing lines at a distance of 13 mm from the end. File the bevel at a 16° angle exactly along the line and do the same on the remaining edges.
Level the beams. Insert spacers 200 mm long, cut from scraps, between the beams, align the ends using a large carpenter's square and secure the parts with clamps.
Attach the first cross bar. Press the block against the beams with clamps, turning its pyramid end forward. Drill and countersink pilot holes, then attach the block to the beams with screws.
Prepare beams and bars
1. Cut out the E beams to the appropriate length. We made them 640mm longer than the distance between the outer sides of the installed brackets to create a 320mm overhang on each side. Mark and cut arcs at both ends of each beam (Fig. lb or 3).
2. Calculate the required number of cross bars F for your canopy (Fig. 3), located at intervals of about 180 mm. Our window awning required 15 bars. Cut out parts of the specified length from bars with a cross-section of 40x40 mm and make pyramidal bevels or roundings at the front end of each of them, corresponding to the consoles and bosses B, C (Fig. 1a and lb).
Gable canopy frame
There are at least two ways to assemble a canopy with two slopes: from two or more (depending on the length of the canopy) triangular rafters or from two rectangular frames with sheathing, secured with crossbars. The second option is shown in the figure below, and the first will be a little further.
A canopy with a house is one of the popular options
Method one
Two quadrangles are assembled from a timber or thick board, which are united by a ridge board. The angle of inclination of the slopes is set by cuts on the ridge, fixed by crossbars - a spacer bar. Since the roofing material is laid from the ridge down, the sheathing strips are laid in the opposite direction. A continuous flooring is required under soft tiles. This can be moisture-resistant plywood or OSB.
How to make a canopy over a door in the shape of a house
Also, brackets are assembled on the ground - stops that will transfer the load from the canopy to a large area of the wall. It is better to assemble the structure on the ground (without fastening the roofing material). In order to lift and secure the canopy, assistants or the services of a manipulator will be required.
Method two
The second option is the assembly of individual rafter structures. Maybe this option will seem easier to you - all gable roofs are assembled according to this principle.
An example of a gable porch with a rafter system
Here, too, a frame is assembled from timber and brackets are needed. But the frame lies in a horizontal plane, supported by brackets. Two or three triangles are assembled from rafters, which rest on a ridge beam, and it rests on a post, the other end of which is fixed to the frame. It turns out a mini-model of a conventional rafter system.
To improve the appearance, bevels are placed near the counter. In the photo above they are curved, but this is far from necessary. You can simply make it from timber, sawing it at the desired angle. It is also better to assemble the system on the ground - it will not be possible to connect it smoothly at a height.
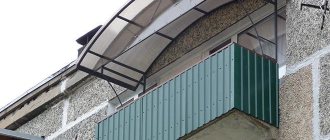
Made of metal
If the canopy frame is made of a metal pipe, everything is much simpler. The pipe has a high load-bearing capacity, so there are much fewer supporting and auxiliary elements.
Two identical triangles are cooked - according to the size of the future canopy. They are connected by jumpers, the length of which is determined by the “depth” of the visor. To prevent the cladding from bending, additional crossbars are welded.
Gable canopy over a porch made of metal pipe
The finished canopy structure is complemented by brackets - stops. In the picture above, the canopy over the porch has only a stop without slopes. For regions with little snow in winter, this is enough, but to hold a significant mass of snow, you will need a mow or stand. Or maybe both (as in the diagram below).
Beautiful gable canopy over the entrance, made of steel pipe with figured stops and pillars (diagram with dimensions)
Decorative elements are an optional part. There may be an ordinary triangle here.
Assembly and installation of the canopy (with your own hands but with an assistant)
1. Place a pair of sawhorses on a flat surface, place beams E on them and fix them (photo C).
2. Take one cross beam F, place it on the beams, 150 mm from the ends, and align the overhangs in front and behind (Fig. 3, photo D). Attach the block to the beams. Do the same with the remaining bars (photo E). Once you've finished installing the crossbars, paint the screw heads the same color as the rest of the canopy to protect them from moisture.
3. Attach the assembled brackets A-D to the trim or wall studs (photo F).
4. Place the E/F grid on top of the consoles and secure with screws, screwing them in at an angle (photos G and H).
Install the remaining bars of the grill. To ensure equal intervals between the bars, use a pair of spacers (in our case 180 mm). Then secure the bars sequentially with screws.
Installation of brackets. Drill and countersink pilot holes in the mounting boards, attach the brackets to the wall with long screws, and then paint the screw heads.
You can't do it without an assistant. Lift the assembled grille, place it on the brackets and align first the side and then the front and rear overhangs.
Finally secure the grille. After drilling the pilot holes at an angle, screw 65mm long screws through the beams into the console. Once installation is complete, paint the screw heads.
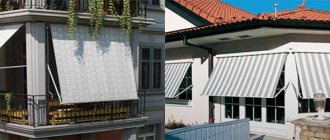
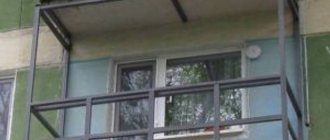
Canopy over the window
In most of North America, the difference between average winter and summer temperatures is quite large, which is typical for areas with a sharply continental climate. Therefore, orienting the long side of the house to the south allows you to make maximum use of solar heat during the winter months and significantly reduce heating costs. However, as summer approaches, the average temperature rises, and you have to worry about limiting the amount of solar heat entering your home in order to reduce the cost of maintaining comfortable conditions in it.
There are many known solutions to this problem , one of them is the installation of window glass with a special reflective coating, which reduces the amount of sunlight and heat entering the room. But nothing works as effectively as the most ordinary canopy or awning over a window. Choosing the right canopy size allows you to optimize the flow of sunlight and heat throughout the year. These relatively cheap and lightweight designs make it possible to effectively regulate the temperature in any room, creating the necessary comfort.
Typically, a sun canopy is a lightweight structure mounted above a window or glazed door. The height of the sun's passage across the sky varies depending on the time of year: in winter the sun is low, in summer it is directly overhead. Awnings should be used on the south side of the house, where they shade windows from the summer sun during the hottest time of day - midday, when the sun rises high above the horizon. On facades facing east or west, it makes no sense to use canopies, since in the morning and evening hours the sun is low above the horizon, so here fast-growing plants with dense foliage can provide more effective protection from direct sunlight to the windows of a one- or two-story house .
Fig 1. Window canopy project
When designing a canopy, it is important to choose the right dimensions, and the most important of them is depth. A properly designed awning should shade the window during the summer afternoon hours, but allow sunlight to enter the home through the window in the winter (Figure 1). In addition, the canopy must necessarily be wider than the window in order to effectively shade it during the hottest time of the day for two to three hours before and after noon, and not just when the sun is at its zenith. As a rule of thumb, for windows up to 1800mm wide and around 1220mm high, the awning should extend beyond the side edges of the window by at least 300-600mm. For wider and higher windows, as well as glazed doors, this distance should be even greater - ranging from 600 to 900 mm. These recommendations are intended for cases where the windows are oriented exactly south or when deviations from this direction do not exceed 15°.
Having determined the size of the canopy , you can begin to develop its design and possible finishing options. There is a wide field for creativity here, but first try to build on the design and shape of the main architectural elements and finishing details of the house itself. The canopy can be highlighted with color or eye-catching details, but the main thing is that it blends harmoniously with the style and architecture of your home. In Fig. 2-7 show several design options for canopies that can be used to shade windows, choosing the most suitable one for a particular home.
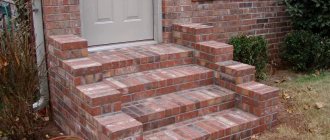
Purpose of the entrance canopy
If we talk about the structure as a whole, the canopy or canopy over the porch consists of a frame and roofing material (cladding). There may also be support posts that support the outer edge of the canopy. They are an optional element. They are needed when there is no confidence that the structure without additional supports will be able to retain precipitation.
Canopy over the entrance: general device
Precipitation generally means snow. In regions with a lot of snow, you can either make the slope of the canopy steep so that the snow melts quickly, or install additional supports. You can do both, as is usually done - the margin of reliability/strength reassures and instills confidence.
Frame and stand materials
The frame and supports of the canopy over the front door are made from:
- metal: steel angle;
- metal strips;
- round pipe;
- profiled pipe;
Rolled metal of various types and wood are two materials that are used in the construction of a canopy over the porch
Determining the dimensions of the canopy
To completely exclude the access of sunlight to the room during the hottest summer months, you need to correctly determine the size of the canopy. There are two ways to do this. The first one is to calculate the depth of the canopy using a very simple equation:
Canopy depth = Height/Kef 1,
where: “Height” is the installation height of the canopy, which is defined as the distance from the bottom edge of the window opening to the bottom surface of the canopy installed above the window (1525 mm in Fig. 1).
Arched canopy over the porch: manufacturing features
A canopy over the front door in the form of an arch cannot be called difficult to manufacture. It is more convenient to make this shape from a steel pipe, and from a profile, rectangular section. Using a pipe bender (you can do it manually, but it’s more complicated) you make several arches of the same size. They are connected by jumpers, the length of which is determined by the desired size of the roofing part.
Arched design is the simplest option
The first and last arches are connected by horizontal jumpers, brackets or, as in the figure above, ordinary stops are welded to the last one.
You can often see double arches with decorative and not very decorative filling. They are typical for large structures. Still, the windage and snow load turn out to be large and it is better to play it safe by making a safety margin than to do everything all over again.
How to choose a visor?
In order for the canopy not only to fulfill its functions, but also to look harmonious with the facade, it is necessary to take into account the design features of the building and perform this detail in the same style. Having a visor has many advantages:
- Effective protection against snow and icicles.
- Creating additional shadow if the window faces the sunny side.
- Debris protection.
- The ability to open the window in rainy weather without the risk of moisture entering the room.
The visor can be decorated in any style. You will be presented with a large selection of sizes, shapes, and stylistic designs. The type of fastening may also differ: it depends on the type of structure and the material from which the building is constructed. The finishing of the facade plays an important role, since in some cases it can interfere.
The technology for manufacturing roofs from profiled galvanized sheets is described on our website.
What does the visor consist of?
The window canopy has several parts. The main part is the supporting element: it can be made of different materials, for example, metal or wood. A frame is attached to it, onto which the roofing material is subsequently attached.
When choosing a frame, great attention is paid to its reliability. The stiffer and stronger it is, the better: the durability of your visor will depend on this. The canopy must withstand the effects of wind and the weight of snow that can put pressure on it in winter. To make a frame with your own hands, you can use wooden blocks, a profile pipe, a metal corner, or aluminum. Don’t forget about the supports: they increase the rigidity of the structure, take on its bulk, prevent the canopy from sagging and serve as additional fastenings. Thanks to the supports, the load is evenly distributed on the façade.
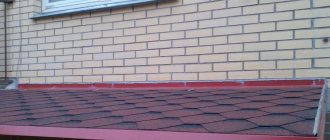
The covering of the visor can be made of various materials. It is installed after the first two stages of work have been completed. Polycarbonate or corrugated sheets are often used, less often soft roofing, metal tiles, triplex, wood. Typically, canopies are covered with the same roofing material as the roof. This makes the appearance of the building unified; the canopy does not stand out from the overall design in terms of meaning.
The most common canopy is the modular canopy. Sometimes a canopy over a window is made with your own hands from reinforced concrete, but such a design is much more complex in its technical design. This variety is distinguished by its large mass and dimensions. You can find it in multi-storey buildings above the entrance to the entrance, so it is rarely used for private houses.
Work order:
1. First of all, decide on the width of the future visor (according to your needs). The length of the canopy above the window should be 8-10 cm less than the length of the canopy of the house itself on the roof. — Based on the length of the balcony and the number of sections in the frame, we make blanks for the brackets. Take a strip (40x5 cm) and bend it at an angle of 20/25 degrees.
(h=30/35 cm, L value - depends on the protrusion of the canopy on the roof)
2. To give rigidity to the bracket, take a corner 25x25cm or 35x35cm.
3. Using a metal hacksaw, cut off one shelf of the corner (see Figure 2) from both ends. 4. We bend the second shelf at the same ends so that when applied to the inside of the bracket, it fits tightly to the surface of the strip (Figure 1). 5. Next, you need to drill the ends of the corner and strip and tighten them with bolts. The result is a rigid structure. The number of brackets depends on the number of sections in the frame and the length of the balcony, respectively. — Then we take a lath (2x4cm) and prepare a frame that can be made solid for the entire length of the balcony. You can also make a frame from several sections, which will be convenient to install from your apartment.
6. To cover the canopy, take plastic slate and cut several sheets (for ease of installation) to the required length. We lay it on the frame(s) so that on one side of the frame the slate is flush with the end of the frame, and on the other side one wave should protrude beyond the end (see Figure 4).
7. Before installation, drill 2-3 holes (4.5-5 mm in diameter) in the bracket on side h - for attaching the frame section to the frame beam. 8. We make 2 more holes (4 mm in diameter) on side l - so that the hole falls on the center of the longitudinal rail of the visor frame. We position the brackets and fasten the frame to the beam with screws (4-5cm X 4.5mm). 9. We begin the installation of the canopy itself from one of the edges of the balcony, so that the next section protruding in a wave lies on the side where the slate is flush with the frame. Each section is attached with a screw to the bracket through a hole in the bracket strip.
Source of the article: https://www.diy.ru/post/2374/
What are the advantages of modular design?
The advantages of this product include the following properties:
- Lightweight, compact design that is easy to make with your own hands. You can also install such a visor yourself; this can be done quickly with a simple set of tools. Since the sections are removable and the choice of materials is varied, you can assemble the visor from anything. Many summer residents have the necessary materials, so if you use your imagination, you won’t have to buy anything else.
- The structure of the canopy is three-layer, which allows you to increase its strength and use the structure all year round. A properly constructed product will not be afraid of temperature changes, weather conditions, and will be able to reliably protect the window.
- Such a canopy can be installed not only in a private house, but also over the window of an apartment in a multi-storey building: it does not require permits and will be useful if neighbors who live above you are not the most tidy, and debris will fall from their balconies and windows.
Choosing a design shape
Depending on the building style and shape of the window, you need to select the shape of the visor:
- Most often you can find a single-pitch model. This is due to the versatility of its use, ease of installation and assembly. Single-pitch canopies fit almost any facade.
- A gable visor is less commonly used. It is a little more difficult to create, but it can provide good protection from slanting rain, which a lean-to roof cannot provide.
- If you want to give the building originality, you can use an arched canopy. A kind of dome will become the highlight of your home, but it should be noted that it has quite a lot of complex components, so assembling such a canopy will require a lot of effort and will cause difficulties. The same disadvantages can be noted with the concave design. It is difficult to collect, and it protects less well from deposits, since some of them remain on the roofing material.
How to connect the canopy over the porch and the wall of the house
One of the most difficult moments is to join the covering of the canopy over the porch so that water does not flow down the wall. Usually, standard methods of joining the roof are used - using a bumper strip. This method is suitable for any roofing material, as well as sheet metal and wood. You just need to choose the right color. There are two approaches: matching the wall or matching the roof covering of the canopy. The options are equal, so it’s up to you to decide/choose.
How to connect a canopy to a wall
A groove (5-7 mm deep) is made under the fender strip in the wall. The edge of the plank is inserted into the recess, secured, and the seam is sealed with moisture-resistant sealant for external use. The other edge of the strip rests on the roofing material. When water runs down the wall, it flows onto the plank, from it, bypassing the joint, onto the roofing material and further into the storm drain system or directly to the ground - depending on how it’s done.
If you use metal tiles, sellers have a special wall profile. It can also be used with other materials - it is important to choose the color. The standard unit includes rubber seals, which are placed a couple of centimeters from the outer edge. In this case, during strong winds, water and debris do not fall under the bar.
Standard solution for metal tiles. Suitable for slate and corrugated sheets
If the canopy over the front door and porch is made of polycarbonate, glass or sheet plastic, the method described above is unacceptable - it looks too rough. In this case there are two options:
- Place a sealing tape made of rubber or polyurethane between the polycarbonate and the wall. The material is pressed against the wall through this gasket, then fixed to the frame using self-tapping screws. You should look for seals at points of sale of polycarbonate. How to seal the joint between a polycarbonate canopy and a wall
- Place the sheet as close to the wall as possible, and seal the joint with transparent sealant (not white, because it will quickly become an incomprehensible color).
There are no other good options. You can only combine both proposed ones for reliability.