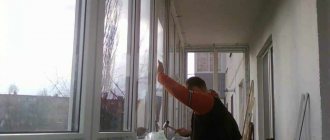
Being on a balcony without a roof is uncomfortable and in some cases dangerous. It is open to the scorching sun, precipitation in the form of snow, rain, hail, as well as icicles and other unwanted objects that may fall from above. If making a solid structure in the form of a roof and glazing is not included in the plans, then a canopy over the balcony would be an ideal option. It protects the people there, the slab and parapet, as well as the window and door unit from external factors. Below you will find information about the features of canopies, their types and installation.
What is the difference between a canopy and a roof and what are its advantages?
A roof is usually called a structure that is installed on top of the end walls or glazing frames. It has a frame and is attached to the external wall of the building and to the glazing of the balcony. Most often, roofs are insulated from the inside and sheathed with trim.
The canopy over the balcony has a simpler design. It is fixed to the outer wall of the house, sometimes additional supports are used.
It is important to know! Even at the planning stage, it is necessary to obtain permission from the management company to carry out work. Restrictions may be related to the architectural features of the building and the aesthetic appearance. The latter is relevant for balconies facing the central streets of the city.
Having decided to install a canopy on the balcony, owners will receive the following benefits:
- The main task of the canopy is protection from atmospheric phenomena in the form of snow, hail, and rain. The accumulation of moisture quickly destroys floor coverings and balcony slabs. In addition, the visor is indispensable when snow melts and icicles form.
- The decoration of the balcony and the objects located there will receive protection from large amounts of sunlight. Owners will also be more comfortable staying in this room in clear weather.
- A hanging balcony without a roof is open to the wind from four sides. By covering it from above, you get a less drafty room.
- Cigarette butts and other debris may fall from balconies and windows located above. The visor will also cope with this problem.
- For apartments located on the upper floors, a canopy protects against unwanted entry by strangers. Jumping from the roof of a house onto an open balcony is easier than jumping over a canopy that is located at an angle or has a convex shape.
- A beautiful canopy made from suitable materials will decorate the appearance of the building.
If you compare the canopy on the balcony with the roof, you get the following positive aspects:
- lower cost;
- possibility of self-installation;
- low weight of the structure;
- does not interfere with the free flow of air.
Internal sound insulation
This is the method of sound insulation that is most often used, since its implementation does not require overcoming additional difficulties that arise when it is necessary to go down onto the roof of the balcony. Before installing soundproofing material, it is necessary to exclude other possible causes of noise. All fastenings are tightened and the roof rafter system is rechecked. If the roof of the balcony is also the floor for the balcony located above, then it is worth discussing with your neighbors the possibility of sound insulation. Bituminous tape is glued to the back side of the flashings, or the space under them is blown with polyurethane foam.
The need for the next step is determined by the susceptibility of the sound-insulating material to moisture, as well as the possibility of moisture getting under the roofing. If the listed factors exist, then the first thing you need to do is take care of good waterproofing. To do this, a membrane is fixed on the inside of the roof, which will prevent moisture from penetrating into the sound insulation. In some cases, this will require first removing the roofing sheets. Once the waterproofing is ready, you can begin installing the sound insulation. Certain types of material may require special fasteners in the form of umbrellas or special brackets.
The sound insulation is fixed closely. The material must cover the entire surface to achieve the desired result. Mineral wool is attached between the elements of the rafter system, and not to the roof deck. If the soundproofing material is hygroscopic, then after its installation the surface is covered with a vapor barrier membrane so that the steam that rises under the balcony roof does not condense directly on the soundproofing material. To give the ceiling on the balcony an attractive appearance, decorative finishing is installed in the form of plastic, wooden lining or other material. During installation, it is important to ensure that no component of the waterproofing is damaged. One of the options for soundproofing a balcony roof is shown in the video below.
Types of canopies for balconies according to shape
When hearing the word “visor”, everyone’s own image of the object comes to mind. Indeed, this architectural form can look completely different depending on the shape of the roof, covering materials, and dimensions. Some are more like a full-fledged roof, others look like a beach umbrella.
Let's get acquainted with the main types of awnings on the balcony, depending on the appearance:
- Single-pitch is the simplest and most common type. It is a straight surface located at an angle relative to the wall of the house. This slope is very important and does not allow moisture to linger on the roof. Thanks to this, the load on the fastening system does not increase and the coating materials are not damaged. The disadvantage is low wind resistance.
- Gable. This canopy for a balcony is made in the form of two wings located at an angle. The structure looks more cumbersome than the previous view. For this reason, it is appropriate to use it on large balconies.
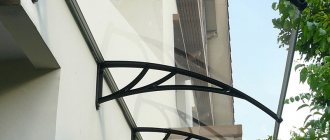
- Arched. It has the shape of a semicircle of different radii. Of all the varieties, the appearance is the most attractive, but you will have to face restrictions on the choice of materials. The most suitable is polycarbonate. Thanks to the convex design, it is resistant to wind loads.
- Shatrovoy. Looks like a hemisphere or dome. Thanks to this, it protects against weather conditions more reliably than other types of structures. To enhance the effect of the tent canopy over the balcony of the last floor, they make the area of the balcony slab larger.
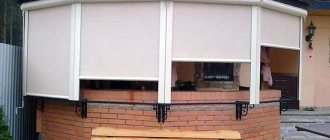
- In the form of a marquise. This design is mobile. The awning folds and unfolds using mechanical or automatic control. The fabric has a moisture-resistant impregnation, and any color can be chosen according to the customer’s wishes.
On a note! Tent and arched options are the most difficult to install yourself. It is recommended to entrust the work to professionals.
We make a canopy over the balcony in 4 stages
Often, balconies on the top floors do not have canopies, which is very inconvenient, since the presence of a canopy makes even an open balcony much more practical. Fortunately, solving this problem on your own is not difficult; the only thing, as in any other matter, is that you first need to familiarize yourself with the nuances of the work. Therefore, in this article I decided to tell you in detail how to make a canopy over a balcony yourself.
The canopy is a functional and decorative element of the balcony
Making a canopy
The canopy can be called a necessary element for comfortable use of the balcony, as it performs a number of important functions:
- protects from precipitation;
- provides shade on the balcony in the summer;
- prevents debris from falling onto the balcony;
- serves as a decorative element.
It must be said that there are quite a lot of options for canopies that meet all these requirements. As an example, I will tell you how to make a structure from beams, since this work does not require a welding machine or any skills in working with metal. Accordingly, every home craftsman can cope with it.
The entire work process can be divided into five main stages:
The main stages of making a canopy for a balcony
Below we will consider in detail how the work is done with your own hands at each of these stages.
Stage 1: Structural Design
It should be noted that the design of the visor, depending on the installation method, is divided into two types:
| Canopy type | Peculiarities |
| Independent | In this case, the canopy is made as a separate structure from the balcony, which is attached to the wall using anchors or other fasteners. This solution is perfect for open balconies and terraces . |
| On supports | In this case, supports are attached to the balcony, which serve as the basis for the canopy. This design is the best solution if the balcony is planned to be glazed . |
An example of a visor frame design
Regardless of which method of mounting the visor you choose, the design of the frame will be almost the same - it is based on several right triangles, which are connected by three slats, as shown in the diagram above .
In the process of designing a canopy, it is very important to correctly indicate the dimensions of all parts in millimeters. They depend on the size of the balcony itself, i.e. The width of the canopy corresponds to the width of the balcony, and the length corresponds to its length.
As for the design drawing, it can even be done by hand. The main thing is that it is clear to you.
A beam with a cross section of 40x40 mm can be used for the manufacture of load-bearing frame elements
Stage 2: preparation of materials
As mentioned above, the easiest way to make a canopy is from wooden beams. For example, a section of 40x40 mm will be quite enough to make load-bearing structural elements.
Of course, if you wish, you can make a frame from metal, for example, from a 20x20 mm profiled pipe . Moreover, for this it is not necessary to use a welding machine, since the connection can be made using special fasteners and bolts.
Of course, in addition to timber or pipes, you will also need some other materials:
- roofing - this can be corrugated sheeting, slate, polycarbonate, metal tiles or any other suitable material;
- wooden slats or boards for lathing the canopy and other frame elements;
- protective impregnation for wood;
- waterproofing film;
- bolts, anchors, etc.
The timber must be smooth and well dried. In addition, there should not be any knots on it.
Independent visor frame design
Stage 3: collection and installation of the frame
After preparing the materials, you can begin assembling the visor. First of all, let's look at how an independent canopy on a balcony is made:
- start work by impregnating the timber and other wooden elements with a protective compound . The liquid is rubbed into the wood with a sponge or paint brush. After the surface has dried, the impregnation is applied again;
- Now you need to fix a horizontal beam on the wall at a height of about two meters above the balcony floor. The beam should be located above the balcony along its entire length. To fasten the beam, use anchors or even ordinary dowel-nails in increments of about 10-15 cm;
- Next, you need to fix vertical slats about 30-40 cm high on the wall in increments of no more than 50 cm. The lower part of the racks should be attached to a horizontal beam using self-tapping screws;
- Now, on top of the racks, use self-tapping screws to attach another beam, parallel to the first, and fix it to the wall;
- Next, attach the slats to the bottom beam, which should be positioned horizontally, opposite the posts. Their length should be equal to the width of the balcony;
In the photo - a metal independent canopy frame
- then connect the free edges of the slats with a strip, which should be located in the same plane with the lower beam fixed to the wall;
- Now you need to secure the visor joists to the frame, as shown in the diagram above.
You should not make the canopy too high, as this increases the likelihood of precipitation getting onto the balcony.
This completes the installation of the independent frame.
Design of the canopy frame on supports
The instructions for installing the frame on supports look a little different:
- The installation of the canopy frame should begin with the installation of the racks. The rear posts are attached to the wall using anchors or dowel-nails, and the front posts are fixed to the fence with metal corners and self-tapping screws. Keep in mind that the rear posts should be 30 centimeters higher than the front ones, which will ensure the slope of the canopy ;
An example of attaching a post to a fence
- then the posts should be bandaged, connecting their upper part into a single structure. This bandage serves as the basis for the roof of the canopy;
- the horizontal beam that is adjacent to the wall should be fixed with dowel nails;
- then the canopy rafters are attached in increments of 40-50 cm;
- then a second (lower) beam is mounted on the wall at the same level as the front trim strip, as shown in the diagram above;
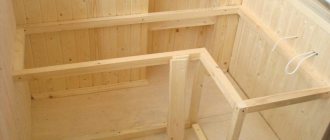
- Between the two beams under the rafters, horizontal slats should be fixed, which will strengthen the structure, and can also serve as the basis for the balcony ceiling if you hem it.
This completes the process of assembling and installing the frame.
Sealing the balcony canopy
Stage 4: framing the frame
Regardless of the design of the canopy over the loggia or balcony, the process of covering the frame looks the same:
- First of all, you need to secure the sheathing to the canopy. As a rule, it is located along the structure;
- A waterproofing film is attached over the sheathing. If you are using several sheets, overlap them and seal the joint with tape;
- Now you need to fix the roofing material on top of the waterproofing film. During the installation process, keep in mind that the sheets of material should protrude 15-20 centimeters beyond the frame so that precipitation does not fall onto the balcony;
- At the junction of the roofing material and the wall, a flashing in the form of a tin corner should be installed, and adjacent surfaces should be treated with construction sealant.
Roofing material should be installed and sealed from the roof side. It is better to entrust this work to specialists who have permission to carry out work at height and all the necessary equipment. Of course, the price of the visor in this case will increase, but you will not risk your life, and the installers will efficiently perform the most critical stage of the work - sealing.
Here, in fact, are all the nuances of making a canopy for a balcony. As mentioned above, you can make the same design from metal. Moreover, if you wish, you can decorate it with forging and make it a real decoration for your balcony.
Conclusion
The canopy for the balcony has a fairly simple design, so making it yourself is not difficult, especially if the frame is wooden. The only difficulty is installing the roofing. Moreover, this work is not only difficult, but also dangerous, so it is better to entrust it to specialists .
See the video in this article for more information. If you have any questions about making a canopy, ask them in the comments, and I will be happy to answer you as soon as possible.
What to make a visor from
Whatever the shape of the canopy, it consists of two main elements: the supporting frame (frame) and the covering. Frames are made of metal or wood. Each material has pros and cons:
- The metal construction is very strong and durable. All parts are coated with anti-corrosion agents or paint. The disadvantage is the heavy weight and the need for special equipment (welding).
- Wooden frames are cheaper than metal frames. Made from high-quality timber and coated with protective agents, they can last a long time. But, like any structure made of wood, outdoors it quickly collapses under the influence of moisture and extreme temperatures. In addition, it has a high fire hazard.
The choice of coverage is quite large:
- slate;
- profiled sheets;
- polycarbonate;
- ondulin.
The choice of roof type primarily depends on the shape of the canopy. For simple forms of single- and double-pitch models, regular or bitumen slate, metal tiles, and profiled steel sheets are suitable.
If you need to make a rounded shape, as in an arched or hipped type, then polycarbonate is used. Thanks to its pliability, it can be given the desired shape.
Preparing tools
After creating the drawing and selecting the material, you need to prepare the tools.
During installation you will need:
- large or small grinder with cutting wheels for metal;
- hammer drill;
- welding machine;
- screwdriver;
- hammer;
- brushes;
- knife;
- wood hacksaw.
You will also need some consumables:
- metal corners;
- profiled metal pipe;
- anti-corrosion agent for treating welding seams;
- anchors, dowels and roofing screws;
- primer;
- acrylic sealant or silicone.
Once all the tools and supplies are collected, you can begin creating the frame.
Advantages and disadvantages of using different materials
You can finally decide on the choice of coverage after familiarizing yourself with the pros and cons of each:
- Slate is a traditional roofing material. It has all the qualities necessary for coating: quite strong, durable, has good sound insulation and moisture resistance. Disadvantages include heavy weight, fragility during transportation and installation, and lack of assortment.
- Corrugated sheeting – made from galvanized metal sheets. The presence of relief ensures resistance to mechanical stress and gusts of wind. It is light in weight. Profiled sheets are available in various colors. A significant disadvantage of the material is noise during rain and wind; additional sound insulation of the balcony canopy will be required. For this purpose, sheets of soft insulation are used, which reduce vibration when impacted by drops.
- Polycarbonate is a popular roofing material that is made from plastic. It is translucent and comes in various shades. A polycarbonate balcony canopy is an excellent solution for shaded balconies. It closes the room from above, allowing sufficient sunlight to pass through. The material also has good sound-absorbing properties - raindrops will not create noise. It is quite durable, but requires care during installation. The main advantage of polycarbonate is its flexibility, which allows it to be used for canopies of non-standard shapes.
- Ondulin is a material similar to slate, but lighter and more pliable. It has various colors and attractive appearance. It has an important quality for roofing material - resistance to natural phenomena and the development of mold and mildew.
Healthy! Polycarbonate is available in two versions - monolithic, which has great strength, and cellular, which bends well. There is also a difference in price - monolithic ones are more expensive. They make a canopy over the balcony from polycarbonate of both types.
How to make a visor
Before starting work, you must obtain permission from the management company. Before this, you will need to make a design for the future visor. It is necessary to calculate the dimensions and weight of the structure, determine the materials of the frame and covering, determine the load on the load-bearing wall and the method of fastening.
What and how to make a frame for a visor
The supporting frame is most often made of metal. It is guaranteed to withstand the weight of heavy roofing materials, such as slate. A wooden frame weighs less, but is less reliable. This option is used when it is necessary to lighten the structure in order to reduce the load on the wall or supports.
Aluminum or forged metal is used to create the support frame. Aluminum, like wood, has less weight, but is also inferior in strength to metal. Forging looks aesthetically pleasing, especially in combination with glass or polycarbonate.
Dimensions and slope of the visor
Canopies, unlike roofs, make the balcony area slightly larger. On average, their length is 40 cm longer than the slab, and their width is 50 cm. This is due to the fact that the balcony does not have glazing, which means that only the upper fence protects from rain. This may not be enough, especially in windy weather. Increasing the canopy area provides better protection against precipitation entering the room.
What to use for soundproofing
The choice of sound insulation for a balcony roof is determined by the type of roofing, as well as the exact method in which the process of eliminating excess noise will be carried out. The material can be laid from the inside or outside. The following product options are most often used to solve emerging nuances:
- "Izolon";
- "Vibroplast";
- mineral wool;
- bituminous material.
The first version of sound insulation is made on the basis of polyethylene, which undergoes a foaming procedure. Thanks to this, the base layer is saturated with air bubbles, which do an excellent job of sound insulation. One or two surfaces are covered with foil. This allows you to increase the reflective properties of the canvas. Izolon, which is used for sound insulation, is produced in slab format and in rolls. The product option is selected depending on specific conditions. The thickness of the base can reach 5 cm and the width of two meters. “Izolon” is suitable for internal sound insulation; it is fixed to the surface using an adhesive composition.
The advantages of the material are its long service life, which can reach 80 years. The level of noise reduction depends on the thickness of the material used, the average is 20 dB. The product tolerates temperature changes well. The lower operating limit is -60 degrees Celsius, and the upper limit is +120. Another advantage is elasticity, which simplifies the processing of surfaces of complex shapes. Izolon can act as insulation, reducing heat loss. The disadvantage of implementing sound insulation using such a base is the lack of vapor permeability.
“Vibroplast” is not a completely standard material for household use. This is professional sound insulation, which is used in cars. Nothing prevents it from being used for a balcony roof. There is already a layer of adhesive on the surface of the product, which greatly facilitates the procedure. The material is based on bitumen and auxiliary substances. The product is produced in sheets with a thickness of up to two centimeters. The front side is covered with foil. Some types of Vibroplast require the use of a technical hair dryer for high-quality gluing. Other options are cold glued to the balcony roof. Thanks to its flexibility, Vibroplast fits perfectly onto any suitable surface. The weight of this material is slightly greater than the previous one, so it is necessary to count on an increase in the weight of the roof. The disadvantage is the possibility of peeling off from the metal roofing due to strong heat from the sun.
Various bitumen tapes can be used as external and internal sound insulation for the balcony roof, which often also have a layer of glue applied and therefore do not require additional tools for installation. The disadvantage of such products is the specific smell that appears when heated. Ordinary mineral wool can serve as an insulator for the roof on the balcony. Most often it is used to implement insulation, but due to its density and other characteristics it perfectly absorbs sound waves. The fixation method will depend on the rafter system used and the material from which the roof is made.
How to make a metal frame
Step-by-step process for creating a support frame:
- Cut metal pipes into pieces of the required size and weld parts of the structure.
- Clean weld seams and treat with anti-corrosion agent.
- Drill holes for fasteners and apply primer to all parts.
- You need to mark on the wall how the frame will be located and where the joints will be. This is necessary so that the entire structure is located symmetrically relative to the balcony slab.
- Using a hammer drill, holes are made in the wall cavity for dowels.
- With the help of an assistant, the frame is applied to the wall, aligned with the applied markings and fixed with dowels into the drilled holes.
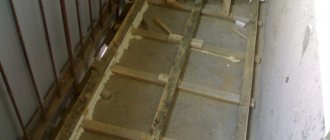
- A wooden beam sheathing is fixed to the trusses.
- All cracks and holes are sealed. To do this, use sealant or silicone glue.
How to lay roofing material
Installation of canopy flooring is carried out only in dry, windless weather. The method of fastening depends on the selected roofing material:
- self-tapping screws are used for corrugated sheeting;
- ondulin and slate are attached to nails with rubber gaskets;
- polycarbonate sheets are fixed with screws and plastic washers.
Progress of the final work on installing the canopy over the balcony:
- Cut and cut roofing material. They do this outside and then lift the cut sheets using ropes.
- Fix the coating using one of the methods described above. Corrugated sheeting, slate and ondulin are laid overlapping to avoid roof leakage and debris. Treat existing cracks with sealant.
- To ensure sound insulation, insulation is placed under the covering.
- To ensure the drainage of rainwater, a gutter is installed along the edge of the canopy.
Roof installation
This work is also performed at height, so professionals must install the roof, but control by the customer will not hurt, especially the following points:
- Sheets need to be fastened only with recommended hardware;
- The edge of the roof adjacent to the wall must be recessed into the groove with the sealing and sealing of the interface with a waterproof compound.
Whether to insulate the roof or not depends on the plans for arranging the balcony, but for safety reasons the canopy is often equipped with electric heating - this prevents the formation of ice.
Visor design
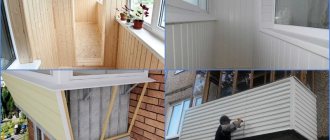
The inside of the canopy can be covered with decorative panels: siding, clapboard. This will hide the metal box and give it a more cozy look. For polycarbonate canopies, a forged support is installed. In this case, the frame does not need to be masked; it itself acts as a decorative element.
The interior decoration of a balcony with a canopy is arranged in the form of a summer terrace. Rattan furniture is installed there, and flower pots are hung on the parapet. It turns out to be a corner for relaxation in the warm season, which is comfortable to be in both on a sunny day and in rainy weather.