Stages of loggia and balcony repair
Decorating a balcony with your own hands should be done consciously. In this case, the stages of reconstruction can be performed well only in this order:
- Strengthening balcony slabs and parapets.
- External finishing of the balcony using siding, corrugated board, lining, polycarbonate.
- Balcony glazing.
- Waterproofing, insulation from the inside.
- Interior decoration of the balcony.
For that. In order to carry out a quality balcony repair with your own hands, you must carefully and responsibly approach the choice of finishing materials, carefully prepare the base, carry out installation, and then properly maintain the cladding during operation.
Finishing the balcony begins with strengthening the base. This is the exact answer to the question of where to start renovating a balcony.
- First, you need to seal all the seams and cracks using cement-sand mortar.
- Secondly, close the parapets of the open balcony for insulation using lightweight foam blocks that are resistant to moisture and retain heat well.
- Thirdly, after strengthening the balcony slab and installing the front wall of the loggia, it is necessary to thoroughly putty the floor using a penetrating moisture-proof putty, and prime the inner surface over the largest possible area of square meters.
- Fourthly, make waterproofing.
Exterior finishing of the balcony is an important first stage of balcony renovation. For these works, it is better to use PVC siding, corrugated board, and polycarbonate, since these materials are most resistant to temperature changes, high humidity and exposure to ultraviolet rays. Also, for such purposes, a lathing made of a metal profile is better suited, since wood can become deformed under the influence of the sun and moisture.
The space inside can be sealed with special insulation to enhance thermal insulation. For this purpose, polystyrene foam is suitable, which is attached to the outer surface using glue and special dowels with wide caps. The outer cladding is attached to such a balcony frame. However, when using siding, it is better to leave small gaps between its panels.
Glazing. At this stage, you need to carefully take measurements, taking into account meters in the horizontal and vertical directions. If necessary, you need to dismantle the old windows. Then, a window frame is installed strictly level on the parapet of the open balcony, which is securely fastened on each side. The space between the frame and the walls must be sealed using polyurethane foam.
If you plan to carry out a major renovation of the balcony, expanding the total area of the apartment by several meters, you need to insulate the balcony space and carefully seal all small cracks. To do this, it is better to use metal-plastic PVC bags, which are inexpensive. A loggia with such glazing takes on a modern, beautiful appearance and increased functionality.
Wooden windows have great aesthetic appeal. They can also be used to ensure that the loggia has a beautiful appearance and is warm enough. The disadvantage of such windows is their high price, so it is advisable to use them for glazing a small balcony.
Do-it-yourself rough finishing of a balcony includes waterproofing and insulation. Consistent implementation of such work allows us to answer the question of how to decorate a balcony from the inside.
Style
If you plan to make a loggia combined with any of the rooms, then it is quite likely best to make the same design inside it as in the room. This will create a feeling of a single whole, which will have a positive effect on the appearance.
- If you need to make a separate area out of the balcony, then it is best to use the same style, but in different shades.
- In this way, the loggia will contrast, highlighting a separate area from the room, but at the same time it will be harmoniously combined with it.
For example, if the main shade of the bedroom is a soothing cream, then for a separate area you need to choose something invigorating, such as mint green. It will allow you to concentrate on your work, and at the same time it will not strain your eyes too much when working. Citrus shades are not recommended because they will be distracting.
Finishing with plastic panels
Plastic panels
Plastic panels are a convenient and practical type of finishing. They are easy to cut, bend, and have high strength. Caring for them is also quite simple. To panel the ceiling and walls of the balcony, you will need wooden slats and a ceiling profile. The slats are attached to the insulated surface in increments of 50-70 cm, aligned strictly vertically. The ceiling profile is mounted along its length, secured with 4-6 mm dowel nails.
Finishing with plastic panels
For corner connections, the ends of the profile are cut at an angle of 45 degrees; It is more convenient to trim the ends using a special device with grooves - a miter box. Sheathing posts must be installed in each corner of the balcony: if this is not done, the panels will sag in the corners, and the entire finish may be deformed.
Plastic panels. Balcony finishing
For the internal lining of the balcony, it is recommended to use plastic panels with a width of 10 to 20 cm and a thickness of 1 cm, as well as guides and dihedral corner profiles. The guides are screwed to the sheathing with screws 20 mm long and with a wide head, placing them in the corners of the room and along the perimeter of the openings.
Frame for panels
Fastening panels
Fastening panels
Now the panels are cut to length, placed with the groove up to the surface and, bending them in an arc, insert both ends into the guide profiles. Having straightened the panel, install the next one, then move both boards tightly and secure with screws.
The last panel is cut to width, a little silicone is squeezed into the grooves of the guides, the cut board is inserted and lifted up until it stops. Holding the panel in this position, insert the missing fragment and tightly join the edges. The areas above and below the openings are sheathed last, then platbands, ceiling moldings, and plinths are attached.
Electrification
Without lighting, it will be inconvenient to use the loggia at night. Electricity is most often supplied to heated premises that are used year-round. But modern technologies make it possible to electrify cold, unglazed balconies.
The following types of equipment are usually installed:
- Lighting on the ceiling, walls.
- Sockets, switches.
- Heating - convector or heated floor on the balcony.
- Clothes dryer on the balcony.
- For a winter greenhouse - an air humidifier and a system for maintaining optimal temperature conditions.
- In the recreation room there is a TV and a stereo system.
It is advisable to install the wires before finishing the finishing work. You can extend the wires for lighting from the junction box. Hidden wiring is more difficult to do, since you will have to ditch the walls. Therefore, in most cases, the wires are attached to the wall and, if necessary, covered with a plastic box on top.
Read more in the article “How to install light on a balcony“
Types of balcony repairs
In principle, balcony repair options can be divided into two main categories - cosmetic, which does not require major reconstructions and administrative approvals, and capital, which often requires obtaining the appropriate permit.
Any owner is free to carry out cosmetic repairs inside the balcony himself, without regard to housing maintenance organizations
- When making cosmetic changes, you can simply paint the walls, lay tiles on the floor and sheathe the fence with waterproof material. This process does not require any complex calculations, since the load on the balcony slab practically does not increase.
- Another option is to expand the balcony area, erect a permanent wall, insulate and glaze, or install panoramic windows. In this case, it is recommended to invite specialists who can determine how much the load on the load-bearing slab can be increased, or whether it will have to be strengthened by creating an additional metal structure.
Open room
If you prefer an open space, glazing may not be necessary. On the area being developed, you can create a wonderful summer recreation area. To do this, a table and several chairs made of moisture-resistant materials that are resistant to fading are installed here.
It is advisable to organize a mini-garden by installing flower pots on the floor or on hanging structures. To achieve this, you will have to work hard:
- remove excess trash from the loggia;
- determine how much the room is exposed to natural factors, for example, whether an additional canopy is needed to protect from rain;
- assess how high the level of illumination is, what design can be chosen and whether protective structures will be required;
- select materials with excellent moisture-resistant parameters, evaluate the suitability of their texture and calculate costs.
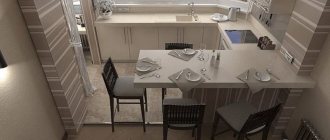
Cosmetic repairs of balcony loggias
At this stage, the main thing is imagination. Only financial possibilities can limit you. A loggia can become a cozy, secluded place where you can play sports, have a tea party or grow flowers. The selected finishing material completely determines the style of the balcony.
Here are the most popular ways to redecorate a balcony and what it can be used for.
On your loggia you can arrange:
- Greenhouse. For this plan it is necessary to make additional lighting and insulation. Plants that bloom all year round completely offset all your costs.
- Tea room. To do this, you can equip your loggia with a wooden table, a couple of armchairs, and a deep-pile carpet.
- Study. In a small apartment, the loggia will find a way to create personal space. To do this, the room is complemented by a computer desk, chair and additional lighting.
Choosing the right glazing
The initial stage of the repair procedure is the selection of glazing for balcony windows and then its installation. There are two options, “cold” and “warm”.
- Cold glazing means installing window products made of polyvinyl chloride or aluminum, in which the glass is made of a single layer. This system will protect those on the balcony from gusts of wind, dust will not penetrate into the space, and rain and snow will not get there. But in this case the heat inside the balcony will not be retained. And in the cold season there will be low temperatures.
- Warm glazing means that window products made of wood, warm aluminum or PVC profile are installed on the balcony, and a single-chamber or even double-glazed unit is placed inside. Then those living in the apartment can go onto the balcony and stay there for a while even during the cold season. Another case is the glazing of a balcony, when this space is supposed to be connected to the living room to which it adjoins. Then they buy structures that have an installation width of 70 millimeters or more, inside which there is a double-chamber double-glazed window, the thickness of which is 40 millimeters.
Glazing a balcony with your own hands is not difficult for a person with minimal repair experience, and inviting a specialist for this purpose is acceptable, but not necessary.
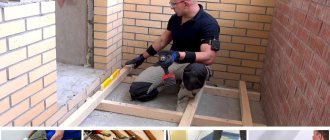
Construction of a balcony on a foundation
Foundation
Extension of a balcony
If the balcony is attached to the first floor, a simple strip base will be sufficient. If you are constructing an extension on the higher floors, build a strip-column foundation.
In general, the procedure for arranging concrete foundations remains almost the same. The following are instructions for constructing a strip-column foundation. By removing recommendations for installing poles from the manual, you will receive ready-made instructions for installing a strip base.
Foundation
First step. Mark the future foundation on the ground. Use pegs and string to mark.
Marking
Second step. Get rid of the top layer of soil. Dig a trench of the required depth (determined in accordance with the soil characteristics of the area) and holes for the posts.
Third step. Drive (screw in) the support piles. You can also make supports yourself from pipes, concrete pillars or other suitable materials. To ensure additional strength of the installation, before installing the pillars, the bottom of the pits can be filled with a 20-30 cm layer of concrete. The empty space between the walls of the pits and the pillars after their installation is also filled with mortar.
Fourth step. Compact the bottom of the trench, fill it with a 10-centimeter layer of crushed stone and a 15-20-centimeter layer of sand. Thoroughly compact each layer of backfill.
Fifth step. Assemble the formwork from durable boards.
Sixth step. Lay the reinforcing frame. Use reinforcement with a diameter of 10-14 mm. As a result, you should get a reinforcing mesh with a cell size of no more than 150x150 mm.
Seventh step. Pour the concrete and give it a month to gain strength. It is recommended to dismantle the formwork after the concrete has completely hardened.
Eighth step. Cover the frozen foundation with waterproofing material (bitumen, roofing felt).
Ninth step. Fill all voids with soil.
Tenth step. Tie the pillars along the upper edges using a channel. The height of the foundations of the balcony and the house must be the same.
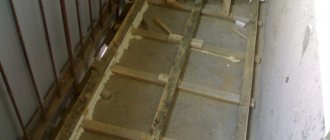
Forming a balcony frame
Balcony design
First step. Lay wooden logs or a reinforced concrete slab on the finished base.
Do-it-yourself installation of an extension ceiling
Second step. Using a hammer drill, create an opening in the wall for installing a balcony block.
Third step. Install the balcony block. After installation, level the slopes with cement mortar and seal any existing cracks with polyurethane foam.
Balcony block
Fourth step. Build walls. For this, it is most convenient to use building blocks, for example, made of foam concrete. They have a relatively light weight and will put a noticeably less load on the foundation compared to the same brick.
Parapet made of foam blocks
The thickness of the walls should be at least 25-30 cm. Bring the walls to the upper ceiling.
During the construction of walls, perform reinforcement every 3 rows.
Finally, all that remains is to arrange the roof. The roof structure must be made with a certain slope in the direction from the house.
To equip the roof, it is enough to lay wooden logs or mount a metal frame, and then lay the finishing roofing material.
Roof
Glaze the balcony. After this, all you have to do is insulate and finish the finished structure. Recommendations for conducting these activities will be presented below.
Glazed balconyThe diagram shows the installation of balcony frames with extension
How finishing occurs
The most popular type of finishing is plastic: it is the easiest to work with, the panels are inexpensive and are sold in any hardware store. If you are interested in decorating a balcony with plastic with your own hands, step-by-step instructions are the way to quickly and efficiently complete the work. The main thing is not to break the sequence, then you will be able to accurately do what you planned.
Before finishing begins, the balcony needs to be prepared for the procedure: this will require glazing, high-quality insulation of all walls, floor and ceiling. Otherwise, there is no point in somehow modernizing the factory design. For glazing a loggia or balcony, plastic double-glazed windows are usually used; Warm glazing will allow you to use the structure at any time of the year, make the living space warmer, and, if necessary, allow you to add a few meters to it due to the area of the balcony.
Several glazing sections must be opened: for example, two. This is the most optimal solution, as it allows you not only to thoroughly ventilate the balcony, but also to wash the glass. After the double-glazed windows are installed, an important step is to eliminate all the cracks. It is necessary to cover the seams with polyurethane foam, small cracks and holes can be closed using a concrete mixture, then the seams are covered with a waterproof sealant
This is important as it will help avoid drafts. After the preparation is completed, you can proceed to insulating the structure
First of all, you need to decide what kind of insulation will be used. Styrofoam may be a good option. It is quite voluminous, but does not require the creation of lathing on the walls; it is enough to fix it with glue. When using softer insulation materials, such as mineral wool, you will need to create a frame for them from wooden slats. The frame should look like cells approximately 40 by 40 cm; the slats can be secured using self-tapping screws. The lathing is useful not only for the convenience of placing insulation, but also for securing future cladding.
When insulating the floor, it is recommended to make a concrete screed, then a slatted frame, and place insulation in the cells; Mineral wool works well, or expanded clay can be used. It absorbs noise well and retains heat, but such material weighs more than mineral wool and will increase the load on the concrete slab.
After placing the insulation, it is necessary to isolate it from the room, especially for insulation with fibers, such as glass wool, mineral wool. For this purpose, a special vapor-proof film is used. It not only insulates the insulation, but also helps retain heat in the room. After this, you can begin covering the walls and floor. The subfloor can be made of boards, on top of which you can place any material or fill them with concrete.
After all the preparations are ready, you can attach the selected finishing material to the sheathing of the walls and ceiling. Plastic panels are usually screwed with self-tapping screws; some other materials can be secured using special locks. Which are first screwed to the sheathing, and then the panels are simply inserted into the locks. It is more convenient to do the work together, starting from the bottom up. Make sure that the panels are attached evenly.
Getting permission
First of all, a work plan is drawn up. It is not recommended to compile it yourself if you do not have a construction education and skills in drawing up documentation in this area.
The plan must indicate the dimensions of the structure, the materials that are planned to be used, as well as the safety margin for them.
The photo of a balcony made with your own hands shows that not concrete slabs are used, as is done in planned construction, but analogues are used. This is due to the fact that concrete slabs are very heavy for a suspended structure, which greatly affects reliability for the worse.
- The drawn up plan and drawings must be taken to the administration, to the department that oversees changes in the layout of the premises.
- There, specialists will study the received plan, make adjustments, and if it meets all the requirements, it will be approved and construction will begin.
Only after obtaining permission can construction begin, otherwise the extension will be illegal and the administration will demand its demolition, which will lead to a loss of financial resources.
Balcony insulation
Be sure to insulate the attached balcony. Start from the floor.
Floor
Floor, insulation
Floor, insulation
Foam boards are well suited for floor insulation. The material is characterized by high thermal insulation properties and can easily withstand various types of loads.
Level the base and glue the foam boards to it using an adhesive specially designed for this purpose. Provide additional fixation of the slabs using plastic dowels.
Place the mounting mesh on top of the insulation with glue, and then fill the entire structure with a self-leveling mixture.
Instead, you can make a wooden sheathing on the base, fill the voids with insulation, and fill the top with plywood or boards.
Linoleum is a good choice as a finishing floor covering for a balcony. You can also use waterproof laminate and other materials with similar properties.
Walls
Insulation of walls and parapetInsulation of walls
Wall insulation
Insulation of walls and parapets
Attach a frame of wooden slats to the walls. The spacing of the slats is determined by the width of the insulation.
Cover the frame with waterproofing film. Use a construction stapler to attach the film. Be sure to seal the joints of the waterproofing material with tape.
Fill the sheathing cells with the selected insulation. Place a vapor barrier on top of the insulation. You can also fasten the material using a construction stapler.
Place a second batten on top of the finished insulating pie, perpendicular to the first, to install the finishing material.
Ceiling
Ceiling insulation with foam plastic
The ceiling can be insulated using mineral wool.
Nail a sheathing of 10mm thick boards to the ceiling. Fix the boards edge down.
Fill the gaps between the boards with insulation.
Cover the insulation with waterproofing material and nail additional cross-bars to the boards. They will retain heat and moisture insulation, as well as provide the necessary ventilation gap between the insulating cake and the finishing material.
Is it possible to make a cellar?
Unfortunately, not every person has a suitable place to store vegetables grown at their dacha, and going out of town to pick them up every time is not a very reasonable waste of time and effort. There is a way out of this situation - you can build a cellar on the first floor balcony, which will allow you to store a certain amount of garden provisions.
The cellar can be made either built-in or as an independent structure - an insulated wooden box. To make both options, you will need various wood parts - boards, beams, corners, which will be arranged in two layers - outside and inside.
In the spaces between the two wooden layers there is insulation, which allows you to retain heat inside the structure. Foam blocks or expanded polystyrene boards are usually used as insulation. Both options have excellent thermal insulation properties.
In addition, some small heating element is installed at the bottom of the structure, which will help keep the temperature inside above zero degrees.
It is best to store vegetables and fruits in separate plastic containers - this will promote good air circulation and help keep the crop fresh longer.
Interior finishing with plastic panels
When the skeleton and frame are assembled, we begin to assemble the body of the skin. We connect the panels to each other and fix them to the slats.
Next, the interior decoration of your loggia or balcony is carried out in the following sequence: plastering the walls and ceiling, painting or finishing with materials (lining, plastic, panels, ceramic tiles, etc.), depending on the functionality of the room and the taste preferences of its owner. Let's look at the most common finishing options.
The most commonly used wall finishing is plastic. It has the advantage of being long lasting and airtight, but can be fragile and flammable. Panel finishing takes place in several stages:
- Prepare the work area, dismantle the old coating, remove dirt.
- Using self-tapping screws, secure wooden slats measuring 20x40 mm to the walls.
- Fix the upper border at the ceiling level, and the lower border of the sheathing at a distance of 50 mm from the floor.
- Screw the slats around the openings.
- Place the first sheet in the corner and level it using a level.
- Using self-tapping screws or a stapler, secure the sheet of plastic to the sheathing.
- Insert the next one into the groove of the previous panel and snap it into place.
- Use brackets or self-tapping screws to secure the outside.
- Install the remaining panels in the same way and screw the finishing profile.
- After installing the last panel, cut the sheet to the desired size, snap it between adjacent planks and press firmly to the sheathing.
- Install F-profile around door and window openings.
- Trim off the excess in the corners and install the baseboard.
Furniture
General requirements for the selection of furniture for the interior of a balcony:
- Quality materials. The environment must be resistant to sunlight and moisture.
- Unity of design. You will be guaranteed a neat design if each object is subordinated to a single concept.
- Do not attempt to install factory furniture if it does not fit the dimensions. Loggia is a small space and every centimeter is valuable. Order built-in models or make your own. This way you will save space, it will be easier for you to clean and overall the interior will look beautiful.
- Use vertical planes. Floor-to-ceiling shelving and hanging shelves above the entrance will help save space and create discreet storage areas.
- Engage the corners. Corner furniture looks compact, but is user-friendly.
- Place only the essentials. Small spaces do not tolerate non-functional items. Leave as much free space as possible. Use transformable furniture, folding models, sofas and poufs with built-in drawers.
- Choose light-colored headsets. Dark shades will “crush” the design; they can only be used as accents.
Types of interior decoration of balconies: saving wisely
The modern market of decorative and building materials offers many options for interior decoration of balcony walls. When choosing one type of finish or another, the consumer is guided by both personal preferences and the size of his budget.
- The most economical option, which can significantly reduce cost estimates, is the use of lime whitewash. However, in a short period of time, the limestone layer becomes clogged with particles of dust and debris, which cannot be removed. Such walls have to be refreshed with a new layer of whitewash at least once a year, because... otherwise, the walls will acquire a gray tint, giving the balcony an untidy appearance.
- Using decorative plaster to decorate the interior walls of a balcony will cost a little more. The plaster should be applied to a rough wall that has been well treated with a primer mixture, after which it should be protected with a layer of water-repellent mortar. This type of interior decor allows you to hide minor defects in the starting surface and keep the interior of the balcony clean.
- Covering the interior walls with wooden clapboard is a fairly expensive way to decorate the interior space of a balcony. The advantages of wooden panels include their naturalness, environmental friendliness, and presentable appearance. The obvious disadvantages of wooden lining is the need to periodically apply a protective layer of varnish, especially in the case of direct exposure to ultraviolet rays on the material. In addition, like any other wood, wooden lining loses its original structure in conditions of high humidity. Therefore, it is advisable to periodically treat the surface of the panels with a water-repellent solution and avoid getting moisture on their surface. During the cleaning process, you should avoid using liquid cleaning products.
- Plastic lining has a low cost compared to wooden lining, but its color range is very limited. It should be noted that this material has a long service life and is easy to care for. During the cleaning process, simply wipe the plastic surface with a damp cloth, which will remove accumulated particles of debris and dust.
- Plastic polyvinyl chloride (PVC) panels are a product of modern chemical production. Their distinctive features are the low cost of the material (at the level of plastic lining) and the wide variety of available colors. Among other things, PVC panels can have a variety of textures that reliably imitate natural stone, wood, marble and much more. At the moment, it is possible to choose between PVC panels with lamination and PVC panels with thermal printing. The buyer will be able to purchase panels with lamination at a higher cost than panels with thermal printing. This is explained by the fact that in the first case the available color palette is much wider and there is the possibility of applying various types of texture and relief to the surface of the material.
MDF (fine fraction) lining is carefully compressed cardboard, wrapped in a film that has a pattern or texture on its surface. The protective layer of this material is a high-density glossy film that protects MDF panels from external negative factors. This type of cladding has been used to decorate the interior walls of balconies not so long ago. Its positive aspects: a variety of available textures and colors, simplicity and speed of installation work, aesthetic appearance. Disadvantages: short service life, poor resistance to high humidity. It is not recommended to use MDF panels on a balcony with low waterproofing. This material quickly absorbs moisture, which contributes to rapid destruction.
Redevelopment
When making major design changes, make sure that what you plan can be done. Contact specialists, study GOSTs and SNiPs.
For example, you cannot:
- Cut off the fire escape. Better be creative in how you design it. But don't block the fire exit. Use lightweight decor in your project that can be removed in a second. From the ladder you can make a bench, flower stand, or bookshelf. Paint it in the color of the interior and thus organically fit into the design.
- Unauthorized combination of a balcony with a living space. First, you need to agree on changes in government agencies and obtain a new technical passport. Before combining, insulate the loggia and waterproof it. Otherwise, in winter you will spend a lot of money on additional heating of the apartment.
It is allowed to dismantle the door and window between the balcony and the room. It is more difficult to obtain permission to dismantle the wall. Most likely, you will not be allowed to do this. But you can easily use it in interior design and turn the wall into a functional area. For example, a table.
- You cannot create non-standard premises for loggias - laundry, sauna - without special permission from government agencies. More often this is due to the fact that such projects require additional communications outputs.
- It is strictly forbidden to install central heating radiators onto the balcony.
What are the best materials to choose?
For finishing work, a variety of materials can be used to ensure excellent results. The following options are considered the most popular.
| Material | Specifics of its application |
| Wooden lining | Finishing balconies and loggias with clapboard is considered the optimal solution. This material is made from natural wood and also has a beautiful appearance. Photos of this design are very beautiful. The material is easy to work with, but it is considered expensive. |
| Siding | Its installation involves not only improving the appearance of the balcony, but also carrying out additional work related to the insulation of this room. Siding is available in numerous colors, and during the production process it is equipped with special fasteners that guarantee a simplified installation procedure. |
| Moisture-resistant drywall | It is mounted on the sheathing, after which all resulting joints are sealed. This coating can be covered with wallpaper, paint or other finishing materials. This option will not require investing a large amount of money in repair work for loggias. |
| Plastic panels | They are a good choice for a balcony, however, they do not have the required vapor permeability, so the result is an airtight finish. They are available in numerous colors, so they create an interesting and vibrant design. |
Siding
Drywall
Wooden liningPlastic panels
The materials described above are considered the most relevant and often used in the process of finishing balconies. They make durable and beautiful coatings. Any person who does not have experience in this direction can carry out all the work on their creation.
Most often, lining is chosen for loggias, which forms a beautiful covering. It is easy to use, and in production conditions it is treated with special protective compounds that prevent possible rotting or the development of microorganisms. Photos of such finishing are widely presented in the selection, so you can make sure that you have chosen the right cladding for the balcony surfaces.
Legal documents for construction
To carry out redevelopment legally, you need to collect a package of papers:
- Technical passport and apartment plan.
- Permits signed by neighbors and certified by a notary.
- Certificate of legality of the structure, confirmed by a specialist from a notary office.
- A balcony project can be drawn up independently and ordered from a company.
- Photo of the area where the structure is planned to be built.
- Receipt for payment of state duty.
The listed documents are submitted to the Technical Inventory Bureau at the place of residence. It is also necessary to obtain permits from Rospotrebnadzor, the city department of culture, fire and utility services.
If all the specified stages are completed, an application for redevelopment is submitted to the local administration. After receiving a positive decision from a government agency, construction can begin.
Since self-registration takes a lot of effort, many turn to law firms that specialize in legalizing redevelopments for help. But you will have to allocate additional funds from the budget to pay for legal services.
Finishing sequence
Repair work on the balcony must be carried out in strict sequence, this is the only way the next step will not spoil the work already done. During the DIY repair process, you will have to go through the following steps:
- Arrangement of the frame, which will become the basis of both the external and internal cladding, as well as the window system.
- Glazing. It is preferable to use two-chamber aluminum or wooden systems: although plastic ones have a more affordable price, they will last less.
- Exterior finishing with moisture-resistant material: clapboard, siding, etc.
- Installation of galvanized metal sheets or plywood on the frame for protection from weather conditions.
- Attaching the waterproofing film, installing insulation, blowing the gap with special foam.
- Installation of additional sheathing from slats.
- Finishing of surfaces: ceiling, floor, walls.
Work related to the balcony should be carried out in the warm season - this will significantly facilitate and speed up the process
When taking on this process yourself, it is especially important to pay attention to choosing a period when cold or excessive dampness will not interfere with finishing
Lining: one of the most popular materials for finishing balconies due to its environmental friendliness and aesthetic appearance
Design features
By arranging a cozy corner on the balcony, you can enjoy freedom or retire from the outside world. In this case, you should take into account all the advantages that the layout of a 4 sq.m. balcony provides you with. m.
Insulation of the loggia
How to make repairs on the loggia so that when you go out you feel comfort and not the cold of the street? Of course, it needs to be properly insulated. All cracks and voids must be sealed, and the structural elements of the loggia must be protected from moisture.
Creating a warm floor
It is very desirable to combine the formation of the floor with its insulation. For this, the following flooring options are used:
1. Wooden floor. To do this, a waterproofing film or foil penofol is spread on the floor. Wooden logs are laid on top of this layer. They are leveled and secured to the slab using dowels. Between the lags, sheets of foam plastic 5 cm thick are inserted, or the same or thinner layer of extruded polystyrene foam. You can also lay a layer of mineral wool. You can lay another layer of penofol on top of the insulation. Tongue boards or OSB boards are attached to the logs.
Floor insulation using mineral wool joists
2. Cement screed. First, the slab is leveled, after which slabs of penoplex or extruded polystyrene foam are laid on it. They are carefully adjusted to size. A cement screed with a thickness of at least 4 cm is made on top of the insulation.
3. “Warm floor” system. It may include one of the following components:
- Heating mats. They are laid in ready-made sections. The advantage of mats is that for their installation it is not necessary to prepare a rough surface. The mats operate electrically, being laid directly into a layer of tile adhesive. Floor tiles are usually laid on top of the mats;
- Electrical cable. A heating cable powered by an electrical outlet is laid in the concrete floor screed. To provide warmth, it is advisable to lay a layer of insulation underneath the screed. It is recommended to use tiles as flooring;
- Infrared film coating. The subfloor is covered with heat-reflecting material, after which an infrared coating is laid on it. The finishing coating can be linoleum, tiles, carpet, etc.
Ceiling insulation
If you decide to make a warm ceiling on the loggia, you should know that all cracks above the windows must be closed to prevent condensation from forming on top of the ceiling panels.
Ceiling insulation is carried out in one of the following ways:
- A wooden frame is placed on the ceiling, with insulation inserted between the slats. On both sides of the insulation there should be a layer of vapor barrier such as penofol, although penofol is often used only on top of the insulation;
- Penoplex is nailed to the ceiling slab with dowels. Next again comes a vapor barrier layer in the form of penofol. Below the insulation layer, on the frame, a suspended ceiling is formed.
Mounting penoplex to the ceiling
Flooring
The floor covering is made from materials such as:
- linoleum;
- carpet;
- laminate;
- ceramic tile.
Linoleum
Manufacturers supply the presented material to the retail chain in various colors and surface reliefs. The color and pattern of linoleum are chosen taking into account the overall color scheme of the balcony design. The relief pattern of the flooring gives the flooring a particularly beautiful appearance and prevents it from slipping on its surface.
If the floor has a complex geometric shape, take linoleum with a reserve
Linoleum is glued by gradually applying glue to the screed as the roll unfolds. If the floor has a complex geometric shape, then linoleum is purchased with a margin of 5 square meters. meters. This compensates for losses during cutting and fitting of the material.
Carpet
Linoleum with a carpet top covering is called carpet. It is much more expensive than linoleum. Carpet has high aesthetic qualities. The floor covered with carpet gives the balcony interior a special rich look. This floor can be low or high pile. Lay it on the floor screed in the same way as linoleum.
Laminate
Laminated parquet is laid on a foam polymer base. Thanks to its structure, the substrate acts as a heat insulator and significantly reduces the noise from walking on the parquet. For flooring, parquet of 2 classes is used: 22nd and 23rd.
Place the tongue of one board into the groove of another
The laminate should lie freely, forming a single “floating disk”. The coating does not require additional fixation to the base of the floor. Its disadvantage is that under the influence of moisture it becomes deformed and becomes unsuitable for further use.
Laminate flooring is laid by inserting the protrusion of one board into the groove of another. Among hundreds of colors, you can always choose the desired shade that will add its own note to the overall gamut of the interior design of a glazed balcony.
Related article: Which convector is better to choose?
The parquet must be laid in such a way that there is a gap of at least 5 mm around its perimeter between the floor covering and the walls. This will protect the coating from temperature deformation.
Ceramic tile
Ceramics are an ideal material for underfloor heating
Ceramic tiles are made in various sizes. 5x5 cm tiles of different colors allow you to create an overall beautiful pattern on the balcony floor. It is better to leave the laying of tiles to a professional. Without the skills in this type of work, you can ruin everything. The tiles are laid on a special adhesive mixture. The seams are filled with a special agent. The surface of the seams is formed by jointing. Ceramics are an ideal material for underfloor heating. The tiles perfectly transfer heat into the room.
The floor on the balcony can be combined. 2 sq. meters can be laid with ceramic tiles, and the remaining 2 square meters. meter covered with laminate. Sometimes 3 sq. meters are covered with carpet, and the rest of the floor is covered with linoleum under a computer desk.
Ceramics measuring 15x15 cm and larger are much easier to lay than small tiles.