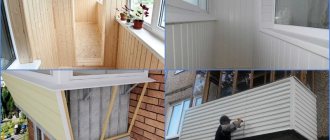
It is impossible to turn a balcony into a living space without appropriate insulation and finishing. For this purpose, they mainly use wooden lining, MDF, plastic, as well as some sheet materials. To achieve the desired effect, these materials must be mounted on a specially prepared frame - lathing. How to correctly select, calculate and install this important element will be discussed further.
How to make lathing on a balcony - instructions for work
Most owners rarely leave the balconies of modern apartments in their original condition to increase comfort, decorative exterior and interior appearance, and expand functionality.
The balcony space is glazed to protect it from precipitation, insulated against the penetration of cold, lined with finishing materials inside and outside to give an aesthetic appearance, and when carrying out many works, balcony sheathing is used to secure the cladding. The use of balcony sheathing is due to the fact that attaching finishing materials to concrete slabs, from which walls and parapets are often made, is difficult and impractical, and if the balcony is separated from the street only by a fence made of steel reinforcement, a lattice frame is the only option for installing any building materials on metal rods.
When carrying out repair and construction work with your own hands, it is useful to know the process of installing lathing on various bases for the most commonly installed types of cladding, the tools used, the building materials used, components and fastening fittings to hold the elements on the surface.
Protecting wood from external influences
It is known that wood is very sensitive to changes in temperature, humidity and insects, so a protective coating should be applied to the surface of the lining. Specially designed for this purpose:
- quick-drying, moisture-resistant varnishes based on water, acrylic, alkyd or polyurethane, which favorably emphasize the texture of wood;
- thickly ground dyes on a water (“stain”) or alkyd basis, capable of giving the material new shades;
- wax compounds that protect the wood structure from rotting;
- antiseptic liquids (“PINOTEKS”, “BELINKA”, “SENEZH”) that prevent the formation of mold and fungal plaque.
The technology for using these materials consists of performing the following actions:
- Sanding the lining with sandpaper.
- Surface treatment with primer.
- Applying the first layer of coating, drying it completely (the drying time of the material must be indicated in the attached instructions).
- Re-coating with a finishing layer.
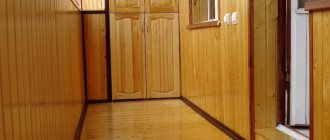
From time immemorial, natural wood has been held in high esteem in Rus'. Durability, strength and the ability to “breathe” have earned it the well-deserved fame of the main building material for all times. Decorating the balcony with wooden clapboard will reliably retain heat in the room and create a special atmosphere there, which will have a beneficial effect on our physical and emotional state. Now we can easily complete all stages of this work ourselves.
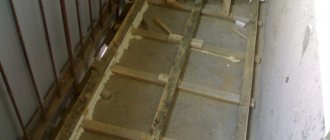
Lathing the floor of a balcony or loggia
Balcony floor lathing
It is better to start lathing from the floor. Beams (joists) 50x70 mm are laid along the length of the balcony. These are the optimal sizes. Thicker ones can bulge due to increased humidity, thinner ones are simply weak for the loads that they will have to withstand.
Laying is done in increments of 45-65 cm. If you consider it necessary to perform the sheathing with the installation of additional cross beams (“in a checkered pattern”), a hammer and a hacksaw are in your hands.
These beams must be connected to the longitudinal beams “groove to groove”: that is, in both the longitudinal and transverse beams, cut out to the middle of the recess, into which the counterpart parts of the beams installed crosswise will fit.
If the balcony floor is uneven, then place wedges of hardwood or simply pieces of siding in the places where the joists “sag.” Fix them with polyurethane foam, but try not to get it between the wedge and the beam itself: in this case, the coating will squeak a lot when walking on it.
In addition, in this case it is not necessary to clean and level the entire balcony slab, but only the areas under the slabs. First, the dies are attached to the concrete with dowels, and the beams are already nailed to them.
Required Tools
The lathing is made of wooden guides or a metal profile; to install the beam on hard hard surfaces made of brick or concrete, the following tool is needed:
- metal building level;
- tape measure with a simple pencil;
- hammer drill with pobedit drill for concrete;
- metal corners for fastening vertical and horizontal lattice links together; in some cases they are used for alternative fastening of bars to walls, floors or ceilings.
- fasteners for connection to concrete slabs and brickwork - self-tapping screws with dowels, anchors or special screws for screwing into concrete channels.
- a screwdriver or a Phillips screwdriver, it should be borne in mind that it is unlikely that you will be able to screw a screw into concrete by hand, and carrying out all the work with a simple screwdriver will take a lot of time and physical effort.
- A thin cord to check the placement of vertical or horizontal guides, plastic wedges or pieces of plywood (wood) to align the slats.
- Polyurethane foam for sealing gaps between joists and adjacent wall or floor surfaces.
When installing a metal profile, you will need a similar tool; instead of a wood saw, use a grinder or scissors to cut the guides to size. Self-tapping screws are used to connect profile sections together and screw the cladding elements together; the profile is also attached to self-tapping screws with dowels.
Rice. 10 Frame installation tool
Requirements for material selection
The composition of the base of the balcony room must be laid without complications on a brick or concrete base, not bend, not be deformed during installation, and can withstand the weight of the future facing sheet.
Other requirements include:
- environmental sustainability;
- be resistant to physical activity;
- have protection from moisture;
- differ in simple installation technology.
Two main components meet these requirements: a wooden beam and a metal frame, which serve to decorate the room.
Creating a sheathing
Knowing how to choose a lining, all that remains is to decide on the material to create the sheathing, which comes in three types:
Each type has certain advantages and disadvantages. The most popular is the wooden one, as it is a familiar and affordable option. It is created from 2.5-5 cm bars. The main thing is that it can withstand finishing and not make the room smaller by absorbing “extra” squares. But wooden lining is highly flammable and intolerant to moisture. Despite the huge variety of existing impregnations, it is not advisable to use wooden blocks when finishing balconies.
The best option when decorating a loggia with clapboards with your own hands would be metal profiles. A mesh-like frame is constructed from them, to which panels can be easily attached. The cost of such sheathing is much more expensive, but it is practically free of disadvantages. Plastic is rarely used, since it is not available to everyone. Therefore, it should not even be considered for balconies.
Insulation and waterproofing
Lathing under PVC panels on the balcony requires additional insulation and waterproofing. Foil materials are used for work. They are easy to install and practical. Attached to the base before installing the frame. Mineral wool or expanded polystyrene are also used for insulation. In this case, the sheathing is first made, and then the protective material is fixed.
Mineral wool is more in demand among builders. It has a low cost, is easy to install, provides reliable thermal insulation, is resistant to fire, quickly dies out when smoldering and does not release substances harmful to health into the space.
The waterproofing is fixed on top of the insulation. Staples are used for fastening. It is important to install the film so that there are no cracks or tears in it. Otherwise, even minor damage may seep in moisture. The waterproofing material is attached with an overlap of 10 cm. The joints between the sheets are taped.
Balcony lathing helps secure the facing material and insulation. In this way you can make the room more comfortable. It is quite possible to carry out all the installation work yourself, but you must strictly observe the installation nuances depending on the chosen material. You should also not forget about preparing the elements and bases. Step-by-step instructions will make installation quick and easy.
Installation methods
The loggia lathing is mounted in two main ways: horizontal and vertical.
Installed vertically:
- PVC sheet;
- MDF (more details: covering the balcony with MDF panels);
- lining;
- wooden panels.
The upholstery is installed horizontally:
- plasterboard sheets;
- OSB;
- corrugated sheeting
The fundamental difference between the methods is the direction of the supporting beams.
In both cases, it is necessary to ensure that the structure lath is located along the perimeter of the sheathing sheet, while the space inside must be filled with sufficient frequency.
Lathing the floor of a balcony or loggia
The floor of the balcony should also be insulated in order to reduce heat loss. To do this, you will need a wooden beam with a cross-section of at least 50 x 50 mm, sections of which are laid in increments of no more than 500 mm perpendicular to the facade wall and fixed to a concrete base. These wooden elements will act as joists. The space between them can be filled with expanded clay; mineral wool mats or foam sheets of appropriate thickness can be placed in it. After this, a regular floorboard is laid over the joists. Sometimes plywood up to 20 mm thick or chipboard is used. After this, the resulting subfloor can be covered with linoleum, laminate, putty and painted with oil paint at the owner’s choice and taste. It may happen that the floor heights on the balcony and in the adjacent room will not be at the same level, and the difference between them will be significant. Then you need to build a threshold step on the inside or outside of the doorway, using concrete, brick or wooden beams for this purpose.
Stage 2 - surface preparation
Lime mortar is an excellent antiseptic
Lathing a balcony under plastic panels, like any other, requires certain preparation of the walls:
- if the wall is made of brick, then it is enough to simply cover it with antibacterial impregnation so that fungus and mold do not appear under the insulation. Simple lime milk is quite suitable as an impregnation;
- walls made of reinforced concrete must be primed, and ideally plastered with a layer of 1-2 centimeters.
In any case, it is necessary to level out significant unevenness, holes and putty all the cracks and cracks in the wall. Ordinary cement mortar or Ceresit adhesive mixture will do.
Don't forget to prime all the wooden parts that will remain under the finish.
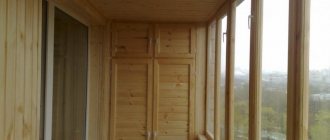
Do-it-yourself lathing on the balcony and loggia
Lathing is the basis for high-quality insulation and decorative finishing of a balcony (loggia).
It is recommended to start lathing from the floor. Along the balcony there are beams with dimensions of 50x70 mm (thicker ones can become deformed due to humidity, thinner ones simply cannot withstand the loads). Laying is carried out in increments of 45-65 cm on transverse blocks with PVC lamellas, with the help of which floor unevenness is leveled.
Fixing the sheathing on the walls and ceiling of the balcony is carried out in a similar way using self-tapping screws without cross bars.
If you plan to install a clothes dryer on the balcony, then you need to choose a stronger beam for the ceiling (50x70 mm) or use paired beams (firmly sewn with nails or bolts, screws) of regular thickness (20x40 mm) instead of one thick beam. They need to be nailed to the ceiling with dowels in increments of 30-40 cm (in the area where the dryer will be attached).
Fastening the lining
After the sheathing of the balcony ceiling has been formed, you can begin covering it with clapboard. The cladding always begins from the ceiling, only then the walls are sheathed. The clapboard slats are equipped with a tongue-and-groove fastening, so covering the balcony ceiling with clapboard is not difficult if the slatted frame is made correctly.
Some installation tips:
And now more about the options for fastening the lining.
Installation with clamps
A clamp or kleimer is a metal plate with holes for self-tapping screws and a protruding tongue. The tongue holds the lining by the groove, making the fastening hidden and accessible for quick dismantling.
The first board is always fastened with nails: a clamp is put on the tenon of the lamella, which is attached to the sheathing using self-tapping screws or nails. Of the three holes on the plate, only two are always used. It’s easier to use a screwdriver, so the work will go faster.
Sometimes a stapler is used for fastening with clamps, but you need to know how to use it. If you press weakly, the staple will not fit into the wood tightly; you will have to either finish it off with a hammer or use another staple.
The fixation scheme is simple: first secure the clamp in the middle, then along the edges. The entire cladding is installed in this way, but the last die is cut to the required width. Then it should be inserted into the groove, secured with nails, recessing the caps. To decorate the fastening points, plastic skirting boards or corners are used.
Installation with self-tapping screws
When looking through the options for finishing loggia ceilings with clapboards and walls also with this material, you should give preference to this method as the most durable and reliable. The stages of work are as follows:
The fastener pitch is 0.4 m. The main thing is to recess the screw head into the body of the lamella, but not damage the die.
Ceiling installation: dryer installation
To lay the ceiling sheathing you will need a 20x40 mm cross-section batten installed at intervals of 40 cm.
However, if you plan to mount a dryer to the ceiling, the structure must be more rigid since the loads on such devices are quite large. It is considered optimal to use a beam with a cross-section of 40x60, fixed on a concrete base with anchors, at least every 80 cm (the smaller side is in contact with the rough ceiling).
Installation includes the following steps:
- For a four-meter loggia you will need 3 beams 4000x70x40 mm (or the same footage assembled from short pieces).
- Holes for anchors with a diameter of 10 mm are drilled in the block.
- When applying the blanks to the place of future fastening, it is necessary to mark the ceiling, and then drill holes in the concrete (also 10 mm in diameter) with a depth of 60 mm using a hammer drill.
- Next, using anchors 120 mm long, the prepared bars should be secured to the rough ceiling.
To ensure the ceiling is level, do not forget to align the bars with each other!
If there are significant unevenness of the concrete surface, they must be compensated with spacers (plastic, thin dry lath, MDF, fiberboard) of appropriate thickness.
If you are planning a small and lightweight dryer made of reinforced plastic, you can make bookmarks from the same bars.
We apply the dryer to the ceiling using markings
We fasten the block with three dowel nails
We measure the distance to the next bookmark
The process will become much more complicated if the floor is the last and there is no floor slab on top. In such situations, a so-called semi-loft or canopy is built, which usually requires a team of qualified builders. A rectangular structure is assembled from hardwood timber (oak, ash, birch, beech) or a thick-walled metal profile. The small leg of this design is rigidly fixed on the main wall of the building, the large leg will be the base of the ceiling, and the hypotenuse will be the slope (roof) of the canopy.
For plastic panels and drywall, a metal profile is perfect:
Summary
The video in this article describes in detail how to install a timber sheathing on a standard balcony, and I invite you to discuss this topic in the comments to the article. After all, winter is just around the corner, and construction materials in the summer can be purchased at favorable discounts.
Did you like the article? Subscribe to our Yandex.Zen channel
September 7, 2016
Premises, Construction and renovation
If you want to express gratitude, add a clarification or objection, or ask the author something, add a comment or say thank you!
How to make sheathing for siding
How to make lathing for siding on a balcony so that your balcony has a beautiful and attractive look. That is why the owners of many apartments make significant efforts to improve them visually. One frequently used option is siding. Before its installation, a sheathing is constructed, which serves as the basis for fastening. What must be taken into account during installation of the sheathing and the siding itself?
Siding as a material for a balcony
How to make lathing for siding on a balcony, along with other types of finishing materials, vinyl siding is most often used for balconies. There are several reasons for this:
- pleasant appearance;
- additional protection from moisture;
- possibility of installing insulation;
- masking design flaws;
- resistance of the material to various influences;
- quite a wide selection of colors;
- ease of interaction with other materials;
- no need for care;
- affordable price;
- possibility of carrying out work at any time of the year;
- environmental friendliness of the material.
The siding panels have a pleasant appearance, and the user can choose from a significant number of color schemes, which will allow them to choose the material to match the facade or the plaster applied to the insulation. In most cases, the panels are embossed with an imitation of some natural material, for example, wood, which also has a positive effect on the appearance. The siding plane is assembled quite simply, since there is a well-thought-out locking system. Thanks to the latter, the surface is continuous, which prevents moisture from getting into the cracks. This, in turn, increases the level of protection of the balcony from wind and rain loads. Siding panels are mounted at a certain distance from the main plane, which is achieved by using a grid. This makes the gap an excellent place to install insulation. At the same time, the insulation process must be approached holistically.
Thanks to this finishing material, it becomes possible to hide all sorts of defects in the building materials that were used for the balcony. The siding itself does not require additional maintenance or periodic painting, which is important for a balcony, since accessing it from the outside if it is located high is quite problematic. Vinyl chloride polymer is an inert substance, so it does not react with various chemicals and moisture. Thanks to this, the service life can reach 50 years. After production, vinyl siding is environmentally friendly, which prevents various harmful substances from entering the living space when panels of the material are heated.
Preparation
How to make lathing for siding on a balcony, without preliminary preparation it is impossible to carry out high-quality cladding of the balcony with siding. It includes not only the calculation and purchase of material, but also the preparation of the required supporting elements and the balcony itself.
Tools and materials
The required tool is clearly shown in the illustration above. Most of the above elements are available to every home craftsman. Some products can be rented. A screwdriver makes the job much easier, so you can also rent one. In addition to the tools, you will need material for sheathing, siding and additional elements for siding. The latter include:
- starting bar;
- outer corner;
- internal corner;
- finishing bar;
- platband
The quantity of each component is calculated depending on the amount of siding that will be used to cover the balcony. The best solution would be to install metal sheathing. It has greater strength, but the profile is made in such a way that it slightly increases the load on the balcony. It is easier to work with wood at height, so it is often used to create sheathing. For work you will need a square beam with a cross section of 50 mm.
Area and material calculations
How to make lathing for siding, the amount of material that will be used to finish the balcony directly depends on its area, so the first thing you need to do is calculate it. In most cases, three planes have to be sheathed, since the fourth is adjacent to the wall of the house (in some cases, only the front part is sheathed, since the side ones are close to the neighboring balconies). If you plan to glaze the balcony along the entire perimeter, then the side walls above the parapet are not taken into account. In the case when the window frame is installed only on the facade side, then additional area appears for cladding. The first step is to take measurements of the balcony along the parapet. Its total length is determined, which takes into account the side walls. After this, it is enough to multiply it by the height to get the area that requires cladding.
Knowing the total area, you can quite simply determine the amount of material that will be required both for lathing and as finishing. In the first case, it is important to understand that the sheathing posts are located at a distance of 40 cm. Their height will completely depend on the height to which the cladding will be mounted on the balcony. It is enough to divide the total length of the balcony by 45 cm, since the width of one plank for the sheathing is 5 cm. After this, the number of planks must be multiplied by the length of one to obtain the total length of the material. The last figure must be divided by three or four; this is exactly the footage that timber of a similar cross-section is sold for.
The amount of cladding required is determined by the quotient between the total area of the balcony and the usable area of the siding strip. To do this, you need to divide the first number by the second, after which the total number of planks is divided by their number contained in one package. In this case, it is necessary to make a reserve of 15%. This is important for various unforeseen situations, as well as to compensate for the gap that will be between the sheathing and the balcony. The balcony has two external corners, so when purchasing, their number will be minimal. The total length of the starting plank is equal to the total length of the balcony, the same is true for the finishing plank.
Preparing the balcony for work
How to make lathing for siding on a balcony, after preparing the tools and purchasing the material, you can proceed to preparing the balcony itself. If some kind of cladding was already installed on it before, then it is better to dismantle it, leaving only the metal parapet. The surface of the slab is well cleaned and its shortcomings are eliminated if complete insulation is planned. It is also worth considering whether a roof will be built over the balcony. Sometimes this is required in cases where the balcony is on the top floor. If the structure is located in the middle, then it is necessary to evaluate the condition of the slab, which is located above, to determine the possibility of attaching sheathing or window frame to it.
In old houses, the quality or condition of the parapet leaves much to be desired, so it is unsafe to fix the sheathing to it. In such circumstances, it will be easiest to dismantle it and build a new metal support system. It is partially attached to the walls of the house, and partially welded to metal heels, which are embedded in the slab. If this is not possible, then special ears are provided through which the anchor bolts are pressed against the balcony slab.
Installation
How to make sheathing for siding on a balcony, start the sheathing process by installing the support system. When working at height, you must adhere to all safety regulations and use safety ropes.
Lathing
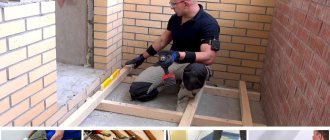
Before using wood, it must be treated with antiseptic compounds so that it does not deteriorate during use, which would weaken the entire structure. For disinfection, you can use regular drying oil. Before processing, it is better to cut the timber into racks of the required length.
Installation of the sheathing begins with the installation of timber around the perimeter of the parapet; it is necessary to make it easier to install the vertical posts. If the parapet is in good condition, then you can fasten the board directly to it using self-tapping screws, having previously drilled holes of a slightly smaller diameter. During the installation of this sheathing element, it is necessary to monitor the horizontal level of the elements being laid in order to ensure their correct placement. In some situations, it will be more convenient to use for a horizontal element not a beam with a cross-section of 5 cm, but a board with a width of 15 cm. Subsequently, it can serve as a support for installing a window and window sill.
The next step is to install the corner elements of the sheathing. For the corner you will need two posts, which are located with a small gap on each side. This is done for the convenience and ease of installation of the corner element of the siding, as well as for greater strength of the entire frame.
The racks at the top and bottom are fixed to the metal corners of the parapet, as well as to a beam or board that was previously laid on the parapet, as can be seen in the photo above.
As soon as the corner elements are ready, starting from them, you can mount all the remaining vertical posts in increments of 40 cm. Each element is fixed in the same way as the side posts. At the same time, it is important to double-check the verticality of each element using a bubble level so that the siding plane is subsequently positioned as required. Once the sheathing is completely ready, you can begin installing the siding.
In some cases, there is no lower corner on the parapet to which vertical posts can be fixed. In this case, you can use a separate metal corner, which is first fixed to the bar itself, and then to the concrete slab.
Siding installation
How to make a sheathing for siding on a balcony, fastening siding on a balcony begins with installing support strips and elements. The first step is to measure and trim the corner elements. They must be mounted in compliance with the level in two planes, in this case it will be possible to correctly place the siding strips. After the corner elements, the starting strip is installed. Most often it is mounted flush against a concrete slab to reduce the gap to the siding.
To make it easier to install, you can pre-tension the fishing line or rope according to the level. Installation of the starting strip under the siding is carried out with a slight indentation from the corner element. This is done to create a thermal expansion seam. A gap of 6 mm will be sufficient. Along with the side elements and the starting strip, a J-profile is installed, which is located close to the wall.
All siding elements are fixed to the wooden sheathing using screws with a wide head. In this case, there is no need to screw in the fasteners all the way; a small gap should remain so that the planks move slightly; this is done so that when the temperature changes, deformation of the siding and components does not occur. The siding panels are cut to the required size so that the end pieces fit into the corner pieces and J-profile. After that, a plane is set, which is sheathed. In this case, each siding strip is screwed to the sheathing. Each subsequent plank is clicked with a lower lock into the upper lock of the previous plank.
If the length of the balcony exceeds the length of one siding strip, then an H-profile is additionally used. It is also called docking. It is installed at the intersection of two planks, ensuring their high-quality connection.
Let's sum it up
How to make lathing for siding on a balcony, using siding as cladding for a balcony is a practical and interesting solution. You can do the installation yourself if you follow the given sequence. Particular attention should be paid to the lathing for the siding, since the strength of the entire structure will depend on it. If in the area where the balcony will be covered with siding there are significant wind loads, then the distance between the sheathing posts can be reduced to 30 cm so that they are located more often. Our group is in contact
Sheathing process
To work you will need:
- hammer drill or drill;
- hacksaw or circular saw, jigsaw (for neat cutting of lining);
- building level or tape measure, pencil (for marking the sheathing and level installation of the first boards);
- hammer, screwdriver, nails and screws (fasteners must be made of stainless materials);
- brush or roller (for applying antiseptic, varnish);
- safety glasses, gloves (neglect of safety precautions sometimes leads to unpleasant household injuries);
Work should begin from the corner (we recommend from the most problematic one). We install the first panel level - the slightest distortion and the entire wall will have to be redone.
First step.
You can secure the lining using nails or self-tapping screws (driving them flush). The lining connected with special clamps is very carefully removed. But working with them requires certain skills.
Important: First, novice craftsmen want to figure out how to properly upholster a balcony with clapboard. Everything comes with experience, and nowadays also with the Internet. Our portal has numerous videos with visual examples of work.
But let’s consider one more thing that is unexpected for beginners. It happens that after going through the entire wall, the last board may be wider than the remaining space. Don’t be alarmed - measure the required distance from the beginning of the ridge, and the small gap will be closed with a plinth or decorative trim. The photo clearly demonstrates this situation.