What types of cabinets are there?
1 Built-in . Most often, you will receive just such a cabinet if you order it from specialized organizations. Of course, it will be delivered disassembled. The floor, walls, ceiling, shelves and cabinet doors are made of solid slabs, often chipboard, both cheaper material, and MDF.
Right on the spot, the cabinet will be assembled from structural elements, fastened with metal furniture corners, and plastic furniture corners installed inside. Actually, having ordered all these elements, it costs the craftsman nothing to assemble the cabinet, but its cost will still be quite impressive.
Balcony cabinet
2 Frame. Only by going this route can you save significantly not only on materials, but also on work, but to do this you will have to go through all the stages yourself. And we will tell you about installing a frame cabinet in more detail.
Furniture options for the balcony
People often ask the question: what furniture to put on the loggia? The choice of balcony furniture depends on how the room will be used.
- Wardrobes and bedside tables for balconies are usually made to order. This is explained by the need to select them according to the dimensions of the room. In some situations, you cannot do without a design project. Wardrobes and bedside tables on the balcony are a guarantee of convenience and practicality.
- Open shelving and shelves can be easily adjusted to any design solutions. This is their undeniable advantage. They will not be superfluous; it is good to place flowers, books, photographs, figurines on them.
- A table and chairs are not only a place where you can sit with a cup of tea and coffee, but also use these items as a bedside table or workspace.
- The pallet sofa has a simple design. It can be complemented with a backrest or a small headboard. This element will look great in any balcony interior.
- An armchair-bed will serve as an additional place to sleep, but it can only be placed on spacious balconies.
- Hanging chairs are a creative option that gives the space unusualness and mobility. A bright and original find allows you to solve the problem of limited space - freeing up space on the floor.
To furnish the balcony, you can use lightweight home furniture.
What tools will you need?
Carpentry tools
- hammer drill or drill with a set of drill bits for concrete and wood
- saw or jigsaw
- hammer and chisel
- screwdriver set or screwdriver
A hand-held electric router will be very useful. This tool is used for processing the edges of wooden parts; you do not have to take them to a carpentry workshop, but do this work yourself. With its help it is convenient to make recesses for loops. In a word, the thing is extremely useful.
You can cut out the necessary grooves and recesses for the hinges and process the edges using a hand-held electric router and a grinding machine.
In the modern world, many tools have been invented to make carpentry work easier, so all work should be done carefully and carefully so that the result is pleasing at any stage of its implementation.
In addition, you need:
- accessories
- metal and plastic furniture corners
- door or furniture hinges
- fasteners
- nails, screws, dowels or anchors
A carpenter cannot do without a metal ruler, a square and a pencil. You will need a building level and a plumb line.
Plastic furniture
Plastic furniture attracts at an affordable price. It is convenient to transport, it is resistant to rain, snow, and many other weather conditions. But there are also disadvantages. Such items may be blown away by strong winds. It breaks easily and gets hot in the sun.
Plastic interior elements can be built into the room.
Material selection
Tree
Wooden cabinet
Tree
- Unrivaled eco-friendly and breathable material. But it is expensive, so financial possibilities do not always allow you to make a completely wooden cabinet on the balcony.
- In addition, on an open balcony, wood tends not only to swell from moisture, but also to become covered with mold or mildew, and to be attacked by insects.
- Therefore, it is very important to treat wooden parts with varnish or special impregnation. Paint and varnish products and impregnations for balcony cabinets should be taken the same as for exterior work.
- Water-based varnish has the least pungent odor. But there is no need to paint the tree, as this will cause it to lose its natural beauty.
- Quite often, lining and plywood are used to make parts of balcony cabinets.
Chipboard
Chipboard cabinet
Chipboard
- In most cases, shelves for cabinets are made from it.
- Has increased resistance to temperature changes.
- On balconies, more moisture-resistant laminated chipboard is often used. MDF, like OSB, has better moisture-resistant qualities, but is used less frequently due to its high cost.
Drywall
Using drywall for a balcony
Drywall
- Lightweight, easy-to-use material, and inexpensive . But the maximum that can be made from it for a balcony cabinet is doors : cover the door frame with sheets of plasterboard using self-tapping screws, cover the joints with reinforcing tape, putty and sand.
- Prime the dried surface, dry it again and paint it with water-based paint or wallpaper it.
- As a result, if you show a little imagination, you can get an unusually beautiful facade.
- Use plasterboard with caution for the side walls of the cabinet and it is better not to use it at all for shelves ; it may turn out to be more expensive if one day the shelves cannot withstand the weight of the objects and fall apart.
Plastic
Ceiling lockers on the balcony
Plastic
- Thick plastic can withstand temperature changes and precipitation, so on open balconies it is more advisable to mount the cabinet completely, right down to the shelves made of thick plastic, made of this material on a metal frame.
- It is flexible and bends easily, so the back and sides of the cabinet can be made from a single piece of plastic.
- Two-layer thick plastic, for this you just need to cut one layer at the bend.
- The plastic is very light, resistant to aggressive environments, it is very easy to care for and wash. It is ideal for a closet if the balcony walls are made of plastic lining.
Rack
- Quite often, several types of material are used simultaneously for balcony cabinets. Metal profiles and plastic are recommended for open balconies, where the impact of temperature changes, rain and snow will be greater. But chipboard and drywall are best used only for closed and preferably insulated balconies.
- The main goal is to make the cabinet not only functional, but also inexpensive. Therefore, it can accommodate leftovers from other works or parts of old furniture. In skillful hands, all this will play in a new way and it can turn out to be a masterpiece of its kind.
- Wooden blocks are best suited for the frame. Craftsmen recommend using pine bars with a cross section of 4x4 cm, 5x5 cm, 4x6 cm, etc.
- If the cabinet will be located on an open balcony, then it is better to use a galvanized metal profile for the frame.
- For the back wall you will need a sheet of plywood or plastic or a chipboard sheet.
- To make shelves, you should use reliable and durable materials, primarily wood or chipboard. The edges of the cut shelves and door parts should be carefully processed using a hand-held electric router.
- Doors are a complex and variable design element that gives the appearance of the entire facade. They are made of wood, in particular, lining, laminated chipboard, plasterboard or plastic. They can be assembled from leftovers and as a result get a unique, elegant façade.
Built in furniture
Built-in furniture is chosen by owners of small balconies. This method saves space. It is usually represented by vertical elements for storing things. Such items are especially favorite among fishermen. Here you can very successfully and conveniently place fishing rods and other attributes of this hobby.
Such elements have a peculiarity - they do not have a back or side wall. Particularly appropriate for balconies and loggias with different niches or recesses.
Cabinet Configuration
Wardrobe under the windowsill
Perhaps this is the most responsible decision. Since the cabinet will be fixed in the selected location, moving it in the future will be impossible and subsequently it can only be dismantled.
- Option 1. The easiest way is if there are 3 blank walls on the balcony. Inside you can stuff guide bars under the shelves and hang the doors on vertical posts
- Option 2. Shallow cabinet framing the window. This is an exotic option, but it can be useful for large balconies
- Option 3. If the balcony is glazed, under a wide window sill, you can construct a low and shallow cabinet (the width of the window sill). It looks appropriate and has great functionality
- Option 4. Most often, the cabinet is built into one of the end sides of the balcony. Or they make 2 symmetrical ones, one opposite the other
- Option 5. Corner cabinets are varied. You can simply make it triangular by using two adjacent walls to install crossbars and placing triangular shelves inside. Or you can fill two bars at the top and bottom at an angle to each other and nail the assembled boards to them, which form 2 more walls. Place shelves inside on the guides and hang the door in the resulting opening.
Example of a corner cabinet
Cabinet furniture
MDF or chipboard are materials used for the manufacture of cabinet furniture. These are cabinets, racks, bedside tables, computer desks. They can be used in well-insulated balconies or loggias connected to the living room.
Due to the small area of space, finding a ready-made option is not so easy. Furniture is manufactured according to individual orders. This makes it possible to take into account the peculiarities of the premises and the client’s wishes.
Dimensions and markings
Rack with tools
- Using a tape measure, you need to measure the dimensions of the future cabinet - height, depth and width. The laser tape measure that designers use is very convenient in this regard, but a regular one is also quite suitable. If we already remembered about designers, then the first rule for them is to take an extremely responsible approach to taking measurements, because the final result will largely depend on this.
- You need to be prepared in advance for the fact that the angles will not always have the required 90 degrees and the distance from floor to ceiling will have different meanings in different places. But knowing this in advance, you can eliminate some of the flaws.
- In order to maximize the use of usable space , as well as increase the rigidity and stability of the entire structure, most often they make a cabinet that is as high as the ceiling, on which ceiling bars are fixed.
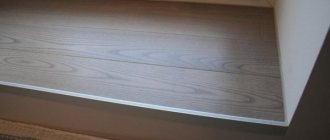
- Its depth is determined by the distance to the window , because the cabinet elements should in no case overlap the window space. It looks untidy and prevents sunlight from entering the room.
- The width of the cabinet is determined by the width of the end part of the balcony.
- Based on the measurements, you need to make a drawing. Yes, it’s still necessary, even if we don’t know how to draw at all, it will come in handy. Because the next step is marking.
- Marking begins from the ceiling. Having drawn a “beam” on it, using a plumb line, you need to transfer the drawing to the floor, and then draw vertical lines on the walls connecting the “beams” of the floor and ceiling into a closed rectangle - this is the place where the future frame frame will be attached.
- To avoid mistakes, the most meticulous ones make a life-size model from cardboard, and then cut out all the details of the future cabinet from it. This is a long and labor-intensive process, but subsequently it pays off by saving materials.
- And yet, you need to be prepared to adjust parts during the work process.
Measurements
To correctly determine the parameters you will need a pencil, tape measure and a sheet of paper. We arm ourselves with everything necessary and fix the following parameters:
- WxDxH (width, depth and height for the future structure);
- We take into account the dimensions of the things we plan to store;
- If necessary, we make allowances for thermal insulation and finishing of the loggia.
- We record data and develop furniture design.
We determine the location for the future structure on the balcony.
Step by step installation
Balcony landscaping
If you understand the basic principle of operation, then installing the cabinet will not be difficult. It is necessary at each stage to take measures to strengthen the structure: use metal furniture corners, abandon flimsy materials. And constantly check the level before fastening work.
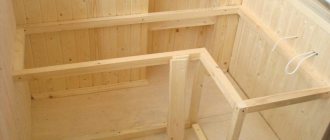
Frame
- First of all, you need to make the back wall of the cabinet from plywood or not very thick chipboard.
- The basis of the cabinet is a frame, most often made of wooden blocks. Everyone chooses a frame installation sequence that is convenient for them.
- In one case, the back and front frames are first made, fastening the vertical and horizontal bars with self-tapping screws and strengthening them with furniture corners.
- Installation begins with the rear frame, aligning it with the markings, and drilling through for fasteners. The frame is removed, plastic dowel plugs are inserted into the holes, the frame is placed again and the screws are screwed in, securing the frame to the rear wall.
Frames made of wooden beams and galvanized metal
- Cross beams are attached to the rear frame, and the front frame is attached to the ends of these beams, which is secured to the ceiling, walls and floor with dowels or anchors.
- In another case, on the ceiling, according to pre-made markings, bars are attached using dowels or anchors to form a rectangle. The same frame of bars is made on the floor. and then install vertical guides, making sure that they are positioned strictly vertically.
- Craftsmen do not advise cutting vertical guides of the same size, especially if the balcony is not finished - their height can vary significantly in different places.
- But if you missed somewhere, it doesn’t matter. The guide that will be fixed to the wall can be assembled from separate bars and this will in no way affect the strength of the structure.
- In both cases, the vertical and horizontal parts of the frame should be strengthened with metal corners; in no case should you skimp on this important detail, the service life of the cabinet depends on them
- The pitch of the screws when installing the frame is 35 - 40 cm.
- When placing the block against the wall, you must not be lazy and carefully measure the correctness of its location along the construction plumb every time.
Shelves
Stacked shelves
- The standard distance between shelves is 35 - 60 cm. First of all, you should think about what will be stored in the closet and, depending on the height of the items, make the distance between the shelves.
- By installing a partition inside, you can divide the closet into 2 compartments, install shelves in one, and leave the second hollow and store, for example, a stepladder or skis in it.
- For shelves on the walls, transverse guides made of timber or galvanized profiles are installed, which also give additional rigidity to the frame and stability of the entire structure as a whole. The most important thing is to mount them strictly horizontally so that the shelves are parallel.
- Most often, shelves are cut out of wood or chipboard, carefully processing the cut edges with a router. Shelves can be made by laying 1-1.5 cm thick boards next to each other and fixing them flush to the beams with self-tapping screws.
Shelves on the balcony
- You can cut shelves from plywood of the same thickness.
- The systems used in stores, consisting of metal guides to which brackets are attached, are very convenient for placing shelves. Such systems are reliable, and special convenience is created by holes with small pitches in metal guides. These holes allow you to easily reposition the brackets to change the distance between the shelves.
- However, something similar can be done by cutting grooves in the vertical posts made of timber with a chisel, making only the top and bottom shelves motionless.
- In fact, the simplest wardrobe with open shelves is ready. For draping open sides, homemade Roman shades or custom-made aluminum blinds are suitable.
- Or you can continue designing and make doors.
Doors
To avoid mistakes, the size of the doors is calculated after measuring the openings of the finished cabinet. Both doors are calculated simultaneously and adjusted to each other by fitting.
Sliding doors
In some cases, it is more convenient to divide a tall cabinet into upper and lower parts, in which case each part will require its own pair of doors. If the width of the cabinet allows, then it can be three-leaf.
The basis for making a door is a frame , which will require a thinner beam than for a cabinet frame, 1-1.5 cm thick. The frame is a rectangular frame made of wooden bars connected to each other with self-tapping screws and reinforced with metal corners. Previously, it was fastened with tenons; according to the same principle, a tenon and groove were inserted into the frame and door elements (a groove is selected in the frame with a router, and a tenon is cut out in the inserts).
Today they do it simpler: they lay the frame on the floor and, using self-tapping screws, fix a solid piece of plastic or drywall or pieces of lining onto it. With special efforts, glass can also be inserted inside the frame.
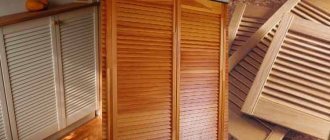
1 Doors made of lining. They look especially good on balconies finished with the same material. If the lining is placed vertically, the door will become almost invisible, and if the pieces of lining are placed horizontally, the space will visually appear wider.
You can assemble the lining with glue and let it dry, holding it in clamps. The resulting shield can be used without a frame. It is recommended to sand the lining parts and treat them with stain.
The finished door, assembled from scraps of boards or lining, must be reinforced on the back side with a crossbar (but make sure that it does not rest against the shelves, preventing the door from closing), and on the outside it can be decorated with platbands.
Clapboard cabinet
2 Swing doors. They eat up space, since nothing else can be placed next to the cabinet, but some people like just such a traditional design. Three pairs of hinges are usually sufficient for a high door. Additionally, closers and magnets can be used.
For wooden doors, regular butterfly hinges are used. At the fastening site, be sure to select a little wood with a hand router in order to recess them flush with the surface of the workpiece. This will minimize the gap when installing doors to the cabinet.
If the cabinet and doors are made of chipboard, special furniture hinges are used for them. Using a router or drill with a core drill, select a round groove for the cup of such a loop.
The sequence of work is as follows: first, the hinges are screwed to the doors, and only then to the cabinet. A very important point is to ensure that the doors are positioned symmetrically relative to each other and form a small gap. All this is achieved by fitting, so it is not recommended to immediately install the door firmly on all the screws; it is better to do it through one - it will be easier during the fitting process.
After all, sometimes you have to take them off and reattach them several times in order to achieve the best result. Self-tapping screws are screwed into pre-drilled holes of smaller diameter.
The handles are attached last. You can buy ready-made ones that are installed using self-tapping screws on the back of the door, or you can cut small, literally for 1-2 fingers, round holes in the door leaf instead of handles. Such handle-holes are most convenient for sliding doors.
Hinged cabinet doors
3 Sliding doors . They use a rather complex system of rollers and guides. For their manufacture, you will have to contact specialized companies, but meanwhile, their aluminum guides are quite flimsy, and in general the entire design of sliding doors requires constant attention.
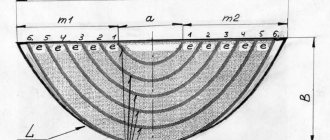
Craftsmen recommend the following option. In a carpentry workshop you need to order guides to be cut into wooden blocks. The lower guides should be mounted on liquid nails, since the screw heads will interfere with smooth movement, and the upper ones can be installed using screws.
The doors for them need to be made from a single sheet of thin material (plywood, plastic, chipboard), then they will move quite freely along the grooves of the guides without any rollers. For easier movement, a plastic corner can be placed in the grooves (these are used as channels for external electrical wiring).
Sliding doors
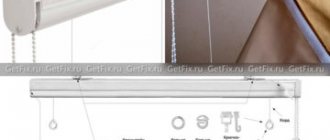
4 Roller shutters. If the closet door is not wide and the balcony is tiny, you can install a special roller shutter door that goes up to save space. She looks quite stylish.
Its significant drawback is its high cost. Roller shutters are made exclusively to order and are installed by the manufacturer.
Using roller shutters
Folding furniture
Folding furniture can change the purpose of the balcony space. On a warm summer night, an installed folding bed will turn the balcony into a sleeping area, and during the day this space can be used as a study.
On small balconies it is wise to install folding structures. Why not equip a dining table that can be converted into a work position at any time.
Folding furniture has one drawback - it is not stable and will not last long.
Helpful tips before assembly
Before making your own cabinet from any materials, check out the practical advice from our experts:
- Check the floor and walls for unevenness. Such defects make work difficult.
- Make a diagram of the planned furniture. Having a drawing, you can accurately calculate the material consumption.
- Make shelves removable. This will allow you to store large items.
- Make and install 2-3 smaller lower shelves (so that they do not reach the back wall). This gap can be used to store fishing rods or other long items.
Before work, purchase the necessary accessories: furniture corners made of metal or plastic, door hinges and handles, fasteners.
Cushioned furniture
The idea of home comfort is inextricably linked with upholstered furniture. If a balcony or loggia is planned as a place to relax, you need to install a sofa, even a tiny one. If the area is small, you should use a soft chair. A small soft ottoman can be placed even in the most modest room.
The upholstery for balcony furniture should be selected so that it can withstand abrasion, dirt and fading. Compliance with such requirements will allow you to maintain its appearance for a long time.
When choosing furniture, you need to focus on the size of the balcony door or opening. This will help avoid unpleasant surprises.
Sofa made of pallets on the balcony
Homemade furniture from pallets is a new popular trend. Structures of various shapes and sizes are assembled from this material.
When making such models yourself, you need to remember the need for careful processing of the wooden surface. It needs to be impregnated with antifungal agents and coated with several layers of varnish or special paint. The basis for the sofa is made according to the following algorithm:
- The pallet is cut into 2 unequal parts. A standard pallet is formed by 7 boards, which means it is divided in such a way that in one part there are 3 boards, in the other - 4. The wide part will become a seat, the narrow part will serve as a backrest.
- The back and seat folded together at an angle of 90 degrees are tightened with self-tapping screws or self-tapping screws.
- The fastening must be fixed using wooden blocks, which are installed diagonally from the upper corner of the backrest to the lower corner of the seat. The result will be something like diagonal armrests.
If desired, the remaining boards can be used to make legs. All that remains is to add a mattress and pillows to the sofa. It is best to place such a piece of furniture near a wall.
How to make a metal model?
A metal rack can support significant weight. Therefore, for example, it is better to install an iron structure for seedlings. Before starting work, it is also necessary to make drawings. The dimensions of the rack depend on the area of the place where the object will be installed.
Materials you will need:
- profile for suspended structures;
- C-shaped frame profile;
- dowel screws;
- press washers;
- profiled sheets for shelves;
- screws for metal;
- polypropylene-based double-sided tape;
- roulette;
- pencil, chalk;
- square, building level;
- jigsaw;
- metal scissors;
- perforator;
- screwdriver;
- anti-corrosion paint.
Before you start work, you need to take care of protection. It is better to use special glasses and gloves. To construct a rack, you need to perform the following steps.
- First, use a tape measure to mark the height of the shelves on the wall. Then, using a building level, draw horizontal lines.
- In order to secure the profiles to the wall, holes are drilled at the marked points and screws with keys are inserted. You can use superglue to make it stick better. Guide profiles are installed on the dowels.
- First, the frame of the first row of shelves is assembled. The structure is assembled starting with the façade parts.
- Next, short supports are placed for strengthening. The frame of the lower shelves should be installed on temporary legs. They will hold the structure until the end of the work process.
- Then future shelves are cut out of the corrugated sheet using metal cutting tools.
- Using self-tapping screws, the shelves are attached to the shelving frame.
- Subsequent shelves are assembled in the same way as the shelves of the bottom row.
- After this, the temporary support legs can be removed.
- All that remains is to paint the structure with anti-corrosion paint. If galvanized metal was used, you can do without paint.
Beautiful design ideas
Minimalistic shelving with a minimum of details is distinguished by its versatility: they can be placed in almost any interior. If the owner of a balcony wants to create a unique, eye-catching interior, he can opt for furniture of an unusual design. Gardeners will love racks with holes cut into the shelves for pots.
The solution not only looks original, but is also characterized by high functionality.
Models with asymmetrical shelves are an option for those who want to furnish a loggia in a modern style. You can choose materials in bright colors, play with contrasts, place souvenirs, books, photo frames or decorative elements on the shelves. Such furniture will look advantageous with colorful walls.
A narrow shelving unit mounted into the wall will be appropriate in conditions of limited space, when every centimeter counts. The choice of wood as a material will give the model a conceptual and deliberate simplicity.
An original solution would be a shelving unit constructed from square cubes attached to the wall. Alternating open and closed shelves will create the illusion of a checkerboard pattern. In plain sight are figurines, flowers, table clocks, and small candlesticks. And behind the doors you can hide items that are not used every day.
Balcony floor made from pallets
Pallets are well suited for floor decoration. There are two ways:
Pallets are disassembled into separate parts using planks that line the surface.
In order to raise the floor level, the pallets are stacked entirely.
The first option is more labor-intensive, but the end result is a beautiful plank floor. The second option is simpler, but it is more expensive.
Floor made from disassembled pallets
The pallets are disassembled and all nails are removed. Each resulting part requires careful polishing.
The base for installation is prepared - logs made of timber with insulation between them. Parts of the pallets are laid on the finished base and fastened with nails so that each next row is offset by a third.
It needs to be fixed carefully. Since low quality wood is used to make pallets, changes in humidity and temperature fluctuations can cause deformation.
The plank surface must be impregnated with an antiseptic and varnished. The latter must be applied in several layers.
Floor made from whole pallets
Whole pallets for decorating the loggia floor can be used in cases where the main goal of all actions lies in significantly raising the level of the future surface. But even here the processing process cannot be ignored. You don’t have to sand it, but you definitely need to soak all the parts with an antiseptic.
A sanded board can be used longer, since the sanding process involves removing the top layer of wood, thereby extending its service life.
The floor is simply covered. All parts must be cut into pieces of the required size and laid on the balcony. If there is plywood or OSB on top, then they do not need to be fastened. When fixed, they will serve as an element that holds the entire structure.
Insulation material can be placed in the pallet cavity.
Door arrangement
Closed shelving models have many advantages over open ones. At the same time, the organization of such storage systems requires more space for maneuvers, as well as the construction of beautiful and practical doors.
Three assembly options are usually considered:
- Conventional hinged doors , fastened using furniture hinges and opened using pre-installed handles.
- Sliding doors based on the principle of wardrobe doors - compartments. The most popular and practical option for modern balcony design. At the same time, a lot of space is saved, and the rack itself looks stylish and attractive.
- Combined designs, when open shelves alternate with doors. Most often, the lower and upper compartments are closed, and an open space is left in the middle for unhindered access to the items located there.