To properly make shelves on the balcony with your own hands, you must first decide on the appropriate type. There are an infinite number of them, but the following options are considered the most common:
- Removable. They are used for a certain time and, if necessary, are removed so as not to take up useful space.
- Folding. This option is common on small balconies. Again, they can be used when needed and simply put away when not needed. Folding shelves can cover the entire wall so that the top ones are always open, and things that are used seasonally are stored on them.
- Floor-standing. An excellent option for a medium or large balcony. Floor shelves resemble racks, but are usually much smaller in size. There are circular shelves that do not have to be placed near the wall; they can be approached from all sides. As a rule, such products are intended for flowers, seedlings or crops that you want to grow in an apartment.
- Fixed. These are already full-fledged racks. Installed along the entire length of the wall. Recently, corner shelves have become popular, they look beautiful and take up minimal space.
- Hanging. You need to be extremely careful when working with such a structure. If the shelf is poorly secured, it will not withstand the load and will fall, which leads to the risk of injury.
Manufacturing
Choose the optimal box size.
An easy manufacturing option is vertical loading, where the lid is at the top. A little more complicated, but more convenient, when the drawer opens from the side. Drawers are also often used. Stage 1. Insulation material is laid. It is advisable to give preference to those that can withstand heavy weight and have a dense structure. For example, polystyrene foam. Plywood or chipboard sheets are placed on this layer.
Stage 2. Making the box. Both boards and sheets of lumber are suitable for this. Make a frame. Furniture corners are useful for installation work.
Stage 3. The inner part must be covered with chipboard or plywood of the appropriate size. Insulating material is attached to the cracks between the boards or beams, then the outer cladding is installed.
So, you know how to make a box on the balcony. Now about the final steps. Be sure to make a small hole in the structure to allow as much fresh air circulation as possible.
The optimal solution for temperature control is to install a thermometer on the door.
Varieties
When choosing plants for landscaping, you should first of all take into account the degree of illumination of the balcony. All types of geraniums, purslane, calendula, petunia, and any types of loaches are perfect for the sunny side.
The shadow side involves choosing colors that do not suffer from a lack of light. These are fuchsia, torenia, calceolaria, impatience, and many hanging species, such as lobelia.
Read more about what types of plants to choose to plant on your balcony here.
What can it be made from?
The design of the cabinet depends on the chosen interior of the room. When a workshop is located on the loggia, the furniture should be spacious and have many shelves for storing small items, but less attention will be paid to aesthetic characteristics.
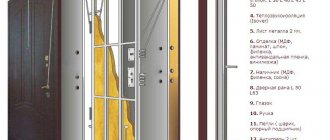
To make furniture, different types of materials are used, which will determine the functional features of the product, its color, texture and service life. Furniture made from natural wood looks most noble and solid.
Wood
The material has the best performance characteristics and lasts longer. The tree is environmentally friendly and does not emit harmful substances into the air. Due to their excellent appearance, the boards do not require additional processing and will look good even without paint or varnish. However, the material also has a number of disadvantages. These include high cost, massiveness, and heavy weight. Wood burns, swells when exposed to moisture, and mold may appear on it.
Drywall
Ease of installation is one of the main advantages of the material, allowing the implementation of complex design solutions. Drywall bends well, so it is suitable for creating furniture with rounded corners or cylindrical decorative elements. The sheets weigh little, so they are easy to carry, and finished furniture can be moved without problems. The cost of the material is lower than that of wood, which makes it popular among consumers.
Plastic
This artificial material has a rich range of colors and can be decorated with patterns and designs. The plastic is malleable, bends easily, and is easy to install, so beginners can handle it.
Modern plastic is UV resistant and retains color saturation even when exposed to sunlight. The material is not afraid of moisture, it does not leave scratches under minor mechanical stress. The advantage is the low weight of the finished furniture. The plastic cabinet can be easily disassembled for transportation to another location.
Chipboard
A slab consisting of sawdust, shavings, and crumbs. The advantages of the material include strength, reliability and density. The panels are easy to install and also have a low price. The special structure of the boards allows you to create furniture of any shape, size and unique design from them. Products made from this material are easy to transport and take up little space during storage. The panels are resistant to temperature changes, humidity and sunlight.
Plywood
A building material consisting of several layers of wood 0.5-10 mm thick. There are several types of plywood depending on its performance characteristics and the specifics of the manufacture of panels. In particular, moisture-resistant, laminated and bakelite building materials are distinguished. Due to its structure, plywood is resistant to external influences. The panels are easy to work with: the same tools that are used for natural wood are suitable for processing them. Parts of any size and shape can be cut out of plywood; if necessary, it can even be bent.
Lining
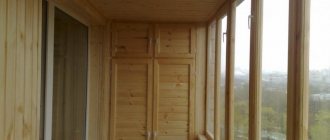
It is primarily used for finishing interior and exterior spaces, but the material can also be used for making furniture. In this case, a wooden frame is made, which is covered with clapboard. The advantage of the panels is durability and high aesthetic characteristics. Wooden lining looks good even without paint and varnish, so it is possible to save money at the finishing stage. To make the material resistant to humidity and temperature changes, it is coated with special solutions.
When creating furniture, it is permissible to combine different materials. The basis can be wood or chipboard, which is complemented with glass shelves and inserts. This option is also suitable for plastic - it can be decorated with metal elements.
Types of shelves and cabinets for balconies
Depending on the selected materials and location, the shelves can be of very different designs. The most practical options:
- Shelves along the side walls of the balcony along the entire width - they will not take up much space, while leaving a wide passage;
- Shelving - depending on the size of the room, they can be placed on the side walls or on the walls adjacent to the room;
- Built-in cabinets - characterized by harmony in the interior and the ability to hide the contents of the shelves behind a door or curtain;
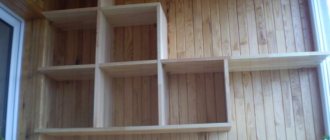
- Niche shelves are a very stylish and convenient option for placing decorative elements or indoor plants. But such shelves are suitable only for spacious balconies or loggias;
- Wall shelves - various variations of wall shelves are the easiest way to organize places to store objects and things, while unusual materials will help create a stylish balcony interior design;
- Corner shelves are more suitable for placing decorative elements, flower pots or books, an option that does not take up much space and easily fits into any interior.
In addition to the above designs and their variations, you can come up with your own original ideas for shelves for the balcony. These could be drawers from an old chest of drawers or cabinets, flower pots or fruit boxes.
Selecting a design and creating a drawing
Before you make a cabinet on the balcony with your own hands, you should decide what kind of structure will be created. It can be presented in numerous types, differing in design, size and other characteristics.
The most popular cabinets created for balconies include:
- standard design, equipped with three compartments. The doors can be sliding, and in this case you get a sliding wardrobe for the balcony. They can also be hinged. This design is quite large in size, so it is preferable to create such a cabinet with your own hands for a large room. If the loggia is small in size, then it is allowed to make two sections for the cabinet. Different materials can be used for production, and assembling a cabinet with a simple design is quite simple using standard tools. The products are attractive and spacious. They can be open at the top, and flowers or decorative decorations can be installed here;
- corner cabinet - selected if there is a small balcony. It does not take up much space and is also considered easy to create. By using an angle that often remains unused, the central part of this design is characterized by good spaciousness. A corner cabinet can have a different design, and the frame and lining can be made from different materials;
- pencil case - if it is impossible to allocate a lot of space for a closet on the balcony, then it is allowed to make a structure presented in the form of a pencil case. It’s easy to make cabinets for the balcony with your own hands; this video will help you with this. Usually it has many small shelves and compartments, so you can store many different items here. Usually a significant height is chosen, and any design can be chosen. The frame and cladding can be made from various materials. It is equipped with standard hinged doors, and such furniture can be installed anywhere on the balcony;
- a built-in wardrobe on a loggia is considered an excellent solution if there are various niches or recesses. Its size depends on the available space. Due to independent work, the production of a cabinet with optimal dimensions is ensured.
Built-in
Corner
Pencil case
With branches
If during finishing you choose to cover the balcony with clapboard, then the same material can be effectively used to form an attractive cabinet, which guarantees a holistic and interesting interior. After choosing the optimal design, you need to start creating drawings. Often standard designs with two doors are chosen, and it is possible to choose both sliding and hinged doors. Drawings are generated independently or you can find suitable diagrams on the Internet. When working independently, the diagram must be made using special computer programs so that even the smallest details and design features can be calculated.
It is recommended to immediately create the detailing yourself, which involves highlighting all the parts, when combined, a complete piece of furniture will be obtained. Using such a drawing, building a cabinet will not be difficult.
The optimal dimensions for any cabinet are:
- height within 250 cm;
- width equal to 120 cm;
- depth from 45 to 60 cm;
- a distance of 35 cm is left between the shelves.
The above parameters are considered universal, but they can differ significantly, since when assembling the structure yourself, the space on the balcony allocated for installation, as well as its purpose, is taken into account.
Rules for choosing the right stand
When deciding in favor of one design or another, you should first of all take into account the size of the balcony itself.
If it is large enough, a floor shelving unit will work well, as long as it does not block the light from entering the room. In this case, it will be quite convenient to care for flowers, and if necessary, it is easy to install additional lighting on such stands.
For small rooms, it is better to consider corner, wall and hanging options. They are compact, securely fastened and allow you to place quite a lot of plants, even if the balcony area is limited.
To the nursery
While the child is very small, I want functional shelves, but with children's drawings. But where can you get these? Do it yourself. Any shelf of the configuration you like can be covered with non-woven wallpaper or thick wrapping paper (glued with PVA). After drying, coat twice with water-based varnish. Such shelves can be washed, but what’s most interesting is that the shelf can change with the child. You tear off the old decor, glue on the new one. The idea is simple, it works perfectly.
Here's what can happen
For children, the shelves are not very different in design. If we talk about floor or shelving, then they must be strong, taking into account the fact that older children will definitely want to climb on them. Therefore, often even those shelves that stand on the floor are additionally attached to the wall: so that they do not collapse and crush young climbers. Based on these considerations, they are not made tall: even if they fall, it’s not scary.
The shelves in the children's room also differ in color - they are brighter, can be made in the form of letters, and boxes for toys can be installed in them: this makes it easier to keep them in order. In general, functionality and security must be combined.
Conclusion
You can make beautiful flower shelves yourself without any special preparation. First you need to come up with your own original design or find a ready-made one suitable for the interior of the room where the plants will be placed.
Available materials make excellent products that create an unusual atmosphere in the room and become bright decorative elements.
Interesting ideas in balcony design
Regardless of whether the balcony is wide or narrow, if you use the space correctly, you can not only get additional storage space, but also decorate it in a very functional, beautiful and creative way.
A built-in monochromatic wardrobe, consisting of many closed modules, which combines plastic doors of different heights, widths, opening directions with drawers, looks very interesting.
Convenient, similar from the inside, is a hinged cabinet containing many sections of various sizes for objects of various sizes. But it is equipped with only two external doors at its full height. Its convenience lies in the fact that when using the doors, you can see all the contents of the cabinet at once. The beauty and shine of such a cabinet can be given by covering it with plastic lining.
The cabinet with frosted glass inserts looks very nice. This makes the balcony look like an extension of the kitchen, which brings comfort and harmony to the space. A cabinet in the shape of a kitchen buffet gives the same impression.
A bedside table to match the balcony trim, built under the entire width of the window sill, is completely invisible, but at the same time quite roomy. Looks good both wooden and plastic.
The cabinet, equipped with slatted doors assembled from lining according to the principle of blinds, is not only beautiful, but also allows air to enter inside when it is closed. This allows natural ventilation of its contents to occur and prevents the formation of mold and odors.
The idea of a balcony cabinet as a workplace is interesting. With the doors closed, it is just an ordinary cabinet, inside of which, on shelves of the appropriate height, there is a computer monitor, a system unit, a keyboard, and a printer.
A cabinet made up of several sections, built like a home furniture wall, around the perimeter of the window is functional and looks great on an insulated balcony. The design is turned with doors towards the street side and surrounds the window without blocking it. The side cabinets reach the top frame in height, the width corresponds to the width of the balcony, and there is a built-in bedside table under the window sill. The entire structure and balcony are covered with clapboard, which creates a complete image of a single stylish space. This option can also be made of plastic.
The spacious, warm loggia with a side exit, equipped in the style of a living room, looks very cozy. A wardrobe with many shelves is attached to the free wall up to the window, its lower tier is replaced by a sofa equal in width, and the window sill of the loggia is completed with a table in the form of a counter. All this is complemented by folding chairs.
And a simple tall double-leaf end cabinet can look very nice from the outside if you equip it with narrow consoles from the street side and place flowers or soft toys on them.
Options for cabinets on the loggia
Built-in modules
Swing built-in option. Facades - MDF, frame made of laminated chipboards, fittings - matte chrome. Swing built-in wardrobe. Facades - MDF, frame made of laminated chipboards, fittings - matte chrome. The main disadvantage of the side-hinged system is that it is impossible to use the space that is occupied by the door when it is open, that is, the area of the room is used irrationally.
Internal breakdown of the frame. The body is made of laminated chipboards, the facades are made of plastic. The walls are covered with plastic lining, linoleum was chosen as the floor covering. Advantages of a swing opening: long service life, doors close well, and when open, you can evaluate the contents on all shelves at once.
The built-in MDF model fills a niche in the balcony space. Two textures were selected for creation (creamy color and wood texture).
Built-in frame, created using laminated chipboards. The door leaves have frosted glass inserts, and a metal profile ensures opening. A light shade of laminated chipboard with an imitation of wood texture suits the neutral palette of this room.
Laconic design in the modern interior of the loggia. Lacobel doors, mosaic and ceramic tiles in the decoration. The main disadvantage is that this type of opening takes up space inside the module.
Plastic facades of the sliding system in the interior of the loggia. The material does not require special care, but scratches may appear on its surface. Bright colors are subject to fading during use.
Models made from wood are environmentally friendly. Often, when creating a structure, the same type of wood is used as for finishing the walls on the loggia.
The space under the window is filled with modules in which the necessary items can be placed. This option is suitable even for small spaces, as it takes up minimal space. You can make this design yourself or entrust the work to specialists. The cabinet provides additional insulation for the parapet.
Simple rules for arranging shelves
When placing flower shelves, take into account the illumination that is necessary for plants. Shelves are installed further from the window for shade-tolerant plants, and those that love bright light are placed in well-lit places, but not in direct sunlight.
Some plants cannot tolerate drafts, especially when ventilated during the cold season. When arranging shelves, it is important to create a healthy environment for all plants.
All designs in color and shape must fit harmoniously into the interior of the room.
Step-by-step manufacturing instructions
Step 1. On a piece of paper, make several sketches of the bedside tables. Look for successful examples on the Internet and adapt them to your conditions. Do not rush to accept the final version, try to look not only at today, but also into the future. The more versatile a bedside table is, the more convenient it is to use, the more different items you can place. It is recommended to take into account not only the height and width, but also the number of shelves and the distance between them. Another important point - for each element, make a safety margin; do not count on storing only light items.
Corner cabinet diagram
Diagram of a corner cabinet with dimensions and arrangement of shelves
Corner cabinet drawing
Step 2. Once the final option has been selected, you can determine the nomenclature and quantity of fittings, hardware and assembly fixtures. It is recommended to fix the frame with corners, it is much easier than making a tenon/groove or half-tree connection. Although, of course, this is a matter for the master; everyone must decide for himself what to do.
Furniture corners. Kinds
Step 3. Take measurements of the cabinet. Take measurements from the walls and ceiling, but when calculating the frame elements, these values need to be reduced by double the thickness of the lining plus another centimeter or two for the gap.
Take measurements on the balcony in the place where the cabinet will be installed
Prepare a template for each element; you should use it to cut out all the others.
Pay attention to the corners; it is better to cut bars at angles using a special device. If it is not there, then use a square
The more tightly the frame bars fit together at the joints, the stronger the frame will be. Don't expect that all mistakes can be corrected with corners, this is not true. If the fixation density is violated, the stability of the frame will significantly decrease.
Step 4. Start assembling the frame. First, the upper and lower parts are connected. Place them next to each other, they should be completely identical. Fix with corners on self-tapping screws, tighten tightly. The length and diameter of the screws are selected in such a way that they provide the required strength of the connection and at the same time do not split the bars.
Secure the frame posts. Be guided by the scheme you choose
Step 5. Once the top and bottom are assembled, you can attach the side vertical posts to them. It is easier to do the work on a flat surface; it is advisable to have an assistant. Together, it is much easier to control the strength and accuracy of the frame assembly. Once the uprights are secured, place the frame in place and check the position and shape again. Don't forget about the gaps between it and the walls for the lining. Problems have been discovered - it’s not too late to fix everything.
Cabinet frame, top view
Step 6. Screw the horizontal bars for the shelves to the frame. It is better to make the distance between them different; it will be possible to store objects of various sizes in the closet.
The photo shows an example of a base for a shelf. Frame made of bars
Instead of bars for shelves, you can use plastic corners
Attaching shelves to corners
Example of shelves for a wardrobe on a balcony with adjustable height
Shelves made of boards
Step 7. Now you can start covering the top, bottom and sides with clapboard. If you did everything correctly, the dimensions of the lining will be the same. You need to make legs in the lower part, the surface should be ventilated. The legs can be made from pieces of wood or bought ready-made.
If, due to a lack of practical experience, the ends of the lining turned out to be ugly and uneven, this is not a problem. Buy thin decorative wooden or plastic strips at the store and use them to frame the cabinet.
Below is a gallery of photographs of clapboard cabinets. Illustrative examples will help you choose the best option for your balcony closet.
The photo shows the process of covering the side of the cabinet with clapboard
Wardrobe lined with clapboard, decorative strips are used around the perimeter of the doors
Flashing strip for cabinet doors made of lining
Wardrobe covered with clapboard horizontally
Another option for a lining cabinet
Wooden cabinet
Preparing wood for installation
To make a wooden rack, well-dried blocks are used, since wet wood will warp after drying. As a result, the structure may become askew, the fastening points will become loose, and the shelves will have to be reinforced again.
The bars are inspected, and if necessary, they are sanded: irregularities, burrs, and peelings are smoothed out. Sandpaper is attached to the sanding block, and the wood is sanded manually. Instead of a manual sanding block, you can use a grinding machine (preferably a belt or vibrating one). It is not necessary to sand all the wooden elements; it is enough to sand only the shelf boards and bars that will be on the front of the rack.
Important. Sanding is carried out only along the grain of the wood. First, the treatment is carried out with the coarsest sandpaper, then medium-grain, and finally the finest.
The tree has a significant drawback - it is attacked by wood-boring insects. It is also susceptible to rotting if kept in a humid environment. Since it is not always possible to create favorable conditions for wood on the balcony, it should be hidden with preventive antiseptics. The wood is treated with an antiseptic twice, but a second layer is applied only after the first has dried.
DIY wooden rack
With fresh, clean lines, simple, durable construction and a contemporary design, this shelving unit will suit any room decor. The credo of many great 20th century architects was “form follows function,” and this bookcase is proof of that. Durable shelves are mounted on equally durable racks. No decorations, unnecessary details, even the back does not overshadow the ideal geometry.
The design is really surprisingly simple, so making a modern wooden shelving unit with your own hands is quite possible. Long threaded rods are hidden inside and firmly tie the entire rack together.
There are no corners to cut, no traditional grooves. Finishing is also practically unnecessary, because all parts are processed before assembly. The rack is made of laminated plywood, so it looks solid, as if it were made of solid wood. You will need a saw, a plane, a jointer, a drilling machine, a drill, and you can see the assembly procedure in the step-by-step photographs.
The size of the rack can be made at your discretion. Do you want it to cover an entire wall (even around a window) with enough shelves to house an entire library? You can do it! Cabinet shelves can be easily made to any size. Need a small shelving unit? No problem either. Familiarize yourself with the drawings, adhering to the proportions, you can assemble a structure of any size, just by changing the distances between the holes or simply reducing and increasing the number of shelves.
Photo source www.popularwoodworking.com/projects/aw-extra-contemporary-bookcase
Corner floor-standing bookshelf (cabinet)
(with your own hands in 2 hours!!! drawings and step-by-step photos of production)
The author claims that he managed to make all the parts of the shelf and assemble the entire structure in 2 hours. The rest of the time was spent on painting, varnishing and drying.
The very design of such a shelf suggests that not a single nail will be needed to make it.
It is important that all the shelves sit very tightly in their places so that the shelf does not wobble. If the connecting holes are unsuccessful and some shelves wobble in their places, then the shelves in these places can be screwed or, as the author advises, simply drive pieces and splinters of wood into the grooves
We also recommend that you remember to screw the shelf to the wall so that it does not accidentally fall)))
Floor shelf or table with shelves for the kitchen
Most likely, this option applies more to tables than to shelves. But still, we placed this model here because... We hope that this option for organizing personal information will be interesting to you, and most importantly useful, because... When arranging your home, you need to keep in mind all the options!!!
See below step-by-step photos of the master class
Photo source: dailyinteriordesignblog.com Author Photos: Josh Rhodes and Elsie Larson
Large wooden home rack
Using these step-by-step photos, you can easily make with your own hands such a huge and simple wooden rack, which is suitable for the garage, for the home, for the store, for storing toys, for flowers, for books and for storing old unnecessary things in the utility room
DIY portable shelf
An excellent option for a simple wooden shoe rack that you can easily make with your own hands from wood. This shelf has a large surface area, which means you can put more of your shoes on it. This shelf is also perfect for toys, books, tools, shoes and other things. The shelf is highly mobile, which means that you can place it at any time wherever you might suddenly need it.
Shelf bench for shoes, toys and books
It won’t be difficult for you to make such a simple wooden shelf for your hallway with your own hands. Check out the step-by-step photos below to see how this is done. The bench shelf is suitable in the hallway for shoes, in the bathroom, in the children's room for toys, in the room for books, magazines and newspapers.
Cabinet shelves
You can make a high-quality and reliable wardrobe for your balcony if you choose the right building material for the shelves
The main load will be directed precisely to this element of the product, so the shelves will have to pay special attention. Chipboard, OSB or thick plywood are best suited for making this part.
The shelves are attached to pre-mounted bars or screws. It will not be difficult to make a frame for a cabinet from bars if you prepare all the tools and materials in advance. You can make a cabinet using metal corners, where you can also attach shelves. If the cabinet is of a built-in type, and the walls of the balcony can be drilled, then it is important to use corners and self-tapping screws.
A home-made cabinet on the balcony will look no worse if you build shelves using metal guides and brackets. In this case, changing the height of the shelves is very simple; just move the brackets to another hole.
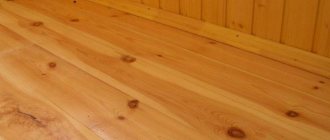
You can build shelves from the remaining scraps of wooden boards
Before attaching the part to the frame, it is important to first prepare the boards. To do this, they are coated with a paint and varnish material (preferably water-based)
Such shelves will not deform under the influence of moisture and ultraviolet radiation.
Racks for flowers and growing seedlings
Balcony shelving is often used for flower gardens and even mini-vegetable gardens. Despite the limited space, the practicality of this option is very high. The main conditions are maximum illumination and resistance to moisture. To do this, you can place rows of shelves along the parapet, as well as make the end parts of the balcony.
It is preferable to use painted wood or moisture-resistant boards, as well as plastic shelves that can withstand sufficient weight.
Shelves and shelves for the kitchen
Say what you like, but in the kitchen the main thing is functionality. There is not much free space even on the walls: the cabinets take up a large area. Therefore, one of the tasks is to make the most of free space. There are interesting ideas for small or even very small gaps between the wall and the refrigerator or other household appliances. Strictly in size, you can make a pokka on wheels, which can be pulled out and completely hidden there. It is wide and narrow (see photo).
It’s easy to make such a retractable shelf-rack on wheels for different jars. Everything you need is at hand and out of the way
There are also interesting ideas for saving space. If the sink or station is located near the window, you can take the sides. There is an interesting hanging option - a grid on chains to which all sorts of utensils are attached. But such a shelf is possible if the desktop is not against the wall. Another option for saving space is if the kitchen-dining room is zoned with a counter, you can also make a shelf above it, which will be partially hanging. One part of it rests on the wall, the second on the counter or “hangs” on the ceiling.
Covering the entire wall above your desk with cabinets is not the best solution. They look heavy. The problem can be solved by using glass doors, but not everyone likes this. The solution is to make open shelves between the cabinets. They will add more lightness to the interior and the work area will not put so much pressure on the rest of the space.
Built-in shelving on the balcony: how to make it yourself
Many balconies in apartments in multi-storey buildings have niches - spaces between the outer wall of the balcony and the outer wall of the house. Many people place things there for storage. This space can also be refined. And give it a stylish, cozy design.
In terms of installation complexity, this type of rack is the simplest. In addition, if there is not a lot of space on your balcony, and you do not have enough space to open and close swing doors, then you can install on such a cabinet structures with doors like a wardrobe, or roller blinds. Such doors do not require a lot of free space, but a closed rack with cans. It looks much neater with boxes and old things.
How to make a built-in shelving unit with your own hands:
- Since you already have a ready-made cabinet frame, you only need to take measurements and make shelves;
- Prepare the necessary fasteners for the shelves; there should be 2 more of them than the intended shelves.
- Install shelves inside the rack;
- A sliding door system will require you to have some knowledge of its installation, if you do not have it, contact a specialist.
- Give the design one overall harmonious background.
By decorating the shelving doors with an interesting painting or in a style that is in harmony with the decoration of your balcony, you will make your loggia elegant and useful.
Corner shelves
For the balcony you can choose different product options. Corner models fit perfectly into small spaces. They will allow you to use the place to your advantage. To make them you will need a minimum of materials and tools.
Corner shelves for balconies are chosen for their practicality and aesthetic appearance. The universal type is suitable for loggias of any size. In closed versions they store preparations for the winter and tools.
Open systems are used for flowers and seedlings, books and other items. Models with alternating closed and open shelves look stylish. They are chosen for spacious rooms.
Among the wide variety of designs, you can find your own option. You should not install too many shelves so as not to clutter the space. They need to be placed at a certain height to avoid injury.
Light wood and pastel colors will allow you to visually push the boundaries. On the balcony you can create a cozy place for children to play if you lay a mattress on the floor. And on the shelves you can place toys that kids will be happy to put back in place.
There's no need to rush. It’s better to think everything over carefully and then get to work. You can organize your space correctly if you take the advice of experts.
You can see finished design projects. They can inspire you to create your own unique interior in a small space.
Ideas, diagrams, drawings and step-by-step instructions for assembling balcony cabinets
Once you have decided which type of cabinet will be most convenient for you, you need to begin creating the most accurate drawing possible. Below we present to your attention several developments designed specifically for installation on a loggia or balcony:
- The simplest version of a rack consisting only of shelves. This model does not require the installation of doors, but you can calculate their dimensions and mount them yourself, securing them to the front frame.
Scheme of a simple built-in shelving
Drawing of a wardrobe for a large loggia
Rack cabinet with hinged doors for a narrow balcony
After reviewing the presented drawings, you can easily create your own project by changing or adding some parameters in accordance with the size of your balcony.
List of tools needed for carpentry work on arranging wooden cabinets.
- screws, dowels, nails;
- hammer;
- chisel;
- jigsaw or hand saw;
- electric drill with attachments for woodworking;
- screwdriver (set of screwdrivers);
- ruler, pencil, tape measure, plumb line, square and building level.
You will need a drill, screwdriver, screwdrivers, hammer, chisel and other tools
Here are some more simple tips before building a cabinet on the balcony:
- On a pre-glazed balcony, the wooden finish will not suffer from dampness and will retain its attractiveness and good quality longer.
- It is advisable to first repair the floor on the balcony, or at least the area on which the cabinet will be installed.
- It is advisable to eliminate all cracks and crevices, insulate the walls and floor of the balcony, which will provide protection from temperature changes and drafts and significantly extend the life of the cabinet. For insulation, you can use polystyrene foam, PVC, or mineral wool.
After the measurements have been taken, the type of cabinet has been selected, the drawing has been drawn up, and you can begin to work directly.
Stages of self-assembly and arrangement of the cabinet
Even a beginner can easily handle this cabinet. To make it you will need the following materials:
- pine timber 40 X 40 mm for the frame;
- metal corners for connecting elements;
- boards or chipboard sheets for shelves.
Pine timber is the best option for making a cabinet frame
The amount of pine timber must be calculated taking into account the selected dimensions of the future cabinet. For simplicity, let’s take the standard dimensions that are most suitable for the balcony space: height - 1.8 m, width - 1.5 m, depth - 0.5 m. Accordingly, the timber will be required:
- for the bottom frame 2x0.5 + 2x1.5 = 4 m;
- for the top frame 2x0.5 + 2x1.5 = 4 m;
- for vertical posts 4x1.8 = 7.2 m.
You can use a sheet of laminated fiberboard as the back wall of the cabinet. This dense and waterproof material will additionally protect the structure from moisture; it is attached to the rear frame using a construction stapler or self-tapping screws.
- First, assemble the back and front frames of the cabinet. To do this, fasten the vertical and horizontal bars together using metal corners.
An example of fastening elements to metal corners
Features and Benefits
A shelving unit is a functional piece of furniture that allows you to place a home library, tools or dishes on the loggia. The main advantage of a closet located on the balcony is the ability to unload the apartment from unnecessary items. In addition, beautiful furniture will decorate the interior and give the room coziness.
What role does the shelving on the balcony perform?
- Helps maintain order on the loggia;
- Allows you to place flower pots or seedlings;
- Used as a storage room;
- Can be used as part of a kitchen set;
- Suitable for storing seasonal items.
When furniture is made by hand, it is possible to track the process of its creation from start to finish. This way, the apartment owner will be confident in the quality of the assembled rack and, if necessary, will be able to upgrade it or repair it if it breaks down.
Another advantage of a self-made cabinet is the ability to choose any materials and dimensions.