A beautiful and complete interior is obtained if you correctly design the slopes on the balcony for window openings and the balcony block. For finishing, plasterboard, plaster, plastic and sandwich panels are used. The amount of work is relatively small. To save on the services of a specialist, you can do it yourself, following the step-by-step instructions below.
Why do you need finishing slopes?
The main purpose of the slopes is to protect window blocks from the onslaught of wind, rain, sun rays, and temperature changes:
- Streams of scorching sun will gradually lead to a decrease in the insulating properties of the sealant and fasteners.
- As water gets into the seams of the structure, it will reduce the thermal insulation properties of the polyurethane foam.
- Low temperatures in winter can cause mechanical damage to plastic windows as the foam expands or contracts.
Polyurethane foam must be protected from external influences
Slope finishing:
- will hide unsightly seams with protruding foam;
- will not allow condensation to accumulate;
- will prevent potholes and cracks from increasing in size under the influence of unfavorable climate conditions;
- will preserve the integrity of doors and windows for a long time, increasing their service life.
Reference! It is enough for the humidity level inside the balcony to increase by only 5-6% for the heat-saving qualities of the polyurethane foam to decrease by 2 times. When installing windows, defects often remain, cracks and chips form on the walls of the opening. Without finishing the slopes, defects can only intensify, causing heat loss or distortions of the window frame.
Plastering slopes
Plaster is a universal type of finishing for any external slopes. The surface of the protective layer of the seam (at the junction of the window structure and the opening) is obtained by applying one or several layers of cement mortar.
The advantages of this option: low cost, durable and waterproof surface. There are more disadvantages: the slope turns out to be “cold”, the event is dusty, it takes a long time to complete, the working mixture and the plastic frame have different coefficients of thermal expansion (therefore, a crack usually forms along the line of their joining).
On a note! You can leave a gap where the plastered surface meets the frame and fill it with elastic sealant. When temperature fluctuations occur, the integrity of such a joint is rarely compromised.
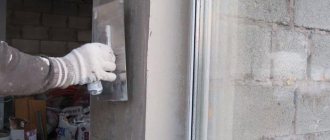
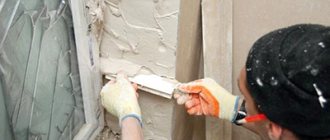
Finishing external slopes with plaster followed by painting
How to cover the foam on the balcony from the outside? Plaster is the easiest option for leveling and improving slopes. The work uses a dry gypsum mixture by diluting it with water and thoroughly mixing it using a construction mixer. First, a layer of primer is applied to the seams, namely the base at an angle of 45 degrees.
Then the prepared solution is applied to the external slopes along the entire opening with a small spatula. Just wait for it to dry.
After:
- eliminate irregularities, sand the seams with sandpaper;
- Apply a small layer of topcoat.
Attention! To finish, level the top layer, and eliminate any remaining cracks and irregularities, you can use the same plaster solution, only in a more liquid state. Lastly, the slopes are carefully painted with water-based paint (read more in the article “how to paint a balcony”), preventing particles from getting on the glass and windows. When plastering, the solution must not be allowed to fall on the internal slopes as a finishing material. Otherwise, it will simply quickly deteriorate. It is better to temporarily cover the windows with masking tape (film) when working.
The standard thickness of the plaster layer is 2.5 cm, but it is applied twice. First, a layer of a mixture of sand and cement (2x1). Then, after drying and applying primer, apply the second coat. After it dries, you can prime it, apply the finishing putty with a spatula, spreading it evenly to correct unevenness. Ideally, you should get a flat surface with a groove of 3-5 cm between the frame and the slope, filled with silicone plastic sealant. It will protect the plaster from damage and will withstand the expansion of plastic.
At the final stage, you can paint the installed slopes with acrylic paints or solvent-based enamel. The main thing is to carry out all the work carefully so that the result is pleasing to the eye.
How to prepare openings for finishing
Regardless of which finishing option you choose, the work surface must be carefully prepared. It should be clean, dry, even. Otherwise, the material used will not adhere well to the wall and your efforts will be in vain.
Before starting installation, be sure to cover the window glass, window sill and floor to protect them from damage and dirt. Thick plastic film, newspapers, tarpaulins and other similar materials are suitable for this.
So what needs to be done?
- Use a utility knife to cut off excess foam.
- Remove old finishing material and crumbling pieces of mortar. You will need a hammer drill with appropriate attachments or a chisel and hammer.
- Remove dirt. Oil stains can be removed by applying clay to them. As it dries, it absorbs fat and is then cleaned off along with it. Regular dirt is removed with a wire brush.
- Dust the work surface using a dry brush and vacuum cleaner.
- Level the slopes. This can be done in several ways. Their choice depends on the extent of damage to the wall.
If you notice defects in the form of small chips and cracks, they can be spot-covered with plaster.
If the damage is much more serious or after setting the level, uneven slopes are discovered, you need to apply a full leveling layer of mortar. To securely fix it and prevent cracking, use a reinforcing mesh. It is installed in one of the following ways:
- using fasteners;
- on a spot-applied solution;
- embedded in a thin layer of not completely dry plaster applied over the entire surface of the slope.
The principle of laying reinforcing mesh
Then another layer of solution is placed on the grate. Level it, let it dry, sand it with sandpaper or a grater, and then prime it. In this case, the final coating can be applied no earlier than two days later.
The use of plasterboard for finishing window slopes
Drywall as a sheet material has many advantages when designing openings:
- cheapness;
- ease of installation;
- undemanding to additional leveling of the coating;
- suitability for creating relief structures;
- flexibility for many types of finishing;
- having a low level of flammability;
- environmental cleanliness;
- durability;
- providing energy-saving and decorative functions;
- possibility of painting the top layer, finishing with colored stone.
When choosing, you should take into account the degree of resistance of drywall to moisture and temperature changes. Although, the material is not suitable if the balcony is open or not insulated. When finishing, its performance will quickly decrease. Exposure to the sun's rays can cause swelling and deformation. If the air humidity exceeds 75%, the strength characteristics will be reduced.
Selection of finishing material
To make good internal slopes for plastic windows, you need to choose a suitable material taking into account its performance characteristics. It is very important that the base for internal slopes on windows is moisture resistant. This requirement is due to the difference in temperature outside and at home, which causes condensation to form. If the material does not have this parameter, the internal slopes on the windows will not retain their attractiveness for very long. They will quickly become unusable and will have to be redone.
Correct installation of plasterboard slopes (video)
Using drywall you can quickly and effortlessly level the surface. The material will maintain a comfortable microclimate in the room and will allow, if desired, to arrange complex and voluminous structures.
Stages of work:
- Rough the base. Remove old plaster.
- Apply a coat of primer and let dry.
- Draw a line along the contour of the balcony window with a level or plumb line.
- Using a screwdriver, screw the U-shaped plastic strip closer to the edge of the outlined line.
- Using a ruler, measure the width and distance from the bottom to the top corner of the window.
- Cut blanks from drywall.
- Treat the surface with a layer of primer or glue (acrylic, silicone sealant).
- Set the desired angle using a square, lightly pressing the segment against the base to indicate the exact size.
- Mark points for fasteners at the top of the slope.
- Screw the profile to the window block so that the upper part of the plaster slightly extends into the frame.
- Cover all protruding parts with plasterboard.
Reference! Finishing is indispensable when cold bridges appear. This happens immediately after installation of aluminum and plastic window blocks.
Plasterboard finishing
To obtain a perfectly flat and smooth surface of wide slopes, sheets of moisture-resistant plasterboard are used. But the loggia (or balcony) where the window faces must still have glazing.
Benefits of drywall
The use of plasterboard sheets is explained by the following advantages of the material:
- environmental friendliness;
- low price;
- simple installation;
- the ideality of the resulting finishing surface;
- the possibility of placing thermal insulation under drywall;
- durability of the finish with minimal maintenance.
Installation methods
After certain preparatory measures, plasterboard blanks adjusted to size are attached to a frame made of standard metal profiles or mounted using an adhesive method. The second option requires compliance with the angles of inclination of the future slope, accurate measurements and careful adjustment of parts. Without some skill, it is easy to make any mistakes.
Advantages of adhesive installation: a minimum of necessary tools and additional materials are required, preparation of the slope for finishing is simplified, and the work is performed at high speed. Any method of installing drywall is completed by preparing the corners, joints and fastener locations for puttying, the puttying process itself, and then the final touch - painting the finished slope.
Finishing with plasterboard on the frame
Slopes on a balcony made of plastic panels
Unpretentious PVC panels are suitable for installing slope walls both inside and outside the room. They create a holistic, respectable look for the balcony block. Thanks to the many textures, types, colors, the decoration will definitely begin to be combined with the design of the main interior of the loggia.
Panels:
- externally aesthetic, well-groomed;
- will serve as a continuation of the frame structure;
- resistant to moisture, ultraviolet radiation, high temperatures;
- can be used in different colors for the most accurate matching to the interior;
- do not require additional finishing with other materials when creating a final coating;
- suitable for installation in cold glazing of balconies and loggias;
- durable;
- easy to care for.
Basic installation steps:
- remove the old layer of plaster from the working surface according to the dimensions of the plastic parts;
- trim the balcony window with wooden slats around the perimeter;
- screw the latch profile into which the panels will be tucked;
- make a frame from a metal profile, which will become the connecting link between the wall decoration elements;
- lay a layer of foam plastic with mineral wool, arranging it like a “thermos” before attaching the plastic to the frame;
- insert the plastic panel using the F shape at the corners of the profile;
- cover the frame with panels, leaving a small gap at the corners with the joining points to avoid thermal expansion;
- cover the joints with special corners.
Attention! For additional insulation, you can pre-lay a layer of mineral wool between the panel and the wall. There is no need to use a lot of cotton wool, otherwise the plastic may swell. If the joints are unsightly and sloppy, then to correct the situation they are coated with white silicone.
Plastering method
The design of window slopes from the inside by plastering is possible provided that the surface is perfectly flat. The maximum permissible thickness of the plaster mass is 2 centimeters. Otherwise, the window slopes will quickly crack and become unusable.
Gypsum putties and plasters cannot be used for exterior finishing of window slopes, since these materials are not resistant to moisture. When organizing internal slopes, it is necessary to ensure good heating and ventilation of the window opening, otherwise there is a high probability of condensation.
Construction stores today offer a large selection of different ready-made plasters. However, if desired, you can prepare such a mixture yourself. To do this, you will need M-400 cement and sifted sand, which must be mixed in a ratio of 1:3. To reduce the amount of water used and speed up the setting of the mixture, you can add a little liquid soap or plasticizer to the solution (one tablespoon per bucket of the finished solution will be enough).
When starting the final finishing, it is better to give preference to white cement putty or acrylic facade putty, which will avoid the base showing through even with some destruction of the paint layer.
Advantages of cladding slopes with sandwich panels
Sandwich panels are rigid structures made of 3 layers with already laid insulation. The downside is the high cost. If the windows are poorly sealed, the material will quickly begin to peel. The advantage is that there is no need for insulation due to the manufacture of products from 2 pieces of plastic with insulation laid between the layers.
The best method for arranging external slopes is panels made of gypsum metal, but with a plastic finish. Composite models with wood elements are also on sale, although they are expensive.
Useful video on the topic
All the subtleties from the pros:
Master class from Alexey Zemskov:
One way to install slopes on a loggia:
Installation of window sills and slopes made of PVC sandwich panels:
The technologies for covering door and window openings with plasterboard and plastic are similar. Once you use one material, you can work with another. In a similar way, it is not difficult to decorate slopes even with the remains of parquet or cork flooring.
YOU MAY ALSO BE INTERESTED
Slopes made of sandwich panels: installation stages
For arrangement you will need:
- wooden slats;
- plastic F-shaped profile (7 mm thick);
- polyurethane foam;
- insulation min. cotton wool;
- U-shaped starting strip made of plastic;
- drill for self-tapping screws;
- roulette;
- putty knife;
- silicone sealant;
- cement mortar;
- level;
- long and short self-tapping screws (95 and 4.5 mm);
- construction stapler.
Installation steps:
- Remove particles of old plaster or wallpaper.
- Treat areas with an antifungal compound.
- Fill with cement the holes on the street side left after installing the metal-plastic window.
- Install wooden slats along the sections of window openings at the top and sides.
- Attach with screws without tightening completely. Insert them into the pre-drilled holes.
- Fix the slats around the perimeter of the balcony opening. Check their equal position with a level.
- Tighten with screws. Attach a U-shaped strip parallel to the edge of the window from the outside using self-tapping screws.
- Cut off protrusions if they remain at the joints. A painting knife can help.
- Mount the F-shaped profile (which will serve as a decorative element), installing the groove opposite the groove of the U-shaped strip. In this case, part of the F-shaped profile will be located slightly above the window. A little overlap.
- Trim the excess protruding F-strips with tin snips as soon as they fit exactly.
- Attach the end of the F-profile to the slats that are located closer to them.
- Seal the joints with sealant if unsightly seams or defects remain after installation.
Reference! To seal and seal seams, you can use Cosmofen (liquid plastic).
Installation of sandwich panels is allowed using a slightly different technology. For example, sections of sandwich panels are immediately attached after installing the starting profile. Their opposite edges are attached diagonally to the slats. Then the F-profiles are fixed and the joints are sealed with sealant. The main thing to get smooth, beautiful slopes is to start working from the top element. Leave the plastic structure alone for 16 hours without removing the protective film from the window.
If the panels, when inserted between 2 starting profiles, do not coincide with the width of the slope, then they can be trimmed with a stationery or construction knife. Secure the joints of the side strips and the top jumper with a special plastic corner. You can disguise wooden slats with narrow trim of identical material.
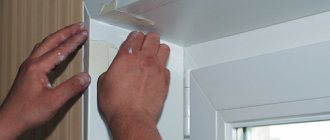
How to sheathe slopes with plasterboard
There are several options for finishing slopes on the balcony with plasterboard sheets. In any case, work with this material should begin with vapor barrier of the visible layer of polyurethane foam. A special tape is used for this.
Adhesive-based vapor barrier tape
Frame finishing method
Installation of a metal frame is necessary if you are working with large openings or similarly covering an entire wall.
The work is carried out as follows:
- Dowels are used to secure the U-profile guides perpendicular to the floor. This is done on the outer and inner corners of the slopes. In some cases, one of the profiles is fixed directly to the plastic frame.
- For structural rigidity, horizontal C-profiles are attached between the vertical ones.
- The finished frame is sheathed with sheets of moisture-resistant plasterboard, fixing them with self-tapping screws. It is better to start work from the side elements.
- All joints are first puttied and then coated with silicone sealant.
- After all the finishing work, the outer corners are masked with a plastic corner, which is attached with glue.
You can additionally insulate the slopes with mineral wool or polystyrene foam, placing them in the cells of the frame.
Metal frame for covering a window or doorway
Glue method for finishing slopes
It is advisable to attach drywall with glue only on slopes that are small in width and not in doorways. The glue does not harden instantly, so the gypsum board element may move from its specified position during installation. It is much easier to fix this with a small coverage area.
There are two options for attaching drywall with glue - behind the frame and directly on it. Installation on the frame is carried out in cases where the distance between it and the slope is too small.
When attaching the sheathing to the frame structure, work begins from the upper wall of the opening and perform the following actions:
- Using a knife, make a recess along the perimeter of the frame corresponding to the thickness of the plasterboard blank.
- Insert it into the resulting gap.
- For more reliable fixation and improved quality of thermal insulation, the place where the gypsum board is fixed is foamed (from the inside).
- Insulation is placed in the resulting space between the wall and the drywall. They fill the gap approximately ⅔.
- The edge of the slope is adjusted to the outer corner of the opening and fixed with drywall adhesive.
Installation of gypsum boards outside the perimeter of the frame
If you want to sheathe gypsum boards and balcony walls, the slope must be level with the sheathing installed on them.
The material is fastened to a plastic frame using an L-shaped profile. It is fixed to the window structure with self-tapping screws and coated inside with drywall adhesive. Then the workpiece is inserted there and all actions are performed by analogy with the previous installation method.
Scheme for installing drywall on a window frame
If with the frame method it is recommended to start work from the side walls of the opening, then with the glue method - from the top wall.
How to make neat slopes with your own hands
You can decorate it yourself using different materials, using several technologies.
The most affordable ones to make the facade beautiful:
- drywall;
- putty;
- vinyl or wooden lining (read more in the article “lining a balcony with lining“);
- clinker tiles.
The material must have increased thermal insulation qualities that are resistant to natural disasters. It is also important to add decorativeness to the cultivated facade.
In general, the methods of external and internal cladding are similar. They differ only in the degree of weather resistance of the materials used and the type of work. When considering the option of plastering the outside, you should first prepare equipment, purchase materials, and carry out consistent cladding. This is important so that after application to the wall the solution does not quickly begin to peel off or crack.
The usual composition for plaster is cement + sand (3x1). To increase the thermal insulation properties, it is recommended to add facade plaster or bulk insulation (perlite, plasticizer, fiber, vermiculite) to the composition.
Attention! It is worth considering that facing slopes does not require a large amount of material due to the small area. This means that you can buy a multifunctional ready-made composition for plastering or prepare your own balancing homogeneous composition of fine consistency with impeccable adhesion to work areas.
First of all, you need to clean the work surface. Otherwise, the new finishing material will quickly crack or crumble. If the base is concrete, then notches can be applied to increase adhesive properties. On top are slopes cleared of dust.
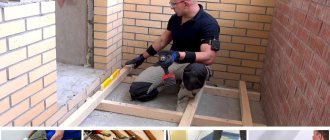
Next steps:
- Install the ebb under the window frame and secure it to the bottom with self-tapping screws. So drops of water, as they flow under the window sill, will immediately fall onto the inclined plane.
- Cover the balcony window with polyethylene.
- Prime all cleaned areas with a wide brush. Impregnate the surfaces to increase the adhesive properties of the materials used and prevent the plaster composition from falling off in the future.
- Attach a perforated metal corner (you can take plastic) to the edge of the window opening from the street. Plant on a quick-drying plaster mixture.
- Wait for the solution to dry.
- Apply a wooden strip to the outer corner of the opening, joining the window block to the wall to determine the thickness of the plaster layer used.
- Make a “grill” to level the walls at the required angle. This way the layer of plaster in certain places will be of the optimal size. Or take a piece of flat plywood (150 mm wide, 50 mm long). Make a cutout on the end side so that there is no movement after applying the plaster; the best thickness was set along the line of the joint with the window.
- Make a small portion of plaster mortar. Beat with a construction mixer.
- Apply a layer of 10-12 mm to part of the slope horizontally. Spread evenly with a trowel or spatula. Level the solution using a spoon.
- Wait until it sets completely.
- Apply the solution to the wall from the bottom, starting from low tide. You can sketch it, then level it with chalk. So apply the solution to the very top. Align.
- Form the joints of the vertical and horizontal surfaces of the slopes with the solution using an angled spatula.
- Wait for the plaster layer to dry. Smooth the surface with putty.
- Apply a layer of decorative plaster with shallow relief as a finishing touch to hide the slightest imperfections.
- Treat with a primer after leveling the base layer of plaster. Let dry.
- Paint the surface.
Instead of putty or plaster, you can use polymer imitation or artificial stone.
Advantages and disadvantages of various solutions
When choosing materials, be guided by their performance properties, appearance, price, and ease of installation. Performance properties are especially important for finishing a window-door unit on an open or glazed, but not insulated, balcony.
Using plaster
Plastering walls in window openings is a traditional solution that is rapidly losing its popularity. The reasons lie in the shortcomings of the material.
- Applying the solution requires careful leveling of the working surface.
- The finished coating does not provide additional heat and sound insulation of the room.
- The work process is labor-intensive and “dirty”.
- In order for the slopes to look organically in the interior of the balcony and harmonize with the finished coating of the walls, they will have to be painted.
As for the advantages of this solution, there are not many of them:
- Firstly, this is the same possibility of painting the final coating. Yes, this process requires additional costs and effort, but it allows you to keep your openings clean and looking fresh for many years.
- Secondly, the variety of decorative compositions. The presence of fractions of different sizes in them will make the working surface textured and original.
- Thirdly, the affordable price for finishing materials.
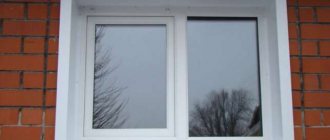
Plastered window opening ready for painting
If the balcony is not glazed or is not well insulated, opt for facade plaster. It is more resistant to temperature changes, moisture and UV rays than analogues for interior work.
Choose plaster if you want to save money, plan to thoroughly improve your balcony, or want to decorate the walls with the same material. Then the time and dirt spent will fit into the overall scope of work. Otherwise, consider other options.
You can protect yourself from splashes of solution using gloves and a work suit
Drywall for balcony block slopes
Drywall is a popular solution for decorating window and door openings. This is due to a number of reasons:
- simplicity, “cleanliness” of installation;
- low cost of material;
- the ability to complete all work in one day;
- good thermal insulation properties;
- no need to level the coating;
- a variety of options for additional finishing of gypsum boards - painting, finishing with artificial stone, etc.
The disadvantages of plasterboard sheets include:
- Low strength characteristics.
- Susceptibility to negative effects of moisture. Already at an air humidity of 75% it swells and becomes deformed.
- Loss of performance properties due to regular exposure to direct sunlight.
Taking into account how drywall reacts to external influences, it is not recommended to use it on an open and insufficiently insulated balcony.
Plastic for decorating slopes on the balcony
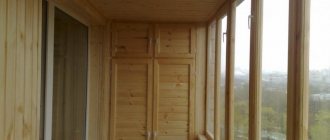
PVC slopes are an ideal option if you have plastic windows and a balcony door made of the same material. They seem to continue the frame structure, which looks natural and attractive. Moreover, you can cover the entire balcony with plastic.
Covering the opening and walls in the same style
Advantages:
- Speed, ease of installation.
- Minimal amount of dirt during installation.
- Plastic panels are produced in various colors. This allows you to match them to the interior as accurately as possible.
- There is no need to use additional finishing material to create a fine finish. Plastic panels are aesthetically pleasing in themselves.
- They are resistant to moisture, UV rays, and temperature changes, so they can be installed on any balcony.
- Easy to care for.
- Durability.
Slopes are made from ordinary plastic panels, under which a layer of insulation is laid, or from sandwich panels. The latter are characterized by increased rigidity and are a three-layer structure: two layers are rigid PVC plates, the third is insulation laid between them. Finishing with such panels is the most expensive.
Sandwich panels are available in a wide range for windows of various colors
How to calculate the required number of plastic panels
First of all, it is important to calculate the perimeter of the base for sheathing. Then minus the perimeter of windows and doors from the resulting number. Next, divide the difference by the perimeter of one element.
Example: it is necessary to finish the external walls with PVC. Height - 2.5 m. The building is equipped with a door and 4 windows. The dimensions of the material for the window will be 1.8x1.2 m, the door - 2.2x0.9 m. If plastic panels of 250x30 cm are used in the work, then we will start by calculating the total area of the walls (6+6+8+8) * 2.5 = 70 m2. Let's denote the area of doors and windows - 1.8*1.2*4+2.2*0.9 = 8.64+1.98 = 10.62 m2. Next, let’s find out the area that needs sheathing, i.e. subtract S walls from S doors, windows - 70-10.62 = 59.38 m2.
The area of one panel will be 0.75 m2. A total of 80 panels will be needed. It is better to purchase facing material with a reserve of 10% more than the total quantity. There will definitely be waste after cutting or damage to the material. If, according to calculations, there are 80 PVC panels, then it is worth purchasing 88-90 pieces.
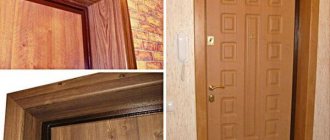
Slopes for PVC windows
The window is one of the central elements in the design of any room, be it a residential apartment, a respectable cottage or a business person’s office.
The illumination of the room largely depends on the size of the windows and their number. From the quality of materials and skillful installation - ease of use, reliability and durability of the window structure. And, of course, the main functions of any window - illumination of the room, retention of heat in it, ventilation - are complemented by a significant role in the design of the room. An important factor in the appearance of the window is the installation of slopes, which give the window openings a neat and finished look and increase their thermal insulation.
Modern plastic slopes combine perfectly with PVC windows, which are so popular today. They are usually made from double-sided sandwich panels and 10 mm thick PVC panels, which are considered the most reliable and convenient material. Slopes made from such material have high heat and sound insulation properties and have high mechanical strength.
Slopes are parts of the window opening that frame the window from the top and sides. They are divided into external and internal. After dismantling old windows, deformation of the slopes - the inside of the window opening - is inevitable, which affects the quality of operation and the appearance of the new window. The best solution to this problem is the installation of PVC slopes.
Plastic slopes have many advantages over plaster ones: • they do not need to be painted; • they are easy to clean and do not collect dust on the surface; • plastic slopes are easy to manufacture and practically do not generate construction waste; • plastic slopes are “warmer” than plaster slopes, since a layer of insulation is laid between the wall and the plastic panel or the cavity is filled with polyurethane foam, which is known for its heat-insulating properties; • such slopes absorb street noise; • plastic slopes have a modern look and will become part of the decoration of your home.
We install slopes using the Sandwich Panel technology. The panels used in this technology have a layered structure (1 - mm walls are connected to each other by foam material). The interlayer makes the panels light, but very “warm”. Insulation is laid between the panel and the wall.
Such slopes have recently been increasingly used in construction. They have a combination of remarkable properties: good rigidity with low weight, excellent thermal insulation, good appearance. The panel is protected on one side with plastic film. In the middle of the panel there is foamed polystyrene with a closed cell structure.
Advantages of slopes made of sandwich panels: High thermal insulation properties. Additional sound insulation. Strength and durability corresponding to the durability of PVC windows. Moisture resistance. UV resistance. Great looks.
Installation of plastic sandwich slopes is carried out using auxiliary profiles “C” and “J” made of PVC, which ensure that the slope adjoins the wall at any angle. An additional advantage of profiles “C” and “J” is the ability to replace wall coverings (wallpaper, etc.) without dismantling them. The size of the sandwich panel for slopes is 3000×1500×10 mm.
The facing plastic of sandwich panels for slopes completely matches the color scheme and texture of the window profile, and therefore choosing a stylish and functional addition to your PVC windows will not be difficult.
Panels for window slopes
| 4004 - white + matte varnish 400 x 3000 x 9.5 | 4000M - white 390х 3000;6000 |
| 4020 - white laminated with UV resistant PVC film (used for window sills) + PE protective film 400 x 3000; 6000 x 9.5 | 6501Р/6511 white matte / Russia 7665 glossy varnish / Russia 250 x 3000; 6000 x 9.5 |
| 4023 – golden oak laminated 400 x 3000 x 9.5 | 4024 - laminated mahogany 400 x 3000 x 9.5 |
Sandwich sheets for slopes
| sandwich panel 3000 x 1500 x 10 3000 x 2000 x 10 | sandwich panel 3000 x 1500 x 24 3000 x 1500 x 32 | sandwich panel golden oak 1300 x 3000 x 10 | sandwich panel mahogany 1300 x 3000 x 10 |
- Balcony glazing with Provedal profile Sliding glazing
- Hinged glazing
- Balcony glazing Provedal
- Provedal glazing systems Sliding glazing system
- Hinged glazing system
- Balcony finishing with MDF panels
- Insulation of balconies and loggias
- Flooring for balconies and loggia
- Infrared heated floor
- Cabinet and wardrobe for the balcony
- Extending the balcony
- Exterior decoration of balconies
- Installing a roof on a balcony
- Rehau windows
- Rehau polyurethane foam
- Secustick handle
- Everything for plastic windows
- Mechanical latch
- Window sills Danke
- PVC doors Rehau
- Plastic window fittings
- Office partitions from Provedal profile
How and with what to remove polyurethane foam from a plastic window
The foam adheres firmly to the plastic profile of the window frame and the glass unit. Of course, it’s better to clean it before it hardens. For example, by soaking a cloth in paint thinner (acetone). You can use special solutions that are used to wash mounting guns. To help - Cosmofen, Macroflex.
Experts recommend testing the products first by wiping a small area of the window frame and waiting a few minutes. Will there be any damage to the plastic? If the foam has already hardened, then you should use a solvent to soften the material. Or try to wipe it off with a piece of plastic without damaging the base. You can rub with vegetable oil, Dimexide (a preparation for joints).
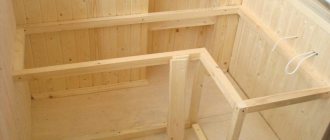
Finishing the ceiling on the balcony
Now we are making the lathing on the ceiling. Here is the next point - we run guide profiles PN 27/28 along the perimeter of the ceiling and fasten them with self-tapping screws through the MDV wall panels
into the sheathing of the walls. In order not to miss, before installing the wall panels, we make pencil marks on the ceiling for the location of the vertical profiles of the assembled sheathing.
The ceiling is also insulated with mineral wool. We assemble the sheathing and MDF panels. We lay the panels perpendicular to the balcony door and install spotlights.
Everything, insulation, cable laying and cladding of walls and balcony ceilings with MDF panels has been completed.
Laying porcelain floor tiles
We return to the floor. After priming (spraying), we lay porcelain tiles on the concrete screed. For aesthetics, diagonal styling looks best. We will not touch the balcony entrance threshold, which will also be made of tiles. We will assemble it after finishing and painting the slopes.
After a couple of days required for the floor tiles to set, we begin the final stage.
Finishing methods using PVC panels
The traditional way to finish slopes is to use plaster and paint, but this method is not suitable for everyone. It requires a lot of labor, it doesn’t always turn out perfectly smooth, as we would like, it leaves a lot of debris during the work, and the work itself is quite dusty. In addition, the plastered structure will require updating every few years, otherwise the slopes will lose their attractive appearance.
A more modern finishing method is plastic panels for window slopes. This method allows you to quickly achieve results without making much effort; even a beginner can cope with the work. The work will not take much time, the result will be good regardless of your construction skills. Plastic slopes are easy to attach, have a perfectly even shape from the factory and do not require updating several years after installation.