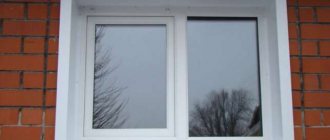
A popular way to level and decorate window openings is to plaster the slopes. It is in many ways similar to leveling walls; it is performed during the construction process, during repairs, or when replacing wooden frames with plastic ones. Let's figure out how to properly plaster and how to finish the slopes so that their service life increases.
plastering slopes
Not everyone cares about the type of windows in an apartment, house or utility room. Windows are looked at as openings that let in light and visually increase the space of the room. They perform an aesthetic function. Therefore, they strive to make them smooth and flawless.
How to plaster slopes
The plastering method of finishing slopes, at first glance, is more complex than plastering walls. There are fewer plastered areas and more structural elements. In addition to leveling their surface, it is necessary to draw a line of dawn (expansion of the opening towards the room). Window slopes are divided into vertical (sidewalls), upper (top) and lower (decorated by installing a window sill).
If desired, plastering window slopes can be easily done with your own hands.
For plastering, by analogy with walls, there are several methods:
- plaster using beacons;
- without using beacons (with counters to strengthen the corners);
- plastering with insulation.
If plastering is not carried out in a newly built building or during renovation, but when replacing wooden windows with plastic ones, then beacons are not used, since slope structures are practically already available. It is only necessary to trim the protrusions of the mounting foam, cut off the excess length of the fastening metal plates or remove them. If the installers have knocked down the old plaster or the old finish has become unusable, it is better to carry out the alignment using the beacons.
Beacons are not needed if sheet insulation material is used for insulation.
A number of problems arise if slopes are plastered after installing plastic windows. The fact is that PVC material for plastic windows and mineral plaster composition expand differently with temperature fluctuations. Therefore, cracks appear over time at the junctions of these materials; this can be avoided by inserting a damping gasket.
Simple tips for fastening and installing slopes for plastic windows
In stores they offer a dense starting profile and a soft one, the latter is cheaper, but bends and is somewhat less reliable, and also does not look beautiful. So buy a thick one.
Before use, slats should be treated with protective compounds against rotting and insects, and then dried.
If you insulate with foam, keep in mind that it can expand greatly and squeeze out the plastic panels. To prevent this from happening, spray the wall with water before you begin filling the space. Secure the panel with spacers while it hardens.
From time to time you will have to “repair” the seams and renew the layer of sealant to maintain high-quality sealing.
How to plaster slopes on windows
For those who have already mastered plastering walls, it is easier to understand how to plaster slopes on windows, because the basic principles are the same. The difference is in the geometric configuration and the need to make a high-quality transition from the window frame to the main plane of the wall.
The sequence of plastering window slopes is as follows:
- carry out an inspection to identify defects in walls and plaster;
- knock down excess protrusions, repair the base;
- carry out preparations;
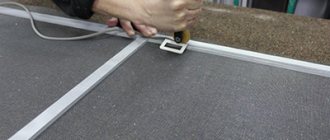
- take measurements, mark the dawn line;
- install beacons or other auxiliary equipment;
- plaster the sidewalls (apply spray, primer, level);
- plaster the supreme;
- After the solution has set, the beacons are removed, the grooves are leveled, and the surface is rubbed.
Taking measurements
Beacon mount
Sidewall plaster
Plaster top
Grouting plaster
Next, we will describe each stage in detail and understand all the nuances of the process.
Window finishing
There are options for constructing slopes from different materials.
Can:
- decorate with gypsum fiber;
- plaster the slope;
- finish with plasterboard;
- clad with plastic panels.
Options for finishing window slopes
When deciding which slopes are better, they usually choose the material by comparing the pros and cons. In our case, we look at how to make slopes using a classic material - plaster.
Surface preparation
First you need to close the window block. The best way to do this is to use construction tape and cover the window sill with film. The surface of the side opening of PVC windows must be cleaned and then leveled. Previous layers of plaster will also need to be removed. The old mixture will fall off if you tap it on both sides. It is convenient to help yourself with a construction knife.
Brick walls are treated with a solution of hydrochloric acid and then washed with water. If there are oil stains, you need to apply oily clay to them, let it dry, and rinse with water.
For better adhesion of the composition to the surface, it is better to use a deep penetration primer. Then install beacons to ensure the job is done smoothly. Visual perception will not help here. Finishing of slopes with plaster is carried out strictly according to the guides. The primer must dry well.
How to plaster slopes
Many questions arise about how to plaster slopes on windows. Here they are also guided by the conditions for using the plaster composition.
From a huge variety of mixtures, it is rational to choose one that meets the following criteria:
- Economical. If a plaster composition is needed only for leveling, it makes no sense to choose those that are expensive when there are compositions that provide strength, environmental friendliness, fire safety and other indicators at a lower price.
- Strength.
- Suitable for plastering facades (for solutions used externally).
- Environmental friendliness (important for interior plastering).
Mineral plasters have all these qualities - gypsum-based for indoor use, cement-based for outdoor use. In addition to them, lime-cement or lime-gypsum materials are used for interior decoration.
If the building has not had time to undergo the shrinkage process or is located in a seismic region, or is located near railway lines, mineral compositions are not suitable. Mineral-based mixtures are not resistant to vibration loads. Instead, acrylic or silicone-based materials are used. They are more elastic.
Specifics of the material
The structure of the mixture for work is a viscous, whitish composition with some inclusions, in which granules of different structures are visible. The surface treated with it has a characteristic rough base, the degree of which depends on the components of the solution.
Modern types of textured cladding have a rich range of colors, as well as the ability to imitate the texture of stone, wood, leather, etc.
Using the selected type of plaster allows you to realize the most daring design ideas. This could be a composition that allows you to create the structure of wood eaten away by insects, or to achieve the effect of crumpled paper or snake skin.
If the mixture contains large particles, then its application requires some preparatory measures and certain skills from the master.
To do this, use a steel grater or trowel. The layer of plaster should be equal to the size of the granules. The composition with small particles has a lime base and a more liquid consistency. Therefore, its application is quite simple. To do this, use a roller or vacuum cleaner.
Tools
Plastering slopes requires a certain set of materials and tools.
You will need:
- mixer to prepare the composition;
- spatulas (spatulas) of at least two sizes - 9 cm, 35 cm or more;
- roller;
- grater;
- rule;
- brush;
- level (plumb line, level);
- square;
- masking tape;
- hammer;
- caulk;
- chisel;
- stationery or construction retractable knife.
Forming a smooth opening
Repairing openings in the bathroom, or near the front door, which will be discussed later, is a completely different matter. In these places there are no plasterboard partitions, but rather thick load-bearing walls.
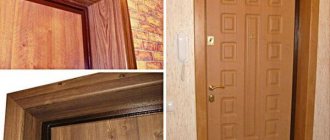
The front door opening is often filled with one frame with two panels or several bindings. This is justified by the fact that one door, for example, can be metal, and the second wooden.
The space between them is called the stub. Considering that the thickness of a load-bearing wall can be quite impressive - say, two bricks (51 cm), then it is natural that even a double frame does not completely fill the opening. Most often, the door is placed flush with the wall on the outside, and slopes are created on the inside.
Slopes can be plastered and thus get rid of curved surfaces. Then everything needs to be puttied
Sometimes they are covered with wood or MDF, but most often they are plastered with cement plaster. In any case, after replacing the door, or during a major renovation of the walls, when the plaster needs to be knocked down to the base, the geometry of the slopes is significantly disrupted, and you have to think about how to level the opening.
Methods for leveling slopes
Now we have come to the most difficult stage of wall repair. By the way, invited craftsmen charge separate money for plastering slopes, and the price, I must say, is rather high - about 250-300 rubles per linear meter.
Thus, the slope of one door measuring 2.1 * 0.9 m will cost at least 1,300 rubles. Although, such work may not take too much time - it all depends on the initial state of the opening.
- Try to do it yourself, especially since you can use a variety of available materials for the work. Aligning the side walls of an opening without a door is carried out according to the same principle as plastering rectangular columns. On the sides of the slope, checking the level, two long aluminum rules are fixed on both sides, extending them beyond the plane of the surface to the thickness of the plaster.
- The rules, in this case, serve as beacons, but in principle, you can do without them. The role of the rules is just as successfully performed by ordinary profiles for drywall, which are mounted on self-tapping screws or dowels, with their backs to the side surface of the opening. Just like the rules, they need to be moved forward by the thickness of the screed.
Template for removing excess plaster
- If there is a door in the opening, then the beacons are mounted only on one side. In the first case, excess mortar is removed with a short rule, a small spatula, or a wide spatula. If there is a door in the opening, you need to make a template from scrap materials, which is shown in the picture above.
- It can be made from a piece of plywood, hardboard, plasterboard or even thick cardboard. The main thing is to make a recess on the template that exactly fits the protrusion of the door frame. This will allow you to make a clear line of the plaster layer around the perimeter of the door. After the solution has set, but has not yet hardened, the beacons are carefully removed and a corner is formed, cutting off all excess with a spatula.
- When the leveling screed, which is made with a base mixture with a coarse dispersion of components, has dried, a perforated plaster corner is mounted on it. And then they putty. If there is no major damage to the slopes, then a thick layer of plaster will not be necessary.
Perforated corners to protect external slope corners
- In this case, you can do without beacon profiles and install the corner straight away. By the way, when plastering walls and slopes with specialized mixtures, you can simplify the leveling process by using the same drywall. If you cut long narrow strips and glue them onto putty along the uprights of the box, you will get a perfectly even junction.
- Aligned in level, these strips will serve as beacons for applying a leveling layer. There is no need to remove them, since after the starting layer has dried, the strips of drywall will be hidden under the putty. By the way, it is also more convenient to level the upper slope with plasterboard.
Plaster mixtures, especially when a thick layer has to be applied, do not adhere very well to horizontal surfaces. You have to install the mesh, apply several layers, and each time wait for them to dry.
And the wall plasterboard itself has a thickness of at least 12 mm, plus a thick layer of glue, which allows you to level the slope in one step.
Nuances when plastering slopes
These structural elements have a number of features that have their own nuances during plastering.
- Window openings are a place where walls are thinned, where double-glazed windows with wooden or plastic frames are installed. Before plastering window slopes with your own hands, you need to make sure that the frames are installed symmetrically, evenly and securely. The correct installation of the frames is checked with a level and square. If the installation was carried out incorrectly, it is better to correct the defects before plastering.
- Previously, the gaps between the frames and the wall structure were filled with natural fibers, for example, caulked with tow. Recently, all holes and cracks have been foamed more often. However, the foam that serves as insulation for repaired windows dries out over time and begins to crumble. Therefore, although the reliable method is more labor-intensive, it is better to caulk the gaps. Fibrous natural materials are treated with an antiseptic before use.
- Plastering is best done with insulation measures taken. In this case, the dew point moves deeper into the wall, and moisture will not condense on the glass and walls nearby.
- First, they plaster the window slopes from the inside, then carry out the work on the outside.
- The angle of dawn is made the same on both sides of the window. For every 100 mm of wall thickness in the opening, the expansion on one side of the sidewall ranges from 10 to 25 mm. That is, with a sidewall depth of 30 cm, the expansion will be from 30 to 75 mm.
- When plastered with a cement composition, the verkhovnik must be reinforced.
- Where the window frame meets the plaster, expansion joints are made from special expansion slats. SDM-chemistry compositions, which have low vapor permeability, are popular as sealants for seams.
Useful tips
Remember that plastering can be carried out in a room where the temperature is at least 6 degrees Celsius.
If this rule is not followed, the quality of the slopes will be low. Carefully read the instructions for preparing the solution that the manufacturer puts on the packaging. The expiration date is also important, since after its expiration the mixture will not have the necessary characteristics. The expiration date that is close to expiration may also not have a very good effect on the final result.
When working with plastic windows, do not forget to make a groove along the entire perimeter between the frame and the slopes, 5 mm deep. After the solution has dried, the recess is filled with silicone sealant. This ensures that in extreme heat, when the volume of plastic increases, the slope will not crack.
Source
What will you need for the job?
The main material is plaster mixture. There are two types of plaster most commonly used: gypsum and cement-based.
Features of the cement mixture
There are compositions for rough coating, including coarse sand, and for finishing surface finishing - with fine-grained sand inclusions. Such solutions can be quickly prepared and are quite easy to apply. But you need to take into account that it takes a lot of time for the layer to dry completely, and this will increase the duration of the repair as a whole. But the diluted mixture sets so slowly that even an inexperienced performer will be able to cope with the work. Another plus is the inexpensive price.
Properties of gypsum plaster
There is another option - special acrylic mixtures. They are universal and can be recommended for any surface. But the cost of materials is such that not everyone can afford to use them.
But you also need to prepare primers in advance: deep penetration and finishing. Putty and sealant may be needed.
Technology
Plastering the slopes begins after the surface of the main walls is leveled. The work ahead is dirty, so it is advisable to cover the door leaf, floor and door frame with film, oilcloth or other similar materials. You can cover the jamb with masking tape - it will be easier to clean.
Preparation
The first stage of work is surface preparation. First, poorly adhering plaster, pieces of brick, and other building material are removed. If the doors have been replaced, the old plaster may stick out a lot. In this case, even if it holds up well, it gets beaten up.
If the old plaster sticks out a lot, it is refinished
Then, grease or oil stains, if any, are treated with neutralizers. Old paint is also removed: plaster does not adhere well to it. Afterwards, remove dust and dirt.
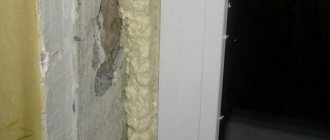
If the cracks were not foamed when installing the door, you will need to do this now. Polyurethane foam is applied to the wetted surface in a volume of no more than 1/3 of the required amount. First, clean out all the dust, then moisten it with a spray bottle. In a few minutes it will greatly increase in size, filling all the empty spaces. After waiting for the foam to polymerize (harden), the excess is cut off with a knife. It’s more convenient to do this with regular stationery paper.
Do-it-yourself installation of door slopes begins with sealing the gaps between the door frame and the wall
If plastering is to be done with cement-sand mortar, the surface is moistened. This can be done from the same spray bottle or using a brush or roller.
Setting up the guides
It is more convenient to plaster slopes with your own hands, as well as walls, using guides. On the outside of the doorway, to obtain a smooth and rigid edge, a perforated paint corner is usually placed. Once secured well, it can be used as a guide.
It is cut to the height of the doorway. The upper edge of the corner, which will be adjacent to the main wall, is cut down at an angle of 45°. It is better to do this, since during work this edge for some reason always lifts up and causes a lot of inconvenience.
You can fix the corner in several ways:
- Gently apply the solution inside the corner, then press it into the corner. You need to apply the solution carefully: the walls are made very thin and even with a small mass it breaks. Therefore, it is better to use the second method.
- The solution is applied to the corner, and the corner is pressed into it.
Having pressed the corner well, it is leveled so that its edge is flush with the main wall. The solution that protrudes through the holes is removed with a spatula. Then they take a level bar (you can use a building level or a rule), apply it to the corner, checking how level the corner is. They check both from the side of the main wall and from the side of the slope.
The procedure is repeated on the other side, and then on top. At the junction of the corners, the absence of differences can be checked by running your finger along the joint.
There is another way to attach the corners - with nails or self-tapping screws. This method is good when working with drywall, but it is not used when plastering: the caps get in the way.
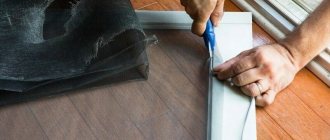
When plastering door slopes it is convenient to use a template
The second guide is the door jamb. When installing the doors, they were aligned straight, so this is a good guide. But since the solution should not cover the entire surface of the jamb, a template is cut out of some dense material, which is then used to level the solution. It is better to cut it out of a piece of plastic: the edge is smooth, glides well, and is quite dense. You can use a piece of flat wooden plank. Only the edge that will cut off the excess mortar should be perfectly smooth. The part of the template that will slide along the jamb is made in the form of a step. This protrusion will remove excess solution.
You can work with a spatula or a rule, but then a beacon is installed and secured along the jamb at the required distance. The tool rests on it when cutting off excess mortar.
Plastering of slopes can be carried out along guides
In this video tutorial on plastering slopes, the technology for attaching perforated corners is explained in detail, and explanations are given regarding the technique of applying putty during finishing.