The situation with blinds and curtains is somewhat similar to that in botany. There, none of the greatest luminaries has yet been able to really explain the difference between dicotyledonous and monocotyledonous flowering plants. Although a child will immediately say: “This is a rose, and this is a lily. This is a birch, and this is a palm tree.” Botanists, however, are not to blame, they are serious scientists, and not slang “nerds,” it’s just that the plant world is incredibly diverse. Well, we are not “nerds” either, the heat has hit, and we need blinds for the windows. First - simple, quick ones from scraps lying around on the farm, and then, perhaps, more permanent ones. How to do both yourself is explained in this article.
Note: the emphasis in the word “blinds” is on the last “i”. The word is neuter, does not decline. Therefore, “blinds”, “blinds”, etc. - illiterate. In RuNet you can also come across “blinds”; apparently, by analogy with trouser legs and trouser legs. However, the element of stacked blinds is called a lamella, which translated into Russian means something long, thin, and flat.
In blinds technology, a set of rotating slats in a frame for regulating light, liquid and gas flows. But in order to properly make blinds at home with your own hands, you need, of course, to understand how the blinds on apartment windows differ from those of a car radiator, a water-jet propulsion system of a boat, etc. We will assume that household solar blinds are designed to regulate natural light in rooms, and that is how we will understand them. That is, simply put, the curtain is against peeking, and the blinds are against the blinding sun. And let’s also take into account that tinted window glass and awnings are not blinds. True, then we will have many types of blinds without slats without them, but what can you do? Ask botanists if there are precise and unambiguous characteristics that distinguish monocots from dicots. And the world of blinds is also rich and diverse.
History and types
Lattice sun screens were invented by the Arawak Indians who lived in the West Indies, on the islands of the Caribbean. The first Europeans to see their blinds were the Spanish conquistadors. They liked the arrangement, but they killed every single one of the Arawaks - because they had less gold and spices than the hidalgos, fooled by greed, wanted to find, and the Arawaks themselves, in the Indian way, preferred death to slavery. However, the history of the conquest, crusades, etc. and so it is known.
The first historical type of blinds is colonial, pos. 1 in Fig. These are simply shutters with angled wooden slats. In the tropics, where it is summer all year round and the sun is high, they are still in use today, because... simple, reliable and cheap. In a temperate climate somewhere in the middle of the 18th century. Based on the Indian ones, Venetian blinds appeared: the inner long sides of the slats were hinged in the frame, and the outer ones were connected with a cord. By pulling it, the inclination of the slats could be changed according to the time of year and the weather. At the same time, the French name for this device, jalousie, “jealousy,” took root. The coquettes of that time, closing the blinds, brought the fans hanging out under the windows to white heat; especially if a man’s face flashed in the window before.
Note: within the same climate zone (and who takes blinds with them?) the rotating mechanism can be abandoned, making Arawakan-style blinds reliable. How - see below.
The development of the “Venetian” principle is now horizontal blinds, pos. 2 and 3. The first samples, in which all the lamellas could be collected into a tight package and lifted up, appeared on sale in 1841. The bad thing about them, firstly, is the price, up to 5000 rubles. and more for a good model for 1 window. Secondly, steel lamellas, especially the lower ones, are easy to bend to the point of breaking, but cannot be restored to their original state. Replacing the slats costs about 1/5 of the cost of new blinds. And the good thing, in addition to being suitable for any climate, is the ability to install rigid horizontal blinds on plastic windows without damaging them or the walls at all, see below for more on this.
Note: horizontal slats made of Faux material do not break or bend; it is something like MDF with strengthening impregnation. But the price of wooden blinds is much higher than that of metal blinds of the same size. In addition, so that the lamellas do not quickly wear out against each other, the so-called cord drive has to be introduced. ladders, see fig. on the right, which do not add elegance to wooden blinds.
People only thought of vertical blinds in 1960. They are no cheaper than horizontal ones, but, firstly, their slats are fabric and do not break. Secondly, the slats can be removed individually for cleaning and replacement. Thirdly, vertical blinds not only regulate light sweat, but also allow it to be optimally distributed throughout the room, which, if used skillfully, saves electricity. And the somewhat “office” look of “vertical blinds” (which, by the way, is no more “office” than horizontal blinds) easily fits into everyday life with design techniques, poses. 4, 5. If the windows in the room are arched or otherwise “wrong”, then there is no alternative to vertical blinds, see next. rice.
Vertical blinds on windows of complex shapes
The Achilles heel of blinds with separate slats is the mechanism. Firstly, it is quite complicated, see for example. rice. below. Anyone who uses such blinds knows that even the world’s best brands can’t do without breakdowns. Secondly, the mechanism has components, for example. ball chain, which is impossible to make yourself; Buying parts at retail will cost more than turnkey blinds. Therefore, further within the “do-it-yourself” framework, we will limit ourselves to methods of attaching ready-made blinds to windows without drilling and installing them indoors.
Installation of vertical blinds
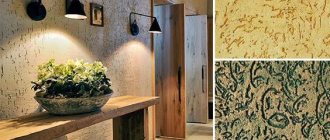
In ancient times there was no robotic production, but the need for blinds was no less than today. In different parts of the ecumene, people came out of the situation in their own way. In the East, for example, they came up with pleated blinds, or pleated blinds, pos. 6. in fig. at first. Actually, this is already a curtain, but in order to get around the nitpicking of pedants, we can assume that these blinds have 1 lamella, which rotates along with the window frame. For the rich, pleated blinds were made from selected silk; the poor made do with palm leaves (in India) or rice paper (China, Japan). A significant fact: modern wallpaper paper is even better than rice paper, so it’s quite possible to make wallpaper blinds with your own hands from trash. One lamella, very attractive in appearance, will take no more than an hour, and will last at least the whole summer, see below.
Silk arrived in ancient Europe, but at such a price that not every archon or senator could afford curtains made from it. The Greeks and Romans saved themselves from the heat by building houses from marble, which they had in abundance, and protected themselves from excess light with Roman or Romanesque curtains, pos. 7. Although it would be more correct to call them Persian, because in Europe they appeared after the campaigns of Alexander the Great.
Structurally, Roman blinds are real blinds with connected horizontal slats. Their mechanism is elementary simple and quite accessible for making with your own hands, without expensive purchased parts. However, to prevent Roman blinds from constantly seizing and warping, the fabric from which they are sewn must be sufficiently dense and rigid; the Persians used brocade. Therefore, next we will briefly touch on Roman curtains - they are certainly not openwork.
Roller blinds on slanted windows
Looking ahead a little, take a look at pos. 10. This is also an oriental invention - bamboo curtains. Apart from the slats (which are also non-rotating), they have little in common with blinds, both structurally and functionally. But according to the principle of bamboo curtains, they make, firstly, roller blinds, pos. 8. These are factory products, not readily available for self-production, but indispensable for attics with sloping windows, see fig. left. The mechanism of roller blinds is much simpler, more reliable, cheaper and lighter than that of blinds with separate slats, and can be mounted on a plastic window independently and without tools, see fig. on right.
Installing roller blinds on a plastic window without drilling
Analogues of roller blinds with a roll of fabric at the bottom are roller blinds, pos. 9 – it’s not much more difficult to make with your own hands than paper blinds, so we’ll deal with them further. As for the blinds, pos. 11, then all that remains of the blinds is the function of adjusting light transmission. The design of blinds-scenes, presumably, explanations for pos. 11 is not required, so we’ll be done with them.
An informed choice - metal roller shutters
In open gazebos
Rough blinds are especially durable blinds that we install only outside: they will protect from rain and wind.
Classics welcome blinds made of high-quality natural materials. In the summer here we use fabric slats. In cold weather, we will install outdoor wooden or plastic ones. At the same time, in large buildings we will equip them with electric lifts. For a glazed gazebo, outdoor blinds are not needed, so we choose only material and colors that are in harmony with the style and color scheme. Designers pay the main attention to texture and materials, because in a glassed room it is these light-protective devices that attract our attention. Thread and fabric slats, as well as curtains of wood textures, look most natural here.
Installation of roller shutters for gazebos
The most reliable option to protect your garden house from unwanted visitors is to install external metal roller shutters. At the same time, the issue of protecting the glazing of the gazebo, if any, is resolved. Before you start looking for blinds, you should understand their varieties.
e34738153426b967c5968806c3b86425.jpe
Metal roller shutters are the most reliable option to protect your garden house from unwanted visitors.
Roller shutters are:
- Classic ones are the most vandal-resistant products. They are made of steel or aluminum with a thickness of elements of 1.5–2 mm, and can withstand blows with a sledgehammer. They do not allow light to pass through at all.
- Lattice - have a similar design, but the links of the canvas are made with through cutouts, so that the room will not be pitch dark after the shutter is lowered. Their strength is somewhat lower.
- Transparent - transmit diffused light - made of durable polycarbonate or polyvinyl chloride (PVC). They are designed for protection mainly from bad weather, although they can withstand even a few not very strong blows.
- Inspection roller shutters can have 3 positions: open, closed, and finally - overview (the links are rotated 90°). The most expensive of those described.
When ordering roller shutters, you need to specify only 2 sizes: the width and height of the window opening. A construction tape measure is enough for this. Installation of ready-made fencing does not pose any particular difficulties. Tools needed:
- electric drill;
- screwdriver;
- level;
- ladder.
Making blinds
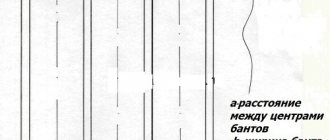
Before you take on any self-made blinds, you need to correctly measure the window opening for them, because... Most homemade structures cannot be altered. A diagram of window measurements under the blinds is shown in the figure:
Scheme of window opening measurements for installation of blinds
As for purchased blinds, the measurements of the openings for them, as a rule, are included in the installation price, and this is included in the selling price. If this service does not reach you, then further, in the section on installing blinds with your own hands, there will be instructions for measurements for individual types; In general, their exact diagrams are given in the company specifications.
Paper
Blinds from paper wallpaper are the easiest and fastest to make. Wallpaper is used because wallpaper paper is strong enough, rigid, resistant and at the same time transmits a little light, i.e. When the blinds are fully lowered, the room will have soft, diffused lighting. By choosing the color of the blank, the blinds can be made quite aesthetic, and paper wallpaper is inexpensive. Step-by-step instructions for making “wallpaper” blinds are shown in the figure:
How to quickly make your own blinds from wallpaper
- A blank 1.25 times the height of the window and a width equal to its width or, if the window is wide, its whole share, is folded like an accordion. The width of the “lamellas” is in the range of 50-70 mm, so that a whole number of them fit along the length of the workpiece. The first and last strips should face outward. Folding an accordion is a very important operation: if you do it carelessly, the error accumulates and the panel comes out crooked. Therefore, before smoothing the next joint, it is best to check using a template made from a long rigid ruler, a flat strip left over from repairing an MDF board, etc., laid next to the workpiece;
- The accordion, while it is still in the form of a foot, is pierced exactly in the middle with a hole punch. The best punch is round, with a diameter of 8-10 mm, so a stationery hole punch will not work. A cord with a diameter of 6-8 mm is threaded into the hole. A thinner cord will soon cut the paper;
- The cord is looped around the top and adjacent “lamellas” and secured with a knot at its end;
- Remove 1 protective film from a strip of double-sided tape as long and wide as the “lamellas” and seal the top “lamella” with the cord with tape;
Adjusting wallpaper blinds with a latch - The ends of the lower “lamella” are brought together to form something like an unfolded fan (“peacock tail”) and glued together with PVA or the same tape. It is impossible to bring the gluing to the very inner bend; the accordion must move freely together and apart on the cord! At the end of the cord, first put a single (you can also double, but there will be an extra hole) cord clamp, then - an end cap, tie a knot at the end of the cord and put the end cap on it. Its role is not only decorative: if you fix the end of the cord with just a knot, it will soon get dirty;
- Remove the remaining protective film from the tape and glue the blinds to the window frame;
- The blinds are assembled/unfolded by moving the lock, see also fig. on the right, marked with an arrow.
The process, as we see, is simple, and if there are pieces of wallpaper left in the closet from the renovation, all the expenses will only be on tape and a couple of small pieces of fittings. In addition, you can watch a master class on making homemade paper curtains in the video below. Regular tape is enough to last the blinds all summer.
Video: DIY paper blinds
The first disadvantage of pleated blinds made from wallpaper is obvious: to assemble them, you need to stretch high up. The second may affect when the blinds are removed - the tape leaves marks on the paint. You can remove them with a cotton swab slightly moistened with vodka, cologne or 70% medical alcohol (alcohol “for injections” in a bottle with a blue stopper), but if the window frames are inexpensive, the sticky layer of tape can eat into the paint so that it can no longer be used. you will bring it together.
The paper blinds of the design shown in the following are free from this drawback. rice.:
Original paper blinds
Making them more difficult: you need to accurately glue many pipes onto a mandrel. By the way, a pair of identical beer cans, placed at intervals so that the tapering parts stick out from the ends of the pipe, are suitable for it. Similar curtains are designed like Roman ones (see below), so you need to punch 3 holes under the cord: 2 10-15 cm from the edge and 1 exactly in the middle. A weighting agent (wooden strip) is placed into the lower pipe and secured with a couple of drops of glue. Its length is the same 10-15 cm less than the width of the canvas; the ends of the weighting material should fit between the outer cords. You can generally make a weighting material from 2 identical pieces laid between the cords. 3 holes are drilled in the top beam for the cords, and the beam is secured into the window opening, placing bosses under its edges so that the cords move freely. The timber is covered at intervals with a piece of the same wallpaper. The design turns out to be quite complex, but it will last for many years, especially if the wallpaper is non-woven.
The simplest paper blinds
Another “design” of paper blinds is shown in Fig. on right. New settlers of the first Khrushchev buildings remember these people well; back then they were made from newspapers. However, using the same method, without cutting the sheet all the way through, you can quickly make quite decent paper blinds for your dacha from wallpaper or paper with a pattern. They are to some extent automatic: a breeze blew, the stripes (30-70 mm) swayed. The shading remains, but this primitive curtain does not interfere with ventilation.
Manufacturing of horizontal lamellas
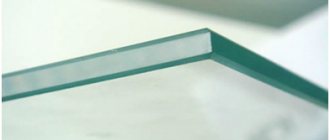
The starting material for the lamellas will be plywood. In addition, you need to take a sheet of plastic, a grinder and a machine for sawing wood. First, strips of plywood, plastic or tempered glass are cut, the edges are sanded, rounded and placed under a press to straighten. After this procedure, plastic parts are ready for assembly, but wooden parts must be primed, treated with stain, varnished and left to dry.
After preparing the material, you need to mark the middle of all parts in length and width, then measure approximately 50 mm from the edges, find the middle and mark. Using a drill, make holes on the cornice by screwing a small ring in the middle. Arrange the parts in order (cornice on top, then slats) and start assembling:
- Thread the cord into the hole in the eaves beam, tie it in a knot or attach it with a stapler.
- Pass one by one into the holes of the lamellas.
- Having reached the bottom edge, you should tie a knot or secure the bead. The cord is inserted on the other side in the same way.
To ensure that the strips move easily along the cord, the fixation in the middle is done without glue. Having reached the cornice, you need to throw the rope through the ring, and from the inside of the blinds, lower the rope down, connect both ends and pull them to the lock. Then you should install the brackets on the wall and attach homemade blinds to them.
Roman curtains
The design diagram of Roman blinds is shown in Fig. Pockets, as a rule, are not sewn separately, but are formed from layers of panel fabric. They sew either on one side, like the picture on the right, or on both sides, sewing the free edge of the pocket to the panel. In the first case, less fabric is used (each stitch requires an allowance of 1-1.5 cm), but the fabric wears out faster on the folds.
Installation of Roman blinds
Fabric cutting diagram for Roman blinds
Roman blinds function reliably if, in addition to sufficient density and rigidity of the fabric, the batten inserts are also rigid, and the bottom panel is weighted with a load of about 1-1.5 kg. Therefore, the armor is made from strips of plywood or hard plastic 2.5-3 mm thick and 30-40 mm wide, and the weighting material is made from strips of plywood 4-6 mm thick and 100-150 mm wide. The top beam (the fabric wraps around it) with a cross-section of approximately 40x40 mm. All edges of the inserts, weighting material and timber must be rounded and sanded with sandpaper, otherwise the fabric on them will quickly fray. The pattern for the pattern of Roman blinds is shown in Fig. on right.
For more information on making Roman blinds yourself, see the video below:
Video: how to make a Roman blind with your own hands
Note: lightweight waterproof and waterproof translucent Roman blinds are made from a special synthetic fabric, the so-called. calender raincoat fabric. But in the hottest sunshine, in a room with such curtains, to be honest, it’s too stuffy.
Features of assembling drapery with decor
Roller blinds can be decorated with a figured cut along the bottom of the canvas.
Curtains with a decorative shape are sewn in the same way as simple ones, but the weight strip is located above the figured element, the drawstring is placed immediately after it
The curtains are cut as in the first case, but for decoration, another 25 cm is added to the length. To cut out the figured edge, you need to prepare a template from paper. If the fabric is double, then the fabric is folded with the right sides facing each other and chipped.
The template is applied to the bottom edge of the curtain and outlined with chalk. The curtains are sewn down according to the applied pattern, the side seams are sewn up. The curtain is turned to the right side, the seams are ironed. The top edge is folded inward, secured with an iron and a stitch is laid.
Next you need to stitch the drawstring on the side that will face the glass. To do this, you need to prepare in advance a piece of material equal to the width of the curtain. The width of the segment should be such that the weighting material can fit in, plus the hem for the seams.
First you need to process the side cuts, and then place it face down and stitch. Then you need to apply a weighting agent, wrap the drawstring around it, mark where the second seam will go, and remove the weighting agent. Pin the second edge of the drawstring to the curtain fabric and stitch it.
Roller blinds
Fabric cutting diagram for roller blinds
Roller blinds made of fabric are much simpler and more economical, which in this case can be any fabric, incl. light translucent. The principle of cutting the panel of homemade roller blinds is shown in Fig. They also require an upper fastening beam, but it can be round, approximately 40-50 mm in diameter. The lower weighting material is the same. The holes for the cord are framed with eyelets for curtains, and the cord itself can be as thin as desired, as long as it does not break. “For beauty”, you can use a ribbon instead of a cord, and so that it is not visible at all, you can use fishing line. In addition, roller blinds can be hung/removed at any time using the top hinges. The overall aesthetics are 3+, but for a summer cottage it’s probably the best option.
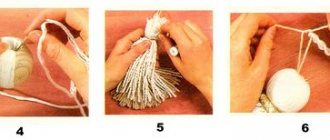
Making roller blinds from bamboo
As already mentioned, roller blinds were originally made from bamboo. If you have bamboo slats at your disposal, nothing prevents you from making bamboo blinds with your own hands. The technological process is simple: bamboos are tied on a flat surface with any sufficiently strong cord in increments of 30-50 cm, see fig. Attach bamboo blinds to a block in the window opening. 3 holes are drilled in the beam for cords for assembling and unfolding the canvas: some ends of the cords are tightly attached to the beam, and the other, traction ones, are surrounded by a loop covering the canvas at the bottom and passed through the holes.
Materials
Depending on the appearance and type of product, different materials of any quality will be needed. Devices are made of wood, plastic, aluminum or plain paper.
Aluminum will be the most durable. They will last for many years. But they also have disadvantages. Each time you open it, a characteristic sound will be heard.
The most fragile types are paper and plastic. Despite this, they are quite popular and have a long service life.
Do-it-yourself wooden blinds will be environmentally friendly. They are the most harmless to humans.
To make cloth ones, special fabrics are used that repel dust.
Colonial Improved
Now let's see how to make simple, cheap and reliable colonial-type horizontal blinds with fixed slats for mid-latitudes with your own hands. First, their grille is assembled in a hinged and/or folding frame, like a window shutter. Then, 3-4 mm thick plywood, twice impregnated with a water-polymer emulsion and painted, will be used on the lamellas. The second impregnation is done after the first has completely dried. In extreme cases, say, for a summer cottage, the slats can be made from cardboard processed in the same way, but then the shutters and blinds also need blind sashes that can be closed for the winter.
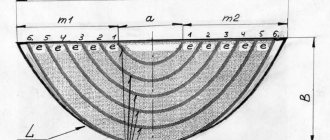
The layout of the slats of “moderate colonial” blinds is shown in Fig. on right. Proportions and angles are given for the Central Zone of the Russian Federation; the dashed line shows additional slats of unshaded windows facing due south. In general, it is advisable to maintain the following ratios:
- South windows: h = W.
- South-east and south-west windows: h = 1.5W.
- East and west windows: h = H = 2W.
If you haven’t forgotten school trigonometry, then you can more accurately calculate both W, h, and the installation angle of the lamellas β. It is necessary that on the winter solstice on December 21, when the altitude of the Sun at noon is α = φ – 22 degrees, the shadow from the overlying lamella does not reach the inner edge of the underlying one, and on the summer solstice on June 22 it should reach half its width on the western/eastern windows, by 2/3 in the southwest and southeast, and by 3/4 in the south. Then in winter the blinds will practically not shade the room, in summer in the morning it will be illuminated by direct rays (which is very beneficial for health), and as the sun rises, the direct light will be replaced by diffused light. In the afternoon, the pattern of lighting changes will be reversed.
Note: 22 degrees with a certain, in this case completely insignificant, addition is the angle of inclination of the Earth’s rotation axis.
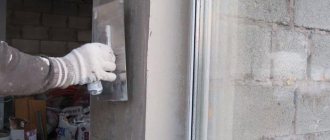
We install blinds
Installing blinds on plastic windows without drilling
All that remains is to figure out how to install the purchased blinds yourself. The first thing you want in this case is to do without plumbing and construction work. Why distort the window frame and/or its opening? Especially if the windows are new plastic, and their slopes have just been refinished. Are there ways to install blinds yourself without drilling? Yes, there is such a possibility, see fig. Installation on brackets that cling to the window frame is more expensive. Fastening with special tape is no less reliable (up to 5 years of warranty), but it may leave indelible marks on the frame.
In general, it is better to mount them on brackets, but then you need to keep in mind that there are 2 main systems for attaching blinds to plastic windows - HOLIS and MAGNUM, see fig.:
Systems for installing blinds on plastic windows
HOLIS is simpler and cheaper, but MAGNUM allows the use of cornice correctors, and the reliability and durability of the blinds significantly depends on its precise adjustment, especially horizontally along. You can learn more about attaching blinds without drilling from the video:
Video: installing blinds on windows without drilling or screws
If you are going to install oak blinds using self-tapping screws in dowels, keep in mind that it is best to attach their cornice to the ceiling. Firstly, there is some savings on a pair of brackets and the work of installing them, see fig.
Attaching blinds to the window opening and to the ceiling
Scheme for attaching vertical blinds to the ceiling
Secondly, fastening the window to the slope is much less reliable: there is a thick layer of not very strong cement mortar without reinforcement and an even weaker finish. In order to reliably drive the dowel into the main wall, the slope will have to be drilled to such a depth that the complexity of installation will be much greater than attaching it to the ceiling. Branded vertical blinds, for example, according to the specifications on them, are attached only to the ceiling, see fig. on right.