- DIY CURTAINS
- >
- Lambrequin
- >
- Calculation of a lambrequin with folds
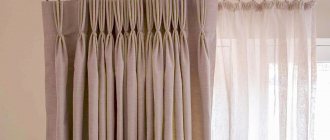
Today I want to tell you about how you can simply calculate and cut a lambrequin that has a figured bottom line.
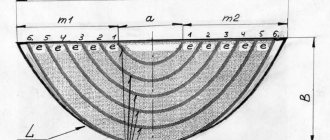
For example, like the one in the photo. First of all, I draw the desired line of the lambrequin to scale on a piece of checkered paper (1 square = 10cm, respectively 1mm = 2cm). Then I use a ruler to measure the distance from the top of the lambrequin to the bottom line along each cell and write down the resulting dimensions.
In order to calculate the fabric consumption for such a lambrequin with a bow fold, you need to multiply the size of the lambrequin along the cornice by the assembly factor equal to 3. For example, in my case the lambrequin is drawn at 2 meters, which means 2x3 = 6. That is, in order to assemble a two-meter lambrequin, we need a strip of fabric 6 meters long. Considering that the standard width of curtain fabrics is 280cm, divide 6m by 2.8m, we get 2.14 - that’s how many strips of fabric we need. If the lambrequin is sewn from dense fabric, then two stripes will be enough, and the coefficient will not be 3, but 2.8 (i.e., the distance between the folds will be 10 cm, and the folds themselves will be 9 cm each). If the fabric is transparent, then it will be ugly to show through the distance between the folds of 1 cm (at least I don’t like it). In this case, you will need to take 3 strips of fabric. We take the width of the stripes from the calculation of the height of the lambrequin at the widest point (in my case it is 50cm). Based on the above, you need to take 1 m for a lambrequin made of dense fabric (provided that this fabric is laid well in this direction) or 1.5 m for a lambrequin made of transparent fabric.
Next, I cut the fabric into strips and begin marking the folds.
A)
If the folds are bow-shaped, then I mark them at 10 cm, and in order not to get confused, I mark the distances between the folds with a line along the cut.
b)
If the folds are one-sided, then I mark them at 10 cm - the distance between the folds, then 20-26 cm - the depth of the fold, etc.
If the depth of the fold is more than twenty centimeters, then the coefficient will be greater. If the depth is 26 cm, then k = 3.6. Accordingly, when calculating the fabric 2 x 3.6 = 7.2 m, 7.2: 2.8 = 2.57. You get 3 stripes.
When the strip of fabric ends, I cut off the excess so that the seam goes along the back wall of the fold closer to the fold. I think everything is clear in the picture (+1 is the seam allowance).
For example, in the case of a bow fold, I finish with an allowance for the fold of 8cm, cut off the rest, and start the next strip with an allowance of 4cm, and then again 10cm each. When all the strips are marked, I sew them into one long strip and immediately hem the side sections.
This may seem like too much of a chore to you, but what does it give me? When I gather the pleats, all the seams will be exactly where I want them. If you don’t do this, but simply sew the stripes and then start marking the folds, then the seams may end up on the front side of the fold, so you’ll have to struggle for a long time to hide them, re-stitching the folds, reducing the depth in some places, adding in others. Therefore, I prefer to spend a little more time at the initial stage, but then it will go like clockwork.
Then, in accordance with the drawing, I begin to measure out the dimensions that were obtained when measuring the drawing. I measure the first size along the side cut - 32cm, and all the next ones - in the middle of the bow fold - 38cm, 42cm, 46cm, etc.
In the case of one-sided folds, I mark the dimensions in the middle of the depth of the fold.
When all the dimensions are marked, I connect them with a smooth line. I cut along this line and process the bottom.
Now all that remains is to lay the folds along the cuts and secure them with a stitch. I do this right under the typewriter.
How to calculate the amount of fabric?
There are several options for sewing curtains with bow elements. But in order for pleated curtains to look beautiful and match the interior, you need to know how to calculate for different types of bow folds. Before sewing such curtains, it is necessary to correctly determine the width of the cut.
Bow fold pattern
You can find out how much material is needed using simple calculations. To determine the footage, you need to consider the following parameters:
- The width of the bow on the front side;
- Width between centers of folds;
- The distance between adjacent elements. The border of which is determined by the edges of the folds. The parameters are selected at will and depend entirely on the total width of the draped fabric.
For each type of folded curtains, calculations are performed individually. Therefore, it is worth considering all the options separately, which will allow you to make the right choice in the future.
Regardless of the type of folds used, the curtains should look neat and fit harmoniously into the interior of the room.
Calculation
There are several ways to create bow folds on different curtains (thick, light), and each of them will require a certain amount of fabric:
- The ratio is 1 to 2, when the size of the folds and the space between them have the same distance. When using this type, the footage of the material should be 2 times larger relative to the finished canvas. This is the most economical option, but at the same time, less voluminous. Most suitable for dense and thick fabrics, which themselves already have volume.
1 to 2 proportion scheme
Proportion scheme 1 to 2.5
Proportion scheme 1 to 3
One-sided bow elements on curtains or tulle can be calculated as follows:
If the final length is 2 meters, then for:
- Option 1, the width of the fabric will be 4 meters (2x2);
- 2nd - 5 meters (2x2.5);
- 3rd - 6 meters (2x3).
The minimum bend width of the material is 2 cm, and the maximum dimensions should not exceed 8 cm, so the parameters vary from 4 to 16 cm.
LiveInternetLiveInternet
-Music
—Tags
—Categories
- . (11)
- FlyLedy (4)
- ribbon flowers (3)
- audio books (10)
- video recipes (0)
- Video lessons on Lyra (3)
- magical rituals (2)
- everything for plus size people (31)
- clothing catalog (8)
- plus size fashion (13)
- everything beautiful for the home (36)
- living room (1)
- kitchen (4)
- master classes (14)
- useful tips (16)
- bedroom (3)
- everything about dogs and everything for dogs (3)
- my cups (1)
- dog translator (1)
- embroidery (20)
- MK (4)
- my works (6)
- embroidery patterns (7)
- knitting (6)
- sofa cushions (5)
- children's (3)
- painting and graphics (1)
- animals (1)
- Curtains (0)
- commandments of a real woman (4)
- health (12)
- diet (2)
- internet (8)
- history of clothing (7)
- women's (6)
- books, audio books (2)
- leather (2)
- beauty and health (12)
- masks (5)
- cooking (38)
- video recipes (2)
- baked goods (10)
- hot snack (2)
- dessert (1)
- cold appetizer (3)
- meat dishes (7)
- vegetables (5)
- bird (1)
- fish dishes (4)
- salads (2)
- soups (1)
- personal (6)
- fur (23)
- everything interesting about fur (4)
- fur products (8)
- master classes (10)
- fashion (141)
- inspiration and its sources (5)
- fashion 50 x (6)
- fashion for children (2)
- fashion for women (22)
- fashion tips (62)
- fashion sentence (3)
- men's fashion (7)
- color scheme in clothes (8)
- music (17)
- music relaxation (5)
- folk wisdom (3)
- way of thinking (49)
- femininity (8)
- dreams come true (4)
- opinion (4)
- wisdom (13)
- formula for success (15)
- orchid (4)
- diary design (59)
- thanks for friends (13)
- postcards (5)
- post dividers (1)
- frames (22)
- poetry (19)
- omens (2)
- psychology (11)
- travel (1)
- handicrafts (6)
- films, videos (22)
- France (19)
- life (1)
- locks (2)
- history (5)
- kitchen (4)
- fashion and style (4)
- music of France (1)
- holidays (1)
- films and actors (1)
- sewing (405)
- blouses, tops, tunics (20)
- knitwear (4)
- trousers (14)
- second life for things (8)
- patterns for men (10)
- home decor (32)
- for children (35)
- fashion and sewing magazines (9)
- correction of cutting defects (6)
- pockets (3)
- cosmetic bags (5)
- MK (90)
- modeling (53)
- my boasts (17)
- underwear (15)
- dresses (15)
- useful sewing tips (88)
- sleeves (5)
- Sergey Karaulov (41)
- bags (4)
- skirts (13)
- this is interesting (48)
- travel (4)
Marking folds on fabric and assembling bow elements
Before you begin assembling pleated curtains, you need to mark the entire width of the fabric with chalk or soap. On light fabric you can use a simple pencil. A separate mathematical calculation is made for each type of fold. You can speed up this procedure using a special online calculator, which will give you the exact dimensions in a matter of seconds. Here is an example of how to calculate a bow fold.
Fixing the edges of the folds
When all the parameters have been calculated and the markings are applied to the fabric, you can begin assembling the bows. It is very important that all edges of the folds are securely fixed with thread or pins; this is the only way to prevent them from moving during the stitching process. Sewing curtains with bow pleats takes a little more time than other types of products, but the end result is worth it.
Despite the simplicity of the work, accuracy must be present, because with the slightest shift of the fabric or crease of the edge, the shape of the bow element is disrupted, which means the curtain will lose its attractiveness.
Draping textiles with bow elements is a common method used to decorate a window opening. Curtains, lambrequins and folds, equipped with folds, look attractive and stylish and fit harmoniously into the interior of any room.
Curtains have long ceased to be an exclusively functional part of the interior; their purpose is to make the room stylish and unique. Draperies, tassels, braid, chains, beads and other accessories will help with this.
Hand-draped curtains
Any skill should always be highly valued, and handmade even more so. the most popular design direction has gained wide popularity .
This option for draping curtains allows you to modify the interior of the room, giving it special attractiveness and even luxury. Ready-made French curtains create equally beautiful draperies; you can learn more about such curtains here.
There are a huge number of variations on the Internet for creating draperies that are unique and inimitable in their design, which can be made using large or very small hand-made assemblies.
The most original decorated element on curtains is created, as a rule, using the simplest methods.
These can be models of curtains with lambrequins in original assemblies or curtains with tiebacks, with the help of which a beautiful volume of freely hanging fabric is created. You can learn more about the types of curtain tiebacks here.
Decoration of curtains, design options, examples, combination with the style in the room
Curtains are considered one of the very first inventions of man. At first they were used only to protect the premises from prying eyes. Over time, in Ancient Egypt, curtains began to be decorated with improvised materials. And only later in Byzantium, the design of a window could eloquently tell about the status and wealth of its owner. The first decoration of Byzantine curtains was natural Chinese silk.
A stylish lambrequin made of leather is a very original solution
Today, decorating a window and making it a work of modern art is not at all as difficult as it seems at first glance. A little time, imagination and the result will surprise you.
This elegant curtain tie is a real find. Harmonizing in color and style with the braid and the curtain itself, it adds chic to the entire composition.
An elegant pair - a caramel-colored silk curtain with a rope tie
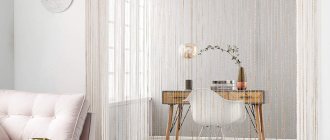
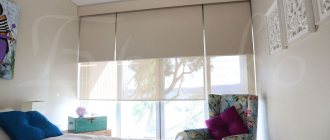
Roman blinds look elegant without additional elements. The right fabric and effective attachment to the cornice are a decoration in themselves. Subtle colors are combined with wall decoration and the color of the cornice.
Roman blinds look beautiful on their own, so they don’t need additional decor.
Accents when decorating a window in a classic style are tassels and a lambrequin. Brushes must be the correct color: either the same color as the curtains, or a couple of shades darker or lighter. Lambrequin is suitable only for rooms with high ceilings. You can choose fabric, rigid or combined construction.
Ribbons, tassels and bows will complement the design of the window space. Volumetric decor will add luxury, while light and elegant options will make the interior romantic.
The combination of Roman and French curtains looks stylish and very unusual. Fabric of contrasting colors, braid and tassels make the interior unique, and at the same time functional.
This combination of curtains is suitable for an interior in a classic style.
Beads are selected for decoration with special care. Their task is to complement the design concept, and not to distract attention to themselves. Transparent beads are the most “harmless” option.
The addition to the thread curtains, which themselves look like decoration, is chosen very carefully. In this case, picking up the correct color scheme and avoiding excessive shine.
A combination of thread curtains of different colors looks interesting
Important! The smaller the room, the more neat and restrained the decor should be. Large tassels, beads and other accessories are appropriate only in large rooms with high ceilings.
Application in the interior of premises
Curtains with drapery of various types are used to decorate a variety of rooms. The choice of fold type depends on the type of fabric chosen and its density.
Kitchen
In the kitchen it is common to use less dense curtains. Preference is given to thin, easily draped fabrics.
Living room
Living rooms are a special category of premises. In such places it is customary to place curtains with lambrequins. It is popular to use different types of tucks to decorate the same fabric, with tassels and fringes as additional decoration.
Bedroom
In this case, dense materials are used that can create the necessary twilight in the room to ensure a restful sleep. When decorating a room, curtains should be in harmony with the surrounding interior.
Children's
To decorate children's rooms, window curtains with bright patterns are often chosen. When draping such fabrics, the location of the pattern should be taken into account. You cannot choose massive, heavy types of folds.
How to make a bow fold with your own hands
The higher the fabric assembly factor, the more magnificent the curtains look
Types of folds, brief description
Drapery is used to decorate curtains, lambrequins and folds. There are only three fold options:
- Unilateral (folds are made in one direction, possibly across a distance).
- Counter (folds on the fabric are made towards one another).
- Bow ones (so called because they look like a lady's jewelry, they look like the reverse side of the ones they meet).
Taking the above three options as a basis, you can create models of amazing beauty and grace. Here are just a few of them:
- Side folds are obtained if the curtain is assembled from the bottom, and a special filler is added at the top, which will create the shape of a glass.
Volumetric decorative fold glass
French shirring with three folds and two pockets
Having a general understanding of the forms of drapery, you can create your own curtain masterpiece that will combine the above options. Moreover, modern design allows some liberties in creating the interior. Design the window so that you feel cozy and comfortable. Choose color and stylistic solutions that are ideal for your particular case. And make the interior of your home unique.
Uniform wafer assemblies look original and elegant
How to calculate bow folds on curtains, diagram, description
Bow folds look very beautiful and elegant. Even a novice craftswoman can make this type of curtain. The main thing is the correct calculation.
As already noted, the folds of the fabric are located towards each other. But there may be options here too.
- First option: the so-called 1:2 scheme. That is, the fabric for such curtains will require twice as much as the length of the cornice. In the figure: a – the distance between the centers of adjacent bows; b – bow width; c is the distance between the bows.
Bow fold pattern 1:2
Species diversity
Folds close up
- A one-sided view is laid in a single direction.
- Counter - involves laying folds towards each other.
- Bow - are the reverse side of the folded counter folds. Thus, it seems that the folds diverge in different directions, forming a “bow”.
Assemblies on curtains can be done in two ways:
- manually;
- with a special mechanism - curtain tape.
Braid
Laying with braid is quite easy:
- to do this, you need to pull the ropes built into the structure;
- this produces assemblies;
- the only disadvantage in this case is the likelihood of rapid wear of the ropes. If they tear, then the upper layers of textiles have to be repaired.
Hands
There is an opinion that only professionals can lay fabric folds manually. This option provides confidence that the ropes will not break during the operation of the structure, and its assemblies will not come apart. However, this technique will take more time to complete:
at the initial stage, you will need to calculate the amount of fabric that allows you to perform draping; It is important to correctly measure the length of the cornice. The curtains themselves will have exactly the same length; Next you will need to divide the resulting length by the planned number of distances between the textile folds; This is how a value is determined equal to the distance between two adjacent folds
Experts advise not to go beyond the limits of 10 cm to 14 cm. And the assembly depth should be in the range from 14 cm to 20 cm; we multiply the depth of one fold by the resulting number and add to this value the length of the curtain along the cornice with a margin of 2-4 cm. The margin will be required for processing the sides of the product; after the top of the product has been processed, it is necessary to pull out the threads from the curtain tape, since with this method they will not be of any use to us; Next you will need to mark the drapery on the front side of the product. This can be done by machine or by hand. You can also complement the product with a large button to match the fabric.
Roman curtains
We present to you a master class on sewing Roman blinds:
- you need to take a fabric of dense texture and a shade suitable for the interior of the room;
- You will also need thin twigs. They can be made of metal or wood;
- the width of the product should slightly exceed the length of these elements;
- take small plastic rings. Their diameter can be 10-12 mm;
- You will also need a cord and a cornice, which will become structural elements;
- determine the dimensions of the window to know the length of the product;
- do not forget about the allowances, you will need them in the future;
- Next you will need to beautifully cut out the panel. To do this, cut out two of its lengths, adding the width of the product to it;
- textiles must be laid face down and ironed, as seen in the photo;
- then proceed to marking the fabric for future assemblies;
- each edge of the product must be hemmed;
- and it would be correct to sew a special Velcro to the upper edge in case the structure will be mounted directly on a wooden cornice;
- for a cornice made of a different material, a double seam is made and a metal rod is inserted into it;
- after this you can attach the product to the cornice using clothespins;
- the hem of the structure is adjusted and hemmed, and a strip is placed between the stitches;
- folds are sewn on the wrong side, and twigs are inserted into the assemblies, as shown in the photo;
- You will need to sew finishing tape over the twigs;
- Having secured the structure to the cornice, three laces are threaded into it;
- carefully pass them through the ring, as done in the photo;
- the cords are carefully pulled through the rings and inserted into a common ring;
- the structure is lowered and the cords are aligned.
The best examples of decorating curtains with folds
Drapery complements and decorates any curtains, regardless of color, texture and shape.
Light green cotton curtain with pleated buttons
In this case, the folds on the laconic curtains made of natural fabric are decorated with round buttons - an unusual and stylish addition. This option demonstrates the possibility of decorating a window opening only with a curtain, without tulle. The general concept of the interior allows you to choose such a solution. The drapery on the curtains gives a feeling of softness, and the right choice of color makes the interior complete.
Curtains with pleats can be made even more attractive by securing them with ribbons.
A more complex design: curtains with counter folds, on hinges. Matching braid and tassels were chosen as finishing. Such curtains require a special interior design. Furniture and decoration should support the overall style of the room.
Combined curtains in various options always look chic
Curtains made of combined fabric with bow drapery. The accent is a tieback made of fabric with a print.
Folds can enhance the look of even the simplest fabric.
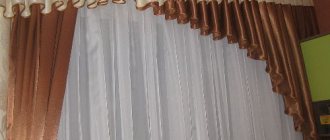
A lambrequin with bow folds, massive tassels at the top of the curtains and tiebacks, as well as a non-standard color scheme make the window design interesting and sophisticated. It is worth noting that the lambrequin is a rather demanding part of the curtain design. It must be the correct size in relation to the window opening, and also have the appropriate shape (as can be clearly seen in the photo). Weightless cream-colored tulle completes the composition.
Stylish window decoration is not an easy task. But if you wish, you can cope with it at a decent level. It all depends on desire, imagination and the availability of free time to implement ideas.
Pulling the tape
Ideally, two people should do the tightening. An assistant will be needed to hold the edge of the curtain opposite you so that there are no deflections along the entire length of the curtain, which can lead to deformation of the folds after hanging the curtain on the curtain rod.
If you are doing everything alone, secure one edge of the curtain to the handle of a door or cabinet. Pulling is simple: take the strings of braid with one hand, and with the other, free, move the fabric towards the middle of the curtain.
httpv://youtu.be/DtQb4nz9oNk
If during the process the fabric gathers tightly and does not want to move further, move the array of folds to the fixed edge of the curtain and continue draping until the folds evenly fill the entire length of the braid.
The process ends when the width of the curtain is exactly adjusted to the width of the cornice on which it will be located.