The handle is part of the door hardware. It allows you to conveniently open and close the door. There are a lot of handle models. Push-on, round handles are installed on interior doors. Each product has its own design features. Regardless of the type, over time the fittings begin to work poorly. You can correct the situation yourself. It is not necessary to spend money on calling and paying for the services of a specialist. It is useful to understand how to remove the handle from an interior door, disassemble the handle into pieces, and replace its damaged elements.
Features of various designs
First, let's talk about the designs of door handles and their features.
The first category we will look at is stationary models. These are the most common solutions for interior doors. Such fittings are now practically not used. Perhaps on doors installed back in the days of the Soviet Union, which have not been modernized since then. And it is usually not used in residential premises. Outwardly it looks like a bracket.
There are two varieties of this model. The difference between them is that they can be one-way or end-to-end.
If we talk about the latter, then long screws are used to fix 2 handles, which are placed on different sides of the door leaf - one opposite the other.
This type of handle can be removed very easily - just unscrew the bolts that hold this structure in place.
Such fittings can literally be called cheap, since they have a minimal price. And it’s pointless to repair it, because it can’t be understood.
The next option is a push design. This design decision will be a little more complicated. The handle is a lever-type product: the working elements, thanks to the axis, are connected to the lock mechanism. Some options of this type are additionally equipped with a latch that locks the locking part.
Such a handle can be dismantled using a screwdriver with a narrow blade. By the way, such a handle can have a lock with a metal core.
Another design worth mentioning is the swivel model. It has a lot of differences from the above-mentioned options, which lie in the shape and design features. The general principle of operation is the same as that of other models.
The next option for the accessories under consideration for an interior door is a handle with a rosette.
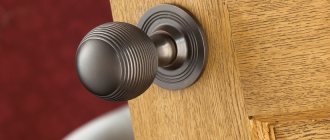
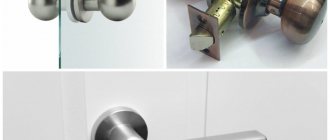
Such handles have a round shape and, depending on the design, can be disassembled using different algorithms. They also differ in the method of securing the decorative element. The spherical shape is very convenient to use. Such models are also called knobs.
In general, as you can see, there are a large number of door handles for interior doors. Each type has its own advantages and disadvantages, at the same time, the algorithm for disassembling them will be approximately the same.
Common causes of breakage and repair of locks on interior doors
In addition to contamination and drying of the lubricant, which lead to increased wear of the metal parts of the locking mechanism, the locks may also have other malfunctions.
For example, an electromagnetic lock may fail for the following reasons:
- short circuit in the circuit;
- button sticking;
- lack of supply voltage;
- reader failure;
- Damage to the electromagnet or control unit.
Problems can occur in the lock cylinder when there are:
- abrasion of the rotary cam (if the manufacturer saved money and did not use hardened steel);
- wear on the side or top pins;
- wear of the steering cam axis;
- foreign objects getting into the pin mechanism.
The lock of doors between rooms may require repair if the operating springs are weakened, wear appears on the plates, or decorative elements are damaged.
Required Tools
To disassemble the door handle, you will need to have a certain tool on hand. Regardless of its type, there may be some hidden elements and parts in it that cannot always be pulled out using conventional tools.
For this reason, you should have the following list of tools on hand:
- hammer;
- screwdriver;
- drill and set of drills with a crown;
- pencil;
- awl;
- square
Varieties
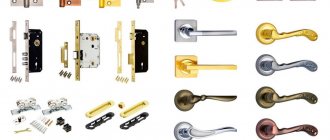
As already mentioned, door mechanisms can be different. Overhead and mortise structures are often found. Fixation is carried out with self-tapping screws.
The mechanism is attached to the sash. The mortise ones have locks or English-type locks.
They can be placed only on one side or used on both sides.
May be from:
- Silicate or plexiglass. It is painted in different shades. There may be drawings made using a router. Often there is photo printing on the glass.
- Metal. It is coated with warm gold, bronze or silver paint. In this case, the coating can be glossy or matte.
- Plastic. This is the most budget option for door handles. Often doors with plastic handles are installed in utility rooms or utility rooms. Such models are fragile and require careful handling.
- Tree. This is a very popular material for rounded door handles. It is environmentally friendly. It also does not heat up even at high temperatures. Therefore, wooden ones are more durable.
How to disassemble and remove?
Removing a door handle is quite simple if you have the above-mentioned tools, as well as a little theoretical knowledge of the structure of this mechanism.
To do this, you must follow these steps.
- Support and secure the door well so that it is in a stationary position.
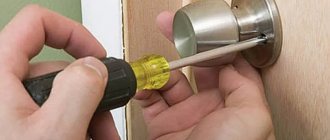
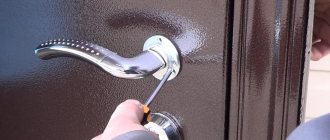
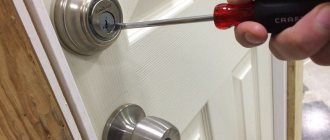
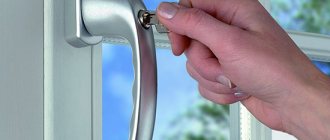
- Now you need to pry up the decorative flange and pull it out a little. Underneath there are fasteners that need to be unscrewed.
- On the mentioned flange of the pressure part there is a special pin, which is locking and spring-loaded. It should be pressed in using a screwdriver. In rotary versions it is usually located in the housing. To get there, you need to insert a key or an awl. If you cannot feel it, then you should rotate the flange until it comes into contact with the pin.
- Now you should press the pin and at the same moment pull out the handle structure.
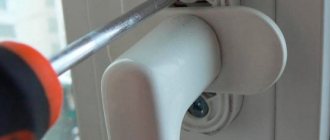
- Now unscrew the fastening bolts.
- We separate the inside of the element from the outside, take out the handle and the decorative flange.
If there is a need to remove the latch for replacement or repair, then you should unscrew the screws that secure it to the side of the door block, then remove the bar, and then the mechanism itself.
When installing fittings to a different position, it is better not to disassemble it for spare parts. It is easily attached to the door structure, but in the reverse order.
Now we’ll tell you directly about the disassembly of each category of handles.
Let's start with the stationary one, which does not have a push set, and is also not equipped with a mortise lock. In order to unscrew such a handle, you will need a Phillips or flat-head screwdriver. Alternatively, you can use a screwdriver. Dismantling must begin by loosening the screws that secure the mechanism.
If there are decorative elements, they must first be removed. As you unscrew the bolts, you should hold the counter parts on the back side of the blade. If this is not done, the structure may simply fall out of the canvas and become deformed.
It should be noted that the fastening can be one- or two-sided; accordingly, the structure can be disassembled in different ways, which means that this must be taken care of in advance.
When all the bolts are unscrewed, you need to carefully remove the handle from the door leaf using a flat-tip screwdriver. In place of the old handle, another mechanism is installed or the same design, but with new spare parts.
If we are talking about disassembling a round handle with a socket, then it is necessary to clarify that the word “socket” is usually understood as a mechanism that allows you to lock the lock using a small key on one side, which is not used on the other side. There is a special lamb on the second side.
In this situation, disassembling the mechanism will be carried out according to the following algorithm:
- first loosen the screws that hold the linings that perform a decorative function on both sides;
- the screws connecting the mechanism on both sides are unscrewed;
- the handle structure is pulled out and the remaining part is removed;
- The locking mechanism is pulled out.
If the handle requires repair or any part of it needs to be replaced, then you should completely disassemble the individual elements and determine the cause of the malfunction. It is necessary to especially carefully monitor the safety of all small structural elements, otherwise if they are lost, it will simply not be possible to put the mechanism back together.
Now let's talk about disassembling the round knob handle. To remove this element from the door leaf, the following steps are usually performed.
- The fastening bolts on one side of the door are unscrewed.
- The mechanism is dismantled through special holes.
- The additional counter-type strip is disassembled. To dismantle this element, simply pull it in your direction.
The non-removable round handle is fixed using the simplest screws for fastening. This mechanism is made with the expectation that later no repair work will be carried out, but a new spare part will simply be purchased, which will take the place of the old handle.
Push options. Usually they are used instead of rotary solutions. This is due to the fact that they are durable and very easy to use and repair.
Disassembly is performed as follows:
- first, the screws holding the decorative cloth of the overhead type, which performs the function of a clamp, are unscrewed;
- after this careful removal of the overhead sheets located on both sides;
- the fastening bolts are unscrewed and the round-shaped structural elements located on both sides of the door leaf are pulled out;
- All that remains is to open the strike plate and the lock itself, and then pull them out of the fitting grooves.
Caring for fittings
Replacing the handle is a simple process. However, proper care of the fittings will guarantee durability and uninterrupted functionality. Intensive use causes locking mechanisms to become unusable. They wear out, get old, don’t turn, don’t latch. Care instructions:
- Cleaning . Wipe the mechanisms from dust in a timely manner with special cleaning agents. It is not recommended to use substances that contain aggressive acids, alkalis and abrasive particles. Door hardware suffers from such components and quickly rusts. After cleaning, wipe it with a dry, clean cloth.
- Checking mechanisms . If the user feels that the handle is loose, then it needs to be tightened. Inattention and negligent attitude will lead to the final failure of all mechanisms present in the design.
- Additional door care . In damp rooms it is susceptible to damage by mold and mildew. Wooden panels are eaten by insects. Moisture-proof compounds are used. When the panel swells, the door lock rusts and is squeezed out. The result is that the structure does not close, the handle spoils the slopes and walls.
- Careful handling . Careful, careful use of the handle does not cause mechanical damage to it. Jerking or forcefully slamming the door will damage the design and functionality.
- Lubrication, inspection for cracks. If the handle sticks when turning, it is necessary to lubricate the mechanisms with special oil. The composition is sold in construction stores. Over time, the panel near the locking element cracks and gradually forms gaps. Typically, such consequences appear when the handle is inserted carelessly.
Solve the problem in several ways:
- Seal small cracks with silicone sealant and putty so that the new layer does not protrude beyond the panel. Otherwise the door will not close. Wait until completely dry and sand the surface. Choose the color of the putty mixture to match the tone of the door surface.
For large gaps, use wood chips made of the same material as the doors. Select wood chips with identical gap dimensions. Carefully insert, cover with sealant, then putty. You can fix the element with construction glue. The main thing is that it does not protrude beyond the boundaries of the piece. After drying, check the door to ensure it can close completely.
Attention. Some models have hard-to-reach elements. It is not always possible to properly disassemble the mechanism in order to lubricate all its parts. You can make the process easier if you use a convenient attachment in the form of a thin and long tube or brush with natural fibers.
Models
Push
It is found in door panels located at the entrance to the room. A common cause of unusability is a broken door hinge. If you have such a problem, you need to know how to remove the door handle of an interior door.
- If the fittings malfunction, unscrew the screws that hold the bar in place. Use pliers to pull the rod out by the protruding edge.
- If the fittings cannot be removed, find a screw or pin. Press it and at the same time pull the handle towards you.
- The new element is installed in the same way, only in reverse order.
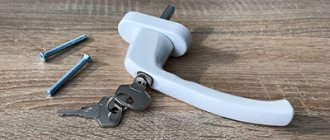
Plastic
This type of handle is easier to remove than others. Find the bar that protects the mechanism. It is located under the handle. Rotate 90 degrees. There are screws at the bottom. Unscrew and remove the fittings. Buy a new one from the same company. The fasteners and holes must match.
Rotary model
Fittings of this type have many differences from push-type analogues. The difference is not only in shape, but also in some design features of the products. Although the general principle of operation of all mechanisms is the same.
Push button in the entrance doors
Such fittings have low reliability and a short service life. A lock is most often installed in the door leaf. If the latch is working properly, there is no need to change it.
The algorithm of actions is the same as when dismantling the hardware in the entrance doors.
Unscrew the screw located in the canvas. Remove the pen. There is a connector in the bar. Carefully place the knife in the slot and lift up. Do not damage the bar; it is easily deformed. There are four screws under the bar. Unscrew them and remove the lock.
Model with socket
Such round handles, depending on the design, are disassembled in different ways. The difference is in the method of attaching the decorative part.
- Option 1 – there is no hole for access to fasteners. In simpler designs it is located on the side and is clearly visible. How to disassemble the round door handle in this case? It consists of two halves. You need to grab the lower (stationary) part and turn the upper part.
With a little effort it will unscrew freely. After this, all that remains is to unscrew the fastening screw that “sits” on the axis and remove the second half.
- Option 2 – there are holes. This is quite simple and no explanation is required.
Reasons for renovation
Before disassembling the interior door lock, it is necessary to identify common defects in the device:
- it is necessary to make significant efforts to lower the L-shaped handle or turn the ball, this is the so-called jamming of the door handle;
- the handle does not return to its original position, here the reason lies in the spring, which is better to replace;
- the latch comes out and enters the lock with difficulty - disruption of the operation of the bolts that move the latch;
- the handle has moved away from the door leaf and has become loose, this is not always a weakening of the fasteners, sometimes it is a consequence of the weakening of the entire mechanism;
- tongue jammed.
How to remove a round handle with a button
The buttons that secure the outer part of the handles may also differ in design - sometimes they are clearly visible, in other cases only a hole is visible. Our task is to find the locking button and press it. Go!
- On the handle of the INSIDE of the doors we find a button or hole under which it is hidden. If the button is not visible under the hole, then you should twist the handle in different directions until the hole aligns with the button.
- Having gained access, we press the button with a handy object - a nail, a thin screwdriver, etc. Having sunk the button, remove the outer part of the handle, turning it a little from side to side and moving it away from the door (pulling it towards you).
Note. Sometimes it takes some effort to retract the button, especially if the handle is oxidized or clogged with compressed dust. When applying force, be careful - the tip of the screwdriver can easily come off the button and scratch the handle. The further path of the screwdriver is easy to trace - it will stick into the palm or finger of the other hand holding the handle.
- The outer part of the handle was removed (its slight oxidation is noticeable in the photo), let's move on to the next step.
- Now you need to remove the decorative element in the form of a cover that hides the fastening screws of the round handle. To do this, pry it off with a thin metal object - a steel technical ruler, a screwdriver with a wide but thin blade, or a similar object.
- Prying should be done very carefully, trying not to scratch or damage the coating of the door leaf. It is advisable to place a thin metal plate under the prying object - a blade, for example, and only then remove the decorative trim.
- You can secure the plate to the door leaf with electrical tape or tape.
Note. Some types of linings have special places for removal in the form of recesses into which the tip of a screwdriver is inserted. If the recesses are semicircular in shape, then it is advisable to pry off the cover with a round-shaped object - in extreme cases, a Phillips screwdriver. Typically, the removable places are located at the bottom of the decorative trim, and not on the side.
- Having removed the decorative trim, all that remains is to unscrew the screws holding the lock ladles together. The handle has been removed.
- As additional information, we note that the above method can be used to remove the vast majority of knobsets with both round and staple-shaped handles. The shapes of the buttons in the images are the most common, but they can look different.
Expert advice
Almost all experts, when removing and disassembling interior door locks, note several points that need to be paid special attention to.
- You can remove the spring manually or pry it off with a screwdriver, covering the mechanism with a rag or hand.
- It is important to wipe all parts of the mechanism with a dry, clean rag to remove old grease and assess the degree of wear, as well as the possibility of further use or the need for replacement.
- Before assembly, it is very important to lubricate all parts of the lock mechanism, including the spring, with special lubricant. This procedure contributes to longer, trouble-free operation of the product.
- Lubricant must be selected from a range of graphite options. Graphite-based substances are less susceptible to temperature changes, dust accumulation, etc.
In this article we examined the features of removing and disassembling interior door locks. However, before disassembling such products yourself, it is very important to read the relevant information in various sources and get advice from a professional technician.
Sources:
- https://furni-info.ru/kak-snyat-dvernuyu-ruchku.html
- https://m-strana.ru/articles/kak-razobrat-dvernuyu-ruchku/
- https://ODveryah.ru/furnitura/kak-razobrat-dvernuyu-ruchku
- https://o-dveryah.ru/zamki/kak-snyat-dvernuyu-ruchku-mezhkomnatnoy/
- https://okcomfort.com/dveri/zamena-mezhkomnatnoj-ruchki.html
- https://DomNaMne.ru/zabory/zamki/kak-pravilno-razobrat-zamok-mezhkomnatnoj-dveri
- https://stroy-podskazka.ru/dveri/zamki/mezhkomnatnye/kak-snyat-i-razobrat/
- 1
Door handle-latch device
So, you are thinking about how to install and disassemble a door handle latch. Knowledge of the device and circuit will help you easily remove the old handle and replace it with a new one. We will look at the most popular knob-type models - with a push and a rotary handle. They are similar in design, differing only in the shape of the handle and the method of opening the latch.
The push button is convenient because it is easy to operate - just pull the handle down and the latch will open.
However, some users find this model quite inconvenient: it happens that they hit it or get caught by clothes. The rotary handle is more ergonomic in this regard, and it looks much more aesthetically pleasing. But it also has its drawback - it is not always possible to turn the latch the first time to open the door.
For example, it is not easy to do this with slippery hands, and children cannot handle such a handle at all. When purchasing, consider these nuances and make the right choice.
The product consists of two interconnected handles (3) and a latch mechanism (1), which is inserted into the door leaf. A strike plate (6) is installed in the door slope. The fastening screws (8) are hidden by a decorative flange (5), in which there is a technical hole (4) for pressing the handle and removing it. To do this, use a special key (7). And several keys (9) are included in the delivery set for models with a keyhole.
If you decide to install a door handle with your own hands, remember the main thing: the mechanism will work properly only if you take into account all the nuances during installation. To make it easier to cope with this task, we offer step-by-step instructions.
Preparation
It is quite possible to correctly replace the handles on a metal entrance door yourself, provided that the following factors are taken into account.
- First, you will need to select a new cover with levers, where the bolt holes completely match the previous version. To try it on, you will have to dismantle the old copy, so it will be easier to decide in the store.
- The shape of the door handle design may be the same, but the bolts to the product may differ in length. This should also be taken into account when purchasing a new copy. It must be suitable for screeding a certain thickness of the door leaf. If the new fasteners are slightly shorter in length, you will have to use the old ones for installation. The same can be said about the plate that is used to turn the additional bolt, usually located on the inside of the door.
- If you have information about the model name and manufacturer of the door handles originally installed, it will be much easier to find a new one.
- When choosing a new handle, you also need to remember that they come in both right and left. It will not be possible to fix this later; you will have to return to the store and change the product.
- If the lock is equipped with an additional latch, then the handle lining must have a special slot with a switch for it.
- Color and design are important selection factors. The door and handle must be in harmony.
These simple tips will help you make the right choice, which will greatly facilitate the subsequent replacement of the door handle.
Installation process
Let's say you installed a new interior door. Now you need to cut the handle into it. Its functioning depends on the quality of the operating mechanisms and correct installation. Before talking about the installation process, we suggest you familiarize yourself with its components.
Knob-type door handle-latch diagram
- 1 – internal rotary handle;
- 2 – technological hole;
- 3 – spring clamp;
- 4 – lock button;
- 5 – handle shank;
- 6 – decorative flange;
- 7 – mounting plate;
- 8 – cylinder of the locking mechanism;
- 9 – decorative flange;
- 10 – external rotary handle;
- 11 – latch mechanism;
- 12 – plate for fastening at the end of the door;
- 13 – strike plate for the door frame.
Kinds
According to the installation method, there are 2 types of handles:
- invoices;
- mortise
Overlay fittings are installed on the door leaf using a strip; for a mortise design, there must be a hole in the door.
By purpose there are:
- input;
- interior.
Based on functionality, door products are divided into 2 types:
- movable;
- stationary.
Movable handles are available in 2 versions:
- rotary (knobs and buttons);
- push.
The analysis of a door handle depends on its type and design features.
Making holes in the door leaf
First you need to make a through cylindrical hole. To do this, use a tape measure to measure a distance of 1 - 1.2 m from the floor. Make a mark with a pencil. From the end of the door, measure a distance equal to the length of the latch mechanism. You can measure the mechanism using a ruler or look at its parameters in the manufacturer's instructions (all the drawings should be there). The resulting intersection point will be the center of the hole.
First, use a drill to make a hole with a diameter of 5–6 mm. Then install a bit on the drill, the diameter of which is equal to the diameter of the hole for the internal mechanism of the handle - as a rule, it is indicated in the instructions.
Helpful advice! To make a neat through hole in the door leaf using a crown, first make a shallow cut on one side of the door - 5 or 10 mm. After this, a through hole is made on the other side of the door, centering the crown along the hole from the drill.
Thus, when the crown comes out from the back side, the decorative coating will not peel off along the edges.
At the end of the door, according to the markings, you need to prepare a hole for the latch. To do this, a drill with a feather drill is used to make a hole. If it is too small, you can widen it with a chisel. Using the same hand tool, a small recess is made under the groove of the plate, which will be screwed from the end.
Replacement
If repairing the mechanism is impossible, then it is necessary to replace the front door handle with another one. To begin with, a latch is inserted into the end hole, which is screwed with self-tapping screws on both sides. After installing the latch, you need to clear the hole from construction debris. This can be done using a stream of air, such as a hairdryer.
Then the pin (square) is inserted into the corresponding square hole of the latch. A handle is attached to a pin on both sides. It is important not to confuse which side the left side of the handle should be on and which side the right should be on. The correct opening of the door will depend on this. Then the handle is screwed to the door with self-tapping screws. Now all that remains is to disguise the fastenings. This can be done using decorative overlays.
Installing the Latch Handle
First, you need to insert the latch mechanism through the hole in the end and screw the plate with self-tapping screws.
Then the part of the handle with the cylinder is inserted into the groove of the latch mechanism. On the reverse side, a mounting plate is put on the cylinder protruding from the door leaf and screwed with self-tapping screws. Then a decorative flange is put on. It is important that the small groove on the edge of the flange is at the bottom - for aesthetics.
And the technological hole must coincide with the internal spring clamp. Otherwise, if you need to dismantle the handle, it will be difficult to disassemble it. Having aligned all the parts of the latch handle in accordance with the diagram, install the handle by pressing - the internal pin will fix it.
Installation of the strike plate
Close the door and mark on the end of the door frame the place where the latch tongue rests. Using a feather drill, make a hole for it. A chisel will help you choose the required depth. Attach the mounting strip and screw it with self-tapping screws.
Ready! On average, installing a latch handle yourself takes 20–30 minutes. The main thing is to take your time, study the manufacturer’s instructions and the dimensions indicated there. Then everything will work out perfectly the first time!
It is worth mentioning separately about the installation of the so-called handle on the socket. Its internal mechanism is impressive in size.
- A nest is made for it at the end of the door - first drilled, then expanded with a chisel to the required size.
- The mechanism is placed inside the door leaf for fitting.
- Make recesses for the lining on the end part.
- Next, the location of the hole and handle square is marked on the surface of the door leaf - holes are drilled.
- The latch mechanism is inserted inside and secured with self-tapping screws.
- After this, handles are attached to both sides of the door.
- The strike plate is attached according to the same principle as when installing a knob-type latch handle.