Housewives sometimes have a question about how to make eyelets for curtains manually, when the original option is not very pleasing or they need to come up with a decent fastening for new curtains. There is more than one way to do this, depending on what materials and skills are available. Therefore, everyone chooses for themselves the level of complexity, decoration style and detailed calculations.
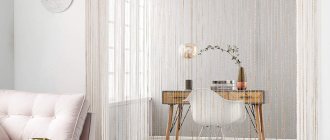
Tulles are often attached using loops; curtains are placed on the cornice less often using this method.
Advantages of thread loops
If you have basic sewing skills, yarn loops are a quick, easy way to hang curtains, drapes, or regular tulle.
It is only necessary to calculate the load and density of the materials.
Advantages
- Practicality. Some variations of thread fastening involve simple replacement or restoration of the element.
- Safety. If the yarn is selected correctly for the main fabric, then the likelihood of breakage is very low. Even if there are small children and animals in the house.
- Aesthetics. It always looks stylish and beautiful, especially if the fabric fastening has a “character” that consists in emphasizing either addition or secrecy.
- Versatility. If after the move it turns out that the cornices have a different structure, or the original ones do not fulfill their function, then this variation of fasteners can still help out the owners.
Also a big plus is the simplicity of the method - you can do it with your hands and a couple of sewing tools and get very elegant results.
Required tools and materials
To make this fastening method, you don’t even need a sewing raspberry - it’s enough to have basic sewing skills.
To make loops, in addition to the selected yarn, you will definitely need a crochet hook, already prepared material and scissors. You will need a lot of yarn, and the hook is selected depending on the thickness of the thread.
The thicker the thread, the larger the hook is needed, at the same time, if the thread is thin, you should not use a thick hook - it will be inconvenient to work with, and the finished loops will look unaesthetic and stretched.
General recommendations
The process of creating curtain or tulle fastenings in itself is not difficult to perform; you just need to gain some skill. But there are also nuances that come only with experience - calculation. This is determining the length of the curtain, the distance of the bottom cut from the floor, the need to process the edges and methods, sequence. It should be taken into account that if there is an additional folded seam at the top, the length of the product will be shortened and may look untidy with too much margin.
If you want more folds and then make a beautiful drapery, then the distance between the loops can be slightly increased.
A more even canvas on the window opening is made by sewing a large number of identical loops. It is difficult to give specific numbers; one must still take into account the total length of the material, its heaviness and tendency to form folds.
Sometimes, if the fabric is thin but difficult to drape, you can increase the distance to 20 cm to “force” it to take the desired shape.
If we talk about the length of the loops themselves, how to choose them, then here it is worth starting from: the length of the material and the highest point of grip of the loops. In other words, the length should be selected individually, taking into account whether there are restrictions on distance from the floor; if you need to raise it, then the loops are shorter, but in order for the curtains to be visually longer, the loops will be calculated differently.
If the loops are not intended for decoration, then they try to place them in inconspicuous places.
Important: the distance by which the fabric needs to be raised or lowered is not equal to the length that the housewife will add or shorten, so it is better to play it safe and “try on” the product for its future location before sewing.
How to make loops on curtains with your own hands
In order not to complicate your life, it is, of course, preferable to choose curtains with universal hinges, but another problem may arise here - the selected fabric may not be available in the store in the format of ready-made curtains.
It is preferable to choose curtains with universal hinges.
In this case, you can, naturally, go and choose another material, but if it is this fabric that you like the most, you can buy it and make loops yourself to hang the ready-made curtain on the curtain rod, without resorting to the help of either curtain tape or eyelet fasteners.
In some cases, you can make curtain loops yourself.
Preparation for the process
Before starting work, you need to choose a hinge model that will be more convenient to use in everyday life. So, loops are divided into the following types:
- Classic. Simple products sewn onto the front or back side of the fabric.
- Tie loops. They are ropes that can be tied in various bows to the cornice rod, creating an additional decoration for the room.
- Loops with buttons. One side of the loop is sewn to the fabric, the other is attached to the button.
- Loops with Velcro. The principle of operation is the same, only with special Velcro (can be bought at a sewing store)
- Original hinges with decor. Here everything depends only on the flight of fancy: loops can be of any kind, even ties, even zippers.
Selection of tools and material
What materials should be prepared before work:
- Threads in the color of the main curtain fabric.
- Needles.
- Pins.
- Scissors that cut fabric.
- Ruler.
- The fabric from which the loops will be made.
To make loops you will need simple tools and materials.
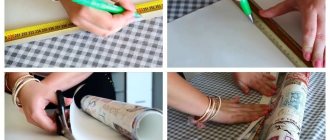
In addition to preparing the materials themselves, you will need to make some calculations: Curtain length: from the eaves down 5 centimeters + distance to the desired level (floor/window sill) + 10 centimeters (for all necessary seams). Accordingly, you will need to cut or hem the fabric from which the curtains will be made.
Creating loops
Creating loops for curtains usually doesn’t take much time if you do everything the first time (ripping off the fabric and re-stitching will take more time than doing all the work, so it’s better not to make mistakes. Having prepared all the materials and made and checked all the calculations , you can choose which loop to make:
- Air.
- Sweeped.
- A loop of threads.
Having made your choice, you can start working, but first you need to arm yourself with a needle and thread of a color that matches the curtain fabric.
From threads with a needle
Thread loops are the easiest way to attach curtains to a curtain rod. Now there are quite a lot of materials on the topic “how to make loops on curtains from threads by hand/how to make loops on curtains from threads with a needle,” which more or less explain what exactly needs to be done and how to make loops on curtains/tulle at home, but Often these manuals lack some “step by step”, without jumping from the beginning of work to the finished product.
The easiest way to make loops from thread is with a needle.
Air loop
Instructions on how to make an air loop:
- Mark on the fabric (along the entire length of the edge) places for the loops.
- Determine the length of the future structure.
- The first stitch must be made with a tail.
- The next stitch is made with a loop (no need to tighten it).
- Place the thumb and index finger of your left hand so that an “ear” appears.
- With your right hand, pull the thread with the needle.
- Thread the thread through the eye.
- Tighten the knot.
The air loop is made in several stages.
Do the same number of times required.
Overcast eyelet
Instructions:
- Start making an air loop.
- Secure a thread at each end of the curtain.
- Form a loop in several layers.
- Wrap it with special stitches.
Conclusion
Curtains made of any material need fastening that will favorably emphasize the advantages of the fabric and highlight features: sophistication, sophistication or playfulness, as well as rigor and restraint.
As a result, you will receive reliable fasteners for curtains that will last a long time and will not spoil their appearance.
Self-made curtain loops can contribute to this in the best possible way, since the craftswoman herself chooses what to emphasize and what not to highlight. Only for this it is necessary to calculate all the nuances, plan correctly and implement it into reality without defects and errors, so that the result brings pleasure for as long as possible.
What threads to use
Depending on what material the curtain is made of, threads are selected. For classic white tulle, it is better to choose a white thread.
If the fabric is multi-colored, iridescent, or has a pattern of a specific color, it should be chosen based on how the finished product will look most natural and whether it will not attract too much attention to itself, since the loops are the first thing It is a method of fastening, not an additional decoration option.
In addition, for making loops it is better to choose strong threads, perhaps even knitting yarn.
It is stronger, denser, and better suited for heavy materials. In addition, if the curtain is long, it usually weighs more than one that only reaches the window sill, so for long curtains it is better to choose this yarn. If the tulle is short, thin and transparent, you can limit yourself to thinner threads, but it is still advisable to fold them in two when working. It should be remembered that very thin threads still run the risk of breaking under the constant load of the fabric, and too often spaced loops will not look very aesthetically pleasing.
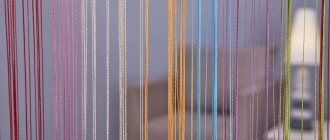
Features of thread curtains
To give the room an exotic and original look, you can hang curtains on the window or door. They do not need additional finishing; they can be used to separate part of the room. You can install in several ways:
- simply by hanging it on a crossbar where it can move easily;
- we sew the braid to the top, collecting the threads into a thicker muslin, securing it to the cornice with rings and hooks;
- sew the braid with fan-shaped hooks, which will create the effect of straight folds;
- secure the threads with adhesive tape.
Strands can be woven into braids, separated with hooks consisting of two parts, etc.
Proper installation with appropriate fastening and design of curtains will be an excellent way to decorate your home, make it more cozy, attractive and comfortable for human life.
Mounting options
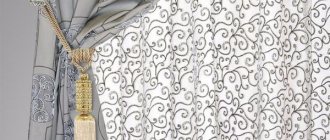
Hinges not only help to add a touch of originality to the decor; with their help you can lengthen the curtains or change their proportions for better perception. The classic option is one-piece loops sewn tightly to the top edge of the panel. To hang curtains with blind hinges, you will have to remove the curtain rod.
Chalet style Source i0.wp.com
Therefore, the option with one-piece hinges is more suitable for short curtain rods, which are easier to remove and put back in place. If the cornice crossbar is large, it is more practical to use hinges with a fastener. There are several ways to attach detachable hinges in everyday life:
- With ties. The fabric is held in place using ribbon, braid or cords, which looks very elegant because it is decorated in the form of decorative bows or knots.
Exquisite canopy Source www.shtora.info
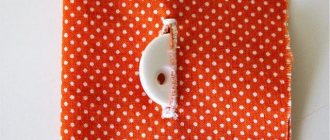
- Buttoned. A beautiful and practical option; convenient where frequent washing is required, for example, on a kitchen or children's window. Buttons can also play a separate decorative role.
On buttons Source atelier-azhur.rf
- Velcro. Velcro is sewn in from the reverse side, this makes the decor indistinguishable from blind loops. With this method of fastening, the number of loops is increased so that they can properly hold the fabric.
- Original. Fantasy options: made of threads, pieces of suede, with decorations made of beads, tassels and ruffles. There are figured varieties with a non-woven base.
In a classic style Source www.muebleydeco.com
First way
Read the article about the mechanism for fastening Roman blinds at the link: https://loveshtory.com/vidy-shtor/podemnye-shtory/mehanizm-rimskih-shtor/
In the first case, you need a minimum of knitting skills; even beginners who have not held a hook in their hands can master it. In addition, if one hinge is damaged during operation, it can be replaced separately, without the need to change the others.
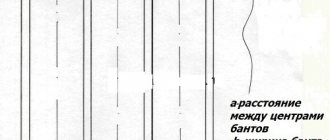
A prerequisite for this method is a careful calculation of the length of the loops and the distance between them. If the loops are different in length or at different distances, this will affect the appearance of the canvas: wrinkles will be visible where long loops are attached, and the waves of the curtain will be crooked and ugly.
The process of sewing on such loops is not quick, we hasten to warn you.
Second way
In the second case, the loops are a solid chain of knots, on which loops in the form of rings are periodically knitted.
Let's start with the most obvious drawback. If any loop is damaged, you will have to re-tie the entire chain. Simply fixing a particular section will not work - the chain begins to unravel when damaged. If you don’t re-link it, you will have to constantly adjust it in one place or another. This will make the curtains look untidy.
The advantage of this method is the relatively high speed of production and sewing compared to the first method. If the number of stitches was calculated correctly, if they are the same length, the curtain will look neat, and the chain itself can even be a unique way to decorate the top edge of the curtain.
Description of loop execution
For strong fastening, the air loop method is suitable.
First, the yarn is secured to the fabric with a regular knot. Next, using a hook, we knit a regular single crochet. Having tied a chain of the required length, the second end is secured to the fabric. Once secured, cut off the free end of the thread. This will be one loop from the first method.
In the second method, you first knit a single crochet along the length required for one loop. Then the last loop is fastened to the first. The resulting ring is one loop. Next, we knit a single crochet for the distance required for the gap between the two loops. Next is a single crochet for a new loop. We fasten it into a ring of the same size as the first loop. And we repeat this until we knit a chain of the required length.
After finishing knitting, sew the chain to the upper edge of the curtain using hidden stitches.
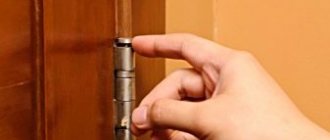
Marking
Installing furniture hinges with your own hands involves precise markings. If you make poor markings, you can get defects when opening the door. The process of marking for furniture hinges involves finding the center of the hole for them. You should retreat 7-12 cm from the edge of the facade. The number of hinges installed on the door may vary. But you need to maintain a certain distance between the canopies, equal to 50 cm. There is a certain dependence of the number of canopies on the door parameters.
| Facade weight, kg | Front length, cm | |||
| Up to 50 | 50-100 | 100-150 | 150-200 | More than 200 |
| Number of canopies | ||||
| 4-5 | 2 | |||
| 6-9 | 2 | |||
| 10-13 | 3 | |||
| 14-18 | 5 | |||
| Over 19 | 5 |
When the number of canopies is determined, the central holes are marked relative to the width of the door. Moreover, the distance from the side of the door should be 2.1-2.2 cm. It should also be taken into account that the fastening should not lie on the location of the shelves.
Thus, having measured the required distance from the top and bottom of the door, a mark is made. Next, keeping the indentation relative to the width, the point of the future location is also marked. At the intersection of the measured marks, a notch should be made using a self-tapping screw or nail. If the facade height is more than 100 cm, marks must be made every 50 cm.
Methods of attaching curtains with photos
- At the cornice. Classic positioning of fabrics. There is a large selection of similar products on the modern market. They vary in shape, assembly, material and color. The structure can be attached to both the wall and the ceiling.
- Fastening systems without cornice. If the design does not have cornices, the curtains are attached directly to the windows, ceiling or wall. Iron or clear PVC hooks, stiff rope, electrical tape and even a dry branch can serve as accessories. There are no restrictions, it all depends on the designer’s imagination.
The photo shows a bedroom with an unusual window opening, the eyelets of which are attached directly to the wall.
Attaching curtains to curtain rods with guide profiles + photo
In these frames, fasteners are attached to the frame profiles for hanging the curtain. In most cases these are hooks and pendants.
To attach curtains to hooks, you can
- Sew loops or eyelets from the rope to the top of the curtain. The diameter of the rings and rings should be slightly larger than the thickness of the hanging hook so that the curtains are more securely attached to the hangers.
- Sew mounting tape that includes installation loops, and attach curtain rod hooks to these loops.
Choosing material for curtains
Curtains with hinges are most often used as the main elements of window decoration. For their manufacture, dense curtain materials are used. Patas are made from the same material or use companion fabric. Curtain loops can be several shades lighter or darker than the curtain or have a color that is in harmony with other interior items. To prevent the curtains from stretching out under the weight of the curtain, a material that is no less dense than the curtain material is used for sewing.
Curtains or curtains made of light fabric are hung on cornices equipped with small hooks that move freely inside a metal rail. To do this, small thread loops for curtains are sewn to the canvas. Any housewife knows how to make eyelets on a curtain by hand using a hook or needle with strong, harsh thread. This method of hanging is used for light silk, cotton or tulle curtains.
How to process a buttonhole on a jacket by hand?
Welt loops are often found on jackets. Many sewing machines are equipped with a sewing function. But sometimes it is necessary to do this by hand if the thickness and density of the fabric does not allow it to be done by machine .
If you decide to perform the process manually, you need to do the following:
- mark and cut the loop;
- sew the sections with loop stitches, trying to make them the same;
- At the beginning and end of the loop, the stitches should be longer.
Important! When processing a loop, precision is needed; use a water-soluble marker for marking. The density and length of the stitches should be uniform. Do not tighten the thread. Practice on another piece of paper first. If you put a thread along the cut, the loops will gain relief.
Whatever type of hinge you choose, if they are made correctly, they will last a long time, be comfortable and delight others with their appearance. Perhaps your imagination will suggest new options for using thread loops and they will find a place in your creativity.
Which hand is the red thread tied to? How are the rituals performed?
Knitted long vest
Design of hinges for different rooms
When choosing a design and material for loop fasteners, consider the room in which they will be used:
- In the kitchen. A material that is resistant to dirt, frequent washing and ironing is suitable. A practical option is linen with viscose added, or cotton with a small polyamide content. Curtains with loops go harmoniously with Roman blinds.
- In the living room. Thick curtains or lambrequins look original in combination with translucent curtains equipped with the same loops. If the room is decorated in a classic style, choose curtains made of fairly dense and heavy fabric; Loops are also sewn from it. The fabric will sag, forming elegant folds.
In the living room Source media.makler.md
- In the bedroom. Here the curtain fabric should not sag; The top edge can even be additionally secured with rigid tape. If the design of the window opening requires the use of a lambrequin, it can also be attached using a loop method.
- In the nursery. Curtains with such a fastening element move silently along the cornice, which is especially important in a room where a small child sleeps,
In the girl's room Source i0.wp.com
How to knit
Even those who have not previously done needlework can cope with knitting with yarn with loops.
You should start working by counting the required number of loops, starting from the width of the product. To do this, lay the thread on any flat surface. Place the second one next to it - this will be the second row. It should be located above the first one.
The basic knitting is:
- Facial surface . You need to thread the loop coming from the skein from behind into the loops of the bottom row and pull it up.
- Purl . The loop should be threaded through the front and also brought up.
End of the row: the second loop passes through the first and stretches up. The loop of the next row stretches through it.
If you finish knitting, fasten the loop from the wrong side.
To decrease, pass the loop coming from the skein through 2 located on the knitted fabric and pull up. To increase, take 2 loops from the skein and pass through 1 on the canvas.
Note : if you want to get patterns, then change the sequence of loops, cross them. To create braids, knit 1 cross every 5-6 rows.