A loop of thread, created by hand, often acts as a partner for a button on fasteners or a hook. However, before creating a part, you will need to first determine its future location on the product, taking into account that fasteners with such loops can be used in those areas of finished items where they will not experience high loads, otherwise they may break.
The thread part does not need to be displayed, so it should be located inside the product. To obtain a less noticeable loop, it is recommended to use threads that match the tone of the base material.
Overlocked loops
This type of loop can be done by hand. Or you can do it on a sewing machine by selecting a special mode for this.
The point of overcasting is to prevent the fabric from fraying on the button hole. This loop can be made either in the same color as the product or in contrast.
It depends on the idea of the item of clothing being made. So, how to make your own buttonhole by hand?
First, you need to mark the locations of the cuts with chalk or a special marker, which subsequently completely disappears. You need to draw on the front side of the future product. You need to start and finish sewing a loop with a thread using bartacks. They can be clearly seen in the next picture.
You need to make fastenings in this way: several even stitches forward, then back and forward again.
It is necessary to sheathe the place of the product where the slot will subsequently be made not tightly, leaving a small gap. So the thread with which we sew the loop will remain intact. You need to overcast one side first, and then the other.
But you won’t be able to make a perfectly even overcast buttonhole by hand. Therefore, the manual method is relevant only for those needlewomen who do not have sewing machines.
Expert opinion
Smirnova Ekaterina Anatolevna
7 years of experience in interior design, professional architect
However, given the presence of this miracle of technology, which facilitates tailoring work, the process will not be fundamentally different. The loops will only become smoother and neater.
But still, we’ll take a closer look at how to make buttonholes with your own hands using a sewing machine.
First, again, we mark everything with chalk (it is important that it is always sharp) or a marker on the front side of the clothing, linen, etc., based on the size of the button. The second is to install a special foot on the machine, which is specifically designed for sewing buttonholes. It looks something like the one shown below.
Next, we select and set the desired mode, not forgetting to first select the type of loop we need.
After stitching, carefully cut holes between the stitches with a thin blade. That's it, the stitched loop is ready.
How to knit
To make the thread stronger, it should all be knitted using the air loop method.
This knitting method helps strengthen the yarn. In order to start knitting, you should secure it to the fabric with a simple knot, and then make one single crochet. Next, it is knitted with air loops and again attached to the material. The location of its strengthening depends on the chosen option. In the first option, a chain of air loops knitted to the required length is secured in the same place where it was attached from the very beginning. After fastening, the remainder is cut off, so one loop is ready. After a certain period of fabric, approximately 5-10 cm, exactly the same loop is knitted. This is done until the end of the material. The finished loops are put on the cornice.
When choosing option 2, you should attach a thread from air loops and not in the place where none was originally attached, but after a few cm. For fastening, use a single crochet. This creates a wide loop. Next, the loops are made the same way across the entire width of the curtain. The cornice pipe is threaded into the finished loops.
Having chosen the fastening option and the material for making the loops, you can begin making this method of attaching the curtain to the cornice.
Loops made from tucked cord
That's how graceful and airy they look.
How to make buttonholes by hand? This is not very difficult, and even not the most experienced seamstress can do it.
To make a roll (this is the second name for this loop), you need to cut a strip of fabric on the bias (5 degrees), the width of which will be 3 cm. The length depends on the intended size.
The loop should be sewn with stitches of approximately 1.5 mm, no more. Large stitches will make it difficult to turn the roll out later.
The strip should look like a funnel: at first a little narrower, and then wider. After the future loop is stitched, the excess fabric along the seam must be carefully cut off.
This will make it easy to turn the steering wheel and it will remain level.
You can turn the loop out using a needle, hooking it onto the remaining thread and pushing it inside with the blunt end. Use a thimble, it will protect your fingers from injury.
After the cord is ready, it needs to be ironed by pinning one end to the ironing board. The roll does not need to be ironed, but only slightly ironed, holding the iron against its weight, because the product should remain round and not become flat.
Now the loop from the tucked cord can be sewn to our product.
Hanging up a towel
Towel loops are the easiest and fastest to make. First of all, because the product requires only one piece. However, on the other hand, if the weight of the curtain is distributed evenly on many hooks, then the towel is held on one, and in order for it to bear the load placed on it, it must be properly made.
So, how to make a loop of thread on a towel? The edge of the thread must be secured correctly, following the advice described above (inject the needle at a short distance from the edge) and having formed a strong loop from several arcs and stitching, complete the work, stepping back slightly from the edge of the arc. An important nuance in the case of towels will be the length of the loops. For curtains, it is selected depending on the cornice and the depth of the hooks. In the case of clothes, the loop is made slightly larger than the diameter of the button, but for towels it is better to lengthen it, for ease of hanging and removing from the hook.
Loops from a straight strip of fabric
Let's look at the instructions on how to make buttonholes by hand.
For this loop, a strip 3.5 mm wide is cut out, and its length will be 4 cm plus two button diameters. This strip is folded in half inward, inside out, and then the folded edges are sewn together.
You need to step back 1 mm from the edge. Next, fold the strip in half, but crosswise, forming a triangle on the fold, and run a transverse stitch along it.
We bend the ends. The loop can now be attached to the fabric.
We equalize the ends. We attach it to the front side at a distance of 4–6 mm from the cut of the item.
It is possible to finish the edges of this fastener by hemming or hemming.
Air loops
They are made from threads. It can be silk, floss, etc. It all depends on whether the fastener is hidden or not, whether it is a bright finish or a regular loop, and on the thickness of the fabric. For example, on thin silk, other loops may look heavy and rough, but a thin, airy one is just right. So how do you make buttonholes by hand?
The essence of the work is to make a loop from several layers of thread, and then finish it. The diameter of the loop should be 1–2 mm wider than the button. How many arcs are needed for this loop must be determined based on the thickness of the threads. For some, 3-4 is enough, but for thin silk, 12 may not be enough.
Loop processing options can be varied. For example, a tatting seam, when everything is overcast with a regular buttonhole stitch, but the knots are made either in front or in the back in a checkerboard pattern.
Gedebo stitch is also suitable. Thanks to this finishing, a rib is formed on the loop along its entire length.
The stitching must be done from the wrong side. The double loop stitch is also well suited for sewing chain stitches.
It also needs to be done from the inside out. Due to the fact that the needle is inserted into the loop not once, but twice, the seam is quite tight.
We think, we select, we do!
So, before you begin painstaking work, which requires a considerable amount of patience and endurance (the work will be monotonous and monotonous), you should choose the right thread for the loop. Several criteria need to be assessed. First, it is important to analyze the color of the thread, then its composition and thickness.
For tulle curtains, it is best to use regular #40 polyester thread. Its advantages are that it is durable and does not fade over time, which is important - having completed the work once, you will not have to think again and again about how to make a loop of thread, because it is especially difficult to do this on a finished product.
For curtain fabrics, experts recommend using crochet yarn (Iris), thickened thread No. 20 (satin, for sewing raised seams) or floss.
Towel loops must also be made from strong and thick threads, because terry fabric, having absorbed moisture, becomes very heavy. But simple kitchen towels can cling to hooks and the thinnest loops.
Stitching loops
These loops are difficult to make. But there is a little trick that will make the tailor's job easier. To ensure that the fabric does not fray and is accurately marked, it is necessary to use masking tape.
How to Make Buttonholes by Hand: Step-by-Step Stitching Instructions:
- It is necessary to determine how long the loop will be. To do this, we use data on the diameter and thickness of the button, adding 3–6 mm here. The width of the loop itself is 6 mm. We draw a loop on graph paper, placing thin plastic and gluing it with tape. For each of the loops you need to make a blank of adhesive tape.
- We carefully sew a seam along the finished frames with a stitch length of 1 mm. Also, for each individual loop you need to prepare your own facing with a width of 6.5 mm. We pin the facing with safety pins to the front side of the bead, where the loop is planned. Now you need to lay two parallel seams on the wrong side, which will exactly coincide with the front ones. The beginning and end of all seams are located exclusively in the corners.
- Carefully cut first the facing, and then the bead itself and turn the edges of the facing to the wrong side. We sew all edges with fastening stitches.
- We baste the hem to the board, completely pierce the layers with pins. Carefully and accurately glue the tape to the basted part and stitch. The tape can be removed, the loop is ready.
It should be noted that such loops are used, as a rule, in the process of making thick outer clothing such as a coat.
We learned the basics of how to make buttonholes by hand. But sewing is a creative process. And fantasy occupies not the last place here. It’s especially cool to think and work on how to make the fasteners into a real decoration for the whole thing, and, of course, then wear this original product with pride.
How to make thread loops by hand
An air loop can perform not only a functional, but also a decorative function on a blouse or dress, and it can also be made from threads.
Expert opinion
Smirnova Ekaterina Anatolevna
7 years of experience in interior design, professional architect
As a rule, air loops are made from the fabric of the product, but you can also use a corset or round cord or roller. In addition, it is possible to make air loops from threads.
The main thing to keep in mind is that fasteners with thread loops can only be used in cases where they will not be subject to heavy load. In terms of strength, they are certainly inferior to traditional options, which means they can rupture under significant pressure.
You will need:
Step 1
Fasten the thread on the wrong side and bring the needle to the front side at the point where the loop begins. Place a loop over your finger (the loop should be large enough for the button to fit through), and then insert the needle at the second point of the loop to the wrong side and out onto the face at the first point.
Step 2
Repeat the last step 3-4 times to make the loop thicker. Holding the project in your left hand, place the thread on your index finger and pass the needle through the loop, as in the photo.
Step 3
Pass the needle through the second loop on your index finger, then remove your finger and tighten the thread, pushing the resulting “knot” to the base of the loop.
Step 4
Repeat the previous step, continuing to add more and more stitches until you make sure they fit together fairly tightly.
When you reach the end, securely fasten the thread from the inside out.
According to the method of execution, thread loops are of two types - chain and overcast with overlock stitches.
You need to repeat everything again and again, and the result is a chain - a thread loop.
The next type of thread loop, a loop covered with loop stitches, differs from the chain loop in that the length of the previous one, the chain loop, can be controlled during operation. But the length of the loop sewn with buttonhole stitches needs to be determined before it begins.
You can make several such stitches connecting the beginning and end of the loop - from 2 to 4. Stitches can be done in different ways. Making punctures in the material in the form of an elongated letter O or an elongated letter X. And so it will be correct, and so. Because further on, they will still be wrapped around with looped edge stitches.
Every woman needs to be a little bit of a seamstress. It is not necessary to know how to cut and sew complex things.
It is important to have basic skills that will be useful in everyday life. One of these is to sew on a button.
But it always needs to be fastened to something, so learning how to make a loop out of thread is extremely important and useful. The loop is used as a fastener, as a hanger for towels or curtains, and also as decoration for clothing and interior items.
Advantages of loops on threads
Hanging a curtain with loops is a great way to lengthen the material if it's too short. Moreover, you can adjust the length of the curtain yourself - by making eyelets for short curtains of a certain length, the height of the tulle above the window sill or above the floor is also determined.
In addition, self-made loops are easy to change - after a while, the fastening method can be changed. Moreover, this type of fastening is suitable for cases where it is not possible to use decorative braid, because it does not fit this type of cornice. You can use thread loops for almost any cornice, because you can simply put them on the pipe. In this way, you can get out of a situation where the mechanism of the cornice is broken, and the curtains need to be secured by some other method.
How to make an air loop by hand?
The fastest and easiest option is to make a loop from one thread. To perform an air loop you will need:
- needle;
- scissors;
- thin threads or floss;
- a product on which you will make a loop (this could be a hanging toy on the Christmas tree, a light towel, etc.).
First, mark the place where the loop should be. Further:
- Thread the thread through a needle, pierce the attachment point and make several stitches in one place. This is necessary to secure the thread. Besides, we don’t need extra knots at all.
- After this, make another stitch, but do not tighten. Instead, drape the resulting loop over the index finger and thumb of your opposite hand.
- Use the middle finger of the same hand to hold the working thread so that it does not get tangled.
- Drop the thread from two fingers so that it remains on the middle one, and then tie it with a knot.
- Repeat as many knots as you think necessary for good fastening.
- Finally, thread the working thread through the loop and tie.
- To hide the end, run it inside out or the back of the item. All is ready!
Lesson #1. Start of knitting. Performing a chain loop and chain
Hello, dear readers of my-crochet.ru
We are starting a series of crochet lessons, from which you will learn how to knit basic elements: chain loops and chains, half crochets, single crochets, double crochets, etc.
In this article we will look at how to hold a hook, a working thread, how to knit a starting loop and a chain of air loops. Watch the video tutorial at the end of the article.
How to hold a hook.
The hook can be held in two ways: like a pencil
or like a table knife.
Use the method that seems more convenient to you. I usually hold it like a pencil, but when my fingers get tired, I change the position.
How to knit a starting stitch.
Before we start knitting and casting on loops, we need to make an initial loop, or rather a knot.
Fold the thread into a loop
we put this loop on the hook so that the working thread is on the index finger, while holding the tail of the thread with the thumb and middle finger,
hook the thread
and pull it through this loop, tighten the knot.
The hook will be inside the loop. This is how we knitted the initial loop.
How to knit air loops.
Make the initial loop (knot) as described above, hook the working thread
and pull it through the initial loop, we get the first air loop . (v.p.)
To obtain subsequent loops, perform the same steps. We hook the working thread
and pull it through the air loop.
This is how we form a chain; it is knitted to the length required to obtain the width of the product we need. When counting the number of loops, each chain stitch is counted as one loop; the loop on the hook and the starting loop (knot) are not taken into account.
A chain of chain stitches forms the basis for knitting the first row, but it does not count as a row. This is what a chain of 10 air loops looks like in the diagram.
The chain of air loops should be knitted loosely, the loops should not be tightened.
Loop of threads tied with threads
If you need to hang a heavier item or sew an additional fastener on a child's jacket, then it's time to improve a simple air loop. Make it twisted.
It will withstand not only more weight, but also more tension, for example, from the back of a woman's blouse . To create it you will need a needle with a fairly dense thread and the product itself.
Do the following:
- on the wrong side, secure the thread with a knot or a pair of stitches and bring it out at the point where the imaginary loop should begin;
- Thread the thread onto the finger of your other hand (use your middle finger). If the loop is made to fasten a button, then make sure that its size matches the diameter of the button;
- bring the thread inside out at the second point next to the first puncture, and then thread it through the first hole again on the front side. Repeat the action 4-5 times. The result should be a thick loop;
- pass the needle through the loop, and then through the second one formed;
- tighten the knot at the beginning of the loop (push it to one of the edges);
- repeat manipulations with the knots until you reach the opposite edge of the loop;
- fasten the thread from the wrong side. The mount turned out to be not only strong, but also very beautiful.
Crochet buttonhole
For needlewomen who know how to crochet, we offer our own version of the loop. You can make it using iris-type knitting threads and the hook itself
. The knitting process is very fast and completely uncomplicated:
- secure the thread with a needle and remove it. Next the hook will come into action;
- make a single crochet (also called chain stitches) of the length required for the size of the button;
- thread the needle again and secure the arc to the product. Everything is very simple!
Advice! Knitting threads tend to stretch over time. Do not make a loop with a margin. Let the button fit tightly into it at first, but after literally 2-3 wears the loop will stretch.
Secrets of weaving
There are several methods for creating loops. The work can be done with a simple sewing needle or crochet hook. These two methods are radically different from each other, although as a result both look just great.
Loops made with a needle look incredibly neat, and you can’t always tell that it’s handmade. First you need to select a place for the loop and fasten the thread at a certain distance from the edge (1-1.5 mm). The next step will be a set of arcs, their length depends on what you will need to hook the loop to, and the number depends on the desire and type of product. A standard curtain loop is 3-5 threads. The main thread should not be laid in one direction, but the direction of the needle should be changed, first from left to right, then back, each time pulling a new arc and adjusting the length of the turn.
In order for the loop to look neat and be as secure as possible, it should be overcast. To do this, use a tatting stitch (a loop stitch, but with alternating knots - first the needle enters the loop of the overcasting knot from the front, then from the back), a Gedebo stitch and a double loop.
The stitching is completed by piercing the fabric with a needle and securing the thread at a short distance from the loop. So its edges seem to be smoothed and strengthened. These methods are best suited for thin materials, and if you are faced with the question of how to make a loop of thread for a button, an air fastener made with a needle is the most correct solution.
Making a loop for a button
Expert opinion
Smirnova Ekaterina Anatolevna
7 years of experience in interior design, professional architect
If no type of air loop suits you, but you need a slot, then you should take care of its careful processing. I wouldn't want my favorite thing to bloom. Perform the following sequence of actions:
- Use tailor's chalk or soap to mark the locations and length of the slits. Do this carefully so that in the future the item will fit correctly on you;
- cut holes using sharp scissors. It is better to use small ones;
- take a needle and thread and fasten it on the wrong side of one of the ends of the cut;
- Using a simple buttonhole stitch, finish the edges of the slit. Make stitches very close to each other so that the fabric does not unravel. Leave at least 3 mm from the edge;
- Use a few stitches to secure the thread.
Advice! Don't pull the thread too tight or it may cut through the edges of your hole.
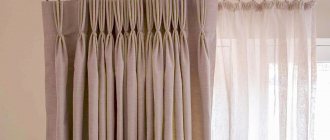
Methods for hanging curtains: thread loops
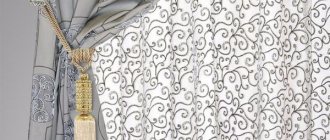
Curtains are hung using a variety of methods, and usually the priority is not the method itself, but the design, that is, how good it looks in the end. Therefore, in such a matter, the main thing is rational application. In general, the following curtain mounts are most often chosen.
These are metal rings that compress the material on both sides, and there is nothing in the middle for stringing onto a pipe.
They are purchased and sewn onto non-stretchy ribbons or rings of the same material; they can be metal or plastic.
The edges of the curtains are grabbed and secured at the same distance.
These are strips of different materials with different methods of attachment.
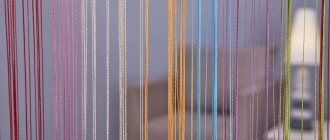
Creating loops from intertwined threads; they are strung on the eaves themselves or hung on hooks.
Housewives often think about how interesting it is to make eyelets on curtains, because this is a universal way to hang the canvas. Plus, the result looks stylish, without frills, and gives the room a feeling of completeness.
Thread disgrace
The first image that comes to mind when hearing the phrase “loop of thread” is the pendants on which unsightly curtains are attached in grandma’s country house or country house. Indeed, when the curtain is hung quickly and not so much for decorative purposes, but as protection from flies and prying prying eyes, the housewife will not delve long into how to make the thread loop more beautiful and neat. A few threads folded together are sewn to the edge of the curtain and the job is done.
As a result, such loops often have unequal lengths, are not located at equal distances from each other, and upon closer examination they do not look very attractive. In this article, readers will be able to look at visual photos and read little tricks on how to make a loop of thread for curtains, clothes, kitchen and bath towels.
Advantages of thread loops
If you have basic sewing skills, yarn loops are a quick, easy way to hang curtains, drapes, or regular tulle.
It is only necessary to calculate the load and density of the materials.
- Practicality. Some variations of thread fastening involve simple replacement or restoration of the element.
- Safety. If the yarn is selected correctly for the main fabric, then the likelihood of breakage is very low. Even if there are small children and animals in the house.
- Aesthetics. It always looks stylish and beautiful, especially if the fabric fastening has a “character” that consists in emphasizing either addition or secrecy.
- Versatility. If after the move it turns out that the cornices have a different structure, or the original ones do not fulfill their function, then this variation of fasteners can still help out the owners.
Also a big plus is the simplicity of the method - you can do it with your hands and a couple of sewing tools and get very elegant results.
Conclusion
Curtains made of any material need fastening that will favorably emphasize the advantages of the fabric and highlight features: sophistication, sophistication or playfulness, as well as rigor and restraint.
As a result, you will receive reliable fasteners for curtains that will last a long time and will not spoil their appearance.
Self-made curtain loops can contribute to this in the best possible way, since the craftswoman herself chooses what to emphasize and what not to highlight. Only for this it is necessary to calculate all the nuances, plan correctly and implement it into reality without defects and errors, so that the result brings pleasure for as long as possible.
General recommendations
The process of creating curtain or tulle fastenings in itself is not difficult to perform; you just need to gain some skill. But there are also nuances that come only with experience - calculation.
This is determining the length of the curtain, the distance of the bottom cut from the floor, the need to process the edges and methods, sequence. It should be taken into account that if there is an additional folded seam at the top, the length of the product will be shortened and may look untidy with too much margin.
If you want more folds and then make a beautiful drapery, then the distance between the loops can be slightly increased.
A more even canvas on the window opening is made by sewing a large number of identical loops. It is difficult to give specific numbers; one must still take into account the total length of the material, its heaviness and tendency to form folds.
Sometimes, if the fabric is thin but difficult to drape, you can increase the distance to 20 cm to “force” it to take the desired shape.
If we talk about the length of the loops themselves, how to choose them, then here it is worth starting from: the length of the material and the highest point of grip of the loops. In other words, the length should be selected individually, taking into account whether there are restrictions on distance from the floor; if you need to raise it, then the loops are shorter, but in order for the curtains to be visually longer, the loops will be calculated differently.
If the loops are not intended for decoration, then they try to place them in inconspicuous places.
Important: the distance by which the fabric needs to be raised or lowered is not equal to the length that the housewife will add or shorten, so it is better to play it safe and “try on” the product for its future location before sewing.