Modern interior designs can include a wide variety of solutions and elements. Interior arches can boast a fairly high level of popularity, which continue to delight the eyes of our compatriots. This interior element has become even more in demand with the advent of new finishing materials on the market. As a result, polyurethane arches have become very popular.
Choosing polyurethane arches
Therefore, it makes sense to figure out what such structures might look like, as well as how to finish the arch with polyurethane.
Arch – new opportunities
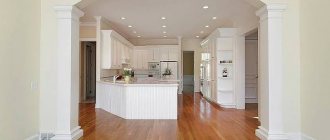
In fact, the arched structure is capable of performing two completely opposite functions. On the one hand, it can make the room holistic, and on the other, it can separate the space. Thus, by building an arch between the kitchen and dining room, you can delimit these spaces. If you want to visually combine, for example, a corridor with a living room, then the arch will become that unifying link.
Therefore, design is limited only by imagination. As for the forms, they are subject to a certain classification. So, the most popular remains the classic type of arches. In this case, the design has a semicircle. This solution is relevant for rooms with high ceilings.
How to do
Preparation
It all starts with preparation. First you need to remove the old door and frame. After this, the surface must be cleaned of unnecessary elements, protrusions, dirt and dust. When cleaning is completed, it is necessary to prime the coating and then apply putty using a spatula to level the doorway.
Next, you should wait for the layer to dry and sand it with sandpaper or a grinder with an appropriate attachment. If necessary, the puttying procedure and subsequent steps will have to be repeated. Just don't forget about the primer.
When the opening is prepared, you can begin gluing the polyurethane elements. To do this, you can use liquid nails or special glue. It must be applied to the back of decorative items. But first you need to take all the measurements in order to accurately select the decorative material.
You need to glue according to the instructions that come with the adhesive composition. As a rule, after applying the glue, you need to wait a while, and then press the part firmly to the base and hold it for a while. Excess glue should be removed as soon as possible.
When the gluing of all elements is completed, the joints between them and the base can be puttied or a special sealant can be used. Then all that remains is to either paint it or stick wallpaper up to the border with decorative polyurethane elements.
Related article: How to correctly measure a stretch ceiling with your own hands?
Wide designs
Such designs can be used when zoning a room. In a situation where a wall is destroyed between two rooms, the zones can be different, which is why an arch is created.
In this case, a design can be created that will have only part of a semicircle. This option is optimal for rooms with low spaces.
Video description
A master class on introducing spotlights into an arched opening is presented in the following video.
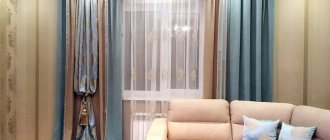
Illumination using LED strip is also possible. To do this, after covering the gypsum board, you need to make a small hole for the tape in the center of the arch. Next, insert the LED strip. After completing work on the arch, close the opening with an acrylic translucent decorative panel.
LED lighting looks unusual and stylish Source pinimg.com
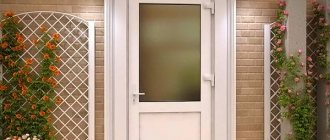
Rectangular portals
This case is the least labor-intensive. There is no need to build various diagrams or use materials to build a structure of a certain shape. If the opening does not need to be widened or narrowed, then the work in this case is minimal. And first you need to remove the old door leaf and its frame. The base of the opening should be cleaned of dirt and dust. And then proceed with the installation of all the components.
It should be noted that this solution is relevant in rooms with low ceilings. And don’t think that decorating a room like this costs nothing. Selecting and installing a box of the required color and structure is not a difficult task, but it requires attention. As a result, the design will be somewhat restrained, but attractive.
Development of Baroque ornament
Modern Baroque, as well as its prototype - the European style of the 17th-18th centuries, is characterized by scale, sharp combinations of light and shadow, fantasy, ornateness in the decor of buildings and interiors. Baroque ornament covered cornices, columns, borders, door portals, window openings, picture frames, and furniture. Baroque ornament uses elements of the late Renaissance - mascarons, shells, acanthus scroll, cartouche. Baroque patterns are enriched with realistic relief images of people and animals, which are mixed with cupids, mythical creatures, flowers and floral curls. The motifs of the shell, cartouche, and medallion are transformed: for example, a shell in Baroque jewelry can take on the appearance of a carnation, fan, sun, or resemble the French royal lily. In addition, Baroque ornament borrows relief designs from Greek and Roman art: half-human and half-animal figures, flower garlands, fruits.
Baroque ornament on the facade of the Church of Santa Susanna in Rome (Chiesa di Santa Susanna alle Terme di Diocleziano). Rebuilt in 1605 by the architect Carlo Moderna.
Baroque patterns of the second half of the 17th century. symmetrical, images often imitate architectural elements: pediments, columns, balustrades. The Baroque ornaments of this period include trophies, classical ova, caryatids, Atlases, dragons, vases with flowers. Smooth lines are combined with straight ones, new motifs appear: mesh with rosettes, lambrequin, teeth, tassels. Thin spirals, curls connected by straight lines, ribbons, masks, and candelabra remain popular. Lush frames include baskets, arabesques, cornucopia, and musical instruments.
Elements of Baroque ornament.
By the end of the 17th century, the Baroque plant pattern became more realistic, the plants looked like natural ones. Images of animals, birds, fairy-tale creatures, mermaids, unicorns, and sibyls are woven into the floral ornament. In the mid-17th and early 18th centuries. The grotesque was revived, and the Baroque sometimes took on extreme expressive, intense forms in relief images.
Expressive Baroque decor of the Trevi Fountain. Architect Nicola Salvi. 1732-62 Rome.
By the 18th century in the ornamental elements of the Baroque, garlands of fruits and berries, bundles of leaves and stems threaded into rings appear.
Baroque ornament.
In the last quarter of the 18th century. a more formal baroque style is in fashion. Ornaments spread from the capital of France in engraved form on boards.
More about polyurethane
Polyurethanes are a class of synthetic elastomers with programmable properties. They are very often used in industry as a rubber substitute. At the same time, they can be used in aggressive environments, with temperature changes. For a short time, the material can be heated even up to 120 degrees; the permissible operating temperature ranges from minus 60 degrees to plus 80 degrees.
In addition, the material is slightly susceptible to aging, resistant to abrasive wear, solvents, ultraviolet radiation and sea water.
Let us separately consider the advantages due to which polyurethane is so effectively used for framing arches.
Making a form
You can create a mold for plaster from silicone. For these purposes, it is better to use a two-component composition. It sets faster. This way, you won't have to wait long to start pouring the plaster.
As already noted, the form can be purchased ready-made. This is a simplified way to achieve the goal - creating an interior arch from plasterboard. You can choose the most optimal option for specific conditions. Fortunately, the modern market can offer a wide range of different materials.
Advantages of the material
Framing an arch made of polyurethane has its advantages:
- High strength, moisture resistance and lightness. The material is resistant to external influences, products made from it will not collapse and are durable.
- Decorative elements to choose from. There are plenty of options for using polyurethane stucco.
- The stucco molding is attached quite simply using special glue. Therefore, the polyurethane arch frame can be decorated at your discretion.
- To paint polyurethane, it is recommended to open it with a primer.
Lead times for production and installation of stucco molding on openings with arches and portals
If we are talking about simple or medium-complexity solutions based on profiled products, then the production time for such an arch will be from two days to one week.
If a piece of furniture is conceived with individual molded decorative fragments that must be made from scratch, namely, sculpted in sculptural plasticine, molded and then only cast in plaster, then the time periods can be large. They can last from two weeks to a month.
From production, the future portal arrives at the site. Here the assembly and installation of individual parts of the product into a single whole takes place. The specificity of gypsum stucco molding is such that usually the necessary set of elements is made in the workshop itself, which are assembled, cut to size and glued into a single whole already on site. Installation time takes from one or two days for simple or medium complexity of work to one week if arches several or they consist of many elements or include columns.
Let's say a few words about preparing the room for the installation of portals and plaster arches. There should be no final finishing of the walls, namely, painting or wallpaper. This is all done after the installation stucco work is completed. The walls must be leveled and plastered with 90% completion. After installing the portal, the final finishing layer of putty is applied to the wall and then finishing work on painting and other types of finishing is carried out.
Pour out the products
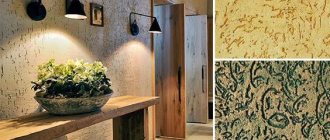
To do this, you need to start by preparing the mold, as well as the gypsum mixture. The latter should be used only from recognized brands. In general, gypsum is slaked lime with the necessary additives. The composition is sold in powder form, as shown in the photo. To obtain the finished mixture, you need to pour water into a container, and then gradually add the powder, stirring constantly. For these purposes it is better to use a mixer. This may be a special attachment for a drill. You need to achieve a fairly thick consistency.
Next, carefully place the resulting gypsum composition into the mold so that it penetrates well into all the depressions. As a rule, you need to wait up to 48 hours for drying - it all depends on the manufacturer and the thickness of the resulting product.