A plasterboard arch is a simple solution to decorate a doorway in a stylish and inexpensive way. Lovers of open spaces and light will appreciate this decorative element. Let's look at the types and shapes of arches, and why they are so popular. Let's figure out which arches are suitable for large and which for small rooms. Read to the end and you will know how to choose an arch for a specific room, install and finish the arched opening.
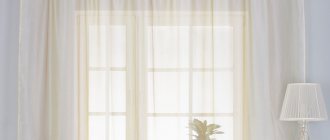
Plasterboard arch in the kitchen interior Source dvervdome.ru
Advantages of an arch over a door
The design of arches dates back to Ancient Greece and Rome, where they served not only as a decorative element, but also played the role of supporting a suspended building structure. Nowadays, arches serve only an aesthetic function.
Why you should give preference to the arch:
- it visually increases the height of the ceiling;
- frees up space that would be needed to open the door;
- it is possible to introduce additional lighting inside the arch, which will have an original effect on the decor of the room;
- it visually connects two small rooms, expanding the space;
- an ideal way to improve a narrow, inconvenient passage;
- don’t worry about how to install an arch in a doorway; even a beginner will appreciate the ease of the process;
- it gives the rooms atmosphere, comfort and status.
The only drawback of the arch is that, if desired, it is impossible to separate the spaces of two rooms. Therefore, it is still more convenient to install a door in the bedroom. But for the corridor, hallway, living room and kitchen, an arch is the right solution.
An example of an interior plasterboard arch with lighting Source budmaster.by
Preparing the base
The doorway should be prepared for finishing with plasterboard. You will need to do the following:
- Clean the opening from the old finish. It is necessary to remove wallpaper and crumbling edges of plaster.
- Repair cracks. Cracks can be covered with gypsum or cement plaster.
- Treat the surface with an antiseptic. This will prevent mold from growing inside the drywall structure.
If you plan to place lamps inside the arch, then at the preparation stage you should stretch the wires. To prevent them from being visible, you need to install them from above or create a groove in the wall. If the wall has a strong curvature, it will be necessary to carry out leveling work in the visible part. Curved areas that will remain behind the structure do not need to be leveled.
Choosing an arch: all attention to the shape
For lovers of arches, there are many options for how to transform your home. All of them can be conditionally divided by the shape of the bend in the upper part of the structure. Below is a general classification of arches.
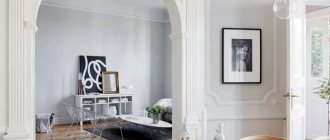
- Semicircular . They have a semicircle at their base. Its shape is classic and fits almost all interiors.
Classic shape: nothing superfluous Source static.venushoteles.com
- Bulbous . Unlike others, it contains only part of a semicircle. Thus, only one upper corner of the arched opening is rounded.
The onion shape will add zest to the hallway Source yandex.net
- Lancets . Two arches brought together to form a shape reminiscent of a cat's eye.
The arched forms have a somewhat futuristic appearance Source www.tokkoro.com
- Multilobed . This is a complex structure that combines two or more arches, smoothly flowing into each other. A multi-blade arch requires a lot of space, so most often it is installed inside one room to zone the space.
Not only beautiful, but also functional Source buzuluk.ucoz.de
For those who have decided on the choice of shape, a more specific classification of types of arches is offered. Each of them has its own circumference diameter (or does not have it at all), and recommendations where they will look best.
| Species name | Description | Characteristic | |
| Classic | The straight lines at the bottom smoothly flow into the semicircle at the top. The radius of the circle is half the width of the arched opening. | The most common type, suitable for all styles. But there is a minus - the arch “eats up” a lot of usable space, letting in less light than other types. | |
| Modern | The radius of the circle is much greater than half the width of the opening; there is a clear boundary between the circle transitioning into straight vertical lines. | Also popular. It transmits light well and does not “eat up” space. It looks harmonious with multi-level ceilings, thick walls and wide doorways. | |
| Portal | A rectangular arch with no bends. Decorative finishing is used for decoration: stucco columns, glass inserts, carvings. | A simple but effective technique for decorating a room. Used most often in dynamic, modern styles. In the form of a portal, interior arches made of wood will look strict and solid. | |
| Romance | The upper corners of the doorway are slightly smoothed (2 identical semicircles at the edges). | Practical shape, suitable for any interior. Lets in a lot of light and does not take up extra space in the upper part of the structure. | |
| Ellipse | Combines the features of classics and romance. There is one circle, less than the width of the opening, (located at the top center) which smoothly turns into vertical lines. | Original shape, suitable for rooms with low ceilings. Accurate calculations are extremely important. | |
| Trapezoid | The trapezoidal shape of the doorway, like the portal, is decorated with stucco, carvings and glass inserts. | A strict, angular shape, used in modern living room and office designs. It looks laconic with a wood finish in a country house. | |
| Arabic | It has the shape of a dome, complemented by wavy or jagged carvings. | An unusual and complex design, used in rooms with oriental or ethnic design. | |
An arch in the Arabic style will charm any guest Source mail.ru
Advice ! You can add originality to even the simplest form: choose a shade contrasting with the main color of the room, decorate it with decorative plaster, stucco molding, or mosaic.
Main types of arched structures
Despite the apparent diversity of arched systems, they all have a common shape, although designers are constantly making changes, limited only by their own imagination. But in practice, there are the following types of arches , depending on the stylization of the general repair:
- an arch of a classic shape, which is a regular arc;
- arched composition in a modernist style with a raised vault at the top;
- romantic rectangular design with rounded corners;
- ellipsoidal arch;
- free form arched composition.
When choosing a suitable arch shape, you need to take into account the width and height of the doorway, and the architectural composition of the building. This is primarily due to the reduction in the opening in the wall and, as a consequence, the passage between adjacent rooms. Based on this, an ellipsoidal arch ; it is better to frame a high door window with a composition in a classical style. Well, to fully understand the process, it is better to watch a video of creating arched systems.
Variety of materials
You can choose a variety of building materials for both the arch frame and the cladding.
- The frame is made of wooden slats or metal profiles.
The first option is more troublesome and will take more time, because for a semicircular vault you will have to bend the wood, and this is not easy. Another disadvantage is that wooden slats can absorb a lot of moisture over time, or, conversely, dry out and become deformed. Metal structures are more durable and reliable.
Advice ! For an arch in a brick doorway, it is recommended to use metal guides, and for wood - wooden ones.
- For facing work, fiberboard, thin plywood or plasterboard are used.
All these materials are sheet, they bend well and are an ideal basis for subsequent finishing in any way.
- It is also possible to make an arch from wood.
This design will look expensive and impressive. But it is rarely used, since it requires high professionalism in installation and expensive materials.
A wooden arch looks both strict and stylish Source yandex.net
See also: Catalog of companies that specialize in decorative forms, windows and door structures
Arch installation
There are several ways to make a plasterboard arch. Let's look at the simplest and fastest:
- Carry out preparatory work. You need to measure the parameters of the doorway, draw the desired arch shape on cardboard of the same size. Check if everything is satisfactory, and if so, set aside the template for later work.
- Install metal profiles. Clean the wall and straighten any obvious distortions. Cut profiles to the dimensions of the future structure. The profile should be in the shape of the letter “P”, 2 pieces. Attach both metal profiles.
- From a plasterboard sheet (GKL), cut 2 rectangles (or squares) according to the required parameters. Transfer to one prepared template and cut it out. If necessary, a sloppy cut can be smoothed out using a smoother and sandpaper.
Advice ! To install an arch in the kitchen, it is better to use waterproof plasterboard. It will help avoid swelling and deformation of the material.
Waterproof drywall will save money and time Source g-stroy.biz.ua
- Carefully examine the sheet for distortions and irregularities. Achieve an ideal result and attach the gypsum board to metal profiles.
- Attach the second prepared sheet of drywall to the second profile. Make sure it is positioned strictly vertically. Using a square and a pencil, transfer the shape of the arch from one gypsum board to the second. To do this, place the square at an angle of 90° to the second plasterboard, and the other side to the first, put a dot. Moving gradually, put the maximum number of points for a perfectly straight line.
- Remove the second gypsum board, draw a line, cut out the shape. Mount it in place, go over it again with a smoothing iron and sandpaper. An important point: the ironing board must be wide to capture both gypsum boards. This way both sheets will be the same.
- Cut 2 metal profiles along the length of the arc. Cut them in increments of 4-5 cm. Attach them to the plasterboard with self-tapping screws.
- Secure the jumper. To do this, measure the distance between the plasterboards, subtract 1.5 cm. Measure the resulting size and cut 5-6 pieces of the metal profile.
This is what the arch should look like before putty Source strourem.ru
- Install the bottom plasterboard sheet. Its length is measured with a tape measure or tailor's tape, its width is the distance between two gypsum boards. A rectangle is cut to these dimensions and attached to the profiles. How to bend drywall is shown a little below.
- Proceed with finishing. Cover the entire structure with fiberglass mesh and apply putty. Sand the surface first with coarse-grain sandpaper, then with fine-grain sandpaper.
How to bend drywall for an arch: video
For the arched part of the arch, it is best to use special plasterboard: its thickness is only 6.5 mm, and the core contains fiberglass. This material is specially designed to work with curved structures. It is durable and flexible. But if we consider the question of how to make an arch inexpensively, then it is better to use ordinary gypsum boards. Knowing special methods, you can bend sheets without losing quality:
- "Wet" bending method.
The prepared gypsum board section is pierced with a needle roller. Press firmly to break the plaster inside. Next, wet the sheet well with a spray bottle and leave for a couple of hours.
Do not overdo it, the gypsum board should keep its shape.
Next, fix the sheet in one direction, and, slowly bending it, gradually screw in the subsequent screws, up to the last one.
How to bend a sheet of plasterboard
When creating an arch, you will need to sew up the structure on 3 sides. The upper sidewalls are trimmed and adjusted according to the dimensions of the opening. The lower part must not only be adjusted, but also bent so that the arc of the arch is repeated. You can bend drywall correctly by following a series of step-by-step steps.
The first method is to cut strips every 10-15 cm on the back side of the drywall. Thanks to this, it becomes much easier to bend. The second method is to treat the surface of the sheet with a perforating roller and water. This allows you to change the structure of drywall, but the method can only be used with moisture-resistant cardboard.
The most preferred method is to fit by cutting strips. This method is dry, does not affect the quality of drywall and allows you to get excellent results. After cutting the sheet, it is advisable to carry out the fastening work together. While one person presses the sheet to the frame, the other screws in the screws.
Video description
A master class on introducing spotlights into an arched opening is presented in the following video
Illumination using LED strip is also possible. To do this, after covering the gypsum board, you need to make a small hole for the tape in the center of the arch. Next, insert the LED strip. After completing work on the arch, close the opening with an acrylic translucent decorative panel.
LED lighting looks unusual and stylish Source pinimg.com
Finishing
After installation of drywall, finishing is carried out. It should include sealing joints and plasterboard putty. To ensure a high-quality finish, you must perform the following steps:
- Seal the seams using mesh. As a solution, you can use plaster or putty for drywall.
- Cover the holes from the screws.
- Cover the drywall with putty. To prevent the finished surface from cracking in the future, it is also recommended to use a special mesh. The best solution is considered to be a thin polymer mesh. The putty is applied to the mesh so that it is hidden, but the layer is as small as possible.
Wallpaper can be directly applied to bare drywall. This finishing option is acceptable if you plan to stick thick vinyl wallpaper that does not show through. If thin paper is pasted, after finishing the wallpaper will be green (the main color of drywall).
It is necessary to apply putty under the mesh if you plan to paint the gypsum board in the future. In this case, finishing should be carried out using the highest quality materials and in compliance with technology.
How to finish an arch
There are many options for how to finish an arch; the choice is limited only by flights of fancy and budget.
- The easiest way to cladding is wallpaper . The process will not take much time and money, and the arched opening will visually seem like an extension of the room. The downside is the fragility of the finish. The slightest snag can damage the integrity of the cover; over time, the color will fade and turn yellow.
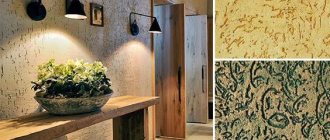
- Painting . Highlighting an arched space using contrasting colors is an excellent solution for small rooms. Stucco molding or decorative stone would look out of place in this case. You should choose the right paint: only water-dispersed paint is suitable for a matte surface.
- Plastic is also easy to install and has a low cost. But a low-quality product breaks quickly, and aesthetically it is not as attractive as other types.
- Polyurethane stucco . Easy to use, it will give the room a majestic and solemn look. Due to its atmosphere, it is not used in modern and dynamic styles.
Features of arches in different rooms of the house
Below we will look at how to make an arch in a doorway not only beautiful, neat, but also durable. For the kitchen, it is desirable that the arch is not cramped. Especially if there are many residents in the house, or holiday feasts involve noisy companies.
The cladding is made mainly with decorative stone, mosaic, colored glass, and ceramic elements. These materials prevent dirt from sticking and are easy to clean. For durability, you can additionally coat the cladding with varnish.
MDF arch: types and structure, tools and materials, assembly
MDF is a relatively new material on our market, however, it has already become widespread. Moreover, it began to be actively used not only in the furniture industry, but also in construction. In particular, recently this material is often used for arranging arches; in fact, this article is devoted to this topic.
Below I will tell you in detail how to install an MDF arch with your own hands, and I will also introduce you to some secrets that will allow you to cope with this task quickly and without any effort.
Video description
In this video you will learn a little more about the features of using arches in the kitchen:
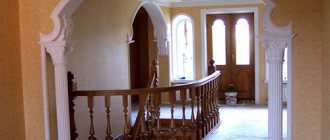
An arched opening in the living room is a decorative element. It gives the interior a solemn, formal look. To achieve this goal, complex designs with niches, inserts of additional lighting, stucco molding, and even built-in decorative columns are used.
Spectacular and majestic columns in the arched doorway in the living room Source www.freelancejob.ru
The hallway and corridor always need more space. Therefore, the arched opening should be as wide and high as possible. In addition to the practicality of this design, this will visually enlarge the room.