Home / Components and accessories / Installing plastic curtain rods - how to cut corners correctly?
The concept of “plastic cornice” is perceived differently by many. It can be a hanger for curtains, or it can be perceived as a decorative overlay that hides the junction of the ceiling and the wall. In any case, it may be necessary to join two planks together or create a corner connection. Therefore, below we will talk about how to correctly cut the corners of such a plastic part as a cornice.
How to hang curtains from the ceiling?
If you plan to install a ceiling curtain
in advance, you can use two methods.
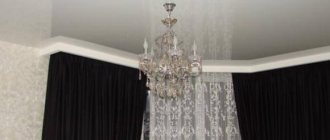
First: before installing the stretch ceiling, make markings and secure the fixing beam. After the ceiling is stretched, attach the curtain
dowel with nails to the beam through the canvas.
Second: make a hidden curtain
.
Interesting materials:
How can you sleep with a lumbar hernia? How can you get rid of thrush? How can you strengthen tooth enamel? How can I find out the year of manufacture of a car? How can you find out your Internet speed? How can I call the main menu? How can you interest a guy by correspondence? How can you fix your makeup? How can you get conjunctivitis? How to wash your hair after laser vision correction?
Design elements
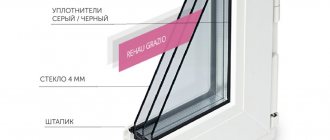
The design of a ceiling cornice with through fastening is extremely simple and consists of several elements. Some of them are included in the standard kit, and some are additional and can be purchased as needed.
- Tire. This is a plastic or metal profile with runners for moving fixing hooks for curtains. It can have different sizes - the width of the ceiling cornice depends on the number of runners (working tracks), and the length is standard (2; 2.5; 3 m, etc.).
Three-row profile tire
Advice. The number of working tracks must correspond to the number of layers of curtains. But lambrequins can also be attached to the front plane of the cornice using special Velcro.
- Hooks are holders for curtains with a leg and a base that prevents them from falling out of the runners. Once connected to the fabric, they snap tightly into place, allowing them to remain in place even when washed.
Photo of plastic hooks
- Caps and stoppers serve to limit the movement of the hooks and prevent them from falling out at the ends of the bar.
Screw stoppers can be installed anywhere on the track
Additional elements include connectors, turns, decorative hoods and brackets.
- Connectors are needed to increase the length. For example, you can assemble a 4-meter ceiling cornice from two two-meter tires.
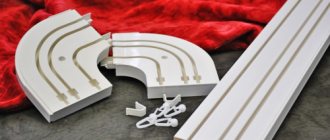
- Turns allow you to change the configuration of the profile - make it with rounded ends or a broken plan.
- Blends are colored plastic strips that snap onto the front surface of the cornice. Needed for decorating an open structure.
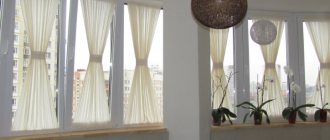
Place in modern design
Window decoration today is an important part when planning the entire interior. The overall appearance of the room depends on how well the cornice is selected.
The curtain mount must fit harmoniously into the overall decor of the room, and the installation work must be carried out efficiently and accurately. This especially applies to open cornices used for decoration. Another thing is the hidden cornice, showing the curtains in all their splendor. Some flaws can be hidden, but you shouldn’t completely neglect accuracy here either.
As is clear from the previous paragraph, cornices perform several basic functions. Firstly, they serve to secure curtains. Also, cornices often have a decorative function, especially if it is necessary to emphasize an unusual curtain mount or ceiling structure. In addition, the fastenings themselves can serve as key elements of the entire design.
A correctly selected cornice will mask flaws during repairs, for example, carelessly executed joints of walls and ceilings, unevenness, and so on.
It can also hide the unsuccessful top of the curtains themselves. For example, decorative models with a wide strip are often used to hide ruffles on curtain tape if this detail is not to the liking of the room’s owners.
The correct choice of fastenings for curtains guarantees the transformation of the entire room, harmonization of proportions, increasing the height of the ceiling or the width of the wall, depending on the type of fastening. This effect is achieved through the competent use of visual illusions, which help to deceive the viewer in a good way.
READ How long does it take to charge a battery from a screwdriver?
Cornices are widely used when installing decorative curtains in the middle of a room, zoning the space. Without properly selected curtain rods, the entire effect produced by such curtains would be spoiled, so they provide invaluable assistance in creating the atmosphere of the entire setting.
When choosing, you need to pay maximum attention to the type of cornice you choose. Each of them has its own advantages and disadvantages, so it is recommended to understand in more detail the particular model you choose before purchasing.
Cornices are divided depending on various characteristics.
Based on materials:
- Plastic;
- Wooden;
- Metal.
According to the method of attachment to the surface:
- Wall-mounted;
- Ceiling.
By number of rows:
- Single row;
- Multi-row.
By design:
- Round;
- Strings;
- Baguettes;
- Tire;
- Profile;
- Telescopic;
- Mini cornices;
- Rotary;
- Spacers;
- For Roman blinds.
It’s worth taking a closer look at the most popular options. The most popular ceiling option is the plastic rail cornice. Also, sometimes a flexible aluminum profile is selected to replace it. This applies to cases where it is necessary to suspend a very heavy structure. For example, a three-row cornice allows you to place curtains, drapes and a lambrequin.
A similar scheme is relevant for living rooms and bedrooms, as it adds grandeur and gloss to the room, while at the same time reliably protecting the room from sunlight and the views of curious passers-by.
Flexible structures can be mounted on shaped windows, for example, in a bay window or in an attic room. The bay window version has a slightly different set of components, since it is necessary to purchase additional spare parts to fix the bends.
A baguette on a cornice is a decorative strip that allows you to hide all sorts of unattractive details, such as uneven ceilings or gathers at the top of curtains formed by tape. Baguettes fit well into various interior styles.
In addition to decorative baguettes, you can purchase a baguette cornice, where both the cornice and the strip are combined into one design.
Speaking about metal structures, we can highlight the most popular round and string cornices.
A round cornice is a rod with tips on which curtains are later attached. A typical rod with a diameter of 16 mm is considered.
This type of cornice is a decoration in itself, especially if you choose a model with artistic forging.
A string cornice is a thin cable stretched between two iron brackets. This type of curtain rod is used for hanging light curtains, such as thread or tulle models.
String designs look modern and dynamic. Thanks to the small diameter of the cable, they are almost invisible and it seems that the curtains are floating right in the air.
Installation technology
A set of additional accessories for the ceiling rail gives freedom of choice when shaping its length, configuration, and method of fastening. Their price is low, so even buying extra parts “in reserve” will not make a hole in your budget.
Let's follow the entire installation process from purchasing the cornice to hanging the curtains.
Assembly
First of all, decide on the required length and shape. If you want the curtains to reach the walls at the edges, purchase rotating elements, and if the standard length of the rail is too short, buy another one of the same width and a connector.
Assembling the ceiling cornice begins with measurements. If it is from wall to wall, reduce this distance by 1-2 cm for ease of installation. If with curves, do not forget to subtract the size of the turning elements from the total length.
If you are satisfied with the standard dimensions of the ceiling cornice, then assembly will be simple:
- Decide on the number of hooks for each row and install them in the runners , inserting them into the groove at the end of the tire;
- Install stoppers and/or plugs;
Advice. The plugs can be placed on glue for reliability.
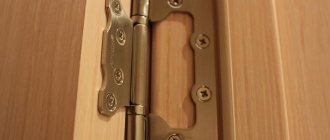
- If there are turns, instead of plugs, put these elements on the ends of the tire . They are fixed using special locking connections.
The turn and the tire must be the same width and profile design
If you need to increase the length, use connectors with the same locks as in the picture above. And you can reduce it by simply sawing off the excess with a hacksaw in a direction strictly perpendicular to the longitudinal axis.
Let us tell you, as an example, how to shorten a ceiling cornice with a turn.
- Measure the length of the assembled cornice with turns;
- Subtract the desired length from it;
- Disassemble the structure and cut off a section from the tire equal to the resulting difference;
- Reassemble and test again;
- If a hood is provided, it is pulled along the profile until the ends align, and the excess at the other end is sawed off with a hacksaw.
Ceiling mount
For installation in a concrete ceiling you will need a hammer drill, a hammer, a screwdriver and dowel nails; for a wooden ceiling - only a screwdriver and self-tapping screws.
Ceiling rails usually already have mounting holes. If not, then drill them with your own hands, making the distance between them about 60 cm. A step of greater length can lead to the following consequences:
The curtain rod sags under the weight of thick curtains
Note! Mounting holes in a three- and four-lane bus are made in two rows in a checkerboard pattern.
Your further actions are described in the table.
| Installation stages | Your actions |
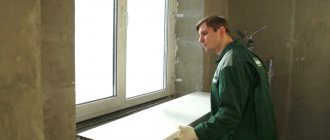
| Line marking | Mark the fastening line. It should be parallel to the wall and spaced at such a distance from it that the first row of curtains does not touch the window sill, radiators and window handles. |
| Fitting | Try on the cornice to make sure the markings are correct. Install it symmetrically to the window opening or in accordance with how it should be secured in the end. |
| Marking fasteners | While holding the tire in a stationary position, make marks on the ceiling with a pencil through the mounting holes in it. |
| Installation | Drill holes at the designated points according to the diameter and length of the dowels, and hammer them into place. Raise the ceiling cornice, aligning the holes in it with the dowels, and screw it in place. |
At what distance from the wall to mount
The first question that arises when you start installing a cornice above a window is at what distance from the corner it should be attached. Close? Stepping back 10 cm? 20 cm?
The curtain rod should be placed so that it hangs freely without touching the window sill or heating radiators.
In fact, the distance can be from 8 to 15-20 cm. It is determined depending on the location of the heating radiators and/or window sill. The cornice must be placed so that the tulle and curtains hang freely, without touching either one or the other. Firstly, this way the drapery lies perfectly, secondly, it is better for the fabrics, and thirdly, there is better air circulation, which is important during the heating season.
How to cut ceiling plinths for uneven corners in a room?
If the corners in the room have a rounded shape, then you need to cut the material into pieces approximately 3-5 cm long. The length depends entirely on the radius of curvature. Next, you should cut each piece on both sides so that the bottom part is wider than the top. This must be done in cases where the internal radius is involved. If you need to decorate the outside, then the top of the baguette should be wider. First of all, you need to fit the next one to each piece, and then glue it.
How to properly cut ceiling plinths? This is quite easy to do without the help of specialists. However, in order to perform the work efficiently and correctly, as well as to save materials, it is better to practice a little on small parts of the material.
Options with a drawn miter box
How to properly join a ceiling plinth if to do this you first need to cut it out, but there is no miter box for this? You can do it yourself. Or rather, not even do it, but draw it.
It can be drawn anywhere: on paper, cardboard or on a regular board.
To do this, parallel lines are drawn on the surface and the necessary cuts are laid out using a protractor, naturally with the required degree.
Quite often during construction, walls are not installed at an angle of 45 degrees, and if you do not check them in advance and cut the workpieces at 45 degrees, then due to these crooked walls, impressive gaps will appear.
Therefore, you should first carry out a quality check for the evenness of the walls.
As for the question of preparing fillets if the walls do not match, in this case you can completely abandon the miter box. Here it is more relevant to use a hand-drawn analogue. It is even more important to carry out this trimming not on the working parts used, but on scraps in the form of small pieces.
A variety of ceiling curtain rods
Ceiling cornices are made from different materials. The most in demand are plastic and aluminum. Cornices also differ in the number of grooves for curtains. The minimum quantity is 1, the maximum is 4, so you can experiment with curtains, lambrequins and a variety of tulles.
There are several types of structures:
- Ceiling rails with guide strips, without decoration;
- Tire cornice with turns;
- Tire cornice with turns and decorative overlay.
How to calculate the length of the cornice?
To correctly calculate the length of the cornice, you need to measure the length of the window and add 40 cm to the resulting number. If you plan to hang thick curtains that will not fold as easily as thin curtains, then increase the amount a little more. It is also worth increasing the sum of the numbers by another 20-30 cm if there are two windows nearby.
When installing the cornice, do not forget to retreat 10 cm from the wall where the window is located. This way you will avoid contact between the curtains and the wall.
Polymer-based adhesive mixture
This composition is considered the most popular for installing polystyrene foam baseboards. Very often, consumers purchase Moment and Titan glues.
The uniqueness of these compositions is that they have a special adhesive base, provide quick setting and good fixation of the bonded surfaces.
CEILING SKIRTING (FILLETS) EASY AND QUICK
It should be noted that other adhesives with similar characteristics can be found on sale, but they will not be presented here, as they have worse parameters. The characteristics of individual adhesive compositions are not without invisible aspects, so before purchasing you should either read the instructions or consult with the manager whether this adhesive is suitable for your needs. The composition must not contain any aggressive solvents that can easily damage the surface of the foamed plastic.
Working solutions for preparing baguettes without miter box
Another option for cutting the plank is to create some kind of structure from thick cardboard and a wooden block. The first step: you need to bend the cardboard at the angle that you measured in the corner of the room. Then press the cardboard onto the wooden block intended for cutting the corner and draw a line along which you need to cut the block - this will be your template. To cut the fillet, place a wooden template on top of the plank, and cut the required angle along the block.
The last proposed option for cutting fillets without a miter box is the most accurate and simple, but somewhat expensive. This is the purchase of special fittings, the set of which includes ready-made internal and external corners for masking imprecise cuts. This method has one drawback: the appearance of the ceiling strips has a lot of options, so the corners from the set may not be suitable for your cornices. You can buy a ceiling plinth and a set of corners for it at any hardware store - the manufacturer usually supplies its ceiling cornices with such kits.
The current offer on the construction market is Kindekor plinth made of foamed polystyrene, made using extrusion technology. Therefore, Russian ceiling strips do not have the disadvantages of polyurethane foam cornices. The cost of curtain rods is much lower than foam or other analogues.
But in old houses with “floating” corners, such sets are unlikely to be useful - in the kit you will only find angles of 450, 600 and 900. How to correct the situation? You need to approximately cut the end of the baguette - at an angle of approximately 450, and then, over the course of several fittings, trim the angle locally to the required value.
When cutting the baguette and forming the outer corner, use this method:
- Press the baseboard to the right side of the corner so that the strip extends beyond the corner by at least its width;
- Use a pencil to mark a line on the ceiling;
- Press the baseboard to the left side of the corner so that the strip extends beyond the corner by at least its width;
- Use a pencil to mark a line on the ceiling, mark the point where these two lines intersect;
- Copy the markings onto the plank, connect the dots with a line, cut the baguette along this line;
- Check the evenness of the cuts by applying the prepared baguettes to the outer corner;
- Before gluing the ceiling plinth without a miter box, eliminate any errors (irregularities, chips, gaps, inconsistencies) on the surfaces of the fillets.
The nuances of trimming internal corners
Work related to how to make the inner corner of a ceiling plinth begins with the product being applied to the ceiling. This is necessary to measure the required length of the part.
When the measurements are completed, the plinth is installed in the prepared miter box. It is placed so that the position of the product in it is exactly the same as on the ceiling.
You need to hold the plinth with your left hand and make sure that it fits snugly against the wall of the device. The section that is intended for installation on the ceiling should be located on top, and the lower part is pressed to the bottom of the miter box.
The hacksaw blade is turned at an angle of 45 degrees and begins to cut. The tool itself is held as close to the left hand as possible and when cutting, do not press hard on it. After we have succeeded in cutting out the inner corner of the ceiling plinth number one, we begin to work with the adjacent product. They cut it in the same way, but in reverse, as if in a mirror image.