Nowadays, plastic windows are no longer a symbol of prosperity and a mandatory attribute of European-quality renovation. The structures are installed everywhere in newly built buildings and private houses. They are even installed in older residential buildings to replace existing wooden window products. The popularity of such construction products is due to their affordable price, aesthetics, and good sound and heat insulation ability. This is especially true for noisy cities and regions with cold climates.
Specialized companies that are resellers or manufacturers of plastic windows offer clients not only the products themselves, but also their conditionally free installation. However, the installation cost is included in the price of the structures in advance. Other companies openly offer to carry out installation work for an additional fee, the amount of which is calculated depending on the area of the windows. The minimum cost of such a service is approximately 1200 rubles. per sq. meter.
If you install a plastic window, for which you do not need to have superpowers, there is a chance to save the family budget. But a positive result can be achieved only with a full understanding of all the intricacies of the installation process and the presence of minimal experience that allows you to use the simplest tool.
Self-installation of plastic windows eliminates an irresponsible approach to the manipulations being carried out. Many craftsmen are in a hurry to complete the maximum number of orders in one day. Therefore, they do not pay due attention to small details, do not comply with GOST requirements, do not be careful, and neglect some stages of installation. Others, so-called specialists, try to save money on consumables. This further prevents you from fully exploiting and enjoying the benefits of plastic window products.
Design features of plastic window systems
Polyvinyl chloride is used to make plastic windows. This material is abbreviated as PVC. The abbreviation is used in the name of plastic window systems.
In the production of PVC windows, a profile with a different number of air chambers is used. Their number affects the heat and sound insulation properties of the product. They are isolated spaces between the profile stiffeners. The number of chambers also affects the installation thickness of the profile system. The difference between the smallest and largest value of this size is only about 30 mm. Therefore, a plastic window, even with the widest profile, can be easily installed instead of an old wooden structure. The profile plastic system from well-known manufacturers in most cases has a minimum of 3 and a maximum of 6 air chambers.
All window profiles are additionally reinforced with a steel insert. Therefore, PVC structures are called metal-plastic products. Reinforcement is performed in the middle chamber. Reinforcing liners increase the rigidity of structures and are used as a basis for fastening elements when installing PVC products and fittings. During the manufacture of profile systems, U-shaped and closed steel inserts are used.
Manufacturers of PVC windows use economy, standard and premium profiles. It is recommended to give preference to the “golden mean”. Choosing a standard class profile will allow you to install high-quality window systems in a tilt-and-turn design. The economical option features thin internal partitions between the chambers. Because of this, profile systems can freeze at low temperatures. Premium products are more expensive for customers compared to other options and are often supplemented with various options.
Metal-plastic windows are manufactured mainly in white. If necessary, you can order designs in wood, black, brown or any other tone.
Before you start installing a plastic window, you need to get acquainted with its design:
- Frame is the supporting base of a metal-plastic window system.
- The sash is the opening and closing part of a PVC product.
- Double-glazed window - consists of at least two glasses. Adjacent elements form a sealed chamber with dry air or inert gas. Argon is often used to increase heat transfer resistance. The name of the double-glazed window depends on the number of chambers. Mainly one, two and three-chamber products are produced.
- Capercaillie - non-opening part of a metal-plastic window
- Distance frame - made of plastic or, more often, aluminum. The element is placed between the glasses and, together with butyl sealant, fastens adjacent translucent parts and ensures the tightness of the chamber.
- A bead is a small PVC strip used to secure a glass unit in the frame.
- Rubber seal to ensure the required degree of tightness of the metal-plastic structure when closed. This material is placed on the frame and sash.
- Fittings are mechanical elements of a plastic window system. They are used to hold, open and close the sash, including ventilation and even micro-ventilation. Such parts include handles, hinges, child locks, rotation locks, folding scissors.
- An impost is a strip in a vertical or horizontal plane that divides the window structure into separate parts. Tilt-and-turn sashes or wood grouse are inserted into them.
When installing a plastic window yourself, a metal drain must be installed. The part is fixed on the street side in the lower part of the polyvinyl chloride structure. The drain is designed to drain water that appears as a result of melting snow or rain.
Is it possible to install?
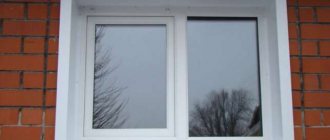
Plastic windows are one of the most common for installation in a brick opening, since houses made of this material can withstand increased loads even from heavy multi-chamber structures.
Note. Taking into account the hardness of the brick and the peculiarities of the masonry around the opening, several different types of fastenings can be used for PVC windows (for frame ones, only one type is most often used - an anchor plate).
This makes it possible to securely fasten even panoramic structures without unnecessary loads on the window.
Measuring the opening before purchasing a window
To install a plastic window with your own hands, you need to order and buy a PVC structure of suitable sizes. Therefore, it is necessary to take accurate measurements of the opening where the PVC product will be installed.
Important! Independent calculation of the dimensions of a metal-plastic window deprives the buyer of the manufacturer’s warranty of the polyvinyl chloride structure. The manufacturer provides it only when the measurements are carried out by a specialist from the company. Even a minor error when calculating the dimensions will not allow you to install a PVC window in the opening.
Before starting measurements, it is necessary to determine the type of opening. It can be flat, which has the same width on the inside and outside of the wall.
PVC window size drawing
There are also openings with a quarter. Their outer size is smaller. A quarter is an internal frame 6 cm wide. This corresponds to 1/4 of a brick. This protrusion prevents the window structure from falling out and allows for more reliable installation.
When ordering or purchasing a ready-made PVC window with a set of additional parts, you need to know its horizontal and vertical dimensions. You also need to have information regarding the length and width of the window sill and all slopes.
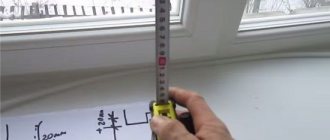
An accurate calculation of the dimensions of a PVC window for an opening with a quarter is accompanied by the following steps:
- the narrow part of the opening is measured in 3-4 places (width between quarters);
- 20-30 mm is added to the smallest result among all obtained values;
- the actual height of the opening is measured.
Important! To obtain accurate results, you must first remove the old slopes, plaster and window sill.
When determining the dimensions of a plastic window for a smooth opening, you need to subtract 3 cm from the width of the installation site, and 5 cm from the height. This is done to get approximately 1.5 cm gaps for the mounting foam on the left, right and top of the frame. Such actions also allow you to install a window sill from below, which requires about 3.5 cm of free space.
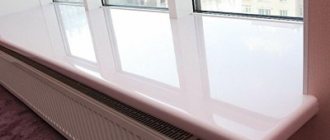
The width of the window sill is selected according to your preferences. Flowers in pots should be placed on it if necessary. It is recommended to add about 10 cm to the width of the inner part of the opening. The ideal option is when the window sill protrudes beyond the inner plane of the wall by a maximum of 6 cm. In this case, convection currents from the hot battery can easily penetrate to the plastic window and prevent fogging of the double-glazed window. The total length of the window sill should be approximately 10 cm longer than the window opening.
The width of the ebb is calculated in the same way as for the window sill. You only need to measure the outer part of the opening, and then add 10 cm per bend to the resulting value. Additionally, it is necessary to take into account the thickness of the insulation and finishing material in the presence of facade cladding.
The exact dimensions of the slopes are determined after installing the PVC window and window sill. Therefore, their sizes should be generous. The excess is cut off after the fact during installation work.
PVC window size drawing
Based on the results of all measurements, a drawing of the metal-plastic window system is drawn up. It indicates the dimensions of the frame and other structural elements, the location of the sashes and capcacaillie, the selected fittings, which, if necessary, will be helped by the employees of the PVC window manufacturer.
Note! When ordering and purchasing several polyvinyl chloride window structures for an apartment, the height of all products must be the same, but their width may differ.
Tools and consumables
To install PVC windows in a brick house you will need :
- polyurethane foam;
- drill;
- screwdriver;
- perforator;
- foam canister gun;
- a set of drills for concrete and metal;
- a chisel with a blunt end (remove a double-glazed window);
- building level and tape measure;
- self-tapping screws;
- steam and moisture insulating film;
- depending on the type of fastening chosen, anchor bolts or plates;
- hammer;
- self-adhesive tape;
- sharp chisel;
- wooden wedges;
- PSUL (pre-compressed sealing tape);
- marking marker;
- plaster;
- cement mortar.
Removing the old window
This stage of installing a new vinyl window system is a dusty and messy process. Dismantling of the old structure, usually made of wood, is carried out after delivery of the purchased PVC product. The procedure must begin with the protection of furniture items. For this, polyethylene film is used. However, the best option is to remove all furniture from the room.
Dismantling work is carried out using:
- wood hacksaws or electric jigsaw;
- mounts;
- chisel and hammer or hammer drill.
The process begins with removing the window or first a small and then a large sash. Then the internal partition is sawn and removed from the frame. Next, the lower part of the remaining structure is dismantled. It is also sawn and removed from the premises. Do the same with other parts of the old window system. The window sill and drainage system are also subject to dismantling.
Advantages and disadvantages
The advantages of PVC windows in brick houses include:
- Durability.
- Good thermal efficiency as well as environmental resistance.
- High levels of sound insulation.
- Variety of profile shapes that can be used.
- Environmentally friendly.
- Availability.
Among the disadvantages it should be noted:
- Difficulty of repair.
- It is necessary to correctly make the assembly seam and install the window, since there is a high probability of condensation formation, and subsequently fungus and mold.
Preparing a PVC window for installation
Installation of a plastic window begins with its preparation for installation. If the structure opens, then the doors are removed from the frame. When a blind polyvinyl chloride product is installed, the double-glazed windows are removed. These steps are not performed if the window system being installed is small in size, and installation is carried out using special plates. When preparing a PVC window, you must also remember to remove the protective film from the outside of the frame. You also need to screw in special elements for attaching the mosquito net and install decorative plugs on the oblong drain holes.
We remove the glazing bead from the grooves using a chisel or spatula
We take out the double-glazed window from the sash
Removing a glass unit from the blind part of the frame is done using a thin chisel or a strong spatula and a rubber mallet. The process itself is carried out as follows:
- the tool is carefully inserted into the gap between the frame and the bead;
- the polypropylene trim is bent from the window profile by lightly tapping it with a rubber mallet on a spatula or chisel;
- the tool gradually moves along the gap and is not removed from the gap until the bead is completely out of the groove.
Vertical thin PVC overlays are always removed first. Then the lower bead is removed. At the end of the process, the upper fixing element snaps off. It is recommended to number the parts so that each of them can be put in its place later. After removing all the beads, the frame tilts slightly. This will allow the glass unit to freely exit the polypropylene structure.
The sash is removed in the following sequence:
- the window handle turns to the closed position;
- plastic covers are removed from the hinges;
- the pin is pulled out from the upper loop by pressing on it from above with a hard object and grabbing the tip of this part that appears from below with pliers;
- the window handle is set to the open position, and the PVC structure with double-glazed windows is held by hand;
- the sash tilts slightly towards itself and rises.
Remove the plastic window hinge plug
We take out the rod of the upper hinge of the window
We remove the sash from the lower window awning.
As a result of removing the double-glazed windows from the blind parts and opening elements, only the frame with imposts remains. Therefore, the weight of the installed PVC structure is reduced. This facilitates the installation process and allows you to secure the window through through holes in the frame (installation using anchors).
conclusions
Now you know how plastic windows are installed, so you can safely get to work. The final check of all elements can be carried out only 24 hours after completion of installation (then the foam will have already “set”).
The described technology is quite applicable to balcony glazing, although it also has its own nuances - such as, for example, installing a parapet to create a partition.
Plastic windows
Installation of a plastic balcony block
Installation of a plastic balcony block
Installation of a plastic balcony block
Installation of a plastic balcony block
Installation of a plastic balcony block
Installation of a plastic balcony block
Find out how to properly make slopes on windows with your own hands from our new article.
Methods of fastening a PVC window system
Before installing a plastic window, you need to decide on the method of fastening the structure. There are several popular options for fixing the profile system - using an anchor, plate or dowel. To choose the appropriate method, you need to know the features of each fastening method.
Anchor dowel
When installing a plastic window yourself is done in a panel or brick house, the walls of which do not have a layer of insulating material, any of the options for fixing the PVC structure can be used. Using an anchor is considered a reliable method. The sleeve of this fastener expands the sleeve when the screw is tightened. Therefore, the anchor dowel is securely fixed in the wall.
The disadvantage of using an anchor is the inability to dismantle it. Therefore, before starting work, it is necessary to carry out thorough preparation, including leveling the profile system. Otherwise, correcting errors will be very expensive.
To apply the anchor dowel, a through hole is created in the frame. This can lead to depressurization of the cameras in the profile. As a result, there will be a violation of the temperature balance inside the profile system.
The use of anchors requires certain professional skills from the work performer. If there is an error, gaps may appear or the fastening element will interfere with closing the sash. If all the work is done correctly, the window system will not sag and vibration will be eliminated even under strong wind loads.
Mounting plate
This fastening option must be used if the installation is carried out in a building with walls made of foam blocks, aerated concrete or reinforced concrete panels with insulating layers. After all, these are porous materials. The anchors will not hold securely in them.
Using plate elements is the simplest method of fixation, but it is not a 100% reliable method. However, it is used most often. It allows you to avoid depressurization of the profile system. The disadvantages of this method of fastening also include the possibility of the PVC window shaking. After all, the plates are fixed at one end to the profile with self-tapping screws, and are not twisted with it through through holes into a single structure. The other side of the fasteners is screwed to the wall using not an anchor, but a screw and a plastic dowel.
Nog
This type of fastener is an ordinary screw. It is used in the same way as an anchor. However, the dowel can always be unscrewed if necessary.
How to install correctly: choosing an installation method
There are two different methods: with and without unpacking (disassembling) the window. When unpacking, holes are drilled through the frame and anchors are driven through them into the wall. This method is more complicated, but the fastening is more reliable.
This is an anchor bolt installation. There are three of them on each side.
When installing without unpacking, metal plates are attached to the outside of the frame, and then they are attached to the walls. This is naturally faster, but the fastening is very unreliable: under significant wind loads, the frame will warp or it will sag.
This is the fastener most often used by installers. In my opinion, they look unconvincing
If you really don’t want to disassemble the window, you can mount it on a plate, but use not narrow and thin ones, but thick and wide ones, which are often used when installing a rafter system.
In principle, small windows installed on mounting plates, provided there are no significant wind loads, can stand normally. If you live in a region with strong winds, and they blow mainly through your windows, if the apartment is located in a high-rise building, in these cases installation with unpacking is necessary.
Below, watch an emotional and intelligible video that explains why it is better to use anchors.
Mounting points for plastic windows
The first fastening must be done at a distance of at least 12 cm and maximum 18 cm from the corner of the profile system. The distance between subsequent places where the frame is fixed to the opening should be no more than 70 cm. This rule is clearly regulated by GOST. It applies to all window openings, regardless of the method of fastening the profile system, material and wall design. In this case, each vertical side of the frame must be fixed at least at three points, and the horizontal side must be fixed with at least two hardware. Determining the location of fasteners is influenced by the type of profile, color and size of the window.
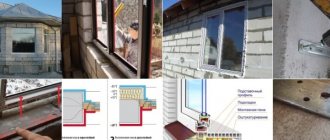
If the house is built of concrete, bricks, cinder blocks or foam blocks, the window frame is installed from the inside of the wall at a distance of 2/3 of the opening thickness. When the wall structure is insulated with foam plastic, the profile system is fixed to the heat insulator. If the building is insulated and ennobled with bricks, the installation of a plastic window is carried out in the area of thermal insulation material.
Stage 6. Drainage
Window drainage device
The drainage is attached to the stand profile with self-tapping screws from the outside. The joints are carefully sealed with sealant to prevent moisture from penetrating into the structure.
Drainage installation
The edges of the ebb are recessed several centimeters into the walls, having previously made indentations using a hammer drill.
Note! Before installation, the bottom gap is also sealed.
It is recommended to glue the lower part of the ebb with a strip of soundproofing material (for example, “Linotherm”) or form a “cushion” of polyurethane foam - this will reduce the sound from the rain.
Aligning a PVC window in the opening
Correct installation of a plastic window is possible only after careful horizontal and vertical alignment of the polyvinyl chloride structure at the installation site. The plumbness of the frame is checked in three planes. The work is performed using a plumb line, construction or laser level. The process cannot be carried out focusing on the edges of the window opening. After all, its side walls in old and even new houses are often not in the vertical and horizontal plane.
GOST states that vertical deviation of the frame is allowed. This value cannot exceed 3 mm per 1 m. However, along the entire length of the metal-plastic structure, the maximum deviation should be less than 4.5 mm. To level the profile system in the opening, mounting wedges made of polymer material or blocks of hard wood impregnated with antiseptic compounds are used. They are placed under the bottom profile and used on all other sides of the frame.
Stage 2. Order
After measurements, the finished drawing should be taken to the window manufacturer, where all the necessary fittings will be selected. It is worth remembering that installation can be performed in one of two existing ways:
- through the frame in the installation plane;
- by means of support fittings equipped during manufacture.
Order windows
In the first option, you will have to pull the package out of the frame, insert it into the opening and install the glass back. In the second case, the entire structure is attached as a whole. Each option has disadvantages - if you pull out the package, it may be damaged; and vice versa, if the window is installed assembled, it can be damaged due to its heavy weight.
Prices for a popular line of windows
Window
Installation instructions for a plastic window
Using the instructions on how to properly install a plastic window, you will be able to simplify the installation process, reduce the likelihood of errors and perform the work better. It is advisable to carry out all manipulations by at least two people. After ordering the exact dimensions, purchasing and delivering a PVC window, preparing the premises, dismantling the old PVC structure, removing opening sashes and double-glazed windows from the blind parts of the frame, work continues in a certain sequence.
Preparing the opening
Construction waste, including polyurethane foam, sealant and remaining fasteners, is removed from the cleared opening from the old window. The slopes are cleared of plaster, and the space under the window sill is cleared of the cement layer. If there are potholes and cracks larger than 2 mm on the surfaces of the opening, they are sealed with a solution of cement, sand and water or putty. Then you need to apply a penetrating primer. This is especially important if the walls are built from loose material.
Advice! It is recommended to use quick-drying mixtures of gypsum or polymers to eliminate defects instead of cement-sand mortar. This will reduce the overall installation time.
PVC window installation
The frame without sashes and double-glazed windows is brought into the prepared opening and installed on mounting blocks with control of the vertical and horizontal position. If bars are used, a layer of waterproofing material can be laid underneath them for additional protection of the wooden elements. Wedges should be used around the entire perimeter of the window. They facilitate the process of leveling the structure.
When installing a plastic window according to GOST, you also need to use a stand profile. The element increases the stability of the PVC structure, allows you to secure the drain and install a window sill.
When the frame is attached with anchors, through holes are made in the profile using a hammerless drill. Their diameter is usually from 8 to 10 mm. The hammer drill is used only for drilling walls made of dense material (reinforced concrete slab, brick, monolith).
Installation of the plastic frame is done by not fully tightening the bottom anchors. Then the top and only then the middle hardware are screwed in. At the same time, the verticality of the window system is constantly monitored.
Advice! It is not recommended to use great force when tightening the anchors. Otherwise, there is a possibility of deformation of the plastic frame.
After complete fixation of the frame structure, the pads from under the lower profile are not removed. They should remain at the edges of the frame and under the impost. Mounting blocks reduce the load on hardware.
Drainage installation
From the outside of the opening, the ebb is fixed by screwing self-tapping screws into the substitution profile. To prevent moisture from penetrating into the structure, a sealant is used. With its help, connecting places are sealed.
Important! Before installing the drainage system, do not forget to seal the bottom gap.
To reduce noise from rain, it is recommended to stick soundproofing material on the bottom of the drain. You can also use polyurethane foam. It creates a pillow under low tide.
Assembly and final fastening of the plastic window
After fixing the frame with anchors or plates, the removed sash is installed. To do this, the lower loop is put on the spindle. Then the parts of the upper similar fittings are combined and connected by a steel rotating shaft, which was previously removed.
The removed double-glazed window from wood grouse is inserted into place and secured with numbered glazing beads. When installing the plastic covers, you should hear a click. If the glazing beads are difficult to get into place, they can be tapped with a rubber mallet.
At the next stage, it is necessary to check the functionality and tightness of the sash. It should stay in place when open. If the sash does not move, the PVC window is level.
After checking, you can start foaming the seams. To improve the polymerization of the polyurethane foam, it is recommended to moisten the gaps with water. The seams should be filled to a maximum of 90%. Otherwise, deformation of the metal-plastic window will occur. If the work is done correctly, the foam will protrude out a little. Its dried excess is cut off with a construction knife. After this, you need to stick a vapor barrier tape around the perimeter of the plastic window.
Installation of window sill and slopes
The window sill is trimmed in accordance with the dimensions of the inside of the opening. The part to be installed must rest against the backing profile and extend at least 2 cm below the slope on each side.
Laying the window sill with a slope of approximately 60 towards the room is carried out using wooden wedges and using polyurethane foam. The window system element must be temporarily pressed with a heavy object.
Installing slopes allows you to refine the window opening by covering the installation seams. These decorative elements do not in any way affect the ability to retain heat and the tightness of the PVC structure if they were sealed according to the instructions and the correct installation of the drain and window sill was carried out. The installation of slopes can be carried out during the finishing of the entire room.
Formation of a three-layer assembly seam
Professional installation of plastic windows in accordance with GOST requires a three-layer seam between the wall and the frame cut, which should ensure:
- thermal insulation;
- noise protection;
- vapor permeability;
- waterproofing.
1. Polyurethane foam. 2. PSUL - vapor-permeable layer.
3. UGK - hydro-steam insulating tape. 4. Stand profile.
5. Support pads. 6. Silicone.
To form a seam, several types of materials are used - vapor barrier tape PSUL (or sealant type STIZ-A), polyurethane foam, vapor barrier tape.
Pasting PSUL
The formation of the seam begins even before installation begins if PSUL tape is used. It is glued around the perimeter of the frame or opening using a self-adhesive compound applied to the surface of the tape rolled into a roller.
This will allow you to achieve two goals at once - to create reliable protection against moisture penetration into the seam from the outside and to prevent the foam from being squeezed out of the frame cut. The tape is produced in accordance with GOST 30971-2002 and was created specifically for arranging ventilated seams when installing metal-plastic structures. It is used only in combination with polyurethane foam. PSUL is made of polyurethane foam impregnated with special hydrophobic components and covered with a self-adhesive layer.
It is produced in a wide range of standard sizes, after gluing it expands on its own and completely fills the seam, sealing it.
Characteristics of PSUL:
- UV resistant;
- not afraid of frost and heat (temperature range for maintaining basic properties is 45 0C ... +85 0C);
- chemically inert;
- does not harden over time;
- water-repellent;
- not susceptible to biological damage (fungus, mold, mosses);
- has good vapor permeability (more than 0.15 mg/(m*m*Pa).
The tape is sold in rolls, ready for immediate use after unwinding. The adhesive layer has excellent adhesion to PVC and most wall materials, which must be dry and free of dust. It is recommended to treat porous materials with deep penetration primer.
The expansion rate of the tape depends on temperature. At + 30 0C it expands completely in 30 minutes, at zero temperature - within 48 hours. Therefore, when installing windows in autumn or winter, it is necessary to use a hair dryer at the minimum position of the heating regulator.
Filling the seam with foam
After installing the protective tape, the seam is sealed with polyurethane foam (polyurethane foam sealant). It is advisable to use professional PRO foams, which are sprayed using a gun. They provide proper material density after expansion and excellent thermal insulation, while their consumption is lower than household sealants sprayed from aerosol cans.
Manufacturers offer universal foam sealants in winter and summer versions. This definition refers only to the minimum air temperature at which they can be applied. Summer ones are used at temperatures above +5 0C, and winter ones can be sprayed at several (up to - 10) degrees below zero. After polymerization (contrary to popular belief), they are no different either in mechanical or thermal properties.
When working with foam, it is necessary to take into account that polymerization occurs only upon contact with moisture. Before filling the seam with foam, all surfaces must be moistened, and after finishing, spray a little water around the perimeter. But it must be remembered that the foam expands up to 40% of the original volume (this means professional material), so it is not necessary to fill the seam tightly. If too much sealant is blown into the gap, then when it expands it can deform the frame.
In order to partially neutralize the loads arising during the polymerization of foam, it is necessary to fill the seams with it after installing all the sashes and double-glazed windows and moving the opening parts to the closed position.
When using foam sealant, you should remember that, regardless of whether it is professional or household, it is afraid of exposure to ultraviolet radiation and moisture from the air. In direct sunlight it deteriorates faster, in the shade - more slowly. But if you do not protect the thermal insulation layer from external influences, then after 2–3 years it will collapse and the cold will certainly penetrate inside the house along the perimeter of the window.
The external PSUL tape does not allow moisture or ultraviolet radiation inside, so nothing threatens the thermal insulation. At the same time, the structure of the tape allows excess water vapor to leave the thickness of the seam, it dries naturally, which also has a beneficial effect on durability. If there is no PSUL tape, then you can use special acrylic-based sealants.
One of the most popular and widespread is Stiz A, specially created for installation seams of metal-plastic structures. It is produced in white and brown colors and can be matched to any design. It has the same high vapor permeability as waterproofing tape and approximately similar other characteristics.
The composition hardens to sufficient strength that it can be painted or plastered, but also retains a sufficient level of elasticity to withstand temperature deformation and shrinkage within 15% of the joint thickness. Adhesion to aluminum, glass, plaster, concrete and other materials is not inferior to the adhesive layer of the tape. But only a completely dry seam can be sealed.
The thickness of the sealing coating is not less than 2 and not more than 6 mm. The sealant can also be used in the cold season, but before applying it it must be kept for several hours at room temperature. The composition is sold in completely finished form and is not diluted with water or other solvents. If there is a partial loss of plasticity, it must be heated.
Formation of the inner layer
The inner surface of the seam, on the room side, is sealed with SAZILAST 11 (StizV). It is created on the basis of polyacrylates and, after drying, forms a vapor-proof layer similar to soft rubber. It protects the seam from penetration of moisture from the room. The sealant has excellent adhesion to putty and plaster compounds; installation of slopes will not cause problems.
In addition to sealant, for the internal coating of the seam, you can use one of the varieties of special vapor barrier tapes, foil-coated or polymer-based. If the slope will be formed using plaster compounds, then before purchasing the tape you need to study the instructions for it, determining the level of adhesion to them.
When is the best time to install frames?
With the use of modern frost-resistant materials, it is possible to install PVC windows in practice in any weather, however, experts limit the operating temperature range from +35 to -10 C; work can only be performed in calm weather.
Working at subzero temperatures, companies began to use special protective screens, so that during the installation of the unit the temperature in the room does not drop significantly.
Requirements for the installation conditions of PVC windows at subzero temperatures:
Preheat the slopes with a blowtorch or a hair dryer so that the sealant sets. Due to the temperature difference between the sealant and the surface, it may not “set”.- Preheat the foam before application for 10 minutes on batteries.
- Before installation, the windows must be in a warm place so that when anchored, the fasteners do not lead to cracking of the plastic.
Detailed information in this article.
No cold bridges
An assembly seam is a node where the joining of wall and window structures, which have completely different properties, including in terms of heating technology, occurs. And it is important to make the knots in such a way that there are no cold bridges on the window slopes.
Basically, the problem of cold bridges is a problem of single-layer wall structures that were used in houses of past years (solid brick, expanded clay concrete, etc.). In this case, the weak area is the wall itself around the window frame due to its low heat transfer resistance. An area appears on the slope with a surface temperature below the dew point. In this area, firstly, high heat losses occur, and secondly, condensation occurs on it. If moisture condensation on a slope occurs frequently, then fungus (mold) may subsequently form in these places. The same applies to openings without quarters. In their absence, the danger of cold bridges seriously increases, and here the heating engineering of the junction units should be especially carefully considered.
An important recommendation is that if quarters are missing, use window frames with a width of at least 130 mm. With a narrow window frame, high-quality sealing of the seam is difficult and the likelihood of cold bridges is high. The options given in GOST with false quarters from the corners or from the platband are possible only with external plaster, and still remain problematic from the point of view of heating engineering.
If there is effective insulation in the wall (mineral wool or non-flammable polystyrene foam), the window should be placed either in the plane of the insulation or behind a quarter of the insulation. In walls where aerated concrete is combined with external cladding and brick quarters, as a rule, cold bridges also do not occur due to the good thermal properties of aerated concrete.