The topic of repairs continues, and today we will tell you how to easily remove an old window from the wall of your house. In an apartment you can also use it in the same way, only if you live on the ground floor. In general, changing windows in an apartment yourself is a very risky thing. Repair work at heights is best left to professionals. Today we will dismantle old windows in a private house. As one great builder of all times and peoples said: “To break is not to build!” As you can understand from these words, there is nothing complicated about this, but we will still tell you.
Many people simply knock out an old window with their feet, hammers, axes and sledgehammers. This is not our method. The old window can be useful for other small buildings in the yard. You can even make a greenhouse from the doors. For the correct dismantling of windows by specialists, the price varies from 400 to 1500 + window sill and ebb 500 rubles. In total, it turns out to be 1000-1500 rubles out of the blue. We will help you save this amount and do it all yourself. Read our step-by-step instructions and strictly follow each step of the instructions. Let's get started!
In what cases is the procedure necessary?
In houses and apartments from previous years of construction, old wooden windows are preserved. In some cases, further use of such structures becomes unacceptable. In this case, they will have to be replaced, and the old ones must be dismantled.
Low thermal insulation
If it becomes colder in an apartment or private house in winter, outdated structures are to blame. The wood dries out, cracks, and cracks form through which cold air penetrates from the street.
If a person lives in a private house, he will have to spend more money on heating. The optimal solution would be to dismantle the old ones and install new ones.
Bad appearance
After years of use, wooden products begin to lose their appearance, the paint peels off, and the material becomes covered with cracks. Updating them won't be easy. Just painting it won't make the cracks go away. Major renovation will be required.
Low sound insulation
Every year, wooden frames gradually move away from the platbands. The sounds of what is happening on the street are heard louder and louder inside the apartment. They will interfere with concentration at work and sleep at night.
How to disassemble a plastic window with your own hands
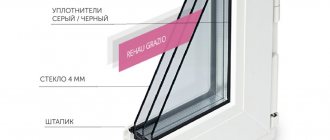
When starting work, you need to understand what a plastic window consists of, since this complex system differs from old wooden windows.
The basis of a PVC window is a metal frame, quite heavy, this must be taken into account when dismantling. The frame, like a frame, holds the double-glazed window and all the protective and decorative fittings. A double-glazed window consists of several glasses that fit tightly together and are connected with a special sealant.
All work on dismantling a plastic window is divided into 4 stages:
- Removing window sashes,
- Removing glazing beads and removing double-glazed windows,
- Removing handles and other fittings,
- Removing the window frame.
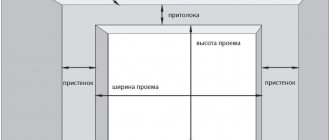
The diagram shows the arrangement of plastic windows
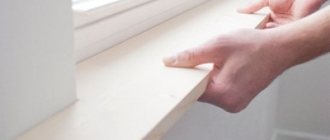
Preparation period
To ensure that the room does not become dirty after the process of dismantling old windows, careful preparation is required.
- Remove all items from the windowsill.
- Curtains or drapes must be removed.
- Furniture must be carefully covered with film.
- Remove household appliances from the room.
- Remove small items and floor coverings, if possible.
- It is better to put sheets of plywood on top of the floor; it will protect the floor from scratches or damage.
It is required to provide free access to the facility for workers.
You also need to make sure that there is an unoccupied electrical outlet nearby. If not, use a portable extension cord.
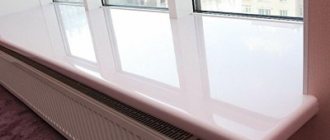
Finishing work
Any repair work occurs with the formation of a large amount of construction waste and dust. Removing a glass unit is no exception. Therefore, it is recommended to thoroughly clean the room immediately after completing all work.
As for the surface on which the window structure was installed: it should be plastered and then cleaned of all kinds of irregularities. This will make the process of installing new windows much easier.
If this work is performed by specialists, it will take no more than an hour to dismantle the windows. An inexperienced master will need much more time, so if possible, it is better to use the services of professionals. However, if you decide to do the work yourself, then the above instructions will help you remove plastic windows without unexpected breakdowns and with maximum ease. But in this case, it is recommended to remember about safety precautions; you should also carry out all repair work using special safety glasses and gloves.
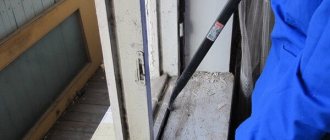
How to remove glass
The next step in the process is removing the glass from the frame. To do this, you need to know how to remove glazing beads from a wooden window.
For this you need a chisel. It must be carefully inserted between the frame and the bead next to the nail. It’s better to start with the last one, then move on to the rest in a circle.
It is necessary to make careful rotational movements with the tool when it enters under the glazing bead. This will help swing the mount. The chisel should also be used as a lever.
If, after removing the beads, the nails are stuck inside the frame, they must be carefully removed using pliers.
Video description
This video shows the process of dismantling a double-glazed window, which is accompanied by useful comments:
Installation of double-glazed windows
Before installing a working translucent sheet, it is necessary to analyze the general condition of the frame itself. It must be solid, without cracks or deformations, without distortions. The latter is especially important if you had to remove a double-glazed window from a plastic window because it burst under the influence of a critical temperature or localized mechanical load. Installation work can only begin if the manual binding is in good working order and is in the correct position relative to the level.
The procedure here is performed in reverse order, observing all the design features of the window design. If sealing rubber bands are provided, they are secured first. Next, the glass sheet is inserted. If a sealant was applied over it, then the perimeter of the bag is also sealed.
Finally, the glass unit is pressed with glazing beads. Here, in order not to damage them and the new glass, you should use a rubber mallet or a wooden hammer and a die. Lightly tap the strips back into the groove.
Installing a bead using a plastic hammer Source stroypomochnik.ru
Dismantling of platbands
If the plans do not include saving the old platbands, they will also need to be dismantled. This should be approached with care so as not to damage the wall of the house or the opening.
If the platbands are ordinary and not carved, you can easily remove them yourself. To do this you will need one of the following tools:
- bit;
- axe;
- screwdriver;
- nail puller
Using anyone, you can pry up a wooden plank, and using the tool as a lever, tear it off the wall.
Replacing glass in a double glazing unit
If you need to remove glass from window sashes with your own hands, you must perform the following steps:
- Remove the glazing beads from the window sashes, while inserting gaskets from improvised means into the resulting cracks. First you need to remove the side beads, then the bottom one, and only finally the top one. To prevent damage to the structure, work should be performed in this sequence.
Use a chisel to remove glazing beads - In order to be able to install the glazing beads in their previous position after installing the new glass, it is recommended to mark them first with a marker.
- Then you need to remove the glass unit, but do not forget about safety precautions; all actions should be performed with protective gloves and preferably with an assistant.
Carefully remove the glass - Install the new glass and secure its position.
- After this, the beads must be installed in the reverse order. First the top, then the bottom and then the side ones. There is no need to perform additional sealing; the glazing beads provide fairly good insulation.
Removing window sills
Important! To avoid hand injuries, gloves must be used when carrying out work.
First, you should check how the window sill is attached. If it is attached to the wall, hit it several times with a hammer to loosen the fastening. Use a crowbar to lift it up. After which you can remove it from the wall with your hands.
If this was not enough, a chisel and a hammer will come in handy. You need to insert a chisel between the window sill and the wall and hit it with milk.
If this does not work, you will have to use a hacksaw. It is necessary to saw through the window sill in several places and remove it piece by piece using a crowbar.
How to disassemble a double-glazed window
A glass unit is usually disassembled if there is a crack in one of the layers of glass or the seal between the layers is broken.
To do this, you need to place the glass unit on a flat horizontal surface, and using a sharp knife, you need to make a cut in the sealant between the glass and the metal frame. Then, holding a knife with both hands, you need to cut the sealant around the entire perimeter. Next, carefully remove the glass from the frame. You need to clean off the old sealant from the glass and frame.
Then, if necessary, you can replace the damaged glass. To do this, carefully, one glass is replaced with another glass sheet of the appropriate size. Before installation, the glass in the double-glazed window must be washed and wiped dry, otherwise all the dust will end up inside the double-glazed window and it will not be possible to wash it.
Then you need to put a cleaned and degreased metal frame over the canvases and restore the seal with butyl tape or double-sided tape. You will need to apply a second layer of sealant over the frame, after which the sealant should dry and the double-glazed window is ready for installation.
How to dismantle the frame
Before removing the old structure from the window opening, you need to cut it. A regular saw will do for this purpose. It is recommended to use a grinder with a diamond blade or for cutting on concrete.
After making several cuts, the frame can be dismantled. To do this, you can use a crowbar, a nail puller, or a hammer drill with an attached attachment - a spatula.
The structure should be removed from the opening without any residue. It is recommended to pick up the piece with the selected tool, using it as a lever.
Reasons for damage and dismantling of plastic windows
Such a need may arise in a number of cases. During operation, plastic windows may lose their original attractive appearance and high level of tightness, and may also stop opening and closing properly.
High-quality window systems, when used carefully and in suitable climatic conditions, can last up to 50 years, which is why replacing them prematurely is quite rare, for example, if you want to increase the thermal insulation and sound insulation of a room or if there is mechanical damage to the glass or the frame itself. In addition, the following may lead to such a need:
- Poor quality components. If they are present, various types of breakdowns may occur during operation, as well as jamming and jamming of various mechanisms, creating inconvenience. In some cases, they can even cause internal glass fogging.
- House shrinkage. This is inherent in buildings whose construction is made of wood, for example, from logs or timber. In buildings with a large number of floors, this can happen in cases where the free space between the wall and the window frame is sealed with cement mortar, excluding the expansion joint.
- Assembly with violation of technology. Errors, for example, distortions, can be made during the manufacture and installation of mechanisms.
- Careless use. Premature wear and damage to various structural elements can be caused by over-tightening of mechanisms, improper maintenance, as well as closing the doors with excessive force and many other similar reasons. Careless handling of various objects at home also often contributes to this.
- Deterioration in appearance. Poor-looking frames are often replaced, because few people like to constantly look at windows covered with scratches or stains received during repair work or as a result of other circumstances.
Note! Contamination of the window structure can occur not only from the inside, but also from the outside, when neighbors living above, for example, paint something or plaster the walls with the same bark beetle, during which drops of paint or other building mixture can fall down, including and on her.
Tools needed
To work, the master will need the following carpentry tools :
- Saw (any of them – reciprocating saw, grinder, jigsaw, electric saw).
- Hammer (regular and rubber).
- Pliers, screwdrivers, nail puller.
- Crowbar (preferably several types), axe.
- Construction knife (with insert blades).
- Grinding machine (for repairing and restoring windows).
- Chisel, chisel, chisel to pry up the frame.
- Spatula, emery for cleaning the surface of the opening.
You may also need a concrete cutter, construction tape (to carefully remove the frame without damaging the glass if the structure is to be repaired), rags, an industrial vacuum cleaner, wide polyethylene for covering floors and protecting things from dust in the room, and garbage bags.
It is best to turn to professionals for dismantling, who will complete the work as quickly as possible, if they have their own tools.
Replacing rotten sections of a wooden frame
If the area has rotted out, you can help the grief in two ways:
- cover with special reinforced putty, recreating the required shape;
- remove the damaged area by inserting a patch in its place.
A reliable way to eliminate rot is to cut out the damaged area.
The second option would be more correct from the point of view of durability: here it is possible to remove the entire infected area, ensuring that the rot will not spread further. The technique is simple. Cut out the affected area, taking some healthy wood. Cut out a fragment of exactly the same shape. Coat the joints with wood glue, insert the patch, level it, if necessary, fix it, and leave until the glue dries completely.
Afterwards you need to putty the seam, sand it and paint it. All. The window frame (or sash) has been restored.
But it is not always possible (or desire) to cut out a damaged piece of wood. Then you can use epoxy putty with reinforcing fiber. Once dry, it is hard enough to hold its shape.
First of all, we separate everything that can be removed. All the rot and rot. We blow away the dust, where possible, and get to a healthy tree. If you plan to use the restored frame for a long time, treatment with antiseptic impregnations is necessary: to prevent, as far as possible, the spread of rot.
A rotten section of a window frame can be restored using putty with reinforcing fiber
Afterwards, the composition is applied to the damaged part with a spatula. This type of putty has a fairly thick consistency; any configuration can be sculpted. Give it a shape close to the desired one, but a little larger in size: after drying, you can sand it and level it out. It takes approximately a day to dry, but the exact time depends on the composition, temperature and humidity of the air. After sanding and leveling, all that remains is to paint the window. Then nothing will be noticeable at all.
What is the repair of old windows?
Repair and restoration of windows involve returning the previous qualities and advantages to the state of a new or practically new product. Standard methods of restoring former characteristics are painting and pasting the junctions with paper. But, often, this is not enough, because more often than not the work is carried out without proper qualifications, according to the usual home standard - the cheapest paint, foam rubber + paper. In this way, it will not be possible to save the windows, except to provide temporary peace of mind to yourself. and then, until the first serious cold weather.
At the moment, experts have tried dozens of methods, thanks to which only a few of the most effective ones have been developed, which are worth using. They are not very expensive, but they will require a lot of attention and time. On the other hand, everyone can afford to spend a weekend to completely tidy up one window in the kitchen or bedroom. Within a month, you can completely renew your windows and not worry about the future cold autumn and winter!
PVC window dismantling technology
How to remove window sashes
An important step in dismantling the entire window module is removing the opening sashes. Indeed, in addition to convenience, such a procedure will significantly reduce the total weight of the entire structure.
If we talk about the method of detaching the sashes, then everything depends on the type of canopies used.
So, in a situation with standard products for removing the sash, proceed as follows:
- Move the sash to the “Open” position;
- The vertical axis-spindle (metal rod) is pulled out from the upper canopy (knocked out with a thin screwdriver and hammer), due to which the structure is disconnected;
- The entire sash rises slightly and is completely disengaged from the window block.
This technique is good because after dismantling and subsequent installation of the sashes there is no need to adjust the windows.
When the canopies have a non-demountable structure or access to the place of their installation is completely difficult, then it is simpler and completely unscrews the self-tapping screws/screws, due to which the canopies are held on the frame. After which the entire sash is removed as an assembly.
And also, if it is not possible to remove the spindle of the upper slope by knocking it out (for example, elements of the opening are in the way), then you can remove the metal rod using an alternative method - using a screwdriver.
Inspection and determination of the scope of work
You meticulously inspect the window sashes and frame, open and close them several times, see if there are any cracks and how big they are. Assess the condition of the wood: are there any rotten areas, if so, what are their sizes.
The first stage is dismantling and assessing the condition of the windows
The first step is to determine whether the affected areas can be restored or whether the rotten fragment requires complete replacement. If replacement is inevitable, there are only two options: if you know how to work with wood, you cut out the required part yourself; if you don’t, you order it from a carpenter. All other window defects can be eliminated by anyone with “straight” hands.
Possible mistakes
Difficulties during dismantling may arise for non-professionals if they do not follow the sequence of window removal and carry out improper preparation for the work process. Errors that will complicate the process and damage elements of the window structure, especially if it is dismantled for restoration, can be of the following type :
- Failure to remove sealant and caulking at frame seams.
- Do not remove the sashes immediately (this will severely damage the glass).
- Applying force rather than using a prepared tool.
- Not removed fittings, glazing beads and fasteners (nails, screws).
When sawing the frame, the slopes may be damaged, so it is better to cut grooves in the plaster in advance and carefully remove the frame along them , especially if you need to save it. When working with tools and old windows, you must follow safety precautions.
It is easier and more convenient for two people to carry out the dismantling process than for one person.
Why is it worth saving old wooden windows?
There are several reasons:
- Opportunity to save a significant amount of money. There is no need to take out a loan or arrange an installment plan for new windows, or spend tens of thousands of rubles from the family budget. Undoubtedly, if such an opportunity exists, and old windows are practically beyond repair, you can take advantage of it;
- Possibility of modification, change of configuration and appearance of windows. The wooden parts of the frame and sashes are repairable. You can change the color, shade, general styling, easily replace glass, install interior decor, stained glass elements;
- The material for making windows is coniferous wood or harder and more expensive wood - ash, oak and others. All parts are heat-insulating and sound-insulating, durable, provided they are properly protected;
- Environmentally friendly products without synthetic additives that give off an odor or a negative background when heated in the sun in summer;
- The function of maintaining the indoor microclimate due to the hygroscopic properties and air exchange of wood!
You can always save yourself from the hassle of repairs, restoration, and window insulation. But this article is about preserving them, not replacing them, which is a radical alternative!