The window sill is usually installed during the installation of the window and slopes, but sometimes a complete replacement of the slab is required after finishing work.
Let's consider when it may be necessary to dismantle and replace the window sill of a plastic window, what will be needed to carry out the work, as well as the algorithm for performing the process itself.
We will analyze safety precautions during dismantling, difficulties or errors, and average prices for replacing the canvas by specialists.
When might it be necessary to remove and replace?
A window sill made of any material has its own service life, protective characteristics, and service life. Most often, standard wood or PVC boards can last up to 15 years.
But replacement may be required sooner due to the following reasons:
- The surface of the slab has minor external damage that does not reduce its effectiveness, but the appearance of the window sill has deteriorated. Most often, such defects can be removed using improvised means or laminating film, but in some cases replacement will be required.
- Serious damage to the window sill, due to which it loses its protective properties or may cause the window frame to break.
- Replacing the window sill with a newer one may be necessary when changing the design of the room or to organize an additional work area.
Carrying out repair work to restore an adjacent wall that has begun to crumble or collapse.
Due to such defects, the window sill may break, fall, become deformed, and also cease to protect the room from the formation of cold bridges.In some cases, such damage will lead to deterioration of the window tightness or its breakage.
- The appearance of drafts from the stove or its insulation. If the insulating material behind the window sill has worn out or the window frame has become deformed, drafts may form. In some cases, in order to reduce the cost of heating or loss of thermal energy, the window sill is insulated (if this was not done during its initial installation).
- Replacing radiators with narrower or wider ones. If the window sill protrudes too much above the heating element, the circulation of warm air near the window will be disrupted, which will lead to the formation of condensation, swelling or fungus. If the slab size is insufficient, the space will not be used rationally.
- Another reason for dismantling and replacing may be the installation of furniture near the window, which will be interfered with by a too large window sill.
Reasons for replacing a window sill
Replacement of the window sill is most often required due to cracks or destruction of the plastic.
The window sill needs to be replaced in the following cases:
- The appearance of mechanical damage on the surface of the product, deformation. They make the window sill less functional and attractive.
- Violation of the integrity of an element, leading to its complete or partial destruction. At the same time, you can no longer place indoor plants or any objects on its surface.
- Changing the interior of the room, replacing old window frames.
- Destructive processes in the adjacent wall. In this case, the fixation of the window sill weakens and it may fall. Depressurization of the structure leads to the appearance of drafts. In winter, this leads to increased home heating costs.
Sometimes it is necessary to increase the size of the window sill to accommodate indoor plants or to make it part of the work area.
Tools and materials
To dismantle and replace the window sill you may need:
- polyurethane foam;
- insulation (expanded polystyrene or mineral wool);
- metal perforated tape;
- Z-shaped fastenings;
- dowels;
- self-tapping screws;
- construction knife;
- drill or screwdriver;
- perforator;
- drills for concrete, metal or wood (sometimes for tiles or stone);
- hacksaw with replaceable blades - depending on the selected material, it may be required for cutting plastic, metal or wood;
- hammer;
- putty knife;
- Master OK;
- protective glasses;
- respirator;
- wedges made of wood or plastic;
- roulette;
- bit;
- mallet;
- silicone sealant;
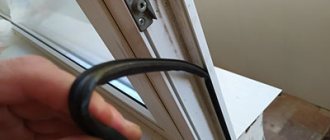
- scrap;
- Bulgarian;
- chisel.
Also, for finishing work after installation, plaster may be required, and for leveling the walls during installation, concrete mixture may be required.
After installing the window sill, it will need to be loaded on top with something heavy, for example, 3-liter jars of water. All these tools may not be useful for dismantling work, but it is recommended to have them in stock.
Recommendations from experts
When replacing a plastic product, use the following practical guidelines:
- Before installation, you need to thoroughly moisten the back side of the canvas and the base of the cement screed of the window opening with water using a sprayer. This will speed up the polymerization process of the polyurethane foam.
- You should not fill the voids with a large amount of foam. It is better to foam the space with stripes, leaving gaps between them. This way you can save mounting foam and avoid undermining the entire installation when the foam swells over time.
- It is better to treat the surface under the new canvas with an antiseptic - this will take a little time, but in the future it will protect the structure from moisture.
You can get specialist recommendations not only for replacing a plastic window sill. Our experts will also talk in great detail about how to install a structure made of concrete, wood or PVC, whether it can simply be updated, what a warm window sill block is and what should be taken into account when installing a window sill on a balcony.
Replacing a plastic window sill is easy. You need to put in a little effort by studying the theoretical foundations outlined in the article. The whole work will take you no more than two days, and with practical experience, you can replace the remaining windows in the apartment.
Rules and safety precautions during work
When dismantling and installing the window sill, it is recommended to adhere to the following rules:
In order for the foam to disperse better under the slab, and also not to bend it, the surface of the window opening and window sill should be moistened with water.
This helps the foam harden faster and spread smoothly throughout the work area.- After dismantling the old window sill, it is necessary to completely clear the window opening of debris, pieces of concrete or finishing materials. All irregularities must be sealed with concrete mixture, and the gaps between the window frame and the opening must be filled with foam (if they appear).
- If loose bricks appear in the masonry, they must be pulled out and placed on fresh mortar.
- During dismantling and installation, it is recommended to use a respirator, safety glasses, and work clothing that will cover all parts of the skin.
This is necessary due to the fact that during the work a large amount of concrete or brick dust is generated (if the window sill has been insulated, then an additional basalt or fiberglass suspension may appear). If it enters the respiratory tract, eyes or skin, it may cause irritation or damage. - It is recommended to treat the surface of the window opening and slab with antiseptics so that mold or mildew does not form there after installation.
Step-by-step instructions on how to replace it yourself
It is recommended to leave the work of dismantling and replacing a window sill made of stone or expensive wood to professionals, since these materials can cause installation difficulties, become damaged or completely break. Before dismantling begins, it is necessary to carry out preparatory work. First you need to remove the slopes.
If the slopes were made of plaster, you will need:
- Remove wallpaper around the window sill by 1 m in height and 30-35 cm along the edges (if any). The trellises can be trimmed using a construction knife and wrapped. You need to start removing wallpaper from the corners.
- Trim the plaster at a distance of 10-15 cm around the window sill to a depth of 30-50 mm (this is the standard distance at which the slab is recessed into the wall).
- Dismantle the cut plaster using a hammer and chisel (chisel).
If they were invoices, then you need:
remove decorative corners and panels (platband) - to do this, you need to cut off the sealant (glue) on which the panel was attached;- unscrew the screws from the panel;
- cut through the silicone between the window frame and the casing;
- pull out the slope - you need to pull it towards you, while slightly shaking it up/down;
- remove polyurethane foam or insulation.
How to dismantle it correctly?
To dismantle the window sill, you need to understand how it is attached, since the type of installation was different depending on the material.
For example, a wooden or PVC plate can be fixed:
- on metal support brackets (Z-shaped ones are most often used);
- with pinching under the window frame by a special section of the profile;
- mechanical fastening through the profile, for example, with screws or self-tapping screws;
- on glue or polyurethane foam - the plate is pre-installed on wooden dies (wedges);
- using foamed polystyrene adhesive, which can be used as additional insulation.
If the board is fastened with self-tapping screws (bracket or through installation), then to disassemble the window sill it is enough to unscrew all the fasteners, trim the sealant, and then carefully pull the board out of the grooves by loosening it.
In other cases, the window sill will have to be torn off from the surface of the window opening using a sheet, a chisel and a pry bar. To do this, you need to remove the outer trim under the slab, lift it 2-3 cm, then try to trim the foam (if there is any) and gradually pull out the board by loosening it.
To dismantle a concrete window sill, you will need to use a hammer drill and a grinder, since you will have to completely destroy the slab (if it is cast directly on the opening itself) or break the layer of cement on which it was planted.
Dismantling can be done in different ways, for example:
- Use a hammer drill to chop off pieces, destroying the slab piece by piece.
- Cut it with a grinder, then knock it out into pieces with a hammer and chisel.
- Drill a lot of holes with a drill, drive wedges into them, and then take them apart piece by piece with a hammer and chisel.
During work, there will be a lot of concrete dust in the air, so it is recommended to use protective equipment and also cover the furniture with film.
How to install without dismantling the window?
In order to install a new window sill, you need:
clean the surface of the window opening from debris, dust or parts of concrete;- check the seam under the frame for cracks - if there are any, then blow them out with foam, and after drying, trim off the excess;
- if there is no installation seam around the window (usually 5-7 cm), then you need to make a groove at the bottom of the opening, the depth of which should be 3-4 cm and the height up to 7 cm;
- level the surface of the opening with cement mortar if there are large depressions or irregularities on it;
- measure the opening of the window sill and cut it to the required size (or order it); when taking measurements, you need to take into account that the slab should be recessed into the opening by 30-50 mm on each side.
Let's look at installing a window sill using a PVC board as an example:
- First you need to install mounting wedges that will hold the slab. They need to be placed close to the frame. When installed, the window sill should have a slight slope towards the room.
- Next, you should lay a vapor barrier tape on the surface of the opening, and then secure it.
- Apply polyurethane foam into the grooves and onto the surface that will be under the slab.
- When it expands a little, but has not yet hardened, install the window sill in place.
- The surface of the board and concrete should be moistened so that the foam disperses more smoothly. Most often this is necessary when installing a window sill on wedges without foam. In some cases, it is blown in after installing the slab into the cavity that is formed between the board and the opening.
- In order for the foam to fit more tightly on top of the window sill, you need to lay a protective layer (for example, newspapers or film) and place a small weight on top. This could be bricks, weights, or jars of water.
- After 15 minutes, blow out all remaining cavities with foam.
- Place an additional weight on the windowsill to create a weight of 8-10 kg and leave everything for 24 hours.
- After 1 day has passed, check that the installation is correct.
- Seal all cracks between the window and the sill with silicone sealant.
- Cover the protruding parts of the slab with end caps.
In some cases, after the foam has hardened, you can strengthen the window sill structure with perforated tape. After all the work has been completed, the slopes and seams in the opening will need to be re-sealed.
Replacing a window sill without replacing a window, video instructions:
What will he be like?
We live in times of technological progress. Nowadays, there are so many materials for construction, and they are all so diverse and versatile that our ancestors would envy us. And this applies not only to durability and quality. It also has a beautiful, aesthetic appearance, which is important.
If we talk about window sills, modern models on the market are presented in various versions. The range of products is so wide that you can choose a model that would fit perfectly into the interior design, fully perform its functions, have various design features, cope with various types of loads and have a very reasonable price.
Plastic window sill
Plastic products . They are one of the most sought after materials on the market as they are affordable for most. Despite the low price, a plastic window sill can be called practical and reliable, resistant to light and heat, and can serve you for a long time, since it does not rot. However, under strong mechanical stress it can break. Considering the fact that the material is of synthetic origin, such a window sill has good environmental friendliness, which is very important, especially for those families who have small children. And of course, one of the important advantages of plastic products is a wide range of colors and product configurations, as well as their low weight. This fact will allow you to choose exactly the window sill that will be in harmony with the overall interior of your home. It should also be noted that such a window sill can be replaced using a simplified scheme.
Wooden window sill
Wooden crafts. Wood will always be in trend. Naturalness always charms and gives nobility to the product. This material was used by our distant ancestors, but has remained relevant to our time and does not lose its popularity. Wooden window sills will give a feeling of warmth and comfort in the house, especially since they have a beautiful natural pattern and texture that is pleasing to the eye. If you are a connoisseur of environmentally friendly and natural materials, you should give preference to this option. Thanks to modern technologies, pre-processing of raw materials ensures that finished products will not rot, deform or break during operation. But, of course, you have to pay for all this, and a lot. The price of wood products is much more expensive than those made of plastic, so not everyone can afford them. If you are a connoisseur of the highest class breed, expensive solid wood window sills are suitable for you.
There are also low-budget options made from materials such as MDF and chipboard.
Acrylic
Acrylic products. Very durable and reliable window sills, which are gaining increasing popularity due to their qualities. Yes, they cost 2-3 times more than PVC (plastic) products, but you pay for a reason. After all, such window sills are able to withstand the weight of not only the objects that will be installed on them, but also the weight of a person. Often, with the help of such window sills, a relaxation area is created, expanding the canvas and adding pillows for comfort; here you can sit with a cup of tea, watching what is happening on the street from the window. They have many advantages: they do not scratch, are not afraid of heavy weight, spilled liquid or a dropped cigarette. They are easy to care for and easy to wash. They do not lose their original appearance, despite their long service life. And what is important, such products can be of any color and shape. This is the case when the price fully corresponds to the quality, and even more.
From stone
Products made from natural and artificial stone. Both before and now, stone also remains a popular material in construction. But such window sills may not fit into the interior of your room. Only when everything is chosen correctly, marble and granite coatings add solidity and sophistication to the decorative design of a house or apartment. Their main advantage is strength and reliability. However, window sills made of stone cannot always be called safe, because they are quite heavy and can be radioactive.
These are not all the materials from which window sills can be made, but they are the main and most popular. The decision of which material to choose is up to you. You start from your means, the purposes for which the window sill will serve, and the interior design. Agree, a stone window sill near a plastic window is most often inappropriate, especially when there are no stone decorative elements in the room. Taking into account all the factors, you can purchase the ideal option. You should not skimp on quality, as this may affect the future.
An important nuance when choosing a suitable design is its parameters and dimensions. When choosing a product, please note that its length should exceed the width of the window by several centimeters (10–20), but the width is selected based on personal preference, but only so that it does not cover the heating radiator. It is just important not to overdo it, so that the installed window sill does not break in a place where there is no support.
We’ve decided on the window sill, let’s look at the detailed instructions on how to install it correctly with your own hands.
Reasons for popularity
The demand for windows in the market is associated with a number of advantages that make them attractive. These advantages include:
- soundproofing characteristics;
- thermal insulation properties;
- high moisture resistance;
- fire safety;
- health safety while observing environmental and technological manufacturing standards;
- ease of care;
- ease of installation, dismantling, replacement of damaged parts;
- compatibility with almost any interior;
- long service life (40-50 years) with proper operation;
- price affordable for the average consumer.
Elements
Flaws
There are no ideal things; metal-plastic also has negative characteristics.
Due to the tightness, condensation accumulates in the windows when there is a difference in temperature between indoors and outdoors, so they are opened and ventilated more often than wooden ones.
The weak side of plastic windows is the vulnerable structural element - the window sill. Due to its horizontal location and purpose, it is at greater risk of negative impacts.
Plastic does not withstand significant loads, especially impacts. Therefore, it is not recommended to place heavy objects on the windowsill.
Plastic should not be exposed to high temperatures (melts, changes shape). It’s hard to imagine the housewife putting a hot kettle or iron on the surface, but it gets damaged in the most unexpected way. A glass jar with an onion acts as a lens that focuses the rays. The surface heats up and becomes deformed.
It is not recommended to make a window sill longer than three meters. Under the rays of the sun, the surface heats up and may swell in the center; replacement will be required.
The window sill heats up mud deposits faster than the slopes. During repairs, paint, putty, or polyurethane foam may accidentally get in. Trying to clean the window sill with abrasive substances damages the coating.
Do not clean plastic parts from stains with aggressive substances (acids, acetone, strong alkalis). Under their influence, microscopic cracks form in PVC, which expand and damage the coating.
The window sill may change color (darken, turn yellow). Low-quality construction made from second-rate plastic collapses quickly. Therefore, it is recommended to buy windows from manufacturers with a good reputation in the market.
Difficulties and errors
When dismantling and replacing a window sill, the following difficulties and errors may occur:
- If you do not lubricate the surface of the slab and the opening with water, then when it hardens, the foam will begin to expand unevenly, which is why the window sill can swell, deform, bend or break.
- During operation, you can damage the mounting seam under the window frame or the window itself. To avoid this, it is recommended to carefully familiarize yourself with all the nuances of the installation or leave the work to specialists.
- If you incorrectly determine the type of fastening, then during dismantling you can break not only the window sill, but also the opening with the window frame.
- During the dismantling process, a large amount of dust and dirt will be generated, which is why it is necessary to protect yourself with goggles and a respirator, as well as cover (clean) furniture or electrical appliances.
- The layer of plaster around the slab will act as an additional fastener, so it must be carefully removed before removing the slab.
Average prices
The cost of installing and dismantling window sills depends on the region, as well as the workers themselves. Average prices are:
for installation they amount to 450-500 r/lm (linear meter);- work with dismantling and reinstallation of the old window sill - 1200-1300 r/l.m;
- if a colored slab up to 600 mm wide is used, then there may be a markup on work of up to 30%;
- dismantling without preserving slabs up to 40 cm deep - 100 r/l.m., more than 40 cm - 150 r/l.m.
Preparation for dismantling
Before starting the task, you need to determine the material from which the product is made, since the technology for dismantling the window sill directly depends on this. It can be wood, concrete or plastic. In addition, it is best to prepare the tools in advance, as well as the room in which the repair work will be carried out.
Tools you will need:
- scrap;
- jackhammer;
- hacksaw;
- chisel;
- chisel;
- regular hammer;
- a knife with a strong, sharp blade;
- Bulgarian (as a last resort).