Window structures are designed to reliably protect the room from the penetration of cold and moisture.
If the seal is broken, these tasks cannot be performed.
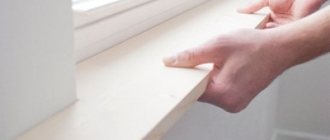
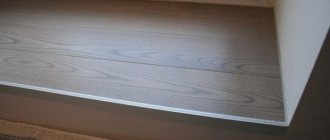
One of the reasons for the problem is the presence of gaps between the window sill and the frame.
You can seal cracks in various ways; it is important to choose the most optimal one for a particular case.
Why do you need to remove the joint?
The appearance of gaps between the window and the window sill leads to unpleasant consequences.
First of all, the sealing of the entire structure is broken , “cold bridges” and drafts are formed.
The microclimate in the room changes, and more money has to be spent on heating. The window stops performing its functions.
Moisture also penetrates through the resulting cracks. Mold and mildew appear on the slopes and gradual destruction of the finish occurs. Mold and fungal spores cause allergic reactions and have a negative impact on human health.
Note. To properly get rid of the problem, you should know the reasons for the appearance of gaps between the window sill and the frame.
The main factor is a violation of the technology for installing a window or window sill. It could be :
- Incorrect choice of material for spacer pads.
- Shriveled wooden wedges used to level a window sill.
- Poor quality sealing or use of low-quality materials for sealing joints.
- Few frame mounting points.
- Insufficient layer of polyurethane foam.
- Unevenly installed canvas.
If any of the mistakes are made, the frame will sag over time and the foam will deform. Another reason for the appearance of cracks is subsidence of the building structure. It is quite rare and requires building repairs to eliminate it.
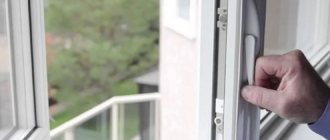
Blowing from under the hinges
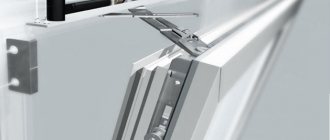
Even when installing a high-quality plastic structure, the hinges gradually become loose. In winter, cold bridges begin to move away from them. To solve the problem, the area to be dismantled is identified. The hinges are directly adjusted with the Asterisk key after removing the plastic protection from them.
Attention! In areas near the window, it is recommended to tighten the hinges more.
It happens that window fittings are not adjusted correctly. The window sash dangles and does not press tightly against the frame. It is worth opening and closing the double-glazed window one at a time and checking whether it moves smoothly and smoothly. If a draft seeps through the frame, then the transom probably remains in summer mode during the winter. We correct the situation by tightening the trunnions clockwise until they stop, having first opened the doors.
How to close the seam?
If a gap is found between the board and the frame, you can apply several options to fix this problem . A high-quality result is obtained by using sealants, flashings, plastic profiles, and polyurethane foam for additional insulation. Each method has its own advantages and disadvantages.
Nashchelniki
Crevices perform two functions - decorative and protective.
This is a very convenient method of dealing with cracks. In addition to reliable sealing of cracks, the element well decorates and beautifies the appearance of the window.
The second name of the product is a false strip. Flashings are produced from various materials.
The designs are very simple, but the installation methods differ slightly.
Note. Modern manufacturers make shutter strips from plastic, metal or wood.
Metal
There are several options for such products - aluminum, galvanized, polymer-coated and with flexible edges. The thickness of the planks varies from 0.5 mm to 2.0 mm.
Advantages:
- durability;
- reliability;
- ease of installation;
- resistance to external aggressive influences;
- large selection of colors;
- appearance.
The disadvantages are the lack of flexibility and limited location of use. The products are recommended for installation on the outside of windows. The price of metal strips starts from 40 rubles per 1 linear meter.
Wooden
There are several types of planks that differ in shape - angular, flat, book-shaped. They can be laminated, painted or varnished. They are used in private homes for installation on wooden windows or when decorating the interior “like wood”. Product thickness up to 3 mm. During installation, wood screws or liquid nails are used.
pros:
- attractiveness and aesthetics;
- environmental friendliness;
- strength;
- tightness.
Disadvantages - cost, low moisture resistance, poor resistance to temperature changes.
Note. Price - from 70 rubles per 1 linear meter.
Plastic
A universal option.
Can be used on windows of any type, you just need to carefully select the product for wooden frames. Available in two versions - rigid and flexible.
Rigid PVC strips are attached with self-tapping screws or using self-adhesive tape. The width of the products is from 20 mm to 100 mm, length 3 m or 6 m.
Flexible models are sold in rolls of 30-50 m, tape width 20-70 mm. Available in plain white or laminated. Mounted on liquid nails, self-tapping screws, self-adhesive tape.
Advantages of plastic strips:
- variability of shapes and colors;
- ease of transportation of the flexible element;
- decorativeness;
- ease of installation;
- durability;
- resistance to external influences;
- ease of care.
Minuses:
- temperature restrictions during installation (only in the warm season);
- one-time use of flexible models;
- the appearance of yellowness in active sunlight;
- the installed flexible strip may begin to curl up.
The price for 1 linear meter of flexible flashing is from 30 rubles, hard (6 m) - from 110 rubles.
Another option for the strip is self-adhesive. It has an adhesive layer that simplifies working with the plank, but limits the temperature regime.
Important. The part can only be installed at temperatures above +5°C.
What sealants should I use?
Another reliable way to improve the tightness of joints is to use sealant. The material is excellent for indoor use; its elasticity allows you to apply an even and uniform layer. The sealant retains its properties for a long time and quickly adheres to materials.
There are several types of sealant that are recommended for sealing gaps between the window sill and frame.
Silicone
Its advantages include good water repellency , ultraviolet resistance, and ductility.
The material tolerates changes in gap dimensions without changing characteristics.
Disadvantages - it contains elements that are harmful to health , so you should ventilate the room during operation.
You need to immediately select the desired shade - the material cannot be painted over. The group of silicone sealants is the most popular. The product line is very large, you can choose a composition with great resistance to fungi and mold. Suitable for windows made of any material. The cost of high-quality glue is from 360 rubles.
Acrylic
also be used on any frame . Excellent adhesion to drywall. Pros: no pungent odor, ease of use, budget cost, versatility. The acrylic composition sands well and can be used as putty.
Minus - after hardening it hardens, so it can crack if the frame or window sill is deformed. Also gives a slight shrinkage.
Less popular types for sealing cracks include thiokol, polyurethane and acrylate sealants.
Blowing from under the windowsill
If it blows between the double-glazed window and the window sill, then the thermometer in the room probably drops sharply and excess heat escapes. The situation threatens significant heat loss and the occurrence of colds in the owners. Significantly shows through even when a gap of 0.5 mm appears. Although, you shouldn't fall into despair.
In order not to return to the problem again after self-remodeling, you need to find out where the blowing is coming from: from the sashes, profile, hinges, joints.
The exact location of the draft is determined by the flame of a lit candle brought to the joint. If it starts to fluctuate, it means there is a draft in that place. Surely the double-glazed window is thin, single-chamber. It is better to replace it, because it is difficult to correct the situation on your own.
Step-by-step instruction
Depending on the reason for the formation of cracks, you need to use different options for sealing them.
For example, a small amount of polyurethane foam or the absence of a reliable layer of protection. Needs to be foamed again .
To do this, you must first carefully trim the old layer and remove the foam. Clean the resulting gap thoroughly.
Then blow out new foam and let it dry. Trim off the excess and apply a layer of putty. Additionally, it is recommended to seal the gap with sealant.
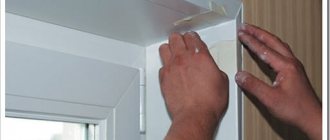
Installation of planks
The products are available in two versions - with and without self-adhesive composition. Before starting work, you need to prepare the surface for installation - remove dust, remaining foam and dry it.
In the case of a self-adhesive version, it is enough to remove the strip from the protective film and stick it in the right place. The fastening process can be performed at a temperature of at least +5°C, otherwise the composition will freeze. The protective film should be removed gradually, 10-20 cm at a time, and immediately carefully applied to the desired area.
If the plank does not have a self-adhesive layer, then you need to coat the surface with a special compound and attach it.
Important! It is necessary to work with gloves so that the glue does not remain on your hands.
The installation process for the trim strips differs slightly depending on the material of the element. Wooden strips need to be joined. Therefore, the parts are filed using a miter box at an angle of 45°.
You can fasten the prepared planks with liquid nails or wood screws. At the joints, be sure to coat the products with a special sealant for wood. This technique will protect against moisture penetration.
Plastic products are installed like this:
- Clean the surface, degrease.
- Measure the dimensions for installing the plank and the width of the gap.
- Cut the required length of the product from the roll.
- Gradually remove the protective film in sections and press the strip to the joint surface.
If the strip does not have a self-adhesive layer, then you need to apply liquid nails to its surface, let the layer dry a little and press firmly to the installation site. For a rigid plastic strip, additional connection of the joints with silicone sealant is required.
Sealing by other means
First, you should carry out the preparatory stage - remove debris and dirt from the crack, degrease the surface, and wipe dry.
Cut the sealant tube at an angle and cover the gap with a thin layer. Then, with a precise movement, straighten the seam, while simultaneously removing excess composition.
For these purposes, you can use the edge of a coin. Drying time of the composition is 15 minutes. The method will ensure tightness for a period of 1-2 years. Then, when exposed to moisture when washing the windows, the sealant will begin to separate.
How to seal the gap between a plastic window and the wall inside. How and with what to seal cracks in windows
In this note we will not talk about the windows themselves, but about the gaps between the window frame (whether PVC windows or wooden ones) and the wall (wood, brick, concrete). This is a common disease of a post-installation installation: the cracks are poorly foamed or completely empty, after a year or two fungus and mold spread, the wind blows, or even a nasty insect breeds (this can also happen). If your hands are growing from the right place (a prerequisite), then you need to take care of your windows as quickly as possible - before frost sets in. All images in the article are clickable. The first part of “caring” is the preparatory work. The cracks need to be cleaned and the brown dry foam removed. If a window is blowing inside the apartment from under the window sill, then you need to hang from the street side, unscrew the ebb (2-3 screws), clean the subframe/substitute profile and the gutter and foam it (be sure to wait until the foam comes out and dries, then you need to cut it off and paint over it). The second part of the job is to find material to fill the gaps between the wall and the frame. For some reason, the majority of the population is firmly convinced that polyurethane foam is the key to sealing, whereas it is just insulation, fasteners and a sealant that is afraid of dampness, moisture and direct exposure to ultraviolet rays. Nowadays you can find anything you want on the RuNet, but we live in the real world, so what is sold in a nearby hardware store or the nearest construction market is much more relevant. The best idea is to make external slopes with your own hands and sleep peacefully by the window in winter. If you are too lazy to bother with plastic, there are options with cement mortar and even simple painting of building plaster (concrete). All this is good and better than nothing, but first you need to get rid of the inter-frame gaps. And the necessary belongings:
- Newspaper
- White spirit (kerosene)
- Rubberized gloves (preferably the smallest ones so that they crack on your hand)
- Spatula (you need a clean one, but mine is dirty)
- Rag (wipe the nose of the sealant gun so as not to stain everything around it)
Essentials of the second order (hidden advertising of Tytan polyurethane foam):
Not everything that stands here is suitable for harsh winter conditions. Can:
- Acrylic frost-resistant sealant (tested!)
- Roofing rubber-bitumen sealant (tested!)
- Cork or polyurethane sealants (tested!)
- Bitumen mastics - possible, but will probably have to be heated before use
It is forbidden:
- Polyurethane foam - it is needed only for sealing seams, but not for final sealing
- Silicone sealant - rolls off after winter; however, if it becomes overgrown with dirt, it will turn into a real piece of gum
Let's focus on acrylic sealant. It has been tested and holds up well (no matter what anyone says; although, of course, acrylic shows the best result on a thick seam, a thick layer + paint on top - it turns into concrete, not subject to frost, ice, or water). And here is the gap itself from different angles. Sound familiar? Due to the fact that it is quite thin and the nose of the gun will not fit there without an attachment, the gap between the PVC frame and the wall remains empty. Or this misfortune (future moisture collector), which needs to be dug deeper in order to put a layer of sealant there:
The third part of the work is practical. We drive the tube with acrylic into the gun. It is advisable to cut the spout at an angle so that you can rotate it in slots of different widths:
We find a relative who has a sufficient sense of participation to hold your legs for half an hour while you writhe on the windowsill in front of the open window. This is not necessary, but I had to write something about safety ;-). The whole idea will be ruined if, when ordering the windows, they were greedy and ordered one half to be blind. In this case, you can't reach the wall. However, trying is not torture. Well, then we press the trigger, move the gun, like a tube of toothpaste, on the crack, trying to fill all the malicious gaps without hackwork:
Actually, further actions depend on skill and diligence. After you have sealed all the gaps with sealant, take a regular small spatula and level it “flush”. Was:
We went through it with a spatula and it became:
The black daub on the spatula indicates that I recently did the same thing with bitumen. Same thing at the top. There is no need to leave gaps - the foam will become unusable (if it has not already arrived). Was:
Became:
Well, actually, 20-40 minutes per window - but it will be more pleasant (from realizing the importance and productivity of one’s own work) and warmer in the cold season.
Difficulties and errors
Typical mistakes include:
- Wrong choice of method for eliminating the gap. When choosing, you should take into account the frame material, the size of the crack and the cause of its appearance, and the degree of contamination. If this is not done, the repair measures will be short-lived.
- Use of low-quality materials. Window tightness is a very important parameter. It is better to purchase a high-quality but expensive sealant than to use home remedies with a short shelf life.
- Neglecting the stage of preparing and cleaning the surface. In this case, any material will demonstrate poor adhesion to the frame and window sill.
Important! Before starting work, you must study the instructions for use of the selected product.
Polyurethane foam protection
To hide the mounting foam, any of the existing types of putty is convenient. However, the preparation process and the proportions of dilution of the mixture depend on the choice of manufacturer and specific model.
Puttying foam
After mixing is completed, the mixture has acquired a thick, uniform consistency; it is applied to the polyurethane foam.
They make a small, protruding excess, which is then eliminated with a spatula, but you should not go too deep, otherwise you will get a notch, a depression, which will have to be eliminated again.
The excess, when it dries, is simply wiped off using sandpaper or a special construction mesh, which is used for finishing work with plaster.
Installation of corners for PVC surfaces on windows or doors
All work begins with a visual inspection of the condition of the base in order to glue slopes onto curved samples of material; when the owner refuses to adjust the partition, it is better to resort to purchasing flexible models of the decorative element.
Most often, masters are faced with the following types of basics:
- Plasterboard structures with putty applied for painting.
- Walls covered with wallpaper.
- Plaster.
- Partitions covered with plastic.
- Tile.
The process technology in each of the above versions of the base is no different; initially measurements are taken, components for repair are purchased and the workpieces are cut.
But the glue is selected taking into account the material of which the slope is made, so that adhesion is at a high level and the element lasts at least 20 years.
The ability of the fixed corners to withstand physical stress also depends on the fixing liquid. After all, people often lean on the corner of a window or doorway, and the component can easily fall off if the master used a low-quality mixture.
In addition to the frustrations of the homeowner, the interior will need to be restored, which often leads to additional waste of the family budget when hiring professionals, as well as purchasing additional materials.
How to cut correctly
Problems rarely arise with the preparation of the main parts for installation; the correctness of the measurements played an important role here, which cannot be said about the joints.
It is better to cut horizontal and vertical strips in one piece, leaving a margin for joining the workpieces in the corners, and overlapping installation will make the design unsightly; cutting the edges at a certain angle, namely 45 degrees, is indispensable.
To cope with the task, you can take scissors or a knife, but with elements with a dense structure it is easier to work with a metal file.
You can achieve an ideal cut using a miter box; professionals always have this device at hand; it has special notches into which the material is placed, and then an even cut is made, precisely at 45 degrees.
How to glue
Option 1: tile
Description
Tile is the most popular material for interior decoration of a bathroom. Its popularity is well founded:
- The service life of tiles is almost unlimited. It only needs to be replaced if you want to make changes to the design of the room;
The tiles change not as they wear out, but when you are no longer satisfied with the design of the room.
- The water absorption of the tile is minimal and does not in any way affect its appearance, size or geometry;
- To clean the tile surface, you can use any detergent, including alkaline, acidic and mild abrasive.
The disadvantages of tiles include:
- The need for preliminary leveling of the walls;
- Relative difficulty of laying tiles: to ensure even rows and a good-looking finish, you will need minimal tile skills;
Carefully laying tiles requires certain basic skills.
- Relatively high cost per square meter of finishing. The minimum price per square is 300 m2, but for truly beautiful tiles you will have to pay at least three times as much.
A compromise would be to use tiles for splashbacks above the bathtub and washbasin - where the walls most often come into contact with water and need cleaning. The remaining wall area can be finished with cheaper materials.
In my attic bathroom there is a tiled splashback only directly above the bathtub.
Technology
Wall alignment can be done in three ways:
- Plastering. Since we are talking about a damp room, it is advisable to use only cement plasters. In principle, gypsum can be used, but only if it is reliably protected from water by the final finish;
- Drywall with glue;
- Plasterboard on a galvanized frame.
I will go into a little more detail on each method.
Choosing a method for fastening plastic tiles
For the bathroom, it is better to use the first or last installation method. Since it is recommended to attach plastic tiles directly to the walls only in dry and ventilated rooms, and the bathroom does not apply to them. On the other hand, the method of fastening to the sheathing or using a special profile will make it possible to hide the pipes and install recessed lamps.
Also, these mounting options, if necessary, allow the installation of additional sound or thermal insulation.
One of the advantages of installation on a lath or a special profile of PVC tiles is that there is no need to spend effort and money on preparing the walls.
If the material is attached directly to the walls, then it is necessary to work well before this to achieve the necessary smoothness of the base.
The windows are sweating, what should I do?
Unlike drafts, the accumulation of condensation on windows is not at all evidence of errors in their installation. Moreover, windows with good sealing often sweat more than ventilated ones. The reasons are mostly natural:
Practice shows that when the outside temperature drops, windows sweat more often; in particularly difficult cases, they become covered with ice, which is unacceptable for obvious reasons. It is impossible to leave the situation “as is”; if there is frequent condensation on the windows, you need to look for and eliminate the reason for the decrease in the temperature of the inner surface of the window to the dew point and take measures to normalize the level of constant humidity.
First, it’s worth remembering what not to do. To solve ventilation problems, it is strictly not recommended to switch windows to micro-ventilation mode in winter. Condensate accumulates in such cracks and freezes first.
Safer and more effective ways to protect windows from condensation include:
Option 2: paint
If you are thinking about what to decorate the bathroom walls with besides tiles, remember the good old paint. Oh, will it peel off when it comes into contact with water? It looks like you haven't been keeping up with the latest developments in the building materials market.
Description
Let me introduce you to water-based rubber waterproofing paint.
Rubber water-dispersion paint produced in Sevastopol.
How is this a waterproof emulsion?
It’s very simple: after the water evaporates, the drops of acrylic latex contained in the paint in the form of a dispersion stick to each other and form a durable and, more importantly, moisture-impermeable coating.
The water resistance and durability of the coating obtained in this way is evidenced by the following fact: I used rubber paint not only to decorate the bathroom, but also to paint the plywood steps of the street staircase leading to the attic and used in the open air. After two and a half years of use, the paint did not wear off and did not allow the plywood to swell due to contact with water.
Niches painted with rubber paint in the sloping wall of an attic bathroom.
The average paint consumption when applied in 4 layers (only with this number of layers will the base not be guaranteed to show through) is about 300 grams per square meter. The cost of rubber paint produced in Sevastopol is about 120 rubles per kilogram. Cheap and cheerful.
Tint the entire volume of paint that is intended to be used.
Technology
How to decorate bathroom walls without tiles using rubber paint?
To level the walls, you can use any of the methods described above. However, painting is much more demanding on the quality of the base than laying tiles: the wall must be puttied. Both cement and gypsum putty can be used under the waterproofing coating.
The method of applying putty is traditional: it is spread and smoothed with sliding movements of a wide (at least 30 cm) spatula, onto which it is applied with a narrower (10-12 cm) tool.
Leveling bathroom walls for painting with gypsum putty.
Puttying with a gypsum mixture has several subtleties:
- A volume of the mixture is prepared at a time that can be processed within half an hour. I prepare the putty in portions of no more than 3 kilograms;
- When mixing, the dry gypsum mixture is poured into a container with water, rather than water being poured into the mixture. In the second case, lumps form at the bottom, which will be very difficult to break;
- Spatulas and utensils must be washed clean before mixing each new batch. Otherwise, the plaster left over from the old batch will form lumps, which, once under the spatula, will leave deep grooves on the wall.
After puttying, you need to sand the wall in bright side lighting: it will highlight any protrusions and potholes with shadows. After sanding, the wall is swept or vacuumed and primed with the acrylic primer we are already familiar with.
Sanding the walls is carried out in bright light, if possible - from the side.
The actual painting is done:
- In the inner corners - with a brush;
- On the planes and outer corners of the walls - with a medium-pile roller.
Paint manufacturers recommend painting in two layers, however, as mentioned above, I did not get an even, one-color coating until after applying the fourth layer. If the viscosity is excessive, the paint is diluted with water to the consistency of very thin sour cream and mixed thoroughly.
Uniform painting in one or two layers is an unattainable ideal.