One of the most common problems is difficulty closing a window due to sagging plastic sash. When closing, a characteristic knock of the sash on the frame occurs, and sometimes it has to be lifted completely to ensure complete closure of the structure.
The problem is easily solved by adjusting the sash, returning the ability to close easily and tightly.
There is no need to put up with the inoperability that has arisen - the faster the error is corrected, the faster the window will restore its functionality.
Reasons for sagging window sashes
Before you start repairing a window, it is recommended to understand what caused it to malfunction. Most of the sagging can be corrected by adjustment. But when the sash is skewed, or there are geometry violations, a different approach is needed.
| Situation | Recommendations |
| Sagging of a plastic window sash is often associated with the impact of its own weight. This is especially true for large windows. | Tip : When the windows are large, it is not recommended to keep them open for a long time. |
| Installation errors are the second most popular reason why the sash sag. The installers made the adjustment incorrectly, thereby violating the technology for installing plastic glazing. | How to avoid : it is better to monitor the work of the craftsmen during installation, this will eliminate the possibility of defects. |
| Operating the window not according to the rules - hanging heavy bags, clothes to dry and other loads. Large loads on the window sashes can cause sagging. | What not to do : windows are not hangers, do not allow them to be misused. |
| Distortion of geometry - understanding of the problem occurs only when installing glazing. The cause of deformation is errors during transportation. This happens when the servicing company does not work conscientiously. Its craftsmen transport the product without a special stand for fixation. | What to do : Read reviews before purchasing, and choose windows from companies with a good reputation. |
Table: causes of skew
Sagging window sashes
For example, the sash has sagged and is catching the bottom or edge of the frame. How to fix?
Brief instructions:
- the sash needs to be opened;
- determine the loop on top, which is adjusted with a hexagon;
- place the key in the hole, turning it clockwise half a turn;
- check the work;
- if the situation has not changed, then the manipulations must be repeated;
- when it still doesn’t help, do the same steps with the loop from below.
These are universal instructions when the window has settled.
Rules before correction
When working with plastic windows, it is important that every movement of the key is thought out and executed correctly. Otherwise, the mechanism can be seriously damaged. Returning to the correct settings is much more labor-intensive than adjusting the sash.
When choosing/purchasing such a window, you should choose models with reliable elements:
- You should check that the profile complies with GOST standards. We are not talking about the good or bad quality of the materials, but rather about their class.
- It is worth paying special attention to the fittings. The durability and correct operation of the structure often depends on it.
High quality fittings will protect you from a large number of problems during use, increasing the service life. Such an element not only provides convenient interaction with the sash, but is also responsible for tight pressing against the window frame.
The cost of adjusting PVC windows in Moscow
Below is a price list of prices for adjusting PVC windows in Moscow and the region. The cost of adjusting such windows depends on the complexity of the work. You can find out the cost of window adjustment in advance by calling or upon the technician’s arrival.
| PVC window adjustment | Price, rub./piece |
| simple adjustment of plastic window fittings | 300 |
| complex adjustment of a plastic window, with sash removal | 1000 |
| window adjustment with wedging of the glass unit in the sash | 800 |
| window adjustment with manual remote control | 2500 |
| opening a locked sash | 500 |
| cleaning and lubrication of fittings without removing the sash | 150 |
| cleaning, lubrication of fittings with removal of the sash | 1200 |
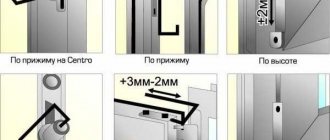
How to adjust PVC windows by height, clamp and handle
Most types of double-glazed windows existing on the market are equipped with voluminous and high-quality fittings. It guarantees a long service life of the product and its reliability.
Note! The design requires timely maintenance in case of malfunctions. It is possible to eliminate them yourself if you have the right tools.
List of handy tools:
- classic Phillips screwdriver;
- pliers;
- machine oil;
- 4 mm hex key;
- star-shaped screwdriver bits marked TX or T.
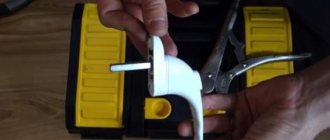
The main tool for debugging the mechanism is an “L” shaped key, which is called a hexagon.
Photo: window adjustment with a hex wrench
Star-shaped attachments are used when the window has special fittings, but not often. However, it is recommended to have them on hand. Bolts are used when the window structure has sagged and requires new fixation.
In simple cases of adjusting the frame, you can only get by with a set of ordinary screwdrivers. Often, repair comes down to correctly setting the distance between the rollers on which the sash is attached.
Main points for debugging plastic glazing
The PVC window system contains five tincture points. Their control can adjust the position of the sash. Regulator characteristics:
- Vertical coordination point – located at the bottom of the loop.
- there is also a second point - it determines the horizontal angle of the sash.
- The upper hinge is installed higher horizontally - it is responsible for the upper position of the sash.
- How tightly the sash is pressed is controlled by the eccentric point of the locking pin.
- The second pressing force setting is the part of the trunnion located at the bottom.
Schematic position of window tuning points
Fig.: schematic position of window tuning points
These coordinators, depending on their own settings, record any arrangement of window sashes inherent in the mechanism. They are universal for most types of PVC windows produced by manufacturers. Differences in the regulatory system can only occur with individual developments.
Advice: when control points are found, they should be checked for contamination (remove dust if present) and possible distortions. If any deformation is detected, it is better to call a specialist.
The plastic window sank down, how to adjust it?
The window structure includes a number of control points. The process of regulating the mechanism is always carried out on them. In this case, both the sash and the window as a whole are subject to impact.
Algorithm:
- Setting the sash functions via a point in the hinge area at the top. You need to use a hex wrench to turn the element. The sash will begin to move upward. Tightening the adjustment screw will press the top against the hinges and raise the structure.
- Adjustment via points in the lower hinges. When the adjustment screw is tightened, the sash will begin to rise, moving the part from below. Note: at this stage it is difficult to make a mistake, since a strong “tightening” with a key will lead to the upper part of the sash clinging, and unscrewing the bolt will have the opposite effect - the sash will go down and move away from the hinge, increasing the drawdown.
- An additional point helps determine the position of the sash on the sides. To move an object to the right or left, configure it. As a standard, the location of the sash is regulated only by the first two points.
Any rotation implies control of the compliance of the position of the sash in relation to the frame. Strong lifting of the frame can cause restriction in the movement of the mechanism. Thus, the sash may fail when the room is being ventilated, for example, if its upper part gets caught on the frame.
Adjustment
In most cases, the sashes have to be adjusted when installing plastic windows. More precisely, the fittings need adjustment. Correct adjustment of the window should ensure tight closing of the sash around the entire perimeter without jamming of the mechanism, and also guarantee free closing, opening and tilting of the sash without the pins touching the sash or the frame. In addition, a precisely adjusted microlift should reliably protect the sash from sagging. For adjustment, a 4 mm hexagonal angled wrench and a T15 Torx angled wrench (6-tooth sprocket) are required.
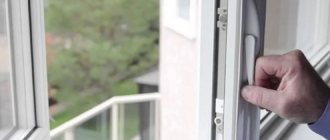
We start by simply trying to slam the sash (in the sense of pressing it against the frame, closing it without turning the handle). If something interferes with the free slamming, we first inspect all the hinges and trunnions opposite them, and especially the unit in the lower part of the impost: a folding locking bar on the impost + a folding lock on the sash. The trunnions should not touch the strikers.
Eliminating sash sagging
The most common problem is a sagging sash. It appears in the lower corner of the sash: the hinged lock hits the bottom of the locking bar.
The first way to solve this problem is to raise the sash higher by screwing down the adjusting screw in the lower hinge of the sash with a hexagon:
During this adjustment, we control the operation of the tilting sash: the scissors should not cling to the frame. We also check the fit of the sash elastic to the frame along the bottom edge, especially in the corners (the elastic should not rise anywhere above the edge of the profile so that the seal of the closure is not compromised). If this measure does not eliminate the problem or creates another (the scissors begin to cling to the frame when tilted), you can try the following adjustment method.
This method involves turning the sash slightly relative to its center point. If the sash is right-handed, then push the top to the right and the bottom to the left:
If the sash is left-handed, then push the top to the left and the bottom to the right: This adjustment is carried out by rotating the horizontal screws in the lower and upper hinge. From below, the horizontal axis of the hinge rotates with a hexagon, the key can be inserted into it either from the right end: or from the left end when the sash is open: From above, the hexagon rotates the adjusting screw at the end of the upper rail of the scissors, which can be reached by opening the sash:
The third, most radical way to eliminate sagging is to pull the sash diagonally using straightening plates. To understand the essence of the method, it is necessary to understand how the sash frame is protected from sagging. The secret lies in a clever scheme for installing spacer straightening plates between the double-glazed window and the sash frame.
As you can see, the plates are placed in the area of the lower hinge ( 3, 4 ) and in the diagonally opposite upper corner of the sash ( 1, 2 ) according to the principle of a conventional gate, in contrast to which in the sash the role of a diagonal spacer is performed by a double-glazed window, tightly spread in two corners with straightening plates . Imagine that the free edge of the sash (left in the figure), trying to fall down under the influence of its own weight, presses through the plates onto the upper corner of the glass unit. This force is transmitted through the package diagonally to the lower corner of the sash, held by a loop on the window frame. Thus, the overhanging edge of the sash receives rigid support (in this example, in the lower right corner), which prevents it from sagging. Of course, if it were not for the additional side struts, the glass unit could simply unfold inside the frame, and the sash would still sag. Therefore, the presence of plates in all four places indicated in the diagram is mandatory.
All other installation points for straightening plates in the sash have a different meaning:
- middle-side (6, 7) prevent the side profiles from bending inwards, due to which the side axles would eventually begin to slip past the wings, and the microlift - past the lifter bar;
- the second lower one (5) no longer serves as a support for the double-glazed window, but as an additional expansion element that prevents loosening of the stretched sash.
Thus, in order to raise the overhanging edge of the sash, it is necessary to increase the thickness of the upper ( 2 ) and/or lower ( 4 ) plate. To do this, of course, you need a set of plates of various thicknesses, but if you are not constantly installing windows, you may not have a supply of plates of different sizes. Then, perhaps, 1-2 extra plates will do, probably left over after sealing the capercaillie (usually left over from the top). In extreme cases, you will have to cut a couple of plates from the sash itself in half or make them from scrap material.
You can tighten the sash without removing it from the frame. To do this, remove all the glazing beads except the side one on the hinge side. If the assemblers installed plates from below under both corners of the glass unit, then we leave only the one that is near the hinge, and remove the second one ( 5 ) using a spatula. If the upper ( 2 ) and lower ( 4 ) plates are close to the middle of the profile, we “accelerate” them closer to the corners along with the liners (at a distance of 5-7 centimeters from the corners of the glass unit). We lift the upper corner of the sash using a spatula inserted between the bag and the frame next to plate 2 , and add an additional 2-3 mm thick to this plate, or replace the old plate with a thicker one (also with a difference of 2-3 mm). Usually this is enough. Excessive (too much) over-tightening of the sash is bad because:
- The skew of the sash is very noticeable, especially noticeable at the top and bottom along the rubber bands running non-parallel to the frame of the glass unit;
- a double-glazed window that rests at an angle against the metal fastening element of the impost may crack, as, for example, at a balcony door;
- An overly raised sash will have to be lowered by adjusting the lower hinge, which is why in the scissors the upper and lower rails may be very far apart from each other in the vertical plane, which leads to the spontaneous tilting of the sash in the “open” mode.
Distorted geometry and methods for correcting it
The defect appears almost immediately after installation work. On the face, the sash clings to the bottom of the frame or fittings, i.e. sagging. Mostly this distortion is a consequence of poor delivery of the finished plastic window. Errors during transportation, loading/unloading disrupt the mechanism.
When the sagging is precisely due to geometry violations, it is possible to correct the matter using a glass block of the sash itself. You will need to bring the sash into the correct position. This work is not the easiest and is recommended to be performed by a master.
Possession of information about the structure of the window and the correct manipulations that are performed to adjust the position of the sash will help you solve the problem yourself.
Self-correction of geometry
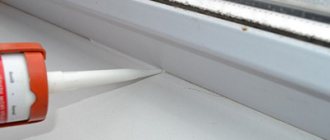
Four beads must be removed. Activities are carried out from the long sides of the window, moving along the perimeter. The correction is made with a knife with an impressive oval-shaped blade. It is necessary to extend the glazing bead - into the area between the glazing bead and the frame, drive the knife in and turn it.
Attention: here you should carefully hold the glass unit and monitor its position so that the glass does not fall out of the frame.
It is also important to work delicately with glass packaging. A plastic spatula will help prevent chipping. There must be a vacuum between the glasses. Otherwise, the tightness will be lost and the performance properties will be impaired.
The substrates on which the glass unit will be installed should be prepared. It is required that the substrates be laid tightly on the sides or on top. When the glass unit “lies” in the frame significantly tightly, the glazing beads return to their original position.
The beads are installed in the reverse order - first short, then longer. It is better to drive the glazing bead with a special hammer with a rubber surface.
With such little preparation, the owner of the premises can handle the regulation process with his own hands, because inviting a professional implies additional costs.
Replacement of glass unit
But in the case when a double-glazed window needs to be replaced, and especially if your window is located at a sufficient height from the ground level (on the second or higher floors of a multi-story building), it is not recommended to carry out repairs yourself. This is exactly the situation when you should contact a service center and entrust the solution to the problem to professionals.
How to prevent window elements from sagging
Repair efforts can be avoided by taking special precautions when using the window.
They are:
- Do not place books under the opening of the sash;
- do not add load to the sash with objects that have an impressive weight (or better yet, do not hang anything at all);
- careful interaction (without sudden movements or jerking) with the handle of the window system;
- It is better to ventilate the room with the window in the folding position;
- do not allow the sash to hit the frame;
- during the adjustment process, in the room, you should cover the work area with tape (to avoid debris);
- Metal elements should be coated with machine oil from time to time;
- To lubricate rubber parts, it is better to use classic glycerin (pour on a napkin and walk over the rubber).
In addition, once every two years, it is worth cleaning the drainage channels from blockages. After all, they help keep the sash in the desired location and prevent it from lowering.
Important: in addition to hanging various things around the window itself, it is prohibited to put any pressure on the window structure.
Setting up the clamping mechanism
Over time, the sealing rubber on the sash loses volume, as a result of which cracks form in the windows, leading to heat loss and deterioration of sound insulation in the house/apartment. It may seem that the best solution to the problem is to replace the seal. But in fact, the clamping force can be increased without these actions.
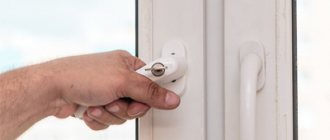
Change the pressure of the clamping mechanism twice a year. This is due to low and high temperatures during the cold/warm season. Thus, the tension in the operation of the fittings will be reduced, which will increase the service life of the rubber gasket.
Special cylinders are installed at the end of the sash. They are located in the slots of metal plugs. They are called eccentrics or trunnions. There are counter elements/hooks installed on the frame, into which eccentrics/trunnions engage when the handle is turned, as a result of which the sash is pressed tightly against the frame. The force of the clamping mechanism is adjusted by moving the counter hooks or turning the eccentrics/trunnions.