Typically, plastic windows are immediately equipped with all the necessary fittings and are installed during installation by the master. However, an element such as a plastic window handle very often fails after long-term use and needs to be replaced. Some users in such cases prefer to call a specialist, but this work is so simple that it can be done independently with a minimum amount of tools.
Before replacing, you need to purchase a handle with a pin of the right size
How to install and adjust the handle of a plastic window
Typically, plastic windows are immediately equipped with all the necessary fittings and are installed during installation by the master.
However, an element such as a plastic window handle very often fails after long-term use and needs to be replaced. Some users in such cases prefer to call a specialist, but this work is so simple that it can be done independently with a minimum amount of tools. Before replacing, you need to purchase a handle with a pin of the right size
Installing a plastic handle on a window
First of all, the fittings are selected. It must match the color, match the type of construction of the window itself and have a long service life. Typically, high-quality products of this type are quite expensive, but you can always save money by purchasing budget models from little-known manufacturers. They differ slightly in quality, and do their job perfectly.
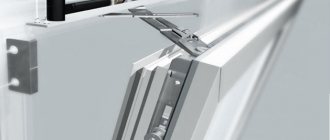
Operating principle of the handle and lock
Tool
For this job you only need a shaped screwdriver. Typically, handles for windows and doors are sold complete with a fastening element, which means you can immediately select the appropriate tool right on the market or in a store.
Dismantling
Before installing handles for window frames, you must remove the old fittings as follows:
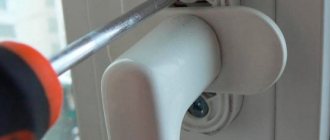
- First you need to access the commit elements. To do this, the decorative plate at the base of the handle is slightly pressed towards itself and shifted 90 degrees around its axis.
- After this, using a shaped screwdriver, remove the fixing screws or bolts.
- Then remove the old handle, slightly loosening it to the sides.
Decorative trim offset direction
Installation
Installing the product yourself is quite simple, since it practically repeats the dismantling steps in reverse order. The stages look like this:
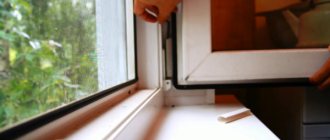
- First, wipe the seat with alcohol. This way you can remove dirt from the surface and remnants of old grease.
- At the next stage, we insert the new handle into the seat. At its base there is a metal pin with a square cross-section, which must fit into the corresponding hole.
- When installing the handle, it is very important to choose its position correctly. Therefore, it is easiest to focus on how the old fittings stood, but you can always carry out tests without complete fixation.
- Next, use a screwdriver to tighten the screws. They must not be clamped very tightly, but play or wobble must not be allowed.
- Finally, the decorative overlay is moved into place.
Installing fittings using a shaped screwdriver
The handle is loose - a simple solution to the problem
Often the handle becomes loose as a result of frequent careless use. In this case, it can scroll in all directions, but this does not change the position of the sash. The reason for this lies in the malfunction of the fastening of the element, as a result of which it does not engage the fitting mechanism. Solving the problem in this situation is quite simple.
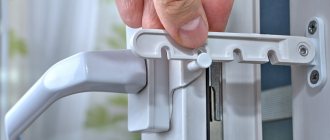
Adjustment of a loose handle is made using screws holding it on the sash
The handle of the plastic structure is adjusted using two screws that hold it on the sash. Under the part itself there is a decorative overlay. You need to carefully pry it up with your fingers or a flat-head screwdriver, pull it and turn it counterclockwise 90 degrees.
Once the trim is in a horizontal position, you will see two screws behind it - one above and the other below the handle. By turning them with a Phillips screwdriver, you can fix the damage, and the handle will once again perform its direct functions.
Adjustment
With prolonged use, a certain deformation of the frame structure occurs and some positions of the plastic window handle begin to function poorly. In such cases, adjustment is necessary. You can also do it yourself using just a screwdriver and a hexagon.
Adjustment of the mechanism driven by the handle
Adjusting the blocker
Typically, adjusting the handle of a plastic window or door involves correctly installing the lock. However, if this element has been in use for a long time, its position can be slightly adjusted as follows:
- First you need to loosen the screw that secures the bottom of the blocker. This is done using a shaped screwdriver, without allowing the thread to be completely unscrewed.
- At the next stage, the location of the latch is adjusted. To do this, it is shifted a certain distance up or down, after which it is secured with a screw.
- Check the position without clamping the fastener to determine the correct offset.
- When the required distance is selected, the screw is clamped with a screwdriver.
Adjusting the handle lock
Adjusting the lock gaps and linings
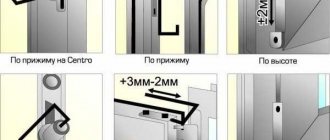
Quite often, the height of the window handle in relation to the lock lining does not correspond to the position required for normal operation. This shift occurs over time and is very common on inexpensive frames.
This defect can be corrected using a regular screwdriver. To do this, the pad is removed from the frame and moved to the place where it will work normally. Usually this is 2 -3 mm up or down from the previous position. If the defect is minor, then you can simply press out the screws slightly and screw them back after displacement.
Adjusting the location of the door locking pads
In some cases, you can observe a certain distortion of the windows, which also affects the operation of the handle. It can be fixed using a hex wrench. To do this, you need to remove the decorative trims from the hinges and by rotating the control bolt, shift the window in the required direction.
You can also adjust the door locking mechanism in the same way. However, not all models are equipped with this element. Sometimes it is enough to install the handle correctly, and there will be no defects in the opening and closing operation.
Taking into account the simplicity of the instructions given, we can come to the conclusion that you do not need to have special skills to perform such work. Installation and adjustment can easily be done on your own, and without the use of expensive tools. More details about this process can be found in the video.
The handle of the plastic window is stuck in the “closed” position, and the window sash does not close
The handle of the plastic window is jammed in the “closed” position
It is quite possible that you have encountered such a problem - the window handle is in a position that absolutely does not correspond to the position of the sash, and it is impossible to turn the handle - it is jammed. For example, the sash may be open, but the handle is in the “closed” position. You are just about to close the window, but it doesn’t work because it’s impossible to turn the handle. What to do? First of all, you should not pull the handle too hard, this will not bring a positive result. The reason for the jamming of the plastic window handle is that the lock did not operate in a timely manner.
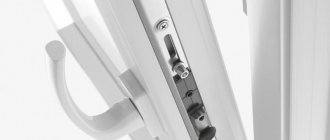
Almost all modern windows are equipped with a special lock that blocks the handle from turning. This was done for a good purpose - so that you do not accidentally break the window. When you turn the handle to the folding position (the handle faces up) or to the rotary position (the handle is horizontal), the lock is activated and prevents the handle from inadvertently turning. It happens that the blocker does not work in a timely manner. Most often this happens if you move the handle too quickly. How to repair the handle of a plastic window in this case? First of all, it is necessary to determine the manufacturer of the accessories; the method of disabling the blocker will depend on this.
Name of plastic window fittings
The name of the fittings can be found on any metal part of the window. This is easy to do if the sash is in the open position. Most often, the name is located in the area of the handle, on the end of the sash.
If you have “AUBI” fittings: to disable the lock, the sash must be in a vertical position. If it is in the tilt-and-turn position, the lock located on the top hinge will also prevent the handle from turning. Therefore, we move the sash to a vertical position, then in the area of the handle on the end of the sash we find a plate with a spring. It must be pressed against the seal, and then the handle must be turned to the position characteristic of the sash.
If you have “Maco”, “Roto”, “GU”, “Winkhaus” fittings: also in the area of the handle on the sash we find a metal plate, which is not located vertically, but is located at an angle to the frame and sash. It is necessary to press on it so that it becomes parallel to the frame, i.e. strictly vertically, then turn the handle to the desired position.
Disabling the plastic window handle lock
If, when you try to close the window, you still cannot turn the handle, then you should check whether the lock is in contact with the response mechanism. A situation is possible when the blocker slips past without catching on the mechanism. The reason is thermal expansion.
Handle response mechanism on plastic window fittings
If you notice that the lock is “slipping,” then you need to open the sash, find the response mechanism, unscrew the screws that secure it to the frame, then remove it, put something between it and the frame and screw it in place. You can use a piece of thin plastic as a lining. As a result, the response mechanism must be located further from the frame, and the lock must engage with it. Let's try closing the window again. If it works, then the repair is complete.
The nuances of Winkhaus fittings: some window models with this fittings are equipped only with a lock located on the scissors of the tilt-and-turn mechanism. During operation, this blocker wears out as a result of constant friction, so over time it may fail. This is characterized by the fact that the handle can only be turned to the “open” position (horizontal) or to the swing-out position for ventilation (handle up). In such a situation, you should not try to close the window and turn the handle with great effort. The main lock gear may break. This is the case when it is better to entrust repairs to professionals, especially if the windows are still under warranty. If you intend to solve the problem yourself, you will have to remove the window sash.
On the top hinge of the sash, you need to remove the decorative trim, then pull out the pin holding the sash in the frame. A screwdriver and pliers are used for this. Carefully remove the sash from its hinges, place it on the floor and remove the scissors. To remove the scissors, you need to unscrew the screws that secure them. We remove the blocker and install the scissors back.
If all the above procedures do not help, do not be zealous, contact professionals.
How to Install a Handle on a Plastic Window
Replacing the handle of a plastic window with your own hands
Before you begin installing the new handle on the window, you need to properly remove the old handle, which will free up space and make it possible to easily access the window fittings. If the handle broke, it may have a bad crank mechanism. Therefore, the old one should be thrown away, and in return, purchase and install a new one. It is necessary to obtain iron handles of the highest quality. It is worth paying attention to recognizable and time-tested manufacturers, for example, ROTO, HOPPE, Winkhaus or MACO. They cost a little more than cheap Chinese ones, but they will last a long time.
Iron handle for plastic window ROTO
The handle is stuck in the closed position and the window sash cannot be closed
It happens that the handle gets stuck and does not correspond to the position of the sash. With such a malfunction, there is no need to use brute physical force to try to fix everything. This will only make the situation worse. The cause of the breakdown is the incorrect operation of the blocker, that is, it works late or ahead. This happens if you turn the handle too sharply and quickly. The locker itself protects the handle mechanism from slipping, that is, it fixes it. But if there are problems with its operation, then the main task is to deactivate this blocker. To properly deactivate the blocker, you must first find out the name of the hardware manufacturer. The logo can be seen on the end of the door.
Let's consider the repair steps for different types and manufacturers of AUBI window fittings: We correct the situation in the following way: you need to firmly press the plate with the spring at the end of the sash and fix the handle in the appropriate position. The sash should be vertical. "Maco", "Roto", "GU", "Winkhaus": the repair principle is the same as in the previous case, except that the plate is located at an angle to the frame.
There is a situation when the handle gets jammed when closing the window. This means that there is no locking mechanism and response mechanism. To correct this situation, you need to insert a spacer (for example, a piece of plastic) between the mechanism and the frame, after unscrewing the screws that secure the mechanism to the frame. After performing these steps, the blocker will cling to the response mechanism.
“Winkhaus”: the elements of some types of these fittings include a lock and scissors for the folding mechanism. It happens that due to constant friction, the blocker stops working correctly. The repair case is quite difficult, so it is better to call a specialist. If you still want to figure it out yourself, then you need to do the following:
- remove the bushing on the sash, then remove the sash itself by pulling out the fastening pin;
- remove the scissors secured with self-tapping screws.
- Having removed the blocker, we assemble the structure to its original form.
If the above operations do not bring results, then it is better to contact a specialist.
Another type of malfunction: the window cannot be closed completely, the handle does not press all the way. There are only two reasons for this problem: 1. Lack of lubricant in the fittings due to it drying out. There are moments when the fittings malfunction if dirt gets clogged up in them. To correct the situation, you will need: lubricant for all types of fittings or a special lubricant for plastic windows; WD-40 will also work. Through the holes, pour lubricant into all movable devices of the fittings. Then you need to twist the handle in different directions so that the liquid spreads over the surface. If dirt is clogged, then the best solution would be to call a specialist, since you will have to wash the sash using special additives.
2. Sagging of the sash. The sash cannot be closed even if there is a 1 mm gap. Repairing such a malfunction is quite simple. Remove the plug from the bottom flap. In the loop we find an adjustment groove into which we insert the hexagon. We begin to twist, thereby adjusting the sash. The task of the action is to put it in its original position.
Reasons for handle breakage
Over time or due to a poor mechanism, the fittings become unusable and the handle on the window will need to be replaced. Before you start replacing the handle, you need to identify the prerequisites for such a breakdown.
Traditional reasons for failure may include the following:
- the lock handle is worn out;
- mechanical damage;
- incorrect operation.
Warped plastic handle
In addition to external breakdowns, faults may appear that are hidden from our eyes. It is worth paying attention to the performance of the pen when at least 1 factor from the presented list appears:
- windows freeze;
- sealing is broken;
- dirt and dust seeps into the room;
- there was a draft.
It is recommended to replace the handle not only if it has broken off and its upcoming implementation is simply unrealistic. It is worth changing the fittings both when turning and if the body on it is cracked, since it will not be able to firmly hold the door and will allow cold/heat into the room. You cannot firmly open a window with a broken handle, so there is no need to save money, you just need to change the handle and use it once a day to ventilate the room.
Tools needed
Do not rush in case of a broken handle on a plastic window. Before changing the handle on a plastic window, to do the job well, you need to read the relevant information, also purchase and prepare the necessary tools:
- obviously the newest pen. Better in the same style as the one that failed. You can buy it in a special store;
- screwdrivers of various sections;
- hexagons;
- pliers;
- lubricant
Handle for a plastic window or How to change the handle on a plastic window or door yourself.
Even more useful stuff for you at: http//oknatuning.ru All about pens
for
plastic windows
and not only about
handles
. How.
How to replace the handle on a plastic window
This video describes in detail how to replace the handle on a plastic window.
. Enjoy watching! Our website:
Tools for replacing the handle of a plastic window
Handles for plastic windows: tips for choosing
Today, plastic windows are found almost everywhere - both in residential apartments and in offices, preschool and school institutions, country or country houses, sanatoriums and recreation centers, etc. This popularity is due to the clear advantages of PVC structures over their wooden counterparts.
However, when choosing a metal-plastic window, many of us pay special attention to such parameters as the presence or absence of an energy-saving function, the number of cameras, the presence of a special protective coating against ultraviolet exposure and do not think at all about what fittings are included in the standard package and included at all. But we must not forget that the proper operation of the window, the smoothness of its opening and closing and the durability of the product as a whole will depend on the quality of the fittings.
One of the important components of the fittings kit is the window handle.
But we must not forget that the proper operation of the window, the smoothness of its opening and closing and the durability of the product as a whole will depend on the quality of the fittings. One of the important components of the fittings set is the window handle.
This seemingly primitive item can have several useful functions, serve as a real window decoration and be made from different materials. In this article we will look at the possible types of handles for plastic windows and give useful tips on choosing them.
Replacement technology
Replacing window handles can take a lot of time, but if you do everything step by step, it will go faster. The work steps look like this:
- identify the causes of failure;
- prepare the necessary tools;
- remove the old handle;
- install a new mechanism;
- check the functionality of the handle;
- if necessary, adjust the handle.
Removal process
The dismantling instructions look like this:
- A broken handle on a plastic window must be placed in a horizontal position.
- To remove the old handle, you need to slide the special plastic trim at a right angle. In this case, it must be slightly moved away from the base towards you, being careful not to damage the mechanism itself.
- When the plastic cover is rotated, free access to the bolts that secure the handle will open. You can unscrew them using a Phillips screwdriver.
Scheme for dismantling the old handle
If the problem is only in the mechanism, then replacing such accessories will not take too much time. However, there may be a number of other breakdowns that cannot always be fixed with your own hands. You may need to call a professional if the handle is difficult to turn, does not turn all the way, or is stuck in the “closed” position.
Installing a new handle on a plastic window
Now let's look at the process of installing new fittings:
- The new handle must be correctly picked up, holding it by the body.
- Then it must be turned at a right angle so that the rotating part of the handle itself becomes horizontal.
- On the new handle, you also need to bend the plastic cover or decorative cover from the base.
- Then it is rotated 90 degrees so that there is access to the holes into which the bolts need to be inserted for fastening.
- Next, you need to insert the handle into the window and get it into the grooves correctly.
- Then use screws to attach the handle to the window, holding it by the body. Initially, the bolts can be screwed in by hand and then tightened with a screwdriver.
Replacing a window handle
- After tightening the bolts on the handle, which is installed on the plastic window, you need to turn the plastic decorative trim to a vertical position, thereby closing the bolts. After this, the handle can be lowered down, setting it to a vertical position.
Sometimes you can find handles for plastic windows that do not have a special decorative lining. These pens have a closed lid. To remove such a handle from the window, you also need to place it in a horizontal position and find a small recess at the bottom of the handle. You need to insert a screwdriver into such a small hole, which will allow you to remove the closed part and expose access to the screws.
When replacing a window handle, you need to correctly adjust the position, of which there are only three:
- closed – the handle is lowered down;
- open - turned to the side;
- ventilation – raised up.
For adjustment, use special hex keys. More detailed instructions can be found on our website.
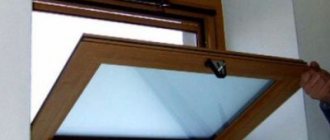
Proper opening of the window for ventilation
If it is difficult to do something or some points are unclear, you can always look at the video tutorial and find information there on how to replace the handle and the reasons for its breakdown.
Nuances of handle repair and replacement
We looked at how to disassemble the handle of a plastic window, but it is also worth paying attention to some important nuances:
- the internal rods of the old and new handles must be completely identical both in shape and length;
- if the handle becomes loose, you just need to tighten the fastening screws a little tighter;
- for windows with limited opening, before installing the handle, you need to use a special comb (it is attached to the base of the handle);
- When screwing in the screws holding the handle, you should not use excessive force, as the plastic parts of the window may not hold up and burst;
- the new handle must be inserted into the window in the same position as the old one was in when dismantling;
- For work you need to use a Phillips screwdriver.
Important!
How to remove a handle from a plastic window: photo and video recommendations
A handle is an element of a mechanism that serves to open and lock a window and regulates its position in the open and closed state. How to remove it correctly if it breaks, how to replace it with a new one without damaging the plastic frame mechanism? Step-by-step photo instructions and an instructive video will help you find the right answers.
Manufacturers of PVC balcony windows use almost identical handles. The training video will help you understand, using one example, how to replace a damaged part of the mechanism. This will allow you to replace it on windows from any manufacturer.
What to do if the handle is jammed
The most common problem is that the handle jams at a certain angle of rotation, or the inability to finally install it in the required position.
The cause of this condition may be a lock that was activated accidentally and locked the lock in a certain position. On the end part of the long side of the frame, when the sash is open, the outer part of the locking mechanism is visible, next to which the lock release lever is located.
Depending on the type and manufacturer of the hardware, the design of the lock may vary.
Externally it may look like:
- Rubberized lever, structurally connected to the mechanism fixation button.
- A steel tongue, pressing on which disables the blocker.
- A metal plate facing a rubber seal. Rotating it around its axis disengages the locking tongue.
The development of new types of fittings is ongoing, so new bollard designs may appear. In any case, it is necessary to find out the reason for its operation.
If the window structure is stuck closed and no action helps, then the best solution is to call a specialist who can deal with the problem. Moreover, the unprepared owner has no options for resolving the issue other than disassembling the handle.
Most known problems
The manual element is one of the weakest parts of the mechanism, with which you can freely open and lock the windows, adjust its position in the closed or open state. The problem is that, unlike the mechanism itself, it is made of silumin or plastic. The most common causes of failure are the following:
- Turns around
- Dangles
- Is in the wrong position
- It broke off.
During operation, dust penetrates into the locking mechanism and dirt forms, as a result of which the handle begins to move slowly and effort must be made to open or close the window. In addition, the plastic window tends to sag, which also affects the proper functioning of the shutter mechanism and leads to breakage of the handle.
Overview of common problems
The most common defects found in products are:
- incorrect functioning of the blocker;
- contamination or drying out of the lubricant;
- the need to adjust the mechanism;
- handle wear;
- sagging of the valves;
- the need for strong, sharp movements to open.
If the lever rotates without making any sound, it is most likely due to the steel rod falling out. You need to pry off the larva located at the very base and place it at a right angle. Using a screwdriver, you need to remove the two screws holding the structure on the sash and remove the masking fittings. Next, grab the rod with pliers and fix it in the base. During the process of reassembling the handle, you need to be guided by the fact that when closed it should look down. The final step is screwing in the bolts and installing the masking cover.
When the handle makes a characteristic cracking noise during use, experts do not recommend disassembling it yourself, as there is a high risk of damage to the working mechanism.
The problem of cracks in the product is also a common problem. Such a defect cannot be eliminated by yourself; it is easier to install a new handle. When choosing, you should be careful: all characteristics of the models must be identical. Guide to action:
- it is necessary to rotate the plate located directly at the base, in this case free access to the fasteners will be open;
- after the screws holding the lever are removed, you can easily remove the damaged element;
- where the new handle will be placed, you need to position the comb correctly.
Installing a new handle
If the plastic lever breaks off, you need to remove its base from the sash and replace it with a new one. The broken part must be placed using pliers in such a position that the panel, when open, rests on the side hinges. Next, you need to unscrew a couple of screws securing the body and carefully free the frame from the broken piece.
The next step is installing new fittings. When searching for a suitable model, first of all you need to take into account the parameters of the internal rods - these are the key working components. Usually the handles are equipped with limiters, so you need to take care of the correct position of the comb. Care must be taken when re-tightening the screws, as over-tightening risks damaging the thin plastic casing.
A sticking handle, which is very difficult to turn, requires additional lubrication of the working mechanism, and sagging of the sashes can also be the cause of this phenomenon.
The lever may jam due to incorrect operation of the lock. This rotation limiter prevents the window sash from closing because the tab is extended. This component is typical for all modern modifications of handles; in working form it is located at an angle to the window frame, and if it does not function correctly, the lever is unpredictably fixed in an arbitrary position.
In such brands of products as Winkhaus, Roto, GU, you need to move the locking tab inward with your finger or a screwdriver so that it takes a vertical position, in this case the handle will easily turn, and it will be possible to close the sash. For the AUBI and MACO brands, a thin plate equipped with a spring replaces the steel tongue; it also needs to be pressed in by holding it with your finger. It may help to check the accuracy of contact between the blocker and the interacting mechanism.
Types of handles
Manufacturers use several types of handles for plastic windows:
- Simple.
- With a mechanism built into the element.
- With locking button.
Regardless of the type of window handle, manufacturers use almost the same fastenings. This allows you to replace the handle yourself and install any of the above types.
A simple handle is used to lock and open the door. A more advanced model - a handle with a built-in locking mechanism will perform double duty.
Attention! The lock button, in turn, allows you to lock and hold the selected position of the handle. To turn it, you need to apply force and press the button. This mechanism is considered more reliable, especially if there are children in the house.
The handle does not turn - reasons and how to fix it
A non-moving handle is a sore spot on plastic windows. Please note that when the sash is open and the locking plate is pressed, the handle will turn without problems. Let's see what's the matter and how to deal with it.
The malfunction may be caused by dried lubricant, which is necessary for the normal operation of all mechanisms. If there is dirt in the lubricant or it has dried out, then problems begin in the functioning of structural elements. To make the product turn again, you need to pour WD-40 lubricant into the holes of the window frame. But this option is only relevant in the case of dried grease. If debris gets in there, you will have to call a technician to dismantle the entire structure.
In addition, the cause of the malfunction may be sagging of the sashes. A 1 mm shift is enough for the handle to start turning - do not open the sash. You will need to adjust the fasteners in the following order:
- remove the plug at the bottom of the window;
- in the top loop, find a hole measuring 4 mm;
- Install an L-type key into this hole, turn it clockwise to lift the sash, and counterclockwise to release it.
When troubleshooting, it is possible to adjust the window horizontally, this will help avoid drafts in the future. Open the bottom hinge and find the hexagon groove on the side. Turn. If you want to move the sash to the left, then turn the key clockwise, if to the right, then counterclockwise.
The top of the window can also be adjusted using a mechanism hidden under the protective cover. It has a groove with a key hole for turning the mechanism.
Stages of dismantling work
To properly dismantle the plastic handle on the window, first of all, you need to know how to properly use a screwdriver, hammer and pliers. All work must be carried out carefully and carefully so as not to damage the mechanism and frame of the plastic window.
The main stages of the work are as follows:
- Rotate the broken handle to a horizontal position. If this action cannot be performed by hand, you can use pliers. If the shutter mechanism is not damaged, the window will be open. Otherwise, you can set the mechanism in the correct position after removing the handle.
- Pull and turn the lid under the handle. This will allow you to get to the fastening screws.
- Tighten the screws with a Phillips screwdriver. Most suitable with tip RN2, RN3. If they have become strongly stuck over many years of use and you cannot unscrew them with one screwdriver, then experts recommend trying to use a hammer. Insert a screwdriver into the screw slots and tap the back of the screw with a hammer. To speed things up, turn the screwdriver counterclockwise during the process.
- You should pull the hand element towards you and remove it. If it is jammed, you can tap it with a rubber-tipped hammer.
- If the handle cannot be removed, then experts recommend inserting the flat blade of a screwdriver under its base and, while pressing on the screwdriver, try to pull the handle towards you.
- Inspect the mechanism rod for possible damage.
Adjusting fittings - step-by-step instructions
If problems arise during operation of the door, it is necessary to adjust the fittings. This process can be divided into several stages.
Determining the nature of the problem
Main possible problems:
- skew,
- draft,
- difficulty opening or closing,
- turning the handle.
It is necessary to carefully examine all parts of the structure to determine which of the fittings requires adjustment.
Setting up Tilt&Turn Hardware
This type of door accessories is customizable in the same way as window accessories.
In case the sash sag and touches the bottom of the frame, the procedure is as follows:
- We turn the sash and remove the lining, which has a decorative function, from the bottom hinge.
- There is a screw at the top of the canopy that needs to be tightened. A hex wrench is useful for this.
- The screw at the bottom of the hinge must be turned several times to move the lower part of the structure.
If the sash catches on the top of the frame, you need to open it and, by rotating the adjusting screw with a hexagon, adjust the correct position.
To increase the pressure, you need to do the following:
- Remove the cap.
- At the bottom there is a screw that is responsible for the clamp. To adjust, you need an asterisk or hex key.
- The upper clamp is changed by moving the eccentric screw, which is located on the bars that hold the sash in the folding position.
Setting up conventional fittings
The adjustment process in this case is simpler, since the design is not as complex as a tilt-and-turn one.
If the sash clings to the frame from above or below:
- There are covers on the top of the canopies that need to be removed.
- The screw on the back side of the structure must be unscrewed with a hexagon.
- The position of the sashes is adjusted by turning a long horizontal screw. You can lower the sash if you loosen the top screws.
The pressure can be adjusted using the profile striker. You need to insert a suitable hexagon into the hole located on it and turn it half a turn.
Sealant
For a balcony or loggia, a plastic door plays both a protective and aesthetic role. Different seals look different on the product.
Balcony doors use different seals. The most popular is inexpensive black EPDM. It requires mandatory treatment with silicone grease at least twice a year.
Thermoplastic or rubber gray rubber is popular.
The most expensive, but also the most practical and beautiful option is a white silicone seal for translucent plastic structures. It requires the least maintenance and retains its elasticity for a long time. With it, the glazing contour looks lighter and neater.
Comb
Refers to locking mechanisms, allows you to fix the door in a folding or half-open position. It is a metal strip with cutouts for a support clamp. The comb is attached directly to the door leaf, and the latch itself is attached to the door frame.
How to install a new handle
Before installing a new window handle, you should make sure that the locking mechanism is in the correct position, that is, in the open position.
If the mechanism is in the closed window or ventilation position, then it is impossible to install a new handle.
Attention! Insert the handle in any position and turn it until the mechanism is in the correct position.
When selecting a new handle, you should pay attention to models that have already proven themselves in the construction market. This will extend their service life and for some time forget about possible damage to the opening mechanism. This issue is especially relevant if children live in the house.
After making sure that the mechanism is in a horizontal position, you can safely screw the new handle into place.
Repairing and replacing the handle on a plastic window is the easiest task that does not require qualifications or additional knowledge. If you follow all the steps in the given instructions, then even a fragile woman can cope with this task.
How to choose?
Before purchasing a product, you need to pay attention to the following parameters :
- Quality of material. If the base is hidden by a layer of polyvinyl chloride, then certificates confirming quality should be required.
- Appearance. The lock handle should not have any yellowing, cracks, stains or burrs on the edges.
- Form. There are a huge number of handle options - straight, with grooves for fingers, curved, with a protective cap.
- Number of window opening steps. Handles with a locking system can have, in addition to three standard positions, a position of 45° and 60° for micro-ventilation.
The most important characteristic of a window handle is the length of the pin.
There are several standard sizes - 35 mm, 40 mm, 45 mm, 60 mm. To determine how long a pin is needed for a particular window, you need to remove the old handle and measure the length of the pin. If a new window is being installed, you need to measure the distance between the centers of the mounting holes for the handle. You cannot purchase a handle with a pin of any length. If it is shorter, it will not reach the fittings. A long pin will not allow you to correctly install the part into the seat.
Causes of breakdown and repair methods
Plastic is not the most durable material. Intensive use, temperature changes, shocks - all this can lead to breakdown.
Signs that the device is faulty:
- There are cracks on the body;
- The handle turns freely, but the locking mechanism does not work;
- The lever has become loose or disconnected.
The most common failure is mechanical. With great force, the lever, which is held by hand, can break in half. From active use, the ring for the pin wears out and simply falls apart, completely making it impossible to control the position of the sash. Cracks are also common at the base, since the plastic is thinnest there, especially if the screws are overtightened.
Plastic handles are cheap, but extremely unreliable, so it is better to purchase a metal one or one with a metal rod inside as a replacement. They are not much more expensive, but they are almost impossible to break.
All handles on windows and balcony doors are designed in the same way, so replacement can be done according to a universal scheme. But these instructions are not suitable for reinstalling push handles on door structures, since their mechanism has significant differences.
Step-by-step instructions for replacing the handle on a plastic window
To work, you will need a new handle - its pin and screws must match the size of the broken one - and a Phillips screwdriver. You can use a screwdriver, but you need to work with it extremely carefully or set a mode that will block the mechanism when the screw is tightened. If you overtighten even a little, the base of the handle will crack.
| № | Description of the stage | Illustration |
| 1 | The fasteners holding the handle to the frame are hidden under a decorative plug. To gain access to the screws, bend it back with light force, holding the small grooves along the edges with two fingers. Then rotate 90 degrees. | |
| 2 | Unscrew the top screw with a Phillips screwdriver of the appropriate size. | |
| 3 | Turn the handle to the “open” position to make it easier to continue working. Unscrew the bottom screw. | |
| 4 | Remove the handle pin from the mechanism by simply pulling the handle towards you. He should come out freely. | |
| 5 | Compare the length of the pin and screws - they should be the same on the old and new handle. However, the model, shape and color of the accessory may vary. | |
| 6 | Install the pin of the new handle into the middle hole on the frame, so that the socket of the accessory fits snugly around the entire perimeter of the frame. | |
| 7 | Bend the plug in the same way and rotate it 90 degrees so that the holes for the screws become visible. | |
| 8 | Place in the hole and screw in the top screw. First with your hands, then with a screwdriver. It is important not to make too much effort. Over-tightening the screw is unacceptable. As soon as he begins to enter with difficulty, stop the movement. | |
| 9 | Turn the handle and screw in the bottom screw in the same way. | |
| 10 | Rotate the plug 90 degrees to its original position; it should snap easily and connect tightly to the base. | |
| 11 | Check the operation of the device. The handle must clearly control the fittings. When the lever is positioned down, the window is closed. When turned 90 degrees, the sash opens completely. When turned 180 degrees, the ventilation mode is activated. The lever should move smoothly, without jerking, and close completely. If everything matches, the handle is installed correctly and is ready for use. |
There are cases when you cannot do without professional help - these are hardware breakdowns:
- If the handle is stuck in the “closed” position;
- The lever turns with great effort;
- The handle does not turn (or close) all the way.
In the absence of minimal skills and knowledge of the fittings of a plastic window, you should not interfere with the mechanism yourself, using the trial and error method. Careless actions can aggravate the situation. And a complete replacement of window fittings costs several times more than repairs performed by a professional.
Replacing the handle is a simple procedure, since the device consists of a small set of parts; the main thing is to act carefully and not rush.
And in order for the new handle to last as long as possible, lubricate the moving parts of the fittings 2 times a year - this will ease the applied mechanical force during manipulation. And also adjust sagging sashes in a timely manner - this will not only extend the life of the handle, but also eliminate blowing, ice and condensation. Related article: Anti-cat mosquito nets for plastic windows
What does it represent?
The window structure necessarily contains elements of fittings. The handle is also a piece of fittings, without which the window will not be able to perform its functions.
The lock handle consists of several main parts :
- Brace or lever. Serves to control the mechanism. For ease of turning the lever, it is made in an L-shape. The choice of bracket length depends on the size of the window sash. The relationship is direct - the larger the sash, the longer the lever is needed. This will allow you not to exert much effort when opening or closing the doors.
- Frame. This is the core of the handle, which is attached directly to the plastic window with two self-tapping screws. The fasteners must be M5 and have a countersunk head.
- The pin is tetrahedral. It is necessary to connect the core with the handle. Pin length 35 mm - 45 mm, width - 7 mm. It is important to pay attention to the material from which the pin is made.
The lock handle has several additional, but also important parts :
- Anti-drilling pad. It covers the pin and protects it from damage. Equipped with a locking mechanism.
- Turn blocker. Serves to prevent accidental opening of the window. It is made in the form of a locking mechanism, latch or button.
- Anti-burglary mechanism. The element is built into the body and is activated at any pressure on the sash. At this moment, the mechanism is blocked, after which it requires replacement or repair. Typically, a disposable element is built into the pen.
The performance of the handle-lock depends on the quality of each of the listed elements.
Why is it necessary?
The part allows you to set the sash in a certain position. The mechanism is designed for :
- opening/closing the sash;
- fixing the ventilation mode;
- child safety protection;
- preventing window break-ins (additional equipment required).
The main function of a modern accessory is to protect children from falling out of the window.
The lock-blocker has another name - “anti-child”. It is built into the handle and locked with a key. Therefore, it is impossible to open it without a key. The main requirement is to keep the key out of the reach of children. It is recommended to install such a handle not only on indoor windows, but also on the balcony door.
The handle-lock has a high degree of protection. It is important that the part is selected with a sufficient margin of safety.