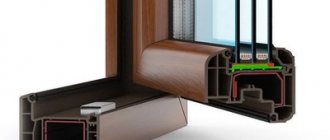
Plastic windows are very popular. This is due to their technical characteristics. They effectively protect against noise and reduce heat loss. But there is one big minus. They do not have the possibility of micro-ventilation. This feature creates a greenhouse effect. Any premises must be ventilated all year round.
A comb on a plastic window effectively solves this problem. It is installed to provide air access to the room. Attaches to frames made of different materials. The doors have a limiter and can be easily fixed in different positions. Rigid fixation will protect the frame from strong drafts.
What are combs used for?
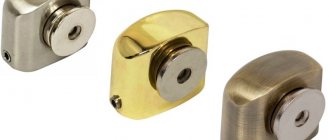
The mechanism for limiting the opening of the sash is usually called a comb, popularly called a crocodile. Its real name is an opening blocker. The toothed base is similar to a comb. This is where the name of the mechanism comes from. The limiter allows you to secure an open window to a width of up to 10 cm. It has the form of a plate with cut grooves and a lock.
They attach it to the profile, install a special plug on the handle, which will fit into the grooves and hold the sash in the desired position. The limiter allows you to leave the window ajar unattended, without worrying that it will swing open in a draft. This will help to regularly ventilate the room without the risk of damaging the window structure.
The comb is installed on rotating frames without hinged opening. It will be an important element of a window that does not have a top opening.
When replacing old windows, clamps are not installed because there is no comb in the standard set. You will have to order it separately and attach it yourself. The sash can be fixed from 0.5 to 10 cm. This is determined at the stage of selecting the limiter. It securely holds the sash in any position and prevents it from closing.
Air ventilation is carried out due to the resulting gap. The intensity of the fresh air flow depends on the opening width of the sash. But in order to prevent drafts, do not open the sash too wide.
Short description
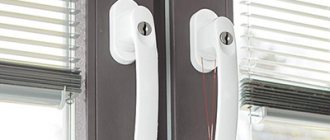
For various reasons, it may be difficult for the user to fix the window sash in one position. Most often this happens due to drafts, as too much cold wind and noise enter the room. It’s quite easy to cope with this problem; you just need to purchase special limiters for plastic windows at a hardware store. The part itself belongs to the category of useful accessories. With the help of such a device, even a child can fix the window sash in the desired position. The comb is mounted near the handle using self-tapping screws. Products can be painted in white and brown shades.
The appearance of the limiter can be compared to a regular comb, which is why this accessory got its name. The mechanism of the product itself consists of two key parts:
- A metal rod that is fixed to a bracket. Its size completely matches the parameters of the mounting plate under the handle. The comb bracket is mounted in such a way that it is absolutely invisible from the outside.
- A plastic model with several recesses, which is mounted on a special stand. This strip is provided with holes for self-tapping screws, with the help of which it is securely fixed to the window.
What types of combs are there?
In appearance, all crocodiles are very similar to each other and consist of a plate with notches and a retainer. The distance between the recesses can be from one to seven centimeters. There are several varieties of crocodiles. They differ by company, country of manufacture and technical characteristics.
Classification by manufacturer
Imported and domestic products are available for sale. Foreign-made products are mounted in a profile, which allows them to be mounted at any height. In addition, their surface is covered with a rubberized layer, so even in very windy weather there will be no rattling. But it is not recommended to mount them on wooden frames. Because strong gusts of wind create an increased load, which causes cracks to appear.
Domestic models do not have a rubberized layer and can only be attached to the surface. The limiter itself is elongated, which makes it less convenient to use. You can understand the differences from the photo.
Classification according to product characteristics
Blockers are grouped based on the following indicators:
- Material . They are made of metal, plastic, or a combination of these materials.
- Color . The products are painted in different shades, but their variety is small. Therefore, if the desired option is not available, you can repaint the retainer in a different shade.
- Mounting method . The fittings can be screwed to the handle, to the sash or to the back of the window frame.
- Number of grooves . There may be different numbers of them.
- Length . There are no strict standards regarding length. A product with four holes reaches a length of up to 10 cm, and with five - up to thirteen centimeters.
Different blocker models serve the same purpose. All of them are used to fix and stable the position of the sash during strong gusts of wind. Combined models are considered the best. The metal base will provide strength, and the plastic will protect against corrosion. A frame with such fittings looks aesthetically pleasing.
According to the method of fastening, the most convenient is the floating mounted crocodile. It can be installed in any part of the frame, regardless of the location of the handle. This feature of the comb allows it to be installed even in cases where the pressing mechanism of another sash interferes.
The mechanism of action of the crocodile is compared to how a door chain works. It is an important element of the window opening in houses with small children and animals.
Species of crocodile
All types of combs are similar in design. They consist of a plate with notches, as well as a retainer. Depending on the manufacturer, the gap between the holes can be 10-70 millimeters. Crocodiles can be made of metal, plastic, or a combination.
Distinctive parameters are:
- Method of installation to the window frame.
- Hue.
- Production material.
The mounting option may be as follows:
- End-mounted sash. This type does not depend on the placement of the handle. It is an alternative in situations where the pressing mechanism of the adjacent sash interferes with the installation of the comb.
- Mounted under the handle.
The size depends entirely on the number of holes: the length is 10 centimeters when there are 4 holes, and 13 centimeters when there are 5 holes. There are also models that can be mounted on balcony doors.
The comb can be either external or built-in. For tilt-and-turn windows, the brake can be permanent or switchable. The external comb is considered the simplest. The built-in type of comb is considered the most acceptable, since it is invisible to the eye.
Scope of application
There is no universal limiter design. Therefore, they choose it based on the scope of application. Euro models are suitable for winter. With their help, the opening of the sash is fixed at a minimum distance. This space is enough to ventilate the room and not cool it more than necessary.
The absolute opposite is the domestic model. It has a large distance between the grooves, which is why it opens to a greater length and provides complete ventilation. Suitable for full ventilation.
Rules for choosing a retainer
The quality of the product affects its service life. Monolithic structures made from durable and reliable materials are considered the best. The limiters must be resistant to strong winds. A combination product is considered the ideal option. Because it will not break under heavy loads and will not rust under the influence of high humidity.
The metal fasteners are strong and reliable. But they look poor on the profile and corrode over time.
The screw holes in the handle must line up with the slots in the comb. The fittings must fit tightly to the surface. There are products that do not rise or fall completely. They cling to curtains and create additional interference.
How to turn an ordinary jar into an original vase: 4 simple steps
A glass jar is not just a valuable container for pickles and preserves, with which your balcony and pantry are probably already filled. This is also the basis for an unusual lamp that will be an excellent gift for the holidays. Photographer and stylist Olga Kuchkina will teach you how to turn a glass jar into an expressive decorative element in a simple step-by-step master class.
An ordinary glass jar can be found in any kitchen. Don’t rush to throw it away or hide it away. With a minimum of effort and spending the same amount of time, a boring jar can be turned into an interesting decoration for any interior. In a simple step-by-step master class by Olga Kuchkina, you will learn how to create unusual homemade vases and candlesticks using ordinary glass containers. So, open the cupboard and take out different-sized glass jars, preferably with a smooth outer surface - they will be “reincarnated” into spectacular decorative elements. We cover the table with protective oilcloth or cover it with cling film; it will become our work surface.
Cans alone are not enough to do the job. In addition to them, you need to prepare materials and tools following the list.
Advantages and disadvantages
The main task of the fittings is to securely fix the sash and prevent it from slamming shut in a strong gust of wind. Crocodiles have many advantages and some disadvantages. All of them are listed in the table.
| Advantages of a comb | Disadvantages of the comb |
| Simplicity of design | The need for additional holes on the window frame |
| Reliability | Reduced thermal insulation and tightness of the profile |
| Easy installation | Short service life under heavy loads |
| Low price | Limited color range |
| Fixing windows in different positions | Low strength of plastic products |
| No additional special care | |
| Installation on surfaces made of any materials | |
| Possibility of ventilation without overcooling the room |
If the clamp is installed low, it will not be a hindrance for children. Because they will be able to open it easily and access to the open window will be unlocked. In comparison, supply valves do not have these problems. They provide a moderate supply of fresh air while the door is closed.
When installing a blocker, the air flow enters the room in a vertical and horizontal direction, which can cause drafts.
The metal fasteners on sale have an unaesthetic appearance. But they have high strength and a long service life. The comb only fixes the doors, but does not lock them. It is worth remembering that they will not be able to protect against intruders.
Blitz tips
In the process of selecting, purchasing and installing a retainer, it is recommended to consider the following tips:
- Taking into account the fragility of the structure, it is necessary to take certain measures to ensure that it lasts longer during active use. In particular, it is recommended to choose models made from high-quality and durable materials, as well as those that have a simple molded form, since individual elements may break off over time.
- It is necessary to periodically tighten the screws, since the quality of the fastener may deteriorate over time, and this will affect the condition of the comb.
- Do not use the stopper during very strong gusts of wind, since the pressure exerted on the window sash can lead to breakage or deterioration of the stopper.
- It is best to make a purchase in specialized stores that sell goods for construction and repair, since most of the products in the markets are of dubious quality, and there is no guarantee that they will last for a long period of time.
Installing a comb on a plastic window
You can order the installation of a comb when installing new windows. But if the window frames are already in place, then you will have to do this work yourself. Before you begin the task, you need to figure out what type of mount is provided on a particular crocodile and how to install it correctly. This can be installed under the handle or at the end of the frame. In both cases, the plate with grooves is installed on the fixed part of the profile, and the latch is on the sash.
It is easier for an inexperienced person to attach the fittings under the handle. Any person without special skills and knowledge can perform installation. Installation using any other method will require the help of specialists. Overlap installation requires special skills and knowledge of how to install fittings. If installed incorrectly, the window seal will be compromised.
Consumers prefer fasteners with flush mounting. It has one significant advantage in the form of the ability to be installed in any part of the frame.
The comb is attached to the frame, and the corkscrew is near the handle for locking. The installation process is carried out in stages. First, remove the handle. Then you need to install the lock and screw the handle into place. At the same level where the blocker is installed, a crocodile is attached to the frame profile. After completing all the work, check that nothing interferes with closing the window.
Watching the video will help you make the correct installation. If the comb fails, you will have to reinstall it.
Step-by-step instruction
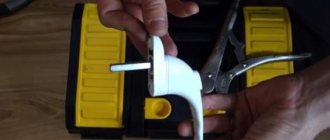
To install the limiter you will need:
- First remove the handle. It consists of two parts - a strip adjacent to the sash and the handle itself. The plank is divided into upper and lower parts. You need to lift and rotate the top bar; there are two screws on the bottom that need to be unscrewed with a Phillips screwdriver. After this, the handle is removed.
- Place the latch in place under the handle.
- Place the handle on the clamp and secure with screws.
- Place the comb on the clamp and mark under the fasteners with a marker or pencil. You should pay attention to ensure that the comb does not interfere with the opening and closing of the windows, since in the future it will be very difficult to reinstall it to the left or right. The holes for the screws must be positioned strictly vertically, otherwise the structure will not last long.
- Using a drill, drill the first hole; it should be up to 13 mm deep. The part is attached to a plastic window with self-tapping screws up to 13 mm long. This is done to preserve the reinforcement, which is not advisable to drill.
- Secure the comb using one self-tapping screw. Check that the second hole is correctly marked.
- Drill a second hole.
- Secure the part with a second screw.
Proper installation of the product guarantees a long service life and is within the power of any home craftsman.