That is why it is important to make it even and smooth so as not to disturb the overall aesthetic appearance of the room.
Horizontal and vertical smoothness of window slopes is achieved through the use of putty.
The building material is suitable for self- and professional application, and is a budget material that is subject to any type of final finishing. What nuances do you need to know about putty slopes on windows, how the work is carried out, what is their cost - read more in this article.
Application
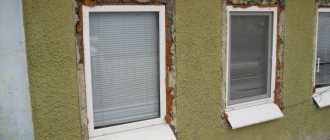
It is possible to make slopes for installed window structures both from the facade (outside) of buildings and indoors.
Slopes are designed for different window profiles: plastic, aluminum, and, at the request of the owners, wooden.
The formation of slopes helps to give the room an aesthetic appearance, protect the wall surface with the window structure from blowing, reliably seal cracks, prevent freezing, precipitation and condensation, and also prevent the appearance of mold.
In addition, slopes perform the additional function of protecting against noise, dust, extraneous sounds, and prevent insects and rodents from entering the room.
Important. After installing the window profile, putty slopes help keep the assembly joints intact, preventing their damage from changes in atmospheric temperatures, exposure to UV rays, as well as loss of properties that construction foam has (strength, density, tightness).
Technical requirements
Putty is an environmentally friendly material made in a factory from natural minerals. It has a uniform structure, is available in dry powder form, and is diluted well with clean water, forming a plastic mass.
Basic technical requirements for building material intended for window slopes are indicated in GOST 10277-90:
- Available colors are white, light gray, pinkish, greenish, gray, brown-red, which after drying becomes lighter by 1-2 tones.
- The ideal temperature for work is 20-21°C. The permissible minimum operating temperature is +7°C, and the maximum is +32°C.
- Strength indicator - up to 50, elasticity - up to 100, viscosity - up to 20-30.
- The surface after application should be flat, as smooth as possible, without flaws or bubbles.
- Minimum drying time is 3 hours.
- When working with putty, it is advisable to comply with sanitary and fire safety rules.
- The best adhesion to the surface is after degreasing with acetone or priming.
- A high-quality composition should not flow from the surface.
- Can be sanded with or without water.
- Acceptance of finished products undergoes laboratory tests according to the rules.
The putty is produced in the form of a dry material, or diluted, ready for use. The dry composition is packaged in three-layer paper packaging intended for long-term storage, weighing from 5 (kg) to 15, 20, 25, 30, 50 (kg).
On each package, the manufacturer indicates dilution instructions, storage rules, batch number, and production date. The wet composition is produced in plastic containers (buckets).
Important! After opening the package, the putty is suitable for use for 6-8 months.
Decor
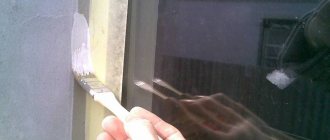
No matter how carefully you work with putty, you will still have to sand the surface after drying. To treat the surface with paint, it is better to get a wool or mohair roller. Basically, for painting slopes, water-dispersed or water-based paints are selected, which are used to cover the wall in 2-3 layers. This is what allows you to achieve the most suitable shade.
If the interior of your house or apartment allows it, the slopes can not only be painted in one color, but also decorated with stucco molding and other decorative elements. Today, thanks to the Internet, you can watch many video lessons from experienced finishers, as well as get acquainted with design solutions. This is very appropriate if you do the work yourself and are trying to save on the services of professional designers.
OK it's all over Now! I would like to believe that our article has given you confidence in your own abilities and that you will cope with the task not only without difficulty, but also with high quality.
Varieties
When choosing a putty composition, they are guided by its purpose (outside, inside), the microclimate of the room (humidity indicators are of great importance), as well as the manufacturer (quality, price, guarantees, certificates). Putty is considered a unique material and is suitable for any surface: monolithic, brick, aerated concrete, wood.
Types of putty include the following compositions :
- For interior work:
- starting - is characterized by structural lightness, well levels and strengthens the surface, masks any imperfections;
- finishing - has a lighter shade compared to the starting one, and forms additional protection for the surface, as well as its ideal smoothness;
- universal – used as a base and finishing layer, suitable at all stages of installation.
- For outdoor use:
- waterproof – especially recommended for areas with high humidity. It contains special polymer additives that give the mixture, after the layer has dried, additional protection from moisture (condensation, precipitation);
- frost-resistant - suitable for regions with low temperatures during the cold season, can be used in work at temperatures below 0°C. It is highly resistant, thanks to the anti-frost reagents included in the composition, strengthens and protects the surface from destruction caused by sub-zero temperatures. It is also recommended for repair work at any time of the year.
According to its internal structure (base), the putty is divided into:
- cement-gypsum;
- acrylic (polymer);
- plaster;
- polycement;
- latex;
- oil-glue;
- glue (PVA).
The manufacturer himself indicates which variety a particular type of putty belongs to on the packaging. Therefore, it is simply impossible to make a mistake with the choice of building material when purchasing.
Important! The predominant amount of cement in the composition indicates that the material is moisture-repellent.
When might replacement be needed?
Replacement may be required:
- If old ones are damaged. The appearance of scratches, holes or chips can negatively affect the appearance and protective characteristics of this element of the window opening.
- If the slopes begin to deform (most often for sandwich panels or plasterboard finishing).
- Infection of slopes with mold means that moisture is poorly removed from the assembly seam.
- Another reason could be replacing the window with a new one or insulating the opening.
- When replacing one type of slopes with others (for example, to change the decor), dismantling may also be required.
Tools and Supplies
To carry out finishing work on window slopes, the master will need the following consumables and tools :
- Set of spatulas with wide and narrow blades: small and trowel (application), medium and large (smoothing).
- Selected type of putty (composition: starting and finishing).
- Bucket or any other container (for diluting the putty composition).
- A special mixer (kneading) or a drill with an attachment.
- Construction tape, a simple pencil, a plumb line and a level (marking and maintaining horizontal and vertical lines).
- Clean running water (formation of the working mass).
- Roller and brushes (for uniform distribution of the solution along the slope, priming).
- Drywall sheets, self-tapping screws, screwdriver (surface leveling).
- Ceramic tiles with glue, paint, wallpaper (for additional finishing, depending on the design of the room).
- Metal perforated corner plates (ideal alignment of the window space).
- Sandpaper or sander (to create extra smoothness before painting and other finishing).
- Plaster composition (if more thorough leveling is necessary).
- Stationery knife (forming cuts of drywall sheets).
If the owner of a house, apartment or cottage turns to the professionals of a construction company, he will not need to prepare tools and consumables.
Specialists have the tools to carry out the work , and the proposed consumables will cost several times cheaper than the market ones - builders purchase materials in bulk. Therefore, payment for the use of consumables is carried out by customers, according to the official price list.
Technique for doing the work: how to do it yourself?
The puttying technique depends on the curvature of the walls and the presence or absence of defects on the surface. Already plastered slopes need to be smoothed over the surface with finishing putty to get rid of:
- small cracks;
- scratches;
- roughness;
- potholes
If you need to completely level the slopes, then the work becomes much more complicated. The main composition is the starting one, it should be applied thick enough. There will be several layers. Before finishing, you should be sure that there are no sudden temperature changes. The ambient air must be maintained at least +10 degrees. The exception is cement putty, which can be applied at +5.
All slopes must be prepared. To do this, remove old finishing materials, as well as surface fragments that do not adhere well. Only after this can the block (wooden or plastic) be primed. It is necessary to cover the glass with tape or protective film. To avoid contamination, it is good to do the same procedure with the window frame.
Preparation of the solution
Making your own solution is not difficult at all.
To do this, pour the required amount of dry putty into the container, add water, and gradually mix the composition until it becomes creamy.
The viability of the solution is 1-2 hours . If plaster is needed before puttying, then it is prepared according to the same principle, and always precedes the starting layer.
You can prepare the solution manually with a spatula or trowel, as well as with mechanical devices - a construction mixer, a drill with a special attachment. Kneading with mechanical devices makes the composition more plastic and uniform, and reduces the time for preparing it by hand.
When working, it is important to adhere to the dilution proportions - on a quality product they are indicated on the packaging, in the form of instructions (volumes of water and dry putty).
Experienced craftsmen focus on the resulting consistency - it should not be too thick, and, if necessary, diluted with water. The compositions are made in small quantities. After complete use, mix a new solution.
Important! Experts recommend infusing the solution (up to 10-15 minutes) before starting installation to achieve the best plasticity.
general information
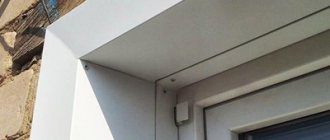
Exterior plastic trim
In order to make external slopes with your own hands, you need to immediately opt for plaster.
Drywall will not work here in any way; it is a material that is afraid of water, and although it has moisture-resistant analogues, they are suitable for bathrooms, but not for the street.
Plastic is the same, although it is more resistant than gypsum board, however, it does not guarantee the quality needed for outdoor conditions.
So, your choice is plaster and subsequent puttying and painting. Let's start making external window slopes with our own hands!
Application Features
The work must be based on strict adherence to technical rules and the consistent implementation of all preparatory and main stages. First you need to make sure that the walls for the slopes are made perfectly smooth. To do this, be sure to use perforated metal corners and plasterboard sheets (GKL).
First, a primer composition is applied on top of the plasterboard, then the prepared plaster, putty, and starting composition. After the surface has dried, within 6-10 hours, the finishing layer is applied to the starting layer, achieving perfect smoothness .
After the surface has dried, it can be painted with paint (any tone), trimmed with ceramic tiles, or covered with wallpaper. But before that, make sure that it does not need sanding (with sandpaper or a special grinding machine).
How to putty slopes on windows:
Possible difficulties and errors
When performing work, beginners can make the following mistakes :
- Replacement of gypsum boards with sandwich panels (cold bridges are formed).
- In humid rooms or climates, it is undesirable to insulate walls under plaster with mineral wool, as it strongly accumulates condensation and changes structurally over time, deforming the surface.
- Lack of preparation and use of low-quality materials.
To avoid errors when installing slopes, the following rules must be observed :
- Plaster, level and clean the working area (removing debris and unevenness promotes good adhesion of the building material).
- If dismantling of the old finishing coating is required, it is better to do it immediately.
- In your work, you must use consumables only from trusted industrial companies with good expert and user reviews.
- A base layer of putty mixture is applied to a thoroughly (1-2 times) primed surface.
- The finishing layer always follows the starting layer.
- The best composition for slopes is considered to be a specialized type, the packaging of which should indicate: frost-resistant or water-resistant.
- Compositions with a large amount of cement are suitable for outdoor work and rooms with high humidity levels (baths, bathrooms, swimming pools).
In difficult cases, when forming slopes, reinforced mesh can be used to better apply the starting base. The mesh can be made of metal, plastic or fiberglass.
Important! For wet rooms, it is best to finish the slopes with tiles, and painting can be done in 1-2 layers - this way a more saturated tone is achieved.
Installation of a perforated corner
This process is considered the most important and time-consuming. You need to choose a metal profile; it will shape and reinforce the slope better than others. Not only will it provide direction, but it will also make basic plastering of the walls easier. Let's consider a step-by-step algorithm of actions:
- First you need to decide on the size of the product. This can be done using a tape measure. Measure from corner to corner.
- Make marks on the profile according to the measurements. To do this, use a construction marker.
- After the corner is cut with metal scissors, you need to compare its original size. It is better to place it against the slope several times.
- To carry out a correct and reliable installation, a small amount of solution is required. It can be pre-mixed before preparing the mixture for the base application.
- To install the corner, it is tedious to determine the thickness of the fixing layer. To do this, it is tedious to find the most protruding area. It is along this protrusion that the alignment will be carried out.
The amount of solution spent will depend on the thickness of the protrusion. Place the corner and use a spatula to fill the gap in several places at once. The voids should be filled as tightly as possible. At the same time, lightly press the corners into the mixture and monitor the surface equally using a level. The adjustment must be strictly vertical.
On a note! Only when the solution has hardened a little, remove the remaining mixture from the boundaries of the profile. Don't worry if there are small uneven spots, they will go away during sanding.
Advantages and disadvantages
According to their purpose, the advantages of arranging slopes around the perimeter of the window area are:
masking any installation flaws;- additional thermal insulation;
- creation of a reliable, durable, stable structure;
- aesthetic orientation;
- noise protection;
- budget for purchasing and ordering work;
- easy care of the window area;
- painting in any color;
- rapid surface restoration;
- cold resistance;
- high speed of installation and finishing;
- no seams.
Slopes have few disadvantages - they are susceptible to mechanical damage.
The slopes fit well with the interior of the window structure, and emphasize its individuality and style.
Why are slopes trimmed?
Plastering the slopes of the entrance door is carried out for the purpose of:
- align, improve the wall around the door, make the hallway attractive;
- close the fastening structure of the door frame;
- seal the area around the door (the plaster forms a monolithic coating);
- additionally insulate the room, reduce the level of noise coming from outside.
All these goals are achievable if plastering of the entrance door slopes is used. The main advantages of plaster:
- the solution can be given any shape;
- the material is plastic, it can be laid flat without much difficulty;
- the compositions are environmentally friendly, non-flammable, create a durable coating;
- finishing and repairs can be done with your own hands;
- the material is available and not expensive.
Average prices in the Russian Federation for work
Putty work for 1 linear meter (l.m.) is indicated in the price lists of official construction companies, and, on average, in the Russian Federation, they amount to 200-600 rubles.
The final cost in rubles per 1 linear meter consists of a complex of such services:
- Dismantling of old coating (material) – 200.
- Surface priming – 30-35.
- Plaster (if necessary) – 450.
- Putty work (start, finish) – 380.
- Painting the slope – 180.
- Installation of gypsum boards and perforated corners - 320.
Work with slopes is individual in each case, and depends on the type of surface and the number of construction services. The region also influences the cost of work. The highest prices for slopes and work with them were noted in Moscow, Moscow Region, St. Petersburg, Novosibirsk, northern regions (25-40% more than above), and the lowest - in Volgograd and Bryansk.
Important! Self-employed builders charge 2 times less for their work than professional craftsmen. In this case, the quality of work may be worse, and there will be no guarantee for the paid service.
Starting putty process
So, we are very close to answering the question of how to putty the slopes of windows.
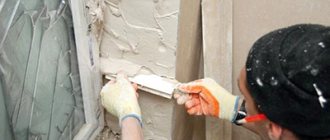
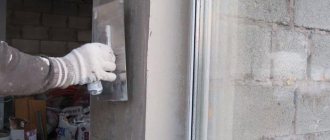
Take a spatula in your hands and apply the solution. For large and open areas, you can use a large spatula to putty the slope, but for hard-to-reach places, use a smaller one.
In case of large differences and poor-quality surface plastering, the process of puttying window slopes is divided into two stages:
- Starting;
- Finishing.
Often these are two completely different mixtures, because lime and gypsum are used for the starting putty, the fractions of which are much larger than for the finishing mortar.
If the surface of the window slope is quite uneven, then applying the starting putty allows a layer thickness of 5-7 mm, which is usually enough to hide all the defects of the area being finished.
The most convenient way to putty the window slopes is with a large spatula, onto which the putty mixture is applied with a narrow one.
So, you’ve put the mixture in, now press the blade of a large spatula firmly against the inner corner of the slope and move the tool “towards you”. In some difficult cases, it is possible to pre-reinforce the surface with a plastic mesh, which will help keep the solution on the surface.
Also, if the corners of the slopes are knocked down, you must install a perforated corner that will help correct this deficiency. To do this, use metal scissors to cut off the size of the corner that you need and place the corner itself on the putty directly on the corner.
Important! It will be necessary to level the surface of the corner in two planes: relative to the slope and the wall.
But if the slope is smooth, you just need to refinish it, then the mixture should be applied from bottom to top, also pressing the spatula tightly against the slope.
In the corners, you should use a convenient corner spatula to putty the window slopes.
It will be possible to putty the window slope a second time (if necessary) only when the first one is completely dry, and the drying process usually lasts at least 24 hours.
Why does the foam need to be covered?
If polyurethane foam is used indoors, it is not affected by external factors such as high and low temperatures, precipitation, wind, and sunlight. All these problems are present on the street, so they can be solved by finishing the facade. If this is not done, the quality of the foam will deteriorate and it will not be able to perform the functions that are required of it.
In addition, unclosed decorative foam spoils the aesthetic perception of the facade. The windows look unattractive and unfinished. Small cracks can allow cold air to enter, causing a draft to form in the room. Closing the installation seams will help solve these problems.
External metal slopes are very practical. How to install them yourself, read the link https://oknanagoda.com/okna/naruzhnye-metallicheskie-otkosy-na-okn.html
Read how to properly foam windows and slopes after installing plastic windows on our website.
Ways to close the foam
How to seal foam around a window from the street without spending a lot of money? How to carry out the work, how to maintain the style of the building? All these issues are completely solvable if you study the building materials market.
One of the most affordable and fastest ways to hide installation seams is to install slopes. Plastic windows are well suited for metal-plastic windows; metal models are less commonly used. They allow you to hide the foam, make the seams airtight, and increase the service life of the structure.
Some apartment owners use plaster. This option is the most affordable, but also labor-intensive. If you use plaster, before sealing the foam after installing plastic windows, you will have to prepare the wall in a special way and use a material suitable for exterior work.
In order to get the seams in order, you will need to wait until the foam dries after installing the windows and cut off the excess as evenly as possible. If you plan to seal joints using plaster, the foam needs to be cut deeper by 2-4 mm. On the outside, a larger layer of sealant should be added. It is advisable to level the surface of the accumulated foam. After this you will need a sealant. You don’t need a lot of it, so you shouldn’t stir a large amount at once.
After the sealant has dried, you can begin to apply the putty. It is most convenient to do this with a spatula or knife. It is better to apply the solution in a layer of at least 3 mm, since thinner ones are more likely to crack when drying. In order to improve the protection effect, water-based paints can be used. They can not only protect the plaster, but also make the appearance of the windows more attractive. The color of the paint does not matter; you should choose it according to your own taste.
How to plaster a doorway without a door
It is not always advisable to install a door. For example, an arched opening is often made for the living room. It looks beautiful and interesting. But there are special requirements for its plastering. These include the following:
- Making a plywood template.
- Reinforcement of the arched section.
To plaster arched passages, you will need two plywood templates. They are attached to both sides of the wall with self-tapping screws. After this, plaster is applied. The mixture is leveled using a rule with a protrusion cut out from one end several times in two directions. Rub the surface with a rounded grater.
Answers on questions
Is it possible to use tile adhesive for external slopes?
It is possible, but to do this, consider two rules - the glue must be frost-resistant, and the thickness of the slope must be up to 2 cm. A thicker layer without reinforcement will cause cracks.
Is regular plaster suitable for slopes on the façade side?
What do you mean by "regular"? If this is a classic of the genre - a lime-cement mixture, then add 5-10% cement to it and there will be no problems.
Is it necessary to insulate the slopes from the outside?
If the windows were installed in accordance with the technology, then the insulation goes along the perimeter of the window from the inside. If the windows are blowing, then it is enough to make an excuse for the slope from the street, drowning the profile in the solution by 1 cm. Full insulation from the outside cannot be done.
Installation stages
The technological process of finishing a particular object with water-containing solutions includes several mandatory stages. This includes site preparation, rough and finishing leveling. Additionally, reinforcement and installation of mounting angles may be necessary. Let's take a closer look at how to plaster door slopes.
Preparatory stage
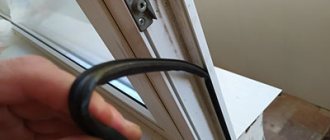
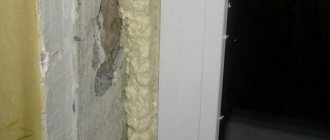
Here all actions come down to the formation of a solid and clean foundation. So, if this is a newly installed box, then first you need to cut off the excess polyurethane foam. A common mistake that is often observed is that the foam mass is removed flush with the profile. However, it is necessary to take into account the plasticity of this material and the minimum layer of solution. The latter should be at least 5-10 mm. That is, cutting the foam should be done with a groove so that the coating does not immediately crack.
Trimming excess polyurethane foam Source chistoe-okno.ru
Preparing the window opening
Restoration of slopes begins after their surface has been prepared. Preparation is performed in the following sequence:
- Use a chisel to knock down damaged and protruding areas.
In order not to destroy the restored slopes, the window sill is installed before the repair begins. To protect against dirt and broken elements, the window and window sill are protected with paper or polyethylene. It also wouldn’t hurt to protect the window handle and battery under the windowsill.
- Excess foam is cut off to seal the window structure. The dried foam is cut off with a knife. To do this, you need to pierce the protruding excess from the top of the window, and then remove it with a downward movement. The foam glued to the wall is also removed.
The protective film on the window is removed only after all work is completed.
- The surfaces of the slopes are thoroughly cleaned. Large dangling fragments are attached to the mortar.
- To improve adhesion, the surface is primed. Usually, a deep penetration primer is used before plastering; in other options, antiseptics are used.
How to cover the polyurethane foam outside the window?
Polyurethane foam is used everywhere, especially when installing windows. This is a convenient and practical material, however, it requires protection from sunlight and moisture. That is why the question often arises: how to cover the polyurethane foam on the outside of the window? There is a large selection of materials that you need to try to understand.
Seal the cracks
The outer slope is not always plastered, but it is constantly foamed. Before work, you need to trim off the excess foam so that the depth of the seam between the window profile and the slope is 1-2 cm. You can trim the foam with a paint knife or a metal spatula.
After cutting the foam, it is advisable to prime the gap, since on the street side, as a rule, there is old plaster with high absorption. If you skimp on the soil, then the fresh plaster will fall off to the owners' grief.
Cut off the foam, coat the seam with a brush dipped in soil and mix the plaster mixture. The consistency is as thick as possible; the joint does not need to be plastered so much as it needs to be filled with mortar. Mix the plaster in a plastic container, apply the solution using the main and auxiliary spatulas. The main one is 20-25 cm long, on it you keep a supply of solution so that you don’t have to run to the bucket with the mixture every time; the auxiliary one clogs the seams. The width of the second spatula is 5-8 cm, no more is needed, it’s inconvenient to work with.
Drive the seam of the slope from the window to the street horizontally, remove excess mixture with a vertical movement along the seam. Try to press the solution into the gap as much as possible, it should fill all the voids inside.
Useful tips
Remember that plastering can be carried out in a room where the temperature is at least 6 degrees Celsius. If this rule is not followed, the quality of the slopes will be low.
Carefully read the instructions for preparing the solution that the manufacturer puts on the packaging. The expiration date is also important, since after its expiration the mixture will not have the necessary characteristics. The expiration date that is close to expiration may also not have a very good effect on the final result.
When working with plastic windows, do not forget to make a groove along the entire perimeter between the frame and the slopes, 5 mm deep. After the solution has dried, the recess is filled with silicone sealant. This ensures that in extreme heat, when the volume of plastic increases, the slope will not crack.