Let's start installation
It will be quite easy to make slopes with sandwich panels if you follow the rules and sequence of actions. Even if you don’t have experience finishing slopes with your own hands, you don’t need to be afraid of this work. Before starting installation, you need to prepare tools and materials, you will need:
- Sandwich panel – you choose what material to buy from yourself
- Start profile
- F profile
- Liquid plastic – used as desired
- Tape measure and knife
- A screwdriver with self-tapping screws, a screwdriver and a drill - probably every home has the latter.
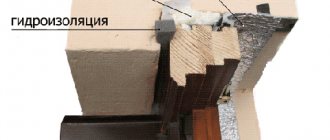
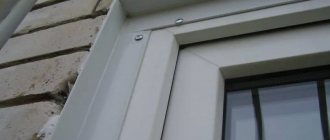
Slopes made of sandwich panels in a panel house
I have already said that installation should be done at least 24 hours after installing new windows. Using a tape measure, you need to take measurements and cut out panels for the side and top slopes. Use a knife to remove unnecessary pieces of polyurethane foam and begin installing the starting U profile using self-tapping screws for fastening. They need to be screwed in with a gap of 10-15 cm. Do not forget that the top profile is attached first, and only then the side ones should fit tightly with the top one. Next, we proceed to install the slopes using a sandwich panel; it is inserted into the grooves of the profile. Using the same scheme, we start from the upper slope.
- The first is to insert pieces of the starting profile into the vertical bar from above and below, and then the side panels fit into these grooves.
- The second is to simply attach the panel end-to-end with the window sill and the upper slope, after which the gaps are closed using liquid plastic.
When this stage is completed, all that remains is to give the slopes a finished look. To do this, use the f profile; it needs to be secured to the edges of the sandwich fabric. For additional thermal insulation, the voids between the sandwich sheet and the wall are filled with polyurethane foam - this process does not bring any inconvenience, since it is very easy to dismantle the profile. After filling the voids, the bar is returned to its place.
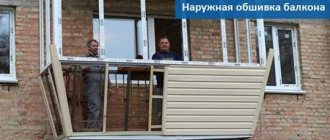
Plastic slopes made of sandwich panels for a balcony block
One more tip! It is better to trim the f profile after installation - to do this, it is attached with an overlap and then the cutting line is outlined with a pencil. In this way, maximum joining of the planks can be achieved.
Advantages over other finishing options
If you are planning to finish the slopes of plastic windows yourself, then insulated panels are the best option.
When using drywall, you will have to purchase more material than is required for one window. Working with this material is considered labor-intensive and requires certain skills.
Finishing slopes with sandwich panels is the least labor-intensive compared to other methods
Plastering will take a lot of time and effort. If you have no experience working with plaster, then creating a smooth surface will be very difficult. It will take time for the plaster layer to dry. The work process itself is associated with significant pollution of the surrounding space.
The use of other materials, such as MDF, will look strange. A finishing element made of the same material will look more harmonious with a plastic window frame.
How to make slopes on windows with your own hands?
After installing the windows, you should wait at least 24 hours. During this time, the mounting foam will dry completely, after which it can be cut flush with a knife from the surface of the frame.
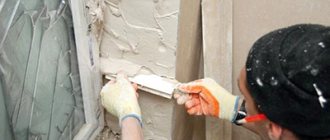
Before installing the slopes, you need to prepare the working area. clean from dirt and treat with an antiseptic.
- The first step is to attach the starting profile to the prepared surface. U-shaped profile strips cut to fit the perimeter of the window opening are screwed with self-tapping screws along the frame.
- For additional rigidity of the slopes, you can build a sheathing of wooden slats with a section of 2x4 cm. The slats are attached along the outer edge of the window niche using self-tapping screws, and they must be screwed flush with the plane of the wall, without protruding beyond its limits.
- The panels begin to be installed from the top of the window. The part cut to size is inserted into the starting profile, making sure that the edge of the material fits tightly, but is not bent. The gap between the wall and the panel is filled with mounting foam, and its other end is screwed to a wooden batten.
- In a similar way, panels are installed around the entire perimeter.
to cut the panels with a circular saw or a hand jigsaw.
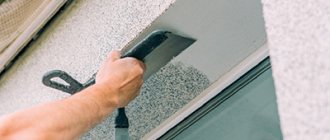
To give an aesthetic appearance to the outer edge of window slopes indoors, cladding is performed with an F-shaped profile, attaching it to a wooden plank with a construction stapler. At the junctions of horizontal and vertical elements, the profile is cut at an angle of 45º.
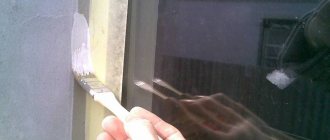
The joints are sealed with sealant or liquid plastic to protect them from dirt and moisture penetration.
Construction of slopes with sandwich panels lesson.
Preparatory stage
Sandwich panels are practical materials that are as simple as possible to install. Due to the inner layer, which is a sheet of compacted foam plastic, thermal insulation of building structures is ensured and heat leakage from the room is prevented. The outer layer, made of smooth polyvinyl chloride, looks neat and aesthetically pleasing and is resistant to aggressive environments and moisture. This material is durable and not damaged by pests and fungi.
The panels can be either two-layer or three-layer; in the second case, there is a PVC coating on both sides. Such panels are suitable for installation on wooden sheathing due to their increased rigidity; attaching them to foam or liquid nails is irrational - PVC surfaces have low adhesion.
Slopes of this type are mounted in three ways:
- for liquid nails (the wall surface must be flat);
- on polyurethane foam (small unevenness of the base is allowed);
- on a frame made of slats (if the base is difficult to level using plaster).
We will consider in detail the first option for installing slopes, i.e. on the starting profile and liquid nails, which “eats” a minimum of space. I forgot to add that the thickness of the two-layer panel is about 10 mm.
At the preliminary stage, you should thoroughly clean the slopes, removing everything that can peel off from the base and all protruding bumps. Be sure to remove any excess foam around the perimeter of the window unit that remains after installation.
Then a plaster solution is prepared for rough work. It is used to seal cracks and depressions - the surface of the slopes must be smooth, this can be checked using a level. Please note that if the surface of your slopes is smooth, then you do not need to plaster it and you can safely skip this step.
Wait until the plaster layer has completely dried and treat the slopes with a primer for porous bases so that the adhesive composition securely fixes the sandwich panel. After the primer has dried, treat it with an antifungal compound; after waiting for it to dry completely, you can begin lining the slopes.
Paste a VALID AdSense code in Ads Elite Plugin options before activating it.
Quick installation of slopes from sandwich panels with your own hands
Have you ever finished window slopes with your own hands? Yes, I do, and I want to say that I didn’t like the plastering. It’s not that it looks ugly, it’s just that the installation process is long and very labor-intensive. I would like to use a faster option that I can do myself. A friend advised me to make the slopes with sandwich panels. According to him, this is a quick and easy method that does not require much effort or skill. Immediately after that, I started looking for the information I needed, which I now want to share with you.
Nowadays technology does not stand still and is constantly improving. One of these innovations is the installation of slopes with sandwich panels. Having a sufficient number of advantages, the panels are becoming more and more popular every day, and even an inexperienced beginner can install them.
What are they needed for
The installation of plastic finishing is the most common way to improve the space of a window opening. PVC slopes have a pleasant glossy surface and are combined with the window profile material. Plastic panels help protect the assembly seam from exposure to sunlight and moisture.
Finishing the slopes after installing the window is done using plastic
The mounting foam, with which the window system is fixed in the opening, is a water-repellent material. But if it is not protected from direct sunlight, it will begin to deteriorate and moisture will freely begin to penetrate into its pores, destroying it from the inside. Therefore, slopes for plastic windows must be installed as soon as possible after installing the window. How to make slopes on plastic windows will be discussed in this article.
Do-it-yourself installation of slopes from sandwich panels
Finishing the slopes is a procedure that is the final touch in the process of installing plastic windows. It not only gives the entire structure an aesthetic appearance, but also, with the right choice of material, provides protection against mold and freezing during the cold winter season.
Those who want the windows in their home to have the above qualities should give preference to finishing with sandwich panels - a material that will help achieve an effective result when installing slopes.
What's the difficulty?
Sandwich panels consist of several layers: external (in most cases metal) that provide strength and an internal layer responsible for insulation. It is the latter that limits the cutting possibilities. Since most insulation materials are highly flammable (or emit acrid smoke when smoldering), the use of fire and other cutting methods that heat the surface to temperatures above 200 degrees is strictly prohibited. Heating is also undesirable for the polymer coating of the outer layers: when heated, it loses its integrity.
Advantages and disadvantages
Positive technical characteristics of the material:
The presence of shortcomings in sandwich panels is mainly due to the quality of the material itself:
- Poor quality panels, as a result of the influence of high temperatures, usually formed due to direct sunlight, can become deformed and acquire a yellow tint.
- In addition, poor quality also affects the durability of products, which, if manufactured unscrupulously, leaves much to be desired.
Characteristics and features of the material
A couple of layers consist of plastic, the third, inner layer is insulation. Such panels are used in construction almost everywhere; any job can be done, but there are some differences, which lies in the insulation used.
Advantages of slopes made of sandwich panels
Panel insulation is most often mineral wool. The sandwich construction is ideal for installing on a window slope; the material does not allow extraneous noise or cold to pass through, due to which the window will retain heat in the house. The characteristics of the panels do not end there, because mold and mildew do not appear on them, and they are not subject to temperature changes. The sandwich panel can be made of different materials, which is located on the outside, see the table for more details:
| Material: | Description: |
| Cink Steel: | Installation of the panels is easy, operation is simple. Not used for windows. |
| Aluzinc: | It is extremely rarely used for windows, due to the fact that the appearance of the window will be spoiled. |
| Drywall: | Suitable for creating panels on slopes. Easy to use, the slopes will look beautiful. |
| Plastisol: | Durable material, since the panels contain special additives that make the panel stronger. Not subject to destruction due to weather conditions, resistant to mechanical damage. The composition is free of toxins, which means that sandwich panels of this type can be installed for window slopes, both inside and outside. |
| Polyvinyl chloride or polypropylene: | Most often used to create a sandwich panel, ideal for window slopes. |
Important! It is convenient to cover a window with such material, because PVC panels are produced in different colors; white material or wood-like material is used.
Material properties
The structure of standard panels looks like a sheet, the outer side of which is solid-sheet PVC, the inner side is sheet polystyrene, and there is insulation in the middle. That is why this finishing option was called the American word - sandwich panel . They differ only in the material of the facing side, and the installation remains the same for any type.
Important! People call sandwich slopes – warm slopes. This is due to the insulation that is present in the panel.
Once you have already imagined what they are, I will tell you about their advantages:
- Despite their popularity, they remain accessible to everyone due to their reasonable price.
- This is not just a building element, it is also an independent device that has its own set of components.
- The interior is filled with mineral wool or foamed polystyrene - this indicates the non-flammability of the structure.
- Excellent thermal insulation performance, as well as additional sound insulation, is achieved with their help.
- This finishing method is durable and strong.
- If you do the installation yourself, you must strictly follow the installation technology. In this case, resistance to moisture and mold will be at a high level.
READ How to Make a Hand Compass Table
For those who have decided to change the windows in their house or apartment and install the slopes with their own hands, I will give you advice: you need to wait at least 24 hours after installing the windows and only then finish the slopes with sandwich panels. The advantage of installing a sandwich over plastering is that installation by hand does not require painting skills and is a clean method.
It is important not only to correctly install the slopes, but also how to cut the panels. It is better to cut plastic elements with a circular saw on plastic or aluminum. At the same time, a fine tooth pitch can cope with the task perfectly. In addition be cut at a temperature of 5 degrees Celsius - if the temperature regime is not observed, then due to a decrease in impact strength, chips may appear on the cutting line. If the slopes are finished with PVC sandwich panels, then cutting can be done with many tools. But the most optimal one is a hacksaw for metal; it can also be used for wood. You need to cut face up and with a slight angular inclination. At your own peril and risk, you can cut with a grinder, but if you apply a little too much pressure, the panel may break.
Plastic corners for slopes: step-by-step installation instructions
Plastic corners for slopes are the logical conclusion of home renovations. They act as a protective and aesthetic design for doorways, window slopes and corners.
Today we will look at how to glue plastic corners to door slopes with our own hands and the best way to glue plastic corners to door slopes.
Scope of use and additional information
The framing corner is made by hot bending a PVC sheet. The decorative element allows you to choose colors that will suit any interior. Application area:
- Window slope inside a house or apartment.
- As an external material to protect external or internal corners.
- Door or arched opening.
- To protect the corner of the wall when decorating with wallpaper.
- Protection of corners when finishing with plastic in the bathroom.
- Draping the joint when decorating external siding.
The plastic element is a good protector from mechanical stress, but, like any material, it has advantages and disadvantages:
- The installed corner is used as a finishing seam at the junction of finishing materials.
- Long service life - up to 25 years.
- Installation is carried out independently; you can glue the corner without prior preparation.
- The plastic element is easy to trim and comes in different colors.
- Acceptable price.
Why are plastic corners needed on slopes
? Among the disadvantages, the following turned out to be significant:
- Plastic is a fragile material, so it must be cut with special tools - cracks may appear.
- The flammable finishing element does not tolerate high temperatures.
Comparing types and sizes
Framing always begins with choosing the type and size of the plastic element. The table shows data about plastic corners, their sizes and types for slopes:
| View: | Size: |
| Equilateral: | 20*20 – 50*50 mm, standard length, attached to give strength. |
| Not equilateral: | 5*17 and 20*25 mm, lining of arch openings, usually installed on curved compositions. |
| T-shape: | 12*10, 18*10, 20*10, 22*10 mm, installation is necessary to hide the seams. |
| Removable (with latch): | Standard, the shelf bends for dismantling. Easy to install, no need to stick. |
During installation, it is necessary to cut the corner to form the desired length. A sharp utility knife will help with this. If you need to cut at a clear angle, you will need to prepare a miter box and a hacksaw.
Important! The colored plastic corner for internal slopes is available in lengths of 2.6 m, 2.7 m, 2.8 m, 3.0 m.
Finishing window slopes inside sandwich panels
Do-it-yourself installation of slopes from sandwich panels
Finishing the slopes is a procedure that is the final touch in the process of installing plastic windows. It not only gives the entire structure an aesthetic appearance, but also, with the right choice of material, provides protection against mold and freezing during the cold winter season.
Those who want the windows in their home to have the above qualities should give preference to finishing with sandwich panels - a material that will help achieve an effective result when installing slopes.
This material is a lightweight board consisting of several layers. where the two outer layers are rigid sheets that can be made of various materials. Between the canvases there is insulation (polyurethane foam, polystyrene foam, mineral wool).
Bonding of all elements of sandwich panels is carried out in two ways - cold or hot pressing. The material itself comes in two types – wall and roofing. Most often, sandwich panels are used in the construction of prefabricated buildings.
The standard dimensions of sandwich panels in terms of length, width, thickness are:
The largest dimensions are roofing slabs, the parameters of which are 12x1.2x0.3 m. For the construction of internal partitions, slabs with a length of 1.5 m and a width of 1 m are most often used.
For the installation of slopes, special sandwich panels with dimensions of 10x1500x3000 mm are used. consisting of the following materials:
- PVC - the outer side of the panel is made from it;
- the back side is made of sheet polystyrene;
- Foamed polystyrene foam or mineral wool is used as an internal insulating layer.
You may be interested in learning how to make slopes on the front door. Read in this article.
Positive technical characteristics of the material:
The presence of shortcomings in sandwich panels is mainly due to the quality of the material itself:
How to make slopes on windows with your own hands?
After installing the windows, you should wait at least 24 hours. During this time, the mounting foam will dry completely, after which it can be cut flush with a knife from the surface of the frame.
Before installing the slopes, you need to prepare the working area. clean from dirt and treat with an antiseptic.
The first step is to attach the starting profile to the prepared surface. U-shaped profile strips cut to fit the perimeter of the window opening are screwed with self-tapping screws along the frame.
In a similar way, panels are installed around the entire perimeter.
to cut the panels with a circular saw or a hand jigsaw.
To give an aesthetic appearance to the outer edge of window slopes indoors, cladding is performed with an F-shaped profile, attaching it to a wooden plank with a construction stapler. At the junctions of horizontal and vertical elements, the profile is cut at an angle of 45º.
The joints are sealed with sealant or liquid plastic to protect them from dirt and moisture penetration.
Construction of slopes with sandwich panels lesson.
Finishing window slopes with sandwich panels - the final stage of installation
If you are planning to install new windows, then you should think about how you will design the slopes. Finishing slopes with sandwich panels is an excellent option that matches any type of window. This material has many advantages over plasterboard and plastic boards. This finishing method is very simple and you can complete the installation work yourself and in a short time.
First, let's figure out what this building material is and how it is made. They have a three-layer structure - two sheets of rigid material and insulation. It is thanks to the insulation layer that sandwich panels are also called warm slopes. This material has many advantages, which we will discuss in detail.
The front sheet of the sandwich panel for window cladding is made of PVC. This material is quite durable and shock-resistant. The thermal insulation layer consists of mineral wool or expanded polystyrene - these materials are fireproof. In order to retain heat in the room, it is necessary to insulate the window as thoroughly as possible. Sandwich panels have a high level of thermal insulation. Moreover, they also provide additional sound insulation of the room. This material is also famous for its durability and reliability.
Installation does not require special construction skills; you can install them yourself and quickly enough. The material is environmentally friendly and you will not need additional protection when finishing. In addition, it is lightweight and when working with it, dust does not emit into the room, unlike drywall.
There are different types of sandwich panels. When choosing a material for finishing windows, purchase panels with a thickness of one centimeter. The panels can be used to cover slopes ranging in size from 5 to 150 cm.
Installation work of window slopes is carried out quite quickly. You can install the panels in just one day. Finishing slopes with sandwich panels is not a difficult task and you can do all the installation work yourself without much experience.
List of tools required for installation:
If necessary, you can further insulate the slopes by installing thermal insulation material on them. They can also be used as polyurethane foam. Liquid plastic can serve as a sealant between the slopes and the window - it is PVC-based glue. Its advantage is that over time it does not darken and does not spoil the appearance of the window. It is necessary that at least 24 hours pass after installing the window - this is the time for the polyurethane foam to dry.
READ Bosch series 6 does not turn on
How to cut a SANDWICH PANEL for slopes. The best way.
Seven times measure cut once. So, we begin the installation work by measuring the slopes in order to accurately adjust the material to the size of the window. Taking into account the measurements, it is necessary to cut three strips, the top one parallel to the window sill and two side strips.
It is very important to install the window sill and slopes at the same time. This will provide better sound insulation and thermal insulation of the window.
First we attach the starting profile, which in its shape resembles the letter “P”. Initially, the top one is fixed. There should be no gaps between the profiles. We fasten them using self-tapping screws 8-8.5 mm long, the distance between them should be no more than 15 cm.
Using polyurethane foam, we fill cracks and voids in the slopes. After the foam has dried, carefully trim and level it using a cutter. We insert the panel into the already installed upper profile. The side profiles are attached to the top board using self-tapping screws. Also, these profiles are fixed to the wall in increments of 150 mm. And we attach the last P-profiles to the window sill. We fill the gaps between the starting strips with liquid plastic. It is not recommended to use ordinary sealant, as it turns black over time, and this spoils the appearance of the window. After the liquid plastic in the gaps has dried, install two side panels.
The next final stage is the installation of finishing profiles. We take measurements and cut off the three necessary strips: one top and two side ones. It is recommended to cut the finishing strips with a margin of approximately 2-3 cm, and subsequently shorten them to the required size.
Then we snap the profiles onto the sandwich panel. In the corners the strips will overlap and need to be trimmed. On the profiles at the junction we mark the edges with a pencil and carefully cut them at an angle of 45 degrees. The void between the wall and the structure is filled with mounting foam. This will increase the degree of thermal insulation of the window. The junction of the finishing strips can also be covered with PVC glue for a more durable fixation.
How to cut a sandwich panel
As you can see, covering a window with this building material is a fairly simple process that can be carried out very quickly. For finishing, the main thing is to take correct measurements so as not to spoil the material. This design looks beautiful and fits into any interior. By following all of the above finishing recommendations, you will ensure a high level of thermal insulation and sound insulation of the window. You can carry out installation work yourself without involving specialists. The advantage of this type of cladding of window slopes is that the work is quite clean, since you do not have to use plaster or drywall.
Video “Finishing window slopes with sandwich panels”
The recording shows how to install slopes from sandwich panels yourself.
Quick installation of slopes from sandwich panels with your own hands
Have you ever finished window slopes with your own hands? Yes, I do, and I want to say that I didn’t like the plastering. It’s not that it looks ugly, it’s just that the installation process is long and very labor-intensive. I would like to use a faster option that I can do myself. A friend advised me to make the slopes with sandwich panels. According to him, this is a quick and easy method that does not require much effort or skill. Immediately after that, I started looking for the information I needed, which I now want to share with you.
Nowadays technology does not stand still and is constantly improving. One of these innovations is the installation of slopes with sandwich panels. Having a sufficient number of advantages, the panels are becoming more and more popular every day, and even an inexperienced beginner can install them.
The structure of standard panels looks like a sheet, the outer side of which is solid-sheet PVC, the inner side is sheet polystyrene, and there is insulation in the middle. That is why this finishing option was called the American word - sandwich panel . They differ only in the material of the facing side, and the installation remains the same for any type.
Important! People call sandwich slopes – warm slopes. This is due to the insulation that is present in the panel.
Once you have already imagined what they are, I will tell you about their advantages:
- Despite their popularity, they remain accessible to everyone due to their reasonable price.
- This is not just a building element, it is also an independent device that has its own set of components.
- The interior is filled with mineral wool or foamed polystyrene - this indicates the non-flammability of the structure.
- Excellent thermal insulation performance, as well as additional sound insulation, is achieved with their help.
- This finishing method is durable and strong.
- If you do the installation yourself, you must strictly follow the installation technology. In this case, resistance to moisture and mold will be at a high level.
For those who have decided to change the windows in their house or apartment and install the slopes with their own hands, I will give you advice: you need to wait at least 24 hours after installing the windows and only then finish the slopes with sandwich panels. The advantage of installing a sandwich over plastering is that installation by hand does not require painting skills and is a clean method.
It is important not only to correctly install the slopes, but also how to cut the panels. to cut plastic elements with a circular saw on plastic or aluminum. At the same time, a fine tooth pitch can cope with the task perfectly. In addition, the material must be cut at a temperature of 5 degrees Celsius - if the temperature regime is not observed, then due to a decrease in impact strength, chips may appear on the cutting line. If the slopes are finished with PVC sandwich panels, then cutting can be done with many tools. But the most optimal one is a hacksaw for metal; it can also be used for wood. You need to cut face up and with a slight angular inclination. At your own peril and risk, you can cut with a grinder, but if you apply a little too much pressure, the panel may break.
It will be quite easy to make slopes with sandwich panels if you follow the rules and sequence of actions. Even if you don’t have experience finishing slopes with your own hands, you don’t need to be afraid of this work. Before starting installation, you need to prepare tools and materials, you will need:
Slopes made of sandwich panels in a panel house
I have already said that installation should be done at least 24 hours after installing new windows. Using a tape measure, you need to take measurements and cut out panels for the side and top slopes. Use a knife to remove unnecessary pieces of polyurethane foam and begin installing the starting U profile using self-tapping screws for fastening. They need to be screwed in with a gap of 10-15 cm. Do not forget that the top profile is attached first, and only then the side ones should fit tightly with the top one. Next, we proceed to install the slopes using a sandwich panel; it is inserted into the grooves of the profile. Using the same scheme, we start from the upper slope.
- The first is to insert pieces of the starting profile into the vertical bar from above and below, and then the side panels fit into these grooves.
- The second is to simply attach the panel end-to-end with the window sill and the upper slope, after which the gaps are closed using liquid plastic.
When this stage is completed, all that remains is to give the slopes a finished look. To do this, use the f profile; it needs to be secured to the edges of the sandwich fabric. For additional thermal insulation, the voids between the sandwich sheet and the wall are filled with polyurethane foam - this process does not bring any inconvenience, since it is very easy to dismantle the profile. After filling the voids, the bar is returned to its place.
Plastic slopes made of sandwich panels for a balcony block
One more tip! It is better to trim the f profile after installation - to do this, it is attached with an overlap and then the cutting line is outlined with a pencil. In this way, maximum joining of the planks can be achieved.
READ How to Cut Skirting to 45
Convenient finishing of slopes with a PVC profile Beautiful and convenient do-it-yourself slopes made of PVC panels, wood or simply plastered Practical and easy installation of plastic slopes on windows Features of using plastic corners on slopes Arrangement and installation of metal slopes for windows
Everything about window sandwich panels: installation, characteristics and dimensions When replacing windows, you always want to perform installation…
Finishing window slopes inside an apartment When creating their masterpieces, architects attached great importance to windows as…
It often happens that the width of the door frame is less than the width of the wall opening where it is installed.…
How to insulate the slopes of plastic windows correctly? Insulation of slopes - a solution to the problem of thermal insulation of plastic windows How...
Do-it-yourself installation of plastic slopes on windows
A beautiful and durable slope not only decorates the window , but also protects the room from heat loss. New construction and finishing materials make it possible to speed up the process of installing slopes. In our article we will tell you and show in photos how the installation of window slopes is done, and how much you can save if you do the work yourself.
With the advent of polyvinyl chloride (PVC) and metal-plastic profile windows in construction, the quality of thermal insulation has increased several times. Windows do not change their shape under the influence of low and high temperatures, do not dry out to the point of cracks and do not jam. Durable anchors and synthetic foam provide quick and high-quality isolation of the room from the external environment. Installation of slopes is the decorative finishing of walls in a window opening, which completes the window installation process.
Installation subtleties
You can install multilayer PVC panels yourself, the main thing is to follow all the rules and instructions for installing such materials. Using window slopes as an example, we will consider the technique of installing plastic panels at home.
Required tools for installation:
- self-tapping screws, liquid nails, sealant;
- mounting profiles;
- polyurethane foam;
Beginning builders need to use such a tool with caution, because if you apply too much pressure, the material will break.
Before you start laying the sheets, you need to get rid of dirt (dust, paint, foam). Sandwich materials are laid only on a clean base. If mold exists, it must be eliminated and the surface treated with a special impregnation.
Existing cracks and crevices are sealed with polyurethane foam. You also need to have a construction level on hand, with which you can check the corners and cut the workpieces correctly.
- Preparation and measurement of slopes. Using a tape measure, measure the length and width of the slopes in order to cut the panels to fit the slope.
- Installation of profiles. The initial U-shaped profiles (starting profiles) are cut and fastened with self-tapping screws, which are installed along the edges of the profiles, leaving a gap of 15 cm between them.
- PVC panel are installed in the plastic profile The sections are fixed to the wall with liquid nails or foam.
- The areas adjacent to the walls are covered with cladding material made from an L-shaped profile. The border profile is installed using liquid nails.
- The junction areas are treated with white silicone sealant.
You need to use polyurethane foam with extreme caution, because when it comes out it doubles in volume. Otherwise, large gaps will form between the layered sheets and the wall, and the entire work will have to be redone.
Slopes on balconies and loggias made of sandwich slabs are made similarly to the slopes of metal-plastic windows in an apartment.
For better thermal insulation in such rooms, experts recommend installing additional insulating material.
How to cut panels without effort
The simplest tool for cutting PVC. But for an unusual kitchen or shoemaker, all you need is a molar knife.
Its blade, while new, is very thin and sharp. And when it gets dull, the blade can be replaced instantly. By biting off a piece or inserting a new one. An ordinary knife is inconvenient and cannot be sharpened quickly. Also, it won't be as thin.
The molar knife is limited in its capabilities. You can only cut the panel Of course, you can try to make a cut across. But nothing good will come of this.
How to cut panels lengthwise? This is difficult to explain within the scope of this article. However, the basic principle can be described.
The blade extends a short distance of 3 mm.
From the back side of the panel we select the place where the cut will be made.
Then we cut out a strip, from edge to edge (we are talking about the internal edges of the panel). A cut is made near the rib, then another cut is made near the adjacent one. We make cuts along the entire length.
A strip of plastic falls out and a groove forms.
Then, on the same back side, you need to make a shallow incision near the desired rib. And break the body over it.
The molar knife has the advantages of being fast, quiet and simple. Its disadvantages are that the panels can only be cut lengthwise.
Production of signs and outdoor advertising.
Sandwich panels coated with PVC sheet are ideal for use in outdoor advertising. They can be used to make various types of advertising media - signs, awnings, shields, signs, plates, pylons, information boards and signs, exhibition modules, bus stop pavilions, information stands, promotional stands.
Sandwich panels coated with PVC sheet are easy to process and can be backlit. Silk-screen printing, self-adhesive film, and paint can be applied to the surface. Extruded polystyrene foam filling provides qualities important for outdoor advertising - moisture resistance and rigidity. This advertising medium is weather-resistant and will last a long time without changing its appearance.
How to cut slopes for windows. Installation of corners on window or door slopes
Having figured out what such products are made of, what their features are and having decided on the choice, you should learn how to install corners on slopes. Detailed instructions are given below.
What glue to use
In addition to the corners themselves, we will also need an adhesive composition with which we will attach the selected element. When choosing it, it is worth remembering that quite often, especially if it is necessary to glue a narrow product, the glue seeps out from under it and, naturally, ends up on the walls. As a result, the latter may be damaged, which, accordingly, will negatively affect the appearance of the room as a whole. Therefore, you should choose an adhesive composition whose excess can be removed from the surface.
Basically, corners are glued to new slopes, but nevertheless, check that the surface is relatively flat, since large bumps cannot be hidden by any decoration. It should be free of foreign objects such as nails, screws, etc. It also needs to be degreased; white spirit is suitable for this purpose.
Main advantages and disadvantages
This type of slope is made using polyurethane foam - a high-quality polyurethane-based sealant. The material is distributed centrally between two small sheets of PVC construction.
Among its main advantages are the following:
- No additional processing or decoration of the surface is required after installing the slopes, because the plane has a structure exactly similar to metal-plastic products.
- Drywall is susceptible to cracking and getting wet over time under the influence of moisture in the form of condensation. Sandwich panels for window slopes always remain waterproof and do not collapse.
- If insulation of sandwich panels is needed, it is more likely to be a precautionary measure, because the material does not allow cold to pass through at all. Specialists often carry out such measures in order to immobilize and strengthen the structure on the window.
- Cleaning sandwich panels is not difficult; dust, dirt and even coffee stains can be wiped off with a cloth soaked in soapy water. If this does not help, you can use a detergent that is usually used to wash dishes, but without an abrasive substance in the composition.
- The installation is reduced to a simple and understandable procedure, so even a beginner in the construction business can cope with the installation.
- The service life declared by the manufacturer ranges from 15 to 20 years. The slopes are not afraid of hail, strong winds and rain.
It's time to discuss the disadvantages of sandwich panels. Rather, they are associated with the low quality of the material offered, so when purchasing, pay attention to the manufacturer, do not be afraid to ask the sales consultant uncomfortable questions and demand to see certification.
Pay attention to the quality of the panel material
This is in your interests, because low-quality panels, under the influence of hot weather and high temperatures, acquire a yellow tint that cannot be eliminated, and become deformed, therefore they are considered extremely unreliable and brittle.
Much depends on the diligence and responsibility of the one who began installing slopes from sandwich panels. Careless attitude, haste and inappropriate installation technology can subsequently lead to the formation of voids between the panels and the window sill.
Paste a VALID AdSense code in Ads Elite Plugin options before activating it.
Installation
How to install plastic slopes on windows with your own hands step by step is shown below. Before you start finishing the slopes with panels, you need to take measurements. The inner sides are measured twice - at the window and at the wall.
- The installation of plastic slopes on windows begins with removing the mounting foam that has gone beyond the seam along the perimeter of the window frame. To do this you need to use a sharp construction knife;
Before installing the slopes, remove excess foam around the perimeter of the window frame; it will be necessary to attach a wooden block. When making a bar, you need to make a slope on one of its faces. This is done so that the block can be firmly fixed near the window frame;
To fasten the slope, a wooden block with a slope is made; the finished bars should be installed around the perimeter of the window frame so as to overlap it slightly. Fastening can be done using self-tapping screws or dowels;
A starting profile is mounted to a wooden block according to previously obtained dimensions and the necessary elements are manufactured. We cut the plastic carefully so as not to damage it;
The cutting of the PVC panel must be done without strong pressure; the panels must first be installed on the side walls of the window opening. Panels must be placed in the starting profile;
The panel is inserted into the starting profile; the part must be separated from the wall and the space covered with polyurethane foam. Then put it in place and press down a little so that the foam sets;
panel is fixed using polyurethane foam
Use masking tape to secure the slopes until the foam dries completely.
When installing slopes on plastic windows, you can attach platbands to their corners. How to make slopes with platbands is shown in the step-by-step instructions below.
Sources:
https://krovati-i-divany.ru/sovetyi/%D0%BE%D1%82%D0%B4%D0%B5%D0%BB%D0%BA%D0%B0-%D0%BE%D1% 82%D0%BA%D0%BE%D1%81%D0%BE%D0%B2-%D0%BE%D0%BA%D0%BE%D0%BD-%D0%B2%D0%BD%D1% 83%D1%82%D1%80%D0%B8-%D1%81%D0%B5%D0%BD%D0%B4%D0%B2%D0%B8%D1%87%D0%BD.html https: //vdomvse.ru/otkosy/chem-rezat-sendvich-paneli-dlya-otkosov.html
Panel composition
The sandwich sheets are made of extruded polystyrene foam with a thickness of 0.9 cm. The products can be decorated with PVC on one or both sides. The size of the panels for windows is 150 by 300 cm. The composition contains the following materials:
- A timber beam that is guiding.
- The top panel acts as a decorative finish.
- Profiles of different shapes and C-type products are installed on the side of the room. A special J-shaped element is needed to secure the inner border.
- Polystyrene insulation, which fills all cavities. Because of this, the structures do not allow the cold to penetrate into the room.
Foamed plastic, polyurethane foam, and extruded polystyrene are used for insulation. The outer layer can be made of the following materials:
- Multilayer plastic. To make it, a layered material consisting of pressed kraft paper is impregnated with resins.
- Rigid PVC sheets. To produce the sandwich, white sheet material is used, the thickness of which can vary from 0.8 to 2 mm. The special external coating can be either matte or glossy.
- Foam plastic sheets. The material inside is porous and has high thermal insulation properties.
Today, construction stores offer a wide range of colors of products, which makes it possible to choose a shade that matches the tone of the window. It should be noted that the sandwich for windows can be in the form of a ready-made system. In this case, no preparatory work for assembling the structure is required. The products are fixed to the slope using a special adhesive mixture. The second option involves assembling and fixing the panel using self-tapping screws.
Panels can be single- or double-sided. In the latter version, all sides are considered front. Some are inclined to think that sandwich can only be used for plastic window structures, but they can also be installed on wooden windows. One-sided designs suggest that one side is external and the other internal. The front part is slightly thicker than the rough part. It is important to understand that the installation of sandwich panels for PVC window slopes is very important for a number of reasons:
- products prevent the formation of condensation and moisture ingress;
- thermal insulation characteristics are improved;
- the seams are protected from destruction.
Vertical and horizontal mounting
Sandwich panels can be fastened to metal structures in two directions: vertical and horizontal. Both installation methods have their advantages and disadvantages.
If the floor has a small height (from 3 to 6 m), vertical installation is used. The panels are attached only to the guide profiles of the floor and ceiling, and are rigidly connected to each other. The resulting integral and strong structure is free from “cold bridges” and has no heat losses. Significant funds are saved during installation, since there is no need for special lifting equipment and scaffolding.
Rules for vertical installation of sandwich panels - laying sealant is MANDATORY on both sides
However, you cannot do without them if the floor height is more than 6 meters. Perhaps, instead of scaffolding, a carriage will be needed to ensure facade work at height. All of them, moreover, are unthinkable without the use of a truck crane. Reinforcing the metal frame of the building to prevent sagging of high panels also requires additional costs.
The level of costs at such a wall height can be reduced by horizontal installation of sandwich panels. They are laid out one on top of the other and attached with their edges to the columns of the frame. This also creates a continuous skin. However, to use horizontal installation, it is necessary that the distance between the columns of the building frame be no more than 6 meters.
Installing panels horizontally
When installing sandwich panels, either a horizontal or vertical method must be used. Their combination is unacceptable.
You can see how to install the panels correctly in the video below:
Subtleties and nuances of performing work
To ensure the evenness of the cut (and therefore the correct geometry of the cut part of the wall or roofing sandwich panel), you should know several rules:
- The sandwich panel must be securely fixed before cutting;
- the markings must be clearly visible;
- cutting always starts from the outer layers;
- cutting of the inner layer is carried out with a thin tool;
- Using a grinder or other “high-speed” cutting devices is only possible in exceptional cases: there is a high risk of both fire and damage to the protective coating.
If you can't cut it, don't cut it!
Different types of sandwich panels can be cut differently. However, regardless of the materials, cutting is recommended only in exceptional cases when it is impossible to select products of the required dimensions. This is due to the fact that structurally sandwich panels are not intended to be cut into pieces at all. When performing such operations, a number of negative consequences may occur:
- deterioration of protective qualities due to damage to the polymer coating;
- the appearance of “cracks”, fraught with moisture entering the insulation layer;
- risk of fire of the inner layer;
- risk of compromising the integrity of the sandwich panel.
There is no need to say that cutting sandwich panels is quite a troublesome task. Both the jewelry marking and the accuracy of the cut are important. Based on this, the answer to the question of whether it is possible to cut sandwich panels should be formulated as follows: “It is possible! But it’s better not!” Therefore, it is better to order sandwich panels of the required size from the manufacturer NTK!
Strengthen, but in moderation
Fasteners for sandwich panels are selected taking into account the type of structure and its thickness. As a rule, self-tapping screws (self-tapping screws) are used for this.
Their length is the sum of the thickness of the panel, frame and compensation for the height of the rubber washer (5 mm). The latter is required for use with self-tapping screws - it prevents the metal head from damaging the panel when screwed in and seals the fastening point.
Correct and incorrect fastening of panels
A panel 6 m long is fastened with six self-tapping screws, 4 m long and less - with four, and over 6 m long - with eight. The screws are fastened with a screwdriver with a pre-adjusted tightening force.
When tightened correctly, the washer does not deform and at the same time is pressed tightly enough to the metal. A tightening that is too tight crushes the washer; a tightening that is not tight enough does not ensure a tight seal. An oblique fit of a self-tapping screw is strictly unacceptable.
How to cut?
Obviously, due to design limitations, only simple mechanical methods are left for cutting.
Sheets with an outer layer of polymers (plastisol, polydifluorionad, polyester, pural) are recommended to be cut with a jigsaw, grinder or construction knife. Operations begin with preliminary marking and cutting of the outer layers. The inner one is cut off last. Synthetic surfaces are very durable and therefore cutting them is quite a troublesome task.
External panels made of OSB or plasterboard are easier to cut. A band saw or circular saw is best here. They can also cut metal coatings. An even better option for metal is a guillotine press. Its mechanism will make the cut quickly and accurately vertically.
How to lift and install panels correctly?
A transport package with sandwich panels (read about the technical characteristics of these products in this article) is raised to the installation height using special equipment - vacuum lifts.
One of the forms of vacuum lift
If a conventional crane is used for these purposes, it is necessary to take a number of measures to prevent damage to the panels:
- Soft slings are used to lift the transport package. In this case, capturing the package itself with slings is not allowed. The locking parts of the panels are protected from possible damage by slings with spacer bars, at least 122 cm long, evenly spaced above and below the package;
- The sandwich panel cannot be lifted directly from the pallet.
Also during the work process you should adhere to the following rules:
- The panels must be joined strictly at an angle of 180 degrees, i.e. vertically. Docking at a different angle may lead to deformation of the locks;
- Installation should be carried out with extreme caution to avoid damage to the protective coating. Otherwise, the service life of the panels will be significantly reduced.