Accessories for plastic panels
To assemble a suspended plastic ceiling, special fittings are required.
The fittings, like PVC panels, are manufactured in accordance with the relevant GOST, which proves their safety in use. To organize a plastic connection you need the following fittings:
- Starting strip (finishing strip) - a U-shaped molding, commonly known as a pawn, with which they begin to lay the plastic ceiling and finish it; it covers the end of the panel. When installing plastic panels on walls, the starting profile is used to design door and window openings.
- F profile is an end molding that is used for decorative design of corner joints, as well as joints of plastic with other materials and for the design of window and door openings.
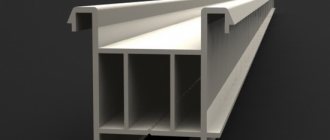
- The joining profile is an H-shaped molding, used to connect plastic panels together along the length, if the length of one panel is not enough to cover the ceiling space.
- External corner - hides the joints of plastic sheets in the outer corners of the room.
- Inner corner - hides the connections of plastic sheets in the inner corners of the room.
- Decorative corner is a universal corner that is used to seal external joints of canvases at right angles.
- A universal corner is a decorative molding that, due to its ability to bend at any angle, is used for both internal and external corners.
- A fillet is a ceiling plinth that helps smooth out the transition from the ceiling to the walls and also hides the joints.
- External corner for ceiling plinth - hides the joints between plinths in places of protrusions, beams, columns.
- Inner corner for ceiling plinth - covers the joints of plinths in the inner corners of the room.
- Connecting element for ceiling plinths – connects the plinths to each other when one ceiling plinth is not enough to finish the entire length of the ceiling.
- Fastening strip - a plastic strip used for lathing under ceiling panels.
- Clippers are universal parts; unlike nails, they do not damage the joints and locks of panels, fit tightly to the surface and ensure high quality assembly.
Characteristics and classification of accessories
Before installing the panels, you should decide on the format and number of additional accessories. When calculating, the following is taken into account:
- condition and finishing of surfaces combined with the mounting plane;
- length, width and height of the room;
- method of installing panels on a working plane.
If only one wall is planned to be finished in a room, then the process of installing a decorative coating begins with the installation of a starting profile for PVC panels. Finishing work covering all vertical surfaces eliminates the need to install this element at the beginning of installation. It will be used for the panels of adjacent walls that form the corner transition.
If the room height is more than three meters (the maximum standard panel size), the addition of “height” is made using a connecting element. If the length and width of the area being designed also exceeds the standards of the product range of plastic ceiling plinths, interlocking connections will be needed to cover the joint line.
Depending on the installation method (on the frame or directly on the wall), external and internal corners for PVC panels are selected.
Main auxiliary accessories:
- starting profile, another name is the end element;
- connecting profile;
- end element with corner;
- external and internal profiles-corners;
- rolling (90 degrees) and universal angles for PVC panels;
- ceiling plinth (fillet).
It is worth considering all the advantages and disadvantages of each of these elements.
Start profile
In cross-section, this element represents an unfinished Russian letter “P”, that is, its hidden side is larger than the front side. This format simplifies the installation of the profile on the frame using self-tapping screws and the subsequent insertion of the main decorative element (panel) into the fixing flap.
The end element has good longitudinal flexibility, which makes it possible to compensate for existing deficiencies of adjacent surfaces without damage.
- If installation is carried out on a frame, the profile is fixed in the position of maximum abutment to the adjacent walls, then the forming element of the decorative coating is inserted into it until it stops, maintaining the absolute level at the best possible level.
- Installation on a wall surface using adhesive or foam requires a slightly different approach. The starting profile is installed on the outer joining end of the panel. A binder is applied to the working surface of the main coating element (in a zigzag), capturing the profile. The panel is installed in its final position on the wall, and the end element is immediately carefully adjusted in accordance with the topography of the abutment surface.
The starting profile provides unique opportunities for designing a decorative canvas made of plastic panels. This element can replace ceiling and floor plinths. In rooms with limited volume and large contents, such a device provides a number of tangible advantages. For example, in standard bathrooms of apartment buildings, where the density of installation spaces is calculated in centimeters, the absence of an additional volumetric element that forms the angle between the wall and the floor allows you to install a washing machine or laundry basket close to a vertical surface.
Connecting element
The connecting profile externally looks like two connected end elements with a common internal partition. Used in structures whose linear dimensions exceed the standard length of PVC panels.
When installing on a frame, it is necessary to install an additional metal profile or wooden beam along the joint line. The connecting profile is fixed on it on both sides with self-tapping screws and a press washer. The panels are inserted into the mounting grooves. When finished, the decorative surface is a solid canvas with a plastic strip running along the joint and hiding the joining seam.
Profile with corner
This element in cross-section resembles the letter F. In fact, this is a starting profile, the visible part of which is designed as an inner corner. It is used as a final detail in the design of corner transitions.
It can be used instead of a starting profile if it is necessary to cover a significant gap formed at the junction with an adjacent wall. However, it does not have the flexibility of its analogue and is suitable for work only on perfectly flat surfaces.
External and internal corners
Already from the name itself it is clear that these accessories are used to design internal and external corner joints of PVC panels. They are fastened to the frame using double-sided jointing with self-tapping screws. They create a perfectly straight line for the decorative framing of corners, but on the condition that the surfaces meet strictly at an angle of 90 degrees.
If the working surfaces at the junction form an obtuse or acute angle, the use of these elements is not relevant, since the ends of the panels will not be able to fit into the groove due to distortion and compression, or a gap will form between the outer part of the profile and the surface of the panel. In any case, aesthetic integrity will not be achieved.
Rental and universal corner
The rolled angle has a rigidly specified side position during molding, which is 90 degrees, and a standard length of three meters. These indicators determine and limit the use of the element in places where mounting surfaces meet at right angles.
The universal plastic corner is supplied to the retail chain in rolls, in the form of a tape with a central fold groove. This element accepts any angular shapes specified by the room configuration. Corners of both types are mounted on completed internal and external corner joints of panels, using appropriate adhesives.
Ceiling plinth
The ceiling plinth is mounted on a suspended frame on three sides, leaving the final part open. This is dictated by the practical impossibility of installing the last panel by performing several operations simultaneously:
- slam the lock with the previous element that forms the ceiling;
- fix the transverse ends of the panel in the mounting grooves of the fillets located on opposite walls;
- insert the free longitudinal edge of the panel into the groove of the plinth limiting the working plane.
Only after the installation of the decorative ceiling structure is completed is the missing fillet fragment installed. To do this, the part that forms the receiving groove is carefully cut off, and the plinth itself is glued to the ceiling and wall.
Use of components during installation
To install PVC slats you will need a jigsaw, a flat screwdriver, a level, a metal saw, a tape measure, a screwdriver, clamps, and self-tapping screws (“bugs”).
Work algorithm:
- first, the sheathing is made - it can be made of metal profiles or timber with a section of 2x2 cm;
- guide strips are fixed to the base of the walls or ceiling using galvanized steel nails or self-tapping screws; an indentation from their edge must be left;
- if there are unevennesses, then the structure should be leveled using wooden pads;
- the starting profile is fixed in the left corner from which the assembly begins;
- The panel is placed on it from the bottom corner and secured with self-tapping screws so as not to damage the plastic; the fasteners should not be over-tightened;
- the next sheet is inserted tightly next, it is desirable that there are no gaps between them.
In order for the plates to fit organically against each other, it is necessary to correctly connect them - the panel is inserted into the corner with a tenon, due to which the groove remains open for the next sheet
If there is a gap near the thorn, carefully trim it
Then you should fasten the lamella to the sheathing and now you will need a clamp - its hooks are inserted into the groove, then the element is pressed tightly. The fasteners are secured with special self-tapping screws. For plastic, staples up to 2 mm high are used. Four of these parts are enough for 2 meters of length, however, with a large perimeter, their number can be increased. When working with a screwdriver, it happens that the “bug” turns the mounting clip, but it can be pressed and held with a screwdriver.
When installing PVC, it is important to focus on some points
- Since assembly begins with the installation of the box, it is necessary to install the slats correctly. The position of the panel installed first is checked especially carefully using a level.
- As work progresses, you need to monitor the accuracy of the fit of the individual sheets of material. There should not be large gaps between them. That is why the slabs need to be compacted as much as possible.
For plastic panels, you should choose high-tech fittings, and, of course, do not rely on their appearance or cheapness. With such a task as the construction of a reliable sheathing, savings are inappropriate. In addition, you should always focus on product compliance with quality standards and GOST.
Video instructions for installing PVC panels are presented below.
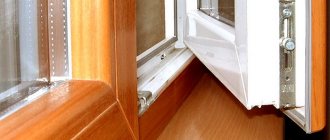
Window lamination - what is it?
Lamination is the best way to get colored PVC windows. The profile is laminated at the preliminary stage of production, before it is cut into frames. The application of decorative lamination film is carried out on special equipment using special glue. The result is a durable, long-lasting textured coating that is not subject to fading or deformation. As a rule, “wood” textures are chosen, this allows you to get plastic windows that are indistinguishable in appearance from wooden ones. Laminated PVC windows are cheaper than wooden ones, last longer, are easy to maintain and do not require regular renewal of the protective coating.
PVC window painting
There are other ways to get colored frames. To give the structure the desired shade, the profile can be painted in a special chamber under production conditions. Only professional painting allows you to obtain a surface of the desired color with a uniform shade without sagging or streaks.
Painted windows are slightly inferior to laminated windows in terms of durability, resistance to moisture and exposure to sunlight.
At home
The colored PVC profile must be ordered immediately, at the stage of choosing a translucent structure. If you want to update the shade of already installed windows, there is only one way - painting the frame with paint or enamel for PVC on an acrylic or polyurethane basis. Before purchasing paint, it is important to make sure that the material is suitable for painting plastic surfaces.
It is worth noting that the result of such painting at home may be much inferior to the quality of profile painting at the factory.
Even when using high-quality paint and a spray gun, there is a possibility of getting a non-uniform layer with bubbles, streaks, and unevenness. In addition, paint of a composition incompatible with PVC may damage the plastic or will not adhere firmly to it.
What will you need?
When starting work with the formation of a ceiling from PVC panels, you should first of all use a starting type of plank. This is the name of the P-shaped molding that locks the panel from the end. Similar strips are also used when panels are placed on walls. But there they are already needed for another task - a more elegant design of door and window openings.
A profile in the shape of the letter F must be placed at the ends; it is needed to make corners and joints between PVC and other materials more beautiful. This profile is also used in the design of recesses for doors and windows. The joining is done using a molding like the letter H. It is used when it is necessary to connect the short edges of the panels due to the fact that one of them is not long enough to cover the ceiling space.
The outer and inner corners are needed respectively to mask the joints in different corners. Using a universal decorative corner, you can cover the outer intersections of the canvases, converging at an angle of 90 degrees.
Ceiling skirting boards can intersect:
- on ledges;
- next to the beams;
- near the columns.
In all three cases, outer corners of a special type (they are called that for ceiling plinths) turn out to be very valuable. Such products should not be confused with similar-named designs directly for panels.
Internal corners for baseboards help seal intersection points in areas farthest from the entrance. Sometimes the skirting boards are not long enough, and then a special connecting element helps solve the design problem
An important component of the fittings for plastic ceilings are slats (guides), from which the lathing is formed
PVC starting profile
Starter is a molded plastic product, which in cross-section looks like the Cyrillic letter P. The profile can be painted in any color according to the RAL system, as well as in dozens of shades that imitate the structure of wood and other finishing materials. They are matched to the color of the profile of the main structure (windows, doors). The standard size of a single part is 6 m. The material is easily cut into segments with improvised tools: a jigsaw, a knife. The main purpose is to join plastic panels made for arranging slopes with frames of window and door structures. In this case, possible gaps between the slope and the window (door) become invisible despite the large angle between them. The profile got its name - “starter” - due to the specific application - it is used in the initial stage of finishing the opening.
Material selection
Currently, the market offers profiles made of plastic and metal. Plastic moldings are cheap, but not of high quality. It would simply be unreasonable to use them for serious tasks, so most often they are chosen as a decorative addition.
In general, if we talk about how the PVC panel and the profile are connected, it turns out that the panel is partially “placed” in the profile itself and is fixed there. Therefore, to ensure reliable fastening, preference should be given to metal molding, which can be steel or aluminum.
Purpose of fittings for plastic panels
PVC wall and ceiling panels are a functional and durable coating; they are available in a wide range of colors, have different textures and are ideal for decorative finishing of residential premises. Sheets are made from a polymer mixture using special equipment - a plasticizing machine or an extruder. The cut lamellas are painted with organic dyes, and the top of the canvas is coated with an antistatic agent and protective varnish - that’s why the material looks good and has high performance qualities.
However, for installation it is not enough to choose an impeccable plastic covering - you will need to purchase fittings and fasteners, which are currently not just a set of individual parts, but also a multifunctional and technologically advanced mechanism that performs different tasks.
Purpose of components for PVC assembly:
- fixing panels to the ceiling, walls and flooring;
- connecting finishing segments of different thicknesses;
- design and connection of joints at different angles;
- formation of a structure of any scale and shape.
The main material for the production of fittings is high-quality steel, although some parts can be made from alloys based on magnesium, titanium, and aluminum, processed by pressure. Polymer elements are used more for decorative framing than for creating a durable sheathing.
A characteristic feature of the profiles used is their ease of use - they can be easily adjusted to the required dimensions by cutting them with an ordinary construction knife. In some cases, it is better to fix the external molding using adhesives, thanks to which the panels are not damaged or deformed.
Types of plastic panels
The building materials market offers a huge selection of plastic panels for interior decoration, which differ in size, color, and design features.
According to the area of application, PVC panels are divided into ceilings and walls. The material used for finishing ceilings is more fragile and lighter than the material used for finishing walls.
Therefore, ceilings made of PVC panels should be installed carefully so as not to accidentally damage them with sharp objects. Wall plastic is stronger and less flexible because it contains more PVC.
Based on the type of decorative layer, PVC panels are divided into matte and glossy. The surface of the matte canvas is without any coating, so they are cheaper than glossy ones. Glossy canvases are coated with special varnishes on top, which additionally protect the plastic from exposure to the sun and moisture, so it is much easier to care for them.
What are PVC panels
Plastic panels vary in size: width, height and thickness. Plastic panels with a width of 125 mm and 250 mm are most often used, since they are easier to install. Wider canvases are less flexible, so it is more difficult to assemble a suspended ceiling from them. The thickness of the panels for walls and ceilings is different. So, for the ceiling, the optimal choice would be panels with a thickness of 6 mm and 8 mm, and for walls - 10 mm and 12 mm. The standard length of PVC panels is 5.95 mm. Panels 3 m long are often sold on the building materials market, which means that they are cut into pieces.
Colored PVC profiles are different
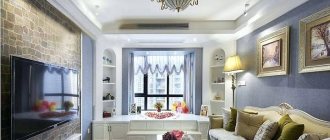
Colorful windows not only look interesting, but also complement the design of the building and emphasize its style much more than traditional white plastic windows. To meet the growing needs of investors, PVC profile manufacturers are increasingly expanding the color range of their products. The WINDOWS MEDIA portal will tell you what opportunities the market offers today.
Colored PVC windows are gaining more and more fans. Although the force of habit can be very strong, and replacing windows tempts us to buy the usual, white ones, but in fact, the modern buyer has much more choice. In the case of multi-apartment residential buildings, investors usually decide to do what the majority chooses, but cottage owners can allow their imagination to go beyond the ordinary and decide on colored plastic windows.
Of course, one must take into account the fact that colored windows are a more expensive investment - they can cost even more than half the cost of a white window. However, many homeowners are willing to spend the money because they understand that this is a long-term investment, so the windows of their dream home should be unique.
Window manufacturers use various methods for painting PVC profiles.
Some of them are more popular and more widely used, others are chosen less frequently. Some methods allow double-sided painting, others only one-sided. Before purchasing colored plastic windows, it is worth studying each method in order to make an informed decision, especially since the market does not stand still and constantly offers new opportunities. Window Profile Lamination Colored PVC windows can be made using window film, available in a variety of colors.
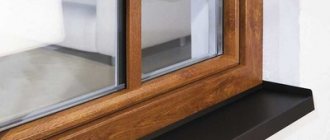
Window films were originally used to make PVC windows imitate the traditional color of wooden windows found in Europe. Window film allows you to imitate the color, grain and texture of wood. Such “wooden” windows can be very diverse and imitate almost any type of wood, both local and exotic. Thus, you can get a PVC window in the color of dark or golden oak, walnut, pine and even mahogany, which looks very elegant and stylish on the windows. An inexperienced eye will not even notice that this window is not made of natural mahogany, its features are so accurately reproduced by the window film with which the PVC profile is covered. The choice of colors and textures of wood-imitating film is huge - every year manufacturers offer more and more options to satisfy the needs of even the most demanding customers. Nowadays it is possible to choose almost any type of wood imitation - the only limit is the design requirements, imagination and the need of the investor.
How are window films used?
Application of the film is possible on almost any type of window profile, since ready-made PVC profiles are laminated. The film is glued with special glue to the visible parts of the profiles, usually on the outside. Modern technologies make it possible to laminate the profile on both sides - outside and inside. Moreover, it is possible to apply film in different colors on the exterior and interior sides, so that the window on the outside matches the style of the building, while on the interior it fits perfectly into the style of each room.
Initially, manufacturers used a substrate painted brown for lamination. Nowadays, film is increasingly being applied to white profiles. For them, this is a cheaper solution, however, this does not automatically mean that all colored windows will be immediately cheaper.
Laminated PVC windows also have their drawbacks - first of all, any mechanical damage on the surface of the film is very noticeable. Profiles of darker color need to be strengthened, as they attract solar radiation more strongly. Naturally, all this affects the price of the window structure.
WINDOWS MEDIA recommends reading: Tree-like PVC windows at the peak of popularity
Coating with a layer of colored acrylic glass
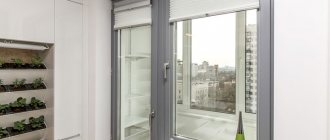
The production of colored windows using acrylic glass occurs using a co-extrusion process. At the window profile production stage, a layer of PVC is combined with a layer of acrylic glass PMMA (polymethyl methacrylate). It is a very durable material that is weather resistant, easy to polish, and at the same time has high resistance to aging and excellent optical performance. The outer surface of a window coated with a layer of acrylic glass is much stronger and more resistant than the inner layer of white PVC.
The color of the window profile during the co-extrusion process can be arbitrary, but this is no longer an imitation of wood. The color of PVC windows is more similar to the surface of an aluminum profile obtained as a result of the powder coating method. Profile systems can have a matte, silky, smooth surface and are very resistant to damage, both mechanical and under the influence of atmospheric factors.
Colored uPVC windows using acrylic glass are more expensive than regular white windows, but their durability and stunning visual effect are so compelling that many homeowners are willing to invest more to be able to enjoy windows in the perfect color.
WINDOWS MEDIA recommends reading: Rules for choosing the color of PVC window profiles
Painting
Until recently, when someone voiced the idea of painting a PVC window, he was only met with a smile of regret, since it was not possible to realize such a plan. Today everything is different, and all thanks to suitable, modern paints.
However, painting plastic windows should only be done in a factory setting. You should not try to do this yourself, even using the best high-quality window paints - we can say with confidence that in 95% of cases the profile will be destroyed, and the dream of colored windows will turn out to be an extremely expensive pleasure. Window profiles must be properly prepared, treated and protected before painting. Only at the next stage of production, the profile is painted by spraying using special equipment.
Colored aluminum trims
Another way to obtain a colored window from the facade side is to use aluminum trims painted with powder coating. This solution combines white PVC window profiles with colored aluminum trims. The effect is truly impressive visually, moreover, the color coating is durable and resistant to damage.
Of all the methods, the creation of combined structures today helps to achieve the best results and allows you to buy windows of almost any color. In addition, the statics of the plastic window, its durability and aesthetics are significantly increased; there is no risk of color fading or yellowing of the white PVC profile. WINDOWS MEDIA recommends reading: Ideal plastic windows
Fixing elements for plastic
The method of installing PVC panels, that is, attaching them to walls and ceilings, depends on the characteristics of the room - humidity level, curvature of working surfaces, the presence of communications and temperature bridges. In each individual case, certain fastening elements are used, which will be discussed.
There are three different methods of fixation.
The most inexpensive and simplest means of fastening plastic is silicone glue or “liquid nails.” You need to choose a special heat-resistant type of product. Silicone dries quickly, has high strength, allows the panels to be assembled in a short time, however, it can be used with a perfectly flat wall surface, and during repairs, this method does not allow replacing a damaged PVC lamella.
Clippers are universal parts; unlike nails, they do not damage the joints and locks of panels, fit tightly to the surface and ensure high quality assembly. Despite the strength of the fastening with brackets, minimal distortions remain, allowing the walls to settle while the panels are intact.
Installation
Installing a profile for PVC panels is not a difficult task. Almost anyone can handle it. Before attaching the guides, several preparatory steps should be completed.
Leveling the surface. Initially, the walls or ceiling are analyzed for damage. If surfaces have large cracks or differences, it is advisable to eliminate them using special mixtures
But you can also construct it from special metal structures.
The profile fastening algorithm consists of several sequential steps.
Installation of starting elements. They are located along the perimeter of the finishing surface (ceiling, wall)
The starting profiles are fastened using brackets or special screws
It is important here to position them correctly horizontally and vertically. The installation of panels in the future depends on this
Installation of corner elements. In this case, both internal and external elements are used. In most cases, they can act as starters. They can be secured according to the same principle as the previous type.
Fastening of internal intermediate profiles. Systems of this type are installed on walls that are too long, where it is impossible to select a panel of the required size.
Plastic panels can expand or contract with temperature changes. Therefore, it is necessary that when installing in a profile, there is a small gap between the wall and the material. It is advisable to take it into account when designing the entire system. Before attaching all profiles, it is advisable to choose the direction of laying the sheets.
During installation work, you need to carefully take measurements to avoid errors.
Not every experienced specialist can do this right away.
When the profile frame is formed, you can begin installing and fastening the panels. The installation technology is selected individually and depends only on external conditions. In most cases, you just need to insert the end of the product into the groove of the profile. The panel is then leveled and nailed or glued to the frame.
Profiles for PVC panels are universal products that not only speed up installation, but also extend the life of the entire system.