To achieve originality in the interior, you can use an idea such as the use of stained glass. To do this, it is not at all necessary to hire a craftsman or purchase expensive finished products. It is quite possible to create a stained glass window with your own hands at home, with some effort and studying the proposed material.
Methods for making stained glass
First of all, you need to decide what images your stained glass windows will receive . To do this, you need to come up with a sketch or find a ready-made one. To do this you will need:
- Paper or cardboard, the same size as the stained glass window.
- A drawing with clear contours and elements.
- Mark with numbers the fragments of the drawing to be painted in the corresponding color.
- If typesetting is enabled, you can specify the direction of the grain.
Externally, the blank resembles a numbered children's coloring book.
Drawing skills are not necessary: just print a suitable basic stencil. A disappearing marker will be needed to transfer the image onto the glass.
Read about how harmoniously stained glass can fit into your home in the article “Stained glass in a modern interior.” For detailed instructions on how to make a Tiffany stained glass window, see our website at the link
What is stained glass film, what types are there and how to glue it, read in our material “About stained glass films for windows, self-adhesive.”
Using thumbnails
The production of stained glass requires a sketch that includes small elements. Small drawings are easy enough to print, large images will require drawing by hand and transferring to glass. You can make a photocopy of the drawing for templates. The main stencil is made using the original, transferring it to the glass. You will need to purchase template scissors: they differ from regular scissors in the presence of a third blade. This will allow you to cut a strip 1.76mm wide.
A copy of the sketch must be glued to thick cardboard of at least 0.5 mm; a box will do. This is necessary for tracing contours. They must be tough. The paper must be glued evenly over the plane, avoiding it getting wet. It is worth numbering the parts of the sketch in advance.
Step by step work
When thinking about how to make stained glass with your own hands at home , you need to develop a work plan. You need to start with simple actions, gradually moving on to more complex ones.
Do-it-yourself film stained glass at home is the easiest thing to do, and that’s where you should start. For this purpose, it is necessary to transfer the image onto a glass base. Curbs are simulated. You can use self-adhesive film. The surface for gluing must be well degreased. If bubbles appear on the film, they can be pierced with a sewing needle.
This method is simple and cheap, but upon careful examination it will be noticeable that the stained glass window is not real. It has no view from the street side. Do-it-yourself film stained glass windows are most often made for ceilings, since they do not have a back side and are located far enough from the eyes. For the ceiling, this type of stained glass is also good because it is light in weight and completely safe in case of collapse. For the ceiling, you can use an acrylic base; glass should be avoided.
Contour stained glass windows and glass painting
Finally, about aluminum
Someone, after reading the article, will remember: wait, what about furniture glazing? Why not stained glass? In standard duralumin profiles, cheap, beautiful, shiny. And you can bend them.
No, it's not stained glass. Stained glass is a separate transportable product in a solid frame, soldered or cast. Okay, let's solder. Aluminum is soldered, and even without argon - there are special “scraping” solders (TSOP, for example) and not particularly caustic fluxes based on oleic or palmitic acid.
Yes, but the temperature is needed at 350-400 degrees; glass does not keep this in close contact with the metal. If you heat the entire set very slowly on a fireproof shield, it will swell and disintegrate due to the difference in TCR. Give allowances for thermal expansion - it shrinks and falls apart when cooling.
So “real-life” stained glass windows with aluminum binding, not using glue and resins, are not yet available. If someone figures out how to make them, it will certainly be a revolution in stained glass art: aluminum alloys are lightweight and comparable in strength to steel.
Imitation lead binding
The original stained glass windows have a metal binding. The imitation should repeat it too, so that its appearance is more realistic. There are several ways to simulate this element:
- Gluing borders with special tape. You can buy one at an artist salon. The tape will help shape the contours. The tape is 1/8″ wide and is designed like regular tape, only it is colored to match. It is very easy to work with this material.
- This method illustrates how to make stained glass windows with your own hands using imitation binding using wire. You will need aluminum or copper wire and porcelain glue, you need to find dish glue. Superglue is not suitable as it leaves a lot of marks. You can use any wire with a thickness from 0.02 to 2.5 mm, depending on the size of your work: it is carefully glued to the seams, then covered with patina.
- You can make the plate yourself. To do this you will need:
- PVA glue for porcelain 50 ml.
- Mascara 30 ml.
- Aluminum powder 40 gr.
All these components must be mixed until smooth. If you want to achieve the color of brass, you need to use bronze powder instead of aluminum. Before dyeing the product, check what color you have obtained. Please note that the paste is not suitable for storage; it must be cooked as needed and stirred constantly. The mixture must be applied using a brush or a small syringe. This requires skill.
Imitation lead binding
"Jellied"
Filled stained glass is performed in the following sequence:
- We are preparing an assembly table: a flat panel covered with white calico, felt, flannel or flannel.
- We put a stencil on it - a numbered primary sketch.
- We degrease the glass base and place it on the stencil. We take the ends with our hands wearing new textile gloves; You cannot use a suction cup or leave your fingers on your face.
- We bend, straighten and flatten the contours, one at a time, from the left (for left-handers - right) upper corner.
- We adjust it as needed and glue it with PVA. We dry it for a day.
- Fill with paint (see below). Adjacent cells of one color are poured one by one as the previous ones dry out: if it leaks, the dried drip can be easily removed with a safety razor blade.
- Let it dry for another day after filling the last cell, insert it into a metal frame - ready for installation!
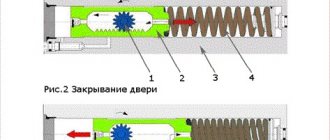
For the preparation of paints, see the following, but for now let’s focus on pouring; This is the most responsible procedure. We pour the paint with a generously soaked brush or syringe from the inside along the contour, but under no circumstances touching the curb (see figure)! The paint should naturally flow into the meniscus! If the color comes out a bit runny, after drying, pour it again in the same way.
Filling stained glass cells with paint
Pouring/topping up paint in the middle is unacceptable. If you need a thicker stain there, you need to outline it and pour more there. In this case, two fillings into the frame (along the outer and inner contours) are done without delay, one after the other.
The fact is that the “blyamba” in the middle will disrupt light refraction. The “bokeh effect” known to photographers will appear, and a single such element will disrupt the integrity of the perception of the composition. And if there are a lot of them, then the entire stained glass window will turn out sloppy.
Paints
There are four types of homemade stained glass paints:
- PVA and aniline are the easiest to prepare and the most unstable;
- Soviet-rare ones - on BF-2 glue and ballpoint pen paste;
- Gelatin-aniline - fragile and fade in direct sunlight, but give an ideal meniscus;
- Nitro-oil ones are the most expensive, but have all the advantages without the disadvantages.
First. PVA-aniline paints are prepared simply: dilute 50-100 ml of tableware PVA two or three times with distilled water. Then, in the hot distillate, add aniline dye for fabric according to the instructions for the tablet, and filter through calico, gas or thin women's tights. Drop a few drops into the PVA emulsion, stir, drop a drop on the glass and check the color. Lightened – add a pigment solution; over-darkened – emulsions.
Second. BF-2 is diluted twice with acetone and a hand paste is added dropwise to the solution with stirring. The color is checked with a test drop, as indicated above. It gives an excellent meniscus, the stand is bright, but - alas! – circulation of pure acetone is limited, because it is used in artisanal illegal drug production. But it cannot be replaced with nitro solvent or alcohol.
Third. 6 gr. Edible gelatin is diluted in 200 ml. distillate at 40-50 degrees. A solution of aniline dye, the same as for the first paint, is added drop by drop after cooling to the same temperature and the color is checked in the same way. Strength and resistance to fading can be increased somewhat by covering it with clear acrylic varnish after drying. Aniline with PVA is not possible, it will float.
Fourth. We are preparing a composition of 60% by volume transparent furniture nitro varnish and 40% 647 solvent. Squeeze out artistic oil paint directly from the tube into pea-sized balls, stir, and check the color for a drop. Suitable for acrylic coating; At the same time, the strength is acrylic, and the durability is almost unlimited.
Notes:
- Sometimes the paint doesn’t stir, but instead gets created. This means that the manufacturer is a deceiver: it is not prepared with natural hemp oil.
- Colors can be mixed, as artists do, but following the rules for mixing mineral oil paints. Otherwise, it may turn out like with Ozerov’s paintings.
Video: master class on stained glass
Types of stained glass
Making stained glass at home allows you to show your imagination and use different technologies, not limiting yourself to one recipe.
Fusing is a rather complex technology for making stained glass . It requires the use of solid glass, onto which elements of different shades are applied. The fragments have clearly defined boundaries; there is no dividing metal strip between them. The finished fabric requires calcination in an oven. The outline of the drawing can be varied depending on the author’s idea. This technique is available for production, and it is unlikely to be repeated at home.
Tiffany is also stained glass, but consisting of separate parts, which are held together by soldering with metal strips. This style is distinguished by its intricate shapes. It has a complex design and bright, varied colors. Most often, this technology is used to make various items, for example, lamps, lamps, and toy houses.
This technology for making stained glass with your own hands can have a number of problems:
- The need to cut glass and polish its edges.
- Soldering metal thread is difficult and requires skill.
- Work exclusively for adults.
An example of a finished stained glass window using the Tiffany technique
Tiffany
Tiffany stained glass windows are an order of magnitude or two more difficult to work with than those described above, so we will deal with them step by step. There are complexities and subtleties at all stages, except, perhaps, patination. And neglecting technology on any of them will ruin the work. In addition, you need to acquire some special tools and materials.
Tool
Glass cutter
The main key to success when working on Tiffany is a glass cutter, because you need to cut out small curved pieces of glass, and stained glass is very tough. Therefore, you only need a diamond glass cutter. The advisers are unlikely to be able to cut a piece of glass into a window themselves by making do with a roller Pobeditov.
Diamond glass cutter for curved cuts
Diamond glass cutters come in two types: with an edge (diamond pencils) and with a curved cutting edge. The first ones are suitable only for straight cuts, and the second ones are suitable for curved ones. The type of cutting part and method of cutting are indicated in the certificate for the tool, and in appearance - a glass cutter with a curved edge is necessarily massive, with a backing for tapping/breaking, see fig. After cutting with a pencil, the cut piece simply breaks off.
It is not advisable to buy it second hand - in 90% of cases they sell it because the diamond is chipped and does not produce a clear cut (see below). There are also glass files - thin steel strips coated with diamond. They produce quite decent curved cuts of large parts (glass for cabinets, etc.), but they are unsuitable for smalt - you cannot cut a small radius.
Notes:
- Diamond, so you know, although it holds the record for hardness, is fragile. The ancient myth about slaves who were promised freedom if they broke a diamond with a hammer on an anvil is just a myth. It pricks even when dropped on a stone floor. Therefore, the glass cutter must be stored in its standard case and handled with care.
- Glass cutters from different manufacturers differ greatly in the quality of the cut. A sign of good quality is a case made of genuine leather with a felt lining.
Soldering iron
Grinder for smalt
Tiffany soldering is done using the capillary method, so an electrical/radio soldering iron with a long red copper tip is unsuitable. You need a tool with a bronze nickel-plated tip; it serves only for heating, and the solder does not stick to it during the soldering process. You can recognize this type by its initially short white shiny tip (see below in the picture with soldering accessories), and they are sold under the Long Life brand. Power – 100 W, no more and no less.
Abrasive
To polish the smalt after cutting, it is advisable to have a glass grinder, see fig. But it costs a lot, and in any case, for precise finishing you need three grinding stones number 220-240 and 12-20 mm wide: square, semicircular and triangular. The latter is also necessary if you have a machine for selecting sharp internal corners; in drawings, say, with leaves, it is very difficult to do without them.
Notes:
- For smalt volumetric stained glass windows, a grinder is absolutely necessary. It is impossible to accurately maintain the required bevel angles of the side faces with your hands.
- It is also advisable to have a diamond needle file with a lenticular cross-section - for finishing the same corners on very small fragments.
You should look for bars made from natural garnet or corundum, heavy and very strong. The “sand” wonders of powder technology do not sharpen glass, but grind against it themselves. But grinding smalt even on the best block needs to be done under a layer of water, for which purpose the block is immersed in a bowl, baking sheet or some other suitable tray when turning.
Patina spatula
We make the spatula for applying the patina ourselves - from a toothpick and a piece of dense foam rubber 5-6 mm wide and 3-4 mm thick. Place it on a toothpick and secure it with a thin soft wire.
Materials
Glass
Tiffany smalts can be made from ordinary glass by painting it as for “poured glass”. But it is better to buy special stained glass. Translucent, matte or milky. In sheets it is expensive, but the same companies sell the battle (the material is valuable), but we don’t need much.
Notes:
- There is no need to immediately order cutting into smalts according to the sketch. Expensive, and you won’t be able to adjust it later. You need to cut the smalts yourself.
- Since Tiffany is assembled using soldering, the temperature of which the paint does not maintain, it must first be completely assembled from plain glass, and only then poured. You can use different colors on both sides, which will give the picture a shimmer when viewed from different sides.
Folia
Foil for framing smalt - folia - is sold in art stores especially for stained glass along with lead tape. A unit of goods is a roll of ribbon 4-7 mm. It is not advisable to cut a sheet of foil into strips yourself: the stained glass window will come out sloppy.
Soldering
Materials for soldering work are shown in the figure, including a soldering iron. Pay attention to the inscription: “Without rosin.” Thread-like solder with rosin inside (harpius) is not suitable for soldering stained glass. Soldering flux (this is the jar in the picture) is needed with borax or another semi-active one for soldering electronics. Residues of active flux (with orthophosphoric acid, etc.) cannot be removed from the binding, and it will eventually be corroded.
Soldering accessories
Usually, POS-61 solder is recommended for Tiffany soldering due to its low fusibility - 190 degrees. From ordinary tin-lead solders (240-280 degrees), smalts sometimes crack. But POS-61 is fragile, very soft. There is also POS-61M with a copper additive, 192 degrees, but it is only slightly stronger.
The best solders for Tiffany are those with cadmium additives: POSK-50-18 (145 degrees, in the figure) and Avia-1 (200 degrees, strength - like duralumin). POSK-50-18 is weaker, but still much stronger than POS-61/61M. It is inexpensive and, unlike Avia-1, it is easily accessible.
Patina
Nowadays, art and construction stores sell various types of blacksmith patina. It is better to buy liquid, ready-to-use. Preparing the composition yourself from powder will be only slightly cheaper, but it will be difficult, and the quality of the coating will be worse.
Stages of work
Design of a non-monotonic bend
Sketch/stencil
Already when choosing a design, you need to take into account the features of the technology and its weaknesses. S-, N- and deep U-shaped bends of the edges of the smalts are unacceptable: due to the difference in the TCR of glass and metal, the smalts along them will begin to crawl out and fall out over time. Ideal smalt is an area limited by convex smooth curves. If a non-monotonic bend is needed, it must be assembled from pieces, albeit of the same tone, see fig. Suddenly, due to the binding, the finished composition turns out to be flickering/clumsy - nothing can be done, you need to change or refine the drawing.
Note: drawings for stained glass windows are a separate area of painting. There are many ready-made ones on the Internet for different techniques, but if you want your own unique piece, you need to turn to a stained glass artist or look for your creative abilities.
Cutting smalt
First you need to make a base, the same as for stained glass. With the correct cut, the residue breaks off with the slightest push, so there is no need to immediately bring it out to the overhang: after the cut, a thin strip is slipped under the glass behind the cut, and lightly press the residue with your finger. It didn’t break off – you can tap it while hanging.
Try cutting a piece of regular window glass. If the cut is creaky, a scratch is visible, and you need to tap it several times to break it, it’s too early to take on the smalts.
When cut correctly, the glass produces a quiet, subtle ringing sound, and the crack is completely invisible. To break it, just light pressure or a light push from below is enough. To obtain such a cut, you need to maintain the angle of inclination of the tool in the direction of the cut (about 45 degrees, or according to the specifications for the glass cutter) and keep it strictly perpendicular in the transverse direction.
The second condition is a strictly constant pressure force. The skill of angle and force must be developed to the point of complete automaticity when cutting lines of any kind. This is called placing your hand.
Note: The exact angle and pressure varies with each diamond glass cutter. Therefore, ace glaziers do not use other people’s tools and do not offer them for rent.
An example of the location of auxiliary cuts
But that's not all. A curved cut along a curve will never crack in itself, even if you crack it. It will go both ways and, according to Murphy’s First Law, exactly where it will do the most harm. What to do?
Auxiliary cuts along a tangent, the thicker the more curved, see fig. The general rule is that the deflection between two adjacent auxiliary cuts should not exceed two glass thicknesses. By the way, this circumstance also needs to be taken into account when developing a stencil. Therefore, if you order a drawing from an artist, then immediately specify the stencil. However, good masters add a stencil to the drawing without anything.
If there is a corner on the smalt, a tangent from its beak to the least convex side is required. An important conclusion follows from the above: do not try to cut out many single-color smalts from a large piece at once. Almost all expensive material will go to waste. In general, smalts are cut one at a time as the stencil is filled, see below.
Here the question arises: how to trace smalt templates? The glass cutter is not the blade of a razor or a mounting knife; it is quite thick. But that's what stencil scissors are for. The width of the third, middle blade takes into account the resulting indentation.
Set to composition
Before starting to assemble the stained glass, the stencil is secured to the assembly board with even slats on the left (for left-handed people - on the right) and at the top. The smalts are laid from the corresponding far upper corner, see on the left in Fig.
Laying smalt on a stencil
The smalts are cut out strictly one at a time, otherwise the whole set will spread out before reaching half. Having cut one out, they finish it and check it according to the stencil (you need an indentation inward from the contour of 0.5-0.7 mm for soldering). Then they wrap it in foil and roll its edges with a round piece of wood or plastic (middle position). After rolling, iron the side edge with the same smoothing iron; For internal sharp corners, it is convenient to use a school plastic ruler with a wedge-shaped edge or a plastic knife from a set of disposable utensils, and then re-roll it.
Now the smalt is placed in place before soldering, pressed tightly against the previous ones or the side, and the template for the next one is checked using a stencil. If necessary, cut the template with curved nail scissors, and only then return to the glass with a glass cutter. On the filled part there should be no visible gaps between the smalts, right pos. in Fig.
Note: the best stained glass windows are obtained when typesetting on a photocopying machine covered with calico or baize. The slightest crack is immediately visible.
Crimping and fluxing
After laying all the smalts, the composition is carefully crimped horizontally with slats, now on the right (left) and below. If the smalts begin to stick out at an upward angle, the foil is smoothed and further rolled, and pressed down from above. After this, fluxing begins.
The used smalt templates are laid out next to the shield in accordance with the composition and numbering. You don't need any special precision, as long as the pieces don't get mixed up. Now the fragments are transferred to this intermediate stencil, starting from the corner opposite to the initial one, i.e. in reverse order of assembly. This is so that the flux on the ends of the smalt does not dry out.
Next, the smalts are transferred one by one back to the working stencil in the same way as they were collected. In this case, the foil frame is coated with a thin layer of flux (it has the consistency of Vaseline) using a match or toothpick. Having assembled the composition again in the old place, they crimp again, but the right (left) and bottom slats are now secured with nails. You can start soldering.
Soldering
The main condition when soldering is not to do too much at once. Due to the difference in the TCR of glass and metal, when overheated, the entire composition may swell and fall apart. At a time, you need to solder a section of one or two men's palms, then let it cool, and solder further. Soldering is carried out in the order of installation.
Tiffany is soldered using the capillary method. First, along the contour of the next smalt, pieces of solder thread the width of a soldering iron tip are dripped onto the seam in increments of 1-1.5 cm. The operation is carried out in weight, without touching the solder thread or the sting of the foil. This is painstaking, exhausting and responsible work, so take your time and take breaks to rest.
Then the seams are soldered. Each drop or sausage of solder on the seam is heated until it all goes into the seam at once and spreads along it inside. If the flux evaporates and burns out earlier, this may not happen, so flux generously, but without dirt. The missing flux during the soldering process can be added only after the soldered area has cooled. There is no need to scatter the set; the flux can be applied on top and heated a little so that it flows into the seam.
Video: technique for working with Tiffany stained glass (eng)
Framing
The composition is also soldered into the frame. There is no need to glue it on epoxy or acrylic: due to the difference in TKR, stained glass will not last more than 5-7 years. The frame is made from a brass or bronze corner.
The frame must be solid; One soldered joint is allowed in the overlay at the junction of the circuit. Therefore, a U-shaped profile is not suitable: how can you fit a stained glass window into it, a solid one? You can, however, slip it piece by piece under the stained glass window, but then you need soldered scarves in the corners, which will be visible on the finished product. However, again, it’s a matter of taste. You can immediately coordinate the design with the scarves.
The inside of the frame is cleaned with a school eraser until it shines (semi-active flux does not dissolve the oxide film on brass) and thoroughly washed with a cotton swab heavily moistened with alcohol. Then they wipe it with a new, unused microfiber cloth for glasses.
Now the frame is coated from the inside, and the edge of the stained glass from the face and side is coated with flux, the frame is placed on the composition, and soldered like smalts, piece by piece. After cooling, the stained glass window is carefully turned over, flux is applied to the back of the gap between the edge of the composition and the frame, heated until it spreads, and the gap is soldered. All that remains is to rinse off any remaining flux and patina it.
Flushing
Now there is no need to waste liters of alcohol to remove flux residues: dishwashing detergents do an excellent job of removing them. A particularly gratifying circumstance for a non-drinker: from “him, my dear” during alcohol rinsing such a spirit...
They wash the stained glass window (now a stained glass window) in the bathroom under the shower with a foam sponge soaked in detergent. Particularly stuck flux residues are removed with a toothbrush. They do not give in immediately, so a simple operation turns out to be painstaking: you cannot press hard or cut them off. Often a stained glass window has to be soaked for a day in a bathtub, into which a whole bottle of Fairy is poured, until the flux soot becomes limp and comes off under the sponge.
Patination
The final stage is patination of the binding. The operation is simple: we cast it into a small consumable container, scoop it onto a spatula and apply it to the binding. After drying, the excess is washed off with the same dishwashing sponge under the shower without any difficulties.
There is only one nuance when patination: it is a caustic and harmful thing, ready-to-use blacksmith's patina. Therefore, you need to work in a ventilated area, wearing protective gloves, goggles, and, preferably, a petal respirator.
After washing off the remaining patina and drying, the stained glass window is ready - you can put it in place in the frame and admire it.
About matting
Film and flood stained glass windows, used with backlighting, look good if the underside of the base is matte. Do-it-yourselfers are sometimes offered recipes for chemical matting, but these recommenders, it seems, have not smelled this chemical themselves, since they are alive: chemical matting uses deadly volatile components - hydrofluoric acid and its compounds. Matting with silicic acid is no better: concentrated sulfuric acid is needed, and toxic volatile products are also formed.
The easiest way to matte the back of the base yourself is to take and apply plastic tracing paper from the inside. Lasts for more than 10 years. If the matte base is visible from both sides, then there is a labor-intensive but completely harmless method:
- We buy 10-50 g, depending on the area, of corundum powder of the smallest fraction (0.05 mm).
- Scatter in small piles over the glass area.
- We drip linseed, rapeseed, palm oil or spindle oil into each pile until a paste is obtained; The list is in order of preference.
- Rub with light pressure with a polish made of whole, not double, rawhide; A piece of an old, rough, wide waist belt will work well.
- The three front (smooth) sides of the polish, alternating longitudinal-transverse and circular movements. With some skill, you can even obtain frosted glass for photographic equipment in this way.
- Wash off the remaining abrasive with water, dishwashing detergent and a sponge.
Note: you need to flush it into the tray, not the bathtub, otherwise the plumbing will be destroyed.
Video: program about making Tiffany stained glass windows
Film stained glass
Making stained glass windows with your own hands is quite difficult, so a very affordable technology is gluing a special film onto the glass. For this you will need:
- Self-adhesive film in various colors.
- Lead based tape.
- Rubber roller.
- Glass.
- Paper knife.
This technique is safe, a teenager can master it, so you can invite him to make such stained glass with his own hands.
To create a picture, you will need to transfer the outline of the picture onto the prepared glass using film. First, a template is created. It can be drawn or printed, then it is applied to the glass using a marker, the outlines are covered with lead tape, the colored film is cut out and glued to the glass. After this, the lead film is applied again. To secure the elements, a rubber roller is passed over them.
Production of film stained glass
Designer technique
American designer Tiffany Louis revived the art of medieval artists and introduced a very important element into it - copper tape. Previously, lead was used, which emitted toxic fumes that negatively affected the health of the master. He not only improved the technique of creating adhesive stained glass, but also created his own style, starting with the production of decorative indoor lamps.
Stained glass using the Tiffany technique will be considered real and will be approved by real masters. But don’t rush to rejoice, because you have to make serious expenses, such as: purchasing opal or iridescent glass, tools for breaking and cutting glass, a grinder, soldering iron, tin, flux, patina, glass cutter, brass or steel profile for the frame. Horrified by what's shown here? As we remember from the beginning of the article, making stained glass is not a cheap pleasure.
The process of making stained glass using this technique is much more complex than those described above. For example, this creates two instances of the sketch. We will cut one of them and place it on glass of different colors, outline the details with a thin marker and cut them out with a diamond glass cutter. Then we wrap it with foil, smoothing the folds with a wooden spatula.
It's time for the second sketch, on which we will lay out our details, gluing them with tape or glue. We will frame the sketch itself so that the mosaic does not move during work. There should be a small gap between the parts; we need it when soldering. We treat the seams with flux and come to soldering; after completing this stage of work, we again go over the seams with a brush with flux to avoid oxidation.
Stained glass paints
The paints will help solve the problem of how to make stained glass on glass with your own hands, without using complex technology, while achieving realism. The outline of the design is applied to ordinary glass using special paints; You can do this work with your children.
It is worth considering that the paint takes quite a long time to dry. It will take about a day to dry completely.
Stained glass paints and contours
Dimensions
The size and weight of stained glass may vary. These parameters determine what the costs and complexity of installation work may be. The size of the stained glass window usually corresponds to the area of the window where installation is planned. The sizes of stained glass windows can be any; only the client’s wishes are taken into account here.
If the structure is very large, the sections are divided into smaller fragments. Thanks to innovative stained glass techniques, you can experiment with both window sizes and stained glass shapes. Stained glass windows in the shape of an arch or a round shape look very elegant.
In addition, the size and shape will depend on the room in which the product will be placed. For a large veranda, you can make a stained glass composition that will occupy the entire front part of the room. The round window placed on the ceiling looks very original. When decorated with multi-colored glass, you can turn an ordinary room into a fairy-tale and fantasy world.
In order for a creation to be unique and original, designers and craftsmen need experience and the ability to create truly unique ones from simple things.
Sketch development
Making stained glass with your own hands should not start immediately with windows or doors. It’s worth trying on an old piece of glass, a decorative vase, or a glass. The paints offered for this work differ: there are fired and unfired types. The first require heating the product in an oven, which is not very convenient if, for example, you are painting a plastic window.
After firing, the paint will become dull and lose its brightness.
Unfired paints do not lose their brightness and do not require heat treatment, but are difficult to wash. They are afraid of aggressive detergents. A window decorated with them will need to be washed very carefully. If you are just trying to create stained glass windows with your own hands , do not skimp on paint. Buy products from high-quality imported manufacturers. Such materials have optimal density and are often equipped with dispensers. They don't flow or smear.
Contours for stained glass can also be purchased separately. They are sold in tubes, making them convenient to apply. You should not immediately purchase a black outline: it is difficult to work with. For a beginner, silver or white will work well. You won’t be able to achieve the required width without experience – you will need to practice. Excess material must be wiped off with a damp sponge immediately, otherwise it will dry out.
For training, you can use any glass or mirror. First you need to clean its surface from dirt, degrease it: this can be done with alcohol or a special solvent. Before making a stained glass window , think about the sketch. If you have created a drawing, it is better to make several photocopies; the finished version can be printed on a printer. If you started your practice by creating a lamp, roll up the sheet, insert it inside the glass and attach it with tape. After this, the drawing can be outlined on the glass with a marker. It is better to take a erasable marker. After this, you can use the stained glass outline. Gently apply it to the surface and let the paint dry.
Before use, gently shake the paint tube. There is no need to shake it. otherwise, bubbles will appear in the paint. The paint is applied in a thick layer; you need to paint over each element of the design. After this, let the paint dry completely. In order to protect the colored layer, you can use acrylic varnish or heat the glass in an oven. The second option is used exclusively for heat-resistant glass.
Are you thinking of installing stained glass windows? Read in our material what you need to consider when purchasing and how much it will cost. Find out the advantages and disadvantages of classic stained glass, read consumer reviews and find out prices in our article “Classic Stained Glass”.
How much do Tiffany stained glass windows cost and what consumers think about them, read on our website.
Material and tools
You can paint panels, clocks, glasses, decanters, vases, glass surfaces in kitchen cabinets, on doors and windows with your own hands. To begin, choose a simple drawing. Make a small sketch. You can use a painting you like (photo 4), glasses (photo 5), vases (photo 6). To create a stained glass composition you will need:
- working material for painting;
- stained glass paint;
- brushes (it is better to use a separate brush for each color);
- stencil or favorite design;
- acrylic outline;
- needle, cotton swabs, toothpicks;
- solvent;
- cloth napkin.
READ ON THE TOPIC:
Stained glass windows - prestige and modernity
Photo 1 – Stained glass window with a peacock
Photo 2 – Glass painting
Photo 3 – Stained glass with a sakura branch
Photo 4 – Stained glass with swallows
Progress
The work surface must be cleaned and degreased with nail polish remover, alcohol or cologne.
The picture is glued to the back of the working surface with double-sided tape or a ready-made stencil for stained glass on glass is used. Next, draw the outline of the drawing with a regular marker or cosmetic pencil.
The outlines are enhanced using a special acrylic contour. It takes 1-2 hours for it to dry completely.
Attention! The main contour must be continuous (without random gaps) so that the coloring material does not find a free opening for flow out. When the outline is dry, you can start filling the pattern with stained glass paint on the glass.
This work is done using brushes or special dispensers.
When the outline is dry, you can start filling the pattern with stained glass paint on the glass. This work is done using brushes or special dispensers.
Coloring and color selection is carried out according to the proposed drawing or at the request of the master. The finished stained glass window should dry well within 1-2 days.
Depending on the subject of painting and its conditions of use, the finished stained glass masterpiece can be protected with transparent nitro varnish.
What is the best stained glass paint?
In order to paint glass surfaces with paints, there are a lot of technologies and many different paints. Glass paints (form. 7) are made with different bases:
- acrylic;
- one;
- nitro.
Photo 5 – Painting glasses
Photo 6 – Artistic painting on vases
Photo 7 – Stained glass paint
Photo 8 - Stencil for stained glass apple tree with apples
Water-based paints are often used in children's works. They can be used in stained glass windows “firing” in kilns. This material is environmentally friendly and has no pungent odors.
Nitro paints dry quickly and do not change color. They do not need to be burned, but consumers are put off by the smell of solvent.
Acrylic stained glass paints are considered the most acceptable painting material for glass surfaces. They differ:
- brightness and color saturation;
- absence of unpleasant odor;
- consistency, texture, additives;
- ease of operation;
- the ability to mix with each other to obtain interesting colors;
- long service life without additional firing;
- by different manufacturers;
- low prices.
You can also prepare coloring elements for stained glass windows yourself. To do this, use ordinary art paints with the addition of PVA glue.
Various stencils for stained glass on glass
In order to create a unique stained glass composition, you will need ready-made stencils for stained glass on glass. They can be printed on a printer, drawn on graph paper, Whatman paper, or cardboard. In addition, you can use a children's coloring book or any picture or leftover wallpaper. Ready-made stencil designs are also available for sale.
Pay attention to the interesting blanks in photos 8, 9. Using stencils for stained glass windows, unique compositions are created on glass that can enliven any design
READ ON THE TOPIC:
Making your own stained glass on the ceiling
Conclusion
There is nothing inaccessible to a person who wants to create and create unique compositions. Making stained glass windows is a very interesting and useful activity that gives real results.
Painted bottles, vases, glasses are a good gift.
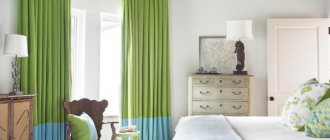
Stained glass compositions on mirrors, windows, doors, partitions are an excellent design solution when decorating kitchens, rooms, balconies, terraces, verandas...
Teaching a child to draw using stained glass paints
teach a child how to make stained glass with your own hands . If he is still small, you can prepare materials for him yourself. You will need:
- PVA glue.
- Food coloring.
The components must be mixed to obtain a thick, homogeneous mass. Place the resulting mixture in a plastic tube. It is safe even for little ones who will enjoy playing with the colors.
Glass should not be used. You can get by with safe film. Take the file and insert a sheet with the desired image into it. Show your child how to make stained glass. To do this, you need to outline the drawing with a marker and paint it with previously made paints. After the paint has dried, the film needs to be cut out and glued to the glass. Let your child come up with a drawing on his own. Many children enjoy being creative, drawing and making stained glass windows.
Conclusion: you can create an original interior decoration yourself, and you will get a lot of positive emotions and be able to engage in the creative process together with your family.
Preamble
In the Middle Ages, plain glass, not to mention colored glass, was an expensive product. Even an ordinary person could not afford it, preferring to decorate their houses with wooden shutters. The stained glass window itself was religious in nature. Geometric patterns, which were seen as a representation of the perfection of God, were especially popular. And such glass greatly transformed the holy place, creating a unique atmosphere.
Today, stained glass windows are simply a beautiful decoration that can be found in any secular home. The right tools and materials, patience and desire will help you create unique colored glass yourself.