Sometimes it turns out that the curtain or tulle is lower than we would like. Then the question arises of how to lengthen the curtains so as not to spend money on purchasing a new product. This often applies to newly purchased paintings, as well as when replacing windows or replacing its design.
If you decide to hang curtains, but for some reason they turn out to be short, then you can correct the situation by avoiding buying new curtains.
There are ways in which you can build up the canvas so that no one will guess that you have done any manipulation with them.
How to solve the problem of short curtains: ways to lengthen them to the required size/height
There are many ways to lengthen, and limiting yourself to a couple of pieces here will not work. You can always find an original version that has not yet been described on the Internet. However, if such a problem exists, then this is generally done.
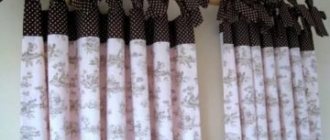
Beautiful loops will not only make the curtain longer, but will also add originality to the product.
Even a person who has nothing to do with sewing can cope with such work.
- Add a piece of fabric to the bottom. In this case, this is often decorated as an additional strip or ruffle, and decor is also added or the bottom seam is unraveled.
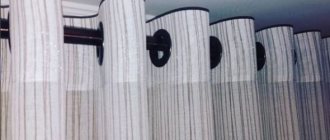
- A strip of fabric is sewn on top and eyelets are inserted, and a lambrequin and long loops are also used.
- Inserts are made in the middle of the canvas - one or more, both below and along the entire length.
- Combine two of the options in one product. These can be inserts and eyelets or ruffles with lambrequins.
The housewife independently decides which processing and extension method to choose, based on her experience, desires and room design.
Please note: if the original canvas has at least a slightly worn, tired look, then it is not advisable to correct its length. And if the fabric looks perfect, you can experiment.
We take into account the quality of pipes
Most manufacturers make pipes for curtain rods with a thickness of 0.5-0.55 mm. Perhaps such products will be cheaper, but their quality leaves much to be desired. Even with light curtains on the eaves, the pipes will begin to sag over time due to insufficient metal thickness.
Note!
OLEXDECO forged pipes have
a metal thickness of 0.6 mm
. If you follow all our recommendations on the correct placement of curtain rods and curtains, OLEXDECO forged curtain rods will delight you for many years without breaking down or sagging.
In addition, we also take care of the appearance of our products. Metal pipes for OLEXDECO curtain rods are sold in special plastic packaging.
This ensures their careful storage in the warehouse and protects them from mechanical damage during transportation. And the presence of a special red thread on the packaging is intended for convenience when removing the plastic film from the pipe.
How to lengthen curtains from below with your own hands
Ways to lengthen the curtains from the bottom are ideas that can be developed and adapted to each situation separately. Because sewing is mostly creativity. Popular methods for adjusting curtains that are too short are: sewing a ruffle or cut, as well as spreading the seam on the bottom edge and attaching decorative elements.
Using ruffles, you can increase the height of curtains up to 50 cm.
This method will appeal to creative and romantic individuals.
Top stripe
A plain stripe at the top is a good idea for curtains or curtains, either plain or patterned.
It is better to stitch the strip onto heavy curtains and gathered curtains. Light tulle with shallow tails can be attached to the extension strip using Velcro tape (Velcro).
The stitched strip can be decorated with stitched folds, guipure, or you can go an unconventional route and sew a durable but weightless transparent mesh to a thick curtain.
Adding a second piece of canvas
This is one of the simplest methods because it is simply attached from below. To do this, you need to make the correct calculations and process the slices. To do this, it is not at all necessary to look for the same material of the same color, these nuances matter, but you can combine different colors and textures.
The main thing is that it looks harmonious as a whole and in the context of the interior of the room.
Instructions:
- The width of one canvas and the piece that is not enough in height are measured. To the first value you need to add three centimeters on each side. And the height of the additional fabric will be equal to the amount of the original figure, plus 3.5-4 cm (bottom seam and top indentation).
- It is necessary to process the sides and bottom of the additional rectangle, with the cut inward, and work with the top edge so that the fabric does not fray (manually or on an overcasting machine).
- When both parts are ready, fold them with the right sides inward and the cuts facing each other, baste them, then stitch them 0.5-1 cm from the cut.
- All that remains is to give the product a presentable appearance and iron the corners the way you want to see them as a result. Ready.
The fabric may be identical to the color of the curtains, but inserts made from a different fabric will look much more interesting.
Important! If the curtains consist of two parts, you need to take care of symmetry - make the same measurements and indentations.
Installation of ceiling cornices
Fastening diagram and methods of bending a ceiling cornice.
You may have to tinker a little with the ceiling before starting to install the cornice. The main thing is a flat surface. Also take care of the ceiling plinth. Once the location where you are going to install the curtain rod is determined and prepared, draw a line there. It should be flat and horizontal. To do this, prepare a ruler, pencil and building level. Make special marks, noting where you will need to screw the brackets or attach the profile to the cornice. From the window to the right and to the left you need to leave the same indentation. Now you have begun work on installing the cornice.
Then you can take an electric drill and make holes at the marked points. You need to hammer in dowels there. Then, using the brackets, firmly secure the screws to the ceiling.
Completely prepare the cornice before installation: install all the necessary fittings, put on all the attachments in advance, etc. Then you can tuck the base of the cornice into the brackets that are fixed to your ceiling, and then fix the structure with locking screws.
Installation of a cornice for Roman blinds.
It is good if you prepare in advance before installation so that you are fully prepared. To do this, check that you have the following tools:
- a simple pencil and a stationery ruler;
- building level;
- screws, dowels, nails;
- electric drills;
- hand saws for metal (also suitable for wood);
- a set of screwdrivers (must be straight and Phillips);
- tape measures measuring 5 m long.
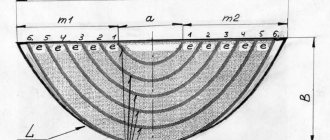
How to make ruffles
Ruffles look romantic and light, so they will suit many types of interior, especially the Provence style. To do this, you need to find out the width of the curtain and multiply it by two, and add 10 cm to the height. Then, after processing the edges of the piece, you need to perform the following steps.
You can increase the length of the curtains at the bottom using beautiful ruffles.
- Make a baste with one thread 2 cm from the edge and gather the fabric into a gather of the desired length.
- Attach and baste the ruffles to the bottom of the curtain, departing 4 cm from the cut.
- Sew two parts on a machine, and the seam on the front part can be decorated with lace ribbons if desired.
This option is suitable if you want to fit old curtains into the new romantic interior of the living room or bedroom.
The result is a ruffle, the waves of which are voluminous and stylish.
Required materials and tools
The length of the curtains can be increased using fabric loops, various pendants or inserts. To work you need to prepare:
- perfectly sharpened scissors;
- lambrequin or fabric, decor;
- construction tape;
- chalk or pencil on fabric;
- thread and needle;
- sewing machine;
- pattern paper;
- decorations;
- electric iron or steamer.
This is a standard sewing kit that is needed to lengthen curtains. For the lambrequin you will need lining fabric, and for the loops you will need buttons or rivets.
If you need to lengthen the curtains a couple of centimeters
If you open the bottom seam and iron it properly, you can achieve the desired length, the same can be done if the question arises of how to increase the width of curtains for the living room, for example. In this case, you cannot leave the sections as is. They must be processed, and the ribbon will help with this.
Choose a fabric that matches the color and texture of the curtains.
To do this, you need to attach it to the canvas and align the seams and stitch. After this, fold it over and make a front securing stitch. This element is usually matched to the tone of the main fabric or in contrast (then the loops or insert for the eyelets on top can be made in the same color). You can also make it yourself or purchase it in the sewing department of the store.
Curtains lengthened in this way look very stylish.
Installation technology
A set of additional accessories for the ceiling rail gives freedom of choice when shaping its length, configuration, and method of fastening. Their price is low, so even buying extra parts “in reserve” will not make a hole in your budget.
Let's follow the entire installation process from purchasing the cornice to hanging the curtains.
Assembly
First of all, decide on the required length and shape. If you want the curtains to reach the walls at the edges, purchase rotating elements, and if the standard length of the rail is too short, buy another one of the same width and a connector.
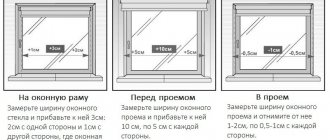
Assembling the ceiling cornice begins with measurements. If it is from wall to wall, reduce this distance by 1-2 cm for ease of installation. If with curves, do not forget to subtract the size of the turning elements from the total length.
If you are satisfied with the standard dimensions of the ceiling cornice, then assembly will be simple:
- Decide on the number of hooks for each row and install them in the runners , inserting them into the groove at the end of the tire;
- Install stoppers and/or plugs;
Advice. The plugs can be placed on glue for reliability.
- If there are turns, instead of plugs, put these elements on the ends of the tire . They are fixed using special locking connections.
The turn and the tire must be the same width and profile design
If you need to increase the length, use connectors with the same locks as in the picture above. And you can reduce it by simply sawing off the excess with a hacksaw in a direction strictly perpendicular to the longitudinal axis.
Let us tell you, as an example, how to shorten a ceiling cornice with a turn.
- Measure the length of the assembled cornice with turns;
- Subtract the desired length from it;
- Disassemble the structure and cut off a section from the tire equal to the resulting difference;
- Reassemble and test again;
- If a hood is provided, it is pulled along the profile until the ends align, and the excess at the other end is sawed off with a hacksaw.
Ceiling mount
For installation in a concrete ceiling you will need a hammer drill, a hammer, a screwdriver and dowel nails; for a wooden ceiling - only a screwdriver and self-tapping screws.
Ceiling rails usually already have mounting holes. If not, then drill them with your own hands, making the distance between them about 60 cm. A step of greater length can lead to the following consequences:
The curtain rod sags under the weight of thick curtains
Note! Mounting holes in a three- and four-lane bus are made in two rows in a checkerboard pattern.
Your further actions are described in the table.
| Installation stages | Your actions |
| Line marking | Mark the fastening line. It should be parallel to the wall and spaced at such a distance from it that the first row of curtains does not touch the window sill, radiators and window handles. |
| Fitting | Try on the cornice to make sure the markings are correct. Install it symmetrically to the window opening or in accordance with how it should be secured in the end. |
| Marking fasteners | While holding the tire in a stationary position, make marks on the ceiling with a pencil through the mounting holes in it. |
| Installation | Drill holes at the designated points according to the diameter and length of the dowels, and hammer them into place. Raise the ceiling cornice, aligning the holes in it with the dowels, and screw it in place. |
In the case of a wooden ceiling, there is no need to drill anything - the cornice is simply fixed with self-tapping screws.
How to lengthen the tulle from below with your own hands, options, instructions.
Tulle is usually an elegant thin fabric (organza, chiffon, muslin), so it is difficult to lengthen it like curtains. However, skilled craftswomen came up with a solution to this problem. In such cases, it is common to buy long lace of the required size plus four centimeters for processing. It must be basted to the edge of the tulle and then carefully stitched, you will get a designer product worthy of a good interior.
One effective way is to sew lace to the bottom of the tulle.
At the same time, it is important that the lace has something in common, a connecting link with the main thin fabric. Only then will a harmonious and beautiful work emerge.
Ceiling cornice installation technology
An important advantage of ceiling cornices is the ease of their installation. If the structure is installed on a concrete ceiling, then installation will not cause any difficulties.
Things are somewhat more complicated with a plasterboard ceiling. Such a ceiling is not designed for heavy loads, so you need to choose the lightest cornice, and hang only airy thin curtains on it.
The task becomes more complicated if the cornice needs to be installed on a suspended ceiling. It would seem that it is impossible to attach the cornice to the film without stretching it. But there are 2 ways to solve this problem:
1. The visible ceiling cornice is mounted on support beams hidden under the ceiling.
2. The hidden cornice is fixed to the main ceiling, and the stretch ceiling is fixed to a special stand located in front of the cornice.
The first option for installing a ceiling cornice is simpler and is used much more often than the second. Let's look at it in more detail:
- First of all, mark the place on the ceiling where the ceiling cornice will be attached.
- Next, mark the perimeter of the room, and attach the fixing profile of the stretch ceiling to the walls.
- Now, along the marking line on the ceiling (see point 1), a wooden beam is attached using dowels. The thickness of the beam is selected so that its lower plane is almost closely adjacent to the suspended ceiling. To achieve this result, mounting wedges are often hammered between the ceiling and the timber.
- After fixing the beam, the stretch ceiling fabric is stretched.
- The ceiling cornice is very carefully attached through the canvas using self-tapping screws (while trying to cause minimal damage to the ceiling). The places where the self-tapping screws pass through the canvas are usually reinforced with special polymer rings. And the holes in the suspended ceiling are not cut, but burned.
If everything was done correctly, then the embedded beam installed under the canvas is practically invisible. Read the next article: how to glue ceiling plinths.
Using decorative elements
This is also not a rare decision, because many housewives consider it useful to diversify the decor with fresh new clothes. To do this, various decorative details are sewn onto the lower edge of the tulle; it can be a solid structure or many small ones. Lovers of embroidery and making crafts from beads understand how well they can complement the appearance of a product with white beads and transparent fishing line; this will give it elegance and shine.
This decor is suitable for classic and modern romantic interiors.
The use of decorative tassels is also popular; they are usually attached with one continuous strip along the sides and bottom of the curtain.
Here you can play with colors, match wallpaper or furniture, and also think about their size.
But you shouldn’t rush to try to complement the length with inserts; it looks organic only in some individual situations. After all, the material for tulle is intended to be an independent canvas and self-sufficient. Well, it’s difficult to choose a matching fabric, because this is a special technique of weaving fibers with density and dullness, etc.
Only light, airy fabrics are suitable for decorating tulle.
Classification
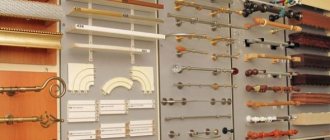
Modern ceiling curtain rods are classified depending on the material, method of fastening, profile design, size and shape. To make a ceiling cornice, manufacturers use three materials: wood, plastic, metal . Wooden structures are more suitable for interiors in a classic style. For rooms where all the furnishings are chosen in a modern style, metal structures are more suitable. Lightweight plastic curtain rods are universal; they will look harmonious in almost any interior.
There are two types of ceiling structure mounting. Either it is hung from the ceiling using various fasteners through a hole in the strip, or it is installed on brackets, which, in turn, are attached to the wall or ceiling.
The profile designs of different models differ in the number of rows. In single-row systems there is only one track. In this case, you can hang the curtains in only one layer. The multi-row system is characterized by the presence of 2 to 4 tracks; it allows you to create multi-layer compositions from different textures of textile fabric.
For the classic version, when hanging curtains with curtains, a two-row design is suitable. When adding a lambrequin, a three-row cornice will be required. The 4-row system allows you to create complex designs from several types of fabrics.
The shapes of cornices are of the following types:
- Straight rectangular cornice . This type allows you to hang drapes, curtains and lambrequins in a straight line; this is the most common option and is called a profile cornice. A variation of the rectangular shape are rounded cornices, consisting of a main straight part and two separate arched elements attached to the main part (tire). Curtain rods of this design have recently become very popular due to their rounded edges, which give the curtains a neat appearance and smooth shape;
- Profile cornice . These curtain rods, consisting of multiple parts, are suitable not only for windows located in one straight line, but also for windows located on different walls next to each other. Thanks to the arc-shaped elements, you can simulate a corner option. The rotary elements completely coincide with the linear parts. Rows are formed along which runners with curtains move freely;
- Flexible bay window cornice . A real find for panoramic windows characterized by non-standard geometry. There are string and profile options. The string structure consists of one or more metal cables stretched between brackets. The length of each string can reach 5-6 meters. The flexibility inherent in the string design allows you to effortlessly design walls with a complex configuration, as well as run them along the perimeter of the bay window protrusion. Any person can handle the installation of this structure.
But do not forget that string curtain rods are characterized by low load-bearing capacity, and therefore are not designed for the use of dense, heavy fabrics.
Light, airy fabrics (chiffon, organza, cambric) are more suitable for this design.
How to extend a curtain in length if the curtain has a pattern
Adding a curtain if there is a pattern is often not so easy due to the original nature of the print. This requires design skills that take into account all the nuances.
With the help of simple manipulations you can increase its size in an original way.
- Do not “overload” the appearance of the curtains, but also prevent dullness.
- The consistency of one and the second parts in color (compatibility), texture and density.
- Sometimes decor is used as an additional connecting detail.
- Practicality of both materials (they should have approximately the same characteristics so that aesthetics are not compromised in the future).
Very often, correctly altered curtains look much better than the original.
And it is important to maintain a uniform style, even if the rules described above or one of them are omitted. After all, in modern times experiments and new solutions are welcomed, which cannot be achieved if you follow a familiar path with minimal risk.
If you decide to hang a curtain and realize that its length is significantly short, don’t be upset!
Nuances to consider during installation
To avoid additional difficulties and to ensure that the work process is not interrupted, it is better to take into account some points in advance.
For example, the brackets must be fixed in a strictly symmetrical position relative to the windows and walls. So, you will achieve the perfect harmonious look of the curtained window.
If the base of the cornice is too long and the curtains are very heavy, then it is better to also attach a bracket in the center. This will serve as additional fastening.
Position the mounting rings so that they are the same distance from each other. Then you will get even folds on the curtains.
If you are installing a round curtain rod, leave one free ring at each end. This secret will help in the future when fixing curtains in extreme positions.
It is worth purchasing a special pointer for moving curtains - a “driver”. Its use will make managing the curtains easy, and the curtain rod will remain durable for a long time.
Examples of beautiful lengthening of curtains from below, real photos.
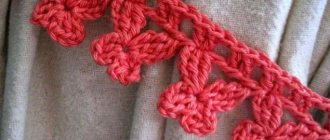
One of the successful options is loops made of fabric, preferably the same as the main fabric. Then one gets the feeling that this was how it was originally intended - natural, noble and elegant.
You need to make one pattern and duplicate it on several loops, then stitch them beautifully.
Lambrequins are a non-moving decorative part of curtains, so length-correcting loops can be hidden under them. They can be made from twine, if there are eyelets there initially, or from threads or any other material, the main thing is that they are measured to the correct length and evenly create waves, distance from the floor.
This method looks especially beautiful on curtains made of noble fabrics.
The eyelets themselves often help out owners if they need to correct something in the original plan for sewing or hanging curtains. You can sew a strip with eyelets to the top of the curtain and string it onto a pipe, only before doing this you can choose the right color for beauty. If the colors are not in keeping with the theme, the whole image will turn out unfinished or will even leave the impression of bad taste.
The combination of two such textures looks very impressive - it is a contrast in itself.
Sixth method: special pendants
Using this method allows you not only to lengthen the curtains, but also to add some zest and charm to their design, creating the overall splendor of the image.
- Buy beads, strings of pearls or pendants with stones and crystals.
- Secure them to the bottom of the fabric.
You can attach special pendants at certain distances, in the form of waves or hanging threads, in general, as your imagination allows you. Such curtains look very solemn, and the length... reaches the desired size. Are you ready for the fact that you will have to not use ready-made pendants, but make them yourself, using creativity and resourcefulness? Such accessories will give your curtains a certain charm that entails a lot of emotions.
Conclusion
Housewives often wonder what to do if the curtains are short: the tulle has shrunk after washing or the yardage of fabric purchased at a sewing store has been calculated incorrectly. Therefore, it is necessary to have an idea of what options for solving the problem already exist, and what nuances must be taken into account during the work process in order to clearly adapt the alteration to a specific situation.
The missing centimeters can be added both from below and from above.
Various ruffles, eyelets and lace can help very well - refresh the interior and give it atmosphere and sensuality, and also, with the right approach, reflect the inner world of the owners.
Such attributes can add additional zest to the room.
Low ceiling solutions
When carrying out design projects in new buildings, not to mention secondary housing, customers are often faced with the problem of low ceilings. There is no need to despair: any ceiling can be “raised”, albeit visually. Let's find out how to do this.
Low ceilings (by this we mean a height of 2.4-2.6 meters) are a problem in many standard apartments. With them, the room may seem darker, cramped, and closed. However, coping with the task is not so difficult if you tackle the repair competently. In this article I will talk about practical ways to visually increase the height of the ceiling.
Textile Features
Among the entire range of fabrics, light, transparent, natural or mixed ones will be more acceptable. It is worth completely abandoning the use of velvet, wool and other pompous heavy materials.
If you need to use a patterned fabric, choose a small floral or geometric pattern. A large abstraction or flowers on a small section will look ridiculous.
The properties of textiles must be taken into account when decorating various rooms: synthetics that can withstand frequent washing are suitable; it is better to choose natural linen or cambric; in the living room you can also use thick curtains.