Not the last place in the interior of the room is occupied by curtains. They not only decorate the room, but also perform a protective function for the room. To attach the curtains in place, you need curtain rods. The choice plays an important role, because there are many varieties, made of different materials, designs, sizes, shapes.
Curtain rods come in different types, designs and from different materials.
The most popular are wooden curtain rods; let’s take a closer look at what they are.
Cornices made from natural durable wood have a convenient shape and fit into any design.
Wooden cornices have been used for a long time; they were one of the first to be used to complement interiors; they are installed in living rooms, bedrooms, children's rooms, and kitchens.
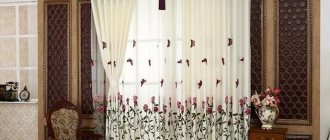
Wooden curtains are made from valuable tree species: mahogany, oak, walnut, beech, mahogany, chestnut, pine. They have a beautiful aesthetic appearance, are valued because nature has endowed them with unique lines and patterns, are durable, strong, and are used with both heavy curtains and light curtains, lambrequins.
Using varnishes, paints, and tonal coatings, these rocks are imitated, decorated with hand carvings, and covered with gilding.
To give the cornice a complete look, it is decorated with figured wooden tips or forged elements
Cornices are in harmony both in the classical style and in the modern style.
Wood is an environmentally friendly material and does not contain substances harmful to human health, which is a plus in its use. But there are disadvantages: they do not tolerate moisture well, over time, abrasions of the rings appear on the rod, and the coating needs to be renewed.
Curtains made of wood require regular maintenance, otherwise over time they will become a haven for wood parasites and lose their appearance. Curtains are easy to install; they have simple designs and convenient fasteners.
Design Features
Modern manufacturers offer many options for curtain rods with different fastenings and designs; the choice depends on:
- interior style and decor;
- curtain compositions (rows, lambrequins);
- shape and area of the window;
- room area;
- method of fastening to the cornice: hooks, clips, rings.
Based on the type of fastening, they are divided into the following types.
Ceiling
This type of fastening is used in rooms with low ceilings; when a curtain is hung, it creates the impression that the room is higher, the effect of an elongated space.
Wooden ceiling cornices are characterized by great strength, durability and decorative finishing options
Wall mounted
This type of cornices is attached to the walls, it’s easy, it just doesn’t take much time. Used in rooms with high ceilings.
Wall cornices are suitable for high rooms, if there is some distance between the window opening and the ceiling
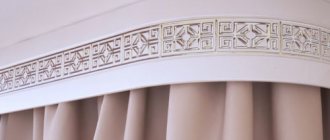
Baguettes
This design is a plastic profile or a series of strings, closed on top with a beautiful wooden plank. The surface is covered with carved elements, patterns and other attention-grabbing components. The purpose of this strip is to cover the internal composition: strings, rings, folds of curtains, sometimes even uneven walls.
Baguette decorative cornices - decorative strips that hide the mechanism for fastening curtains and cornice structures
The designs of wooden cornices are distinguished by the number of rows.
Single row
The simplest and most inexpensive, they consist of one rod, light for curtains. They are used in the kitchen or other room where thick, heavy curtains are not needed.
Single-row curtain rods - products consisting of a single rod designed for attaching one set of curtains
Double row
These curtains are the most common and can be used in any room; you can hang thin tulle and thick curtains.
Double-row cornices are designed to combine tulle and curtains
Three-row
To create a multi-layered rich composition, three-row cornices are used, and lambrequins are added to tulle and curtains.
Three-row designs have three rods, which allows the use of complex ensembles with the presence of lambrequins
Cornices also have different shapes:
- Round. These are the most practical, the rings move easily, softly, smoothly along the bar, the interior seems more cozy and comfortable.
Round rod - the most common type of cornice - Rectangular in the form of a plank. This design is less practical; it is difficult to move along the fastening bar; you can install lighting to create a romantic atmosphere.
A wooden cornice can also have the shape of a plank; the edges of the crossbar are decorated with square or rectangular tips
Attention! You can buy and fix the curtain rods yourself, but still, when choosing such an important accessory in the design of the room, it is better to consult with experienced employees of specialized stores and companies.
Our staff will help you choose a product that suits the design of the room, style, type of fabric, and which fastenings are most suitable. Professionally installed curtains are safe and durable, so you don't have to worry about them falling at some point.
How to make a curtain rod with your own hands: step-by-step instructions describing the process
There are several ways to produce a product. Before starting work, you need to choose the type of structure.
- Decorative strip.
Model for string cornice. It increases the attractiveness of the design.
Chipboard cornice
For production you will need:
- a circular saw;
- chipboard sheets;
- steel corners;
- screwdriver
Algorithm:
- A strip 15 cm wide is cut out of a sheet of chipboard. The length depends on the dimensions of the window.
- The element is coated with paint and varnish. You can glue decorations - patterns, leaves, etc. It all depends on the overall design.
- Make markings on the ceiling for steel corners. They should be positioned with birch strings so that the bar disguises the product. Drill holes. Self-tapping screws are inserted into the holes formed.
- Steel corners are screwed to the bar.
- Fix the structure to the ceiling. Install it on self-tapping screws. Shift it so that the parts fit along the grooves.
The decorative strip can be used not only for string, but also for any cornice that needs to be decorated.
- Construction made of metal pipes for wall mounting.
This system looks attractive and can withstand even heavy curtains. To make a cornice, you will need pipes with a diameter of 19, 25 mm, and a 12 mm rod.
Cornice made of metal pipes
Procedure:
- Cut the required length of pipes. It depends on the size of the window.
- They make holders for the structure. To do this, the rod is cut into 3 parts. The length of each is 25 cm. At a distance of 1.5 cm from the edge, a groove with a diameter of 26-27 mm is made in the element so that a large pipe can easily pass into it. After 8 cm from the first hole, a second one is formed. Diameter – 20-21 cm. This groove is intended for a smaller pipe. Each element is sanded, dusted, coated with a primer and paint.
- Markings are made on the wall for three holders. Two should be installed on the sides of the window, the third in the middle.
- Drill holes. Brackets are inserted into them. To ensure the reliability of the product, they are sealed with putty.
- The pipes are inserted into the grooves.
- Install plugs. You can use elements from an old device or purchase round door handles of a suitable size.
The curtain should be hung on the element in advance so as not to remove the strips again.
Product length
Selected individually. Depends on the type of room, area, what style and fabric structure is chosen.
For small rooms, use narrow and preferably light-colored curtains, without threads, which will harmoniously fit into the interior. But in large rooms you can use a flight of fancy. In any case, when choosing, the length should be 40-50 cm wider than the window opening. If the window is large, in order to avoid sagging of the wooden cornice due to the gravity and weight of the curtains, use additional fasteners, intermediate holders.
Ceiling cornices made of wood: what to look for
Such cornices have more of a decorative function than a practical one, since they are much more noticeable than wall ones. This element of decor can no longer be hidden, and indeed it is not necessary. With the right choice of wood and color, it will complement the curtains perfectly.
For this type of carving, wavy lines are considered universal carvings. They are often confused with profiles. Unlike wall cornices, functional mechanisms are completely hidden in ceiling cornices.
There are also other advantages over wall-mounted ones, for example, the following: fasteners can be three-row, the choice of design for such fastenings is huge. However, they can hardly be called budget.
The high cost is due to the exquisite carving and massive material. This design is most likely suitable for draped curtains, as well as heavy dark fabrics. If you want to emphasize your high income, then it is better to choose mahogany ceiling cornices.
Products made from oak are considered more restrained. If, on the contrary, you need to save money, then it is better to choose products made from pine or alder. In some cases, they even emit a pleasant forest smell.
Wood Curtain Styles
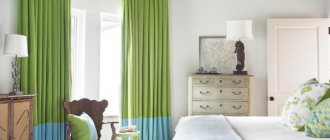
Advances in modern technology make it possible to use natural wood, creating products from it in various colors and shades, ranging from natural tones to black and white, with different colors used in different styles.
In eco and minimalist style, light shades of wood look beautiful and are used in small, low rooms.
Baroque, Empire, and classic styles are a lot of luxury and wealth and are made in dark colors and are used in pompous, elite places.
Scandinavian does not have a specific color scheme, and depends on the design of the room, but preference is given to white tones.
Italian curtains in red shades of wood, carved inserts for curtains, intricate patterns.
Important! Curtain rods with a sharp contrasting color in relation to the curtains and decoration of the room are not recommended, but a slight difference in shades is acceptable.
Set of wooden curtains
Standard kit:
- rods 1 -3 pcs;
- brackets;
- a set of parts for fastening curtains (hooks, rings, eyelets, clips);
- decorative tips, fleurons.
Taking into account all the nuances when purchasing wooden products, the interior of the room will acquire a unique, individual design. We could have stopped there.
But you can make wooden curtains for curtains with your own hands.
Conclusion
Designing, creating and installing a homemade cornice is a labor-intensive process, but if all the rules are followed, the result of the work will exceed all expectations. Not every owner can boast of an original product in the decor of their home, so such touches are always highly valued.
Designers remind us that we shouldn’t focus only on the functional side of the issue. Thanks to the abundance of fittings, even the simplest product can be decorated in accordance with the basic style of the room and emphasize its uniqueness.
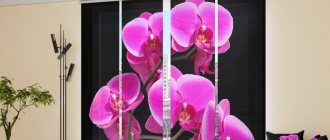
As for Japanese panel curtains, it is better to trust the craftsmen, especially since in the light of growing competition the cost of such work is no longer so high.
Barbell
- Take a board, as for the bracket.
- sawn into square slats 25x25 mm, the edges are rounded on the milling table, a round base is obtained.
- the edges of the rod at a distance of 10 cm are reduced in diameter, equating to the size of the holes on the brackets, sanded and painted.
- Everything is varnished.
- The cornice is being installed and the curtains are being hung.
As you can see, it is possible to make wooden cornices at home, but this requires skills and tools. Therefore, it is easier to purchase in a store.
Work order
All of the above options for curtain hangers will be assembled in approximately the same order. Therefore, below we present a general order of work for everyone, which, with minor differences, may be suitable for any option.
- First, the window opening is measured. The assembled structure should be 30-50 centimeters wider than the window. This size allows you to completely darken the room by covering the window with thick curtains.
- According to the obtained size, blanks for the guides on which the curtains will be hung are cut.
- Fasteners for the guides are being prepared. In the case of a wooden or steel round rod, it can be a wooden piece, with a hole for the rod and another hole through which it will be attached to the wall, or a simple metal corner of a suitable size. For string systems, it is necessary to prepare steel angles, two for each string. The tire is attached with dowels or screws directly to the ceiling.
Photo selection of beautiful round and square, single-row and double-row wooden cornices:
PreviousCurtainsHow to decorate the interior of a living room, bedroom and kitchen with turquoise curtains
Next
CurtainsUse of burgundy curtains in the interior of the living room and bedroom
Pros and cons
Before making a curtain for the door, we suggest you familiarize yourself with some of the advantages of such a solution:
Using curtains, you can visually adjust the size of the room - reduce or enlarge it. You can achieve this effect using the appropriate color of the product. Possibility of using different materials.
It can be textiles, wood or threads. Curtains bring a certain lightness to the interior. Saving usable space, which is especially important in small apartments. On average, a swing door requires 1 m2 of space, and when installing curtains, this problem is eliminated. Save money on purchasing a high-quality interior door. Even the most expensive curtains are cheaper than doors.
Like everything else, curtains installed on a doorway have their drawbacks. Among them, it is especially worth noting the insufficient heat and sound insulation. In view of this, the choice is between beauty and practicality.
Some people install a door, on the opening of which they then hang curtains. Some designers fully justify this option, especially in cases where the room has an old door that is not in harmony with the overall concept of the interior. This combination is quite logical when arranging a balcony doorway.
Finishing
Profile grinding
Fill all nail holes and other uneven areas with wood putty. Using fine sandpaper, remove the protruding parts of the putty (after it has dried). Sand away any loose fibers or other possible imperfections.
Padding
After applying the primer (or the first coat of decorative coating), sand the entire surface of the cornice with fine sandpaper.
Note: If your design has very tiny parts, you may need to apply the paint in light coats with a spray bottle instead of using a brush, which leaves a lot of paint behind.
What is required for assembly
In order to assemble a cornice specifically for Roman blinds with your own hands, you will need the following set of materials and tools:
- You will need a board with a width of 4 cm and a thickness of at least 2 cm. As for the length, it must correspond to the selected width of the curtain. However, if we are talking about mounting inside a window opening, then it is better to take a board that is narrower and thinner.
- You need a piece of fabric that will match the color of the curtain or its lining. The width of the piece of fabric should be enough to wrap the cornice + 2.5 cm. The length should be equal to the length of the board + 7.5 cm.
- To attach the cornice to the wall, you must have metal corners.
No drapery
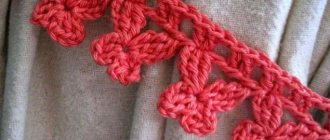
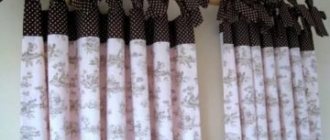
The basic principle of the modern method of window design “minimalism” is the absence of folds and gathers. Curtains with loops (patches), which are made from ribbons, braid in a contrasting color or from curtain fabric, look stylish. It doesn't need hooks. The loops can be fastened with buttons, snaps, Velcro, or tied with bows on the curtain rod. If it can be easily removed, the patches can be sewn without unfastening. You should first check how easily the fabric will move along the cornice. The width of the fabric for it should be 1.5 times larger than the window opening. The side sections are processed as stated above, the corner joints are sewn together with a hidden seam. The simplest option is to sew curtains on “blind” loops. Their width and length are chosen arbitrarily. The required allowance is 2 cm. The number of loops is calculated based on the fact that the distance between them should be 2 times their width. The strips for them are folded lengthwise with the right side inward, stitched, turned inside out, ironed and pinned to the top edge of the main fabric turned 2 cm. After this, the loops are adjusted with some kind of braid or fabric facing.
Video description
About ideas for curtains with ties in the following video:
Hooks
Hooks are a popular type of fastening due to their obvious ease of use. There are two types of hooks. The first ones (usually metal) are sewn from the inside of the panel and are equipped with rings that move freely along the cornice. The second hooks are small, plastic, which allows you to make them invisible by hiding them under a closed cornice. In this case, loops are sewn to the curtain.
Hooks in a Mediterranean interior Source art-interior.moscow
Fastenings for curtains in the form of hooks are hidden from view, so they do not affect the appearance of the window decor. This is ideal for attaching curtains to a flat cornice. Hooks will hold curtains made of any fabric except the heaviest ones. When choosing this fastener for the cornice, purchase clamps that prevent the hooks from slipping.
Their advantages include low cost, easy installation and reliable operation. The downside is that the fastening is not one of the most aesthetically pleasing, plastic hooks break, and metal ones make a fair amount of noise when moving along the eaves.
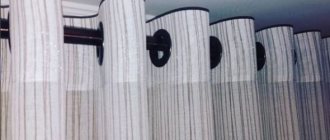
Airy muslin on hooks Source hzcdn.com